1. Wprowadzenie
The KCEVE KCDZUS302DP KVM Switch allows three DisplayPort-enabled computers to share two DisplayPort monitors, a keyboard, a mouse, and other USB 3.0 peripherals. This device is designed to streamline your workspace by eliminating the need for multiple sets of peripherals for different computers. It supports high-resolution video output and offers flexible display modes.
2. Funkcje produktu
- 3 Computers, 2 Monitors: Connects up to three computers to two DisplayPort monitors.
- Łączność USB 3.0: Features four USB 3.0 ports for sharing a keyboard, mouse, USB printers, scanners, and other USB devices with faster data transfer rates (up to 5Gbps).
- Obsługa wysokiej rozdzielczości: Supports resolutions up to 8K@30Hz and 4K@144Hz. Backward compatible with lower resolutions. Requires DisplayPort 1.4 cables for optimal performance at high resolutions.
- Tryby podwójnego wyświetlania: Supports both Copy Mode (main screen duplicated to second monitor) and Extend Mode (desktop extended across two monitors).
- Wiele metod przełączania: Switch between connected computers using physical buttons on the KVM switch or the included wired remote control.
- Podłącz i graj: Driver-free installation, compatible with various operating systems including Linux, Windows, Chrome OS, and macOS.
3. Zawartość opakowania
Sprawdź, czy w przesyłce znajdują się wszystkie elementy:
- 1x KCEVE Dual Monitor USB 3.0 DP KVM Switch
- 1x Instrukcja obsługi
- 1x DC12V Power Adapter (1.5m/4.92ft)
- 1x Wired Remote (1.52m/4.98ft)
- 2x DisplayPort 1.4 Cables (1.5m/4.92ft)
- 3x USB 3.0 Cables (1.5m/4.92ft)

Image: Contents of the KVM Switch package, including the switch, cables, power adapter, and user manual.
4. Schemat produktu
Familiarize yourself with the ports and controls on your KVM switch:

Image: Detailed diagram of the KVM switch showing front panel (ON/OFF switch, PC selection buttons, USB 3.0 ports, Wired Remote port) and rear panel (DP Monitor outputs, DP Input ports for PC1, PC2, PC3, USB 3.0 Input ports for PC1, PC2, PC3, DC12V power input).
- Panel przedni: Power ON/OFF switch, PC selection buttons (PC1, PC2, PC3), USB 3.0 peripheral ports (for keyboard, mouse, etc.), Wired Remote port.
- Tylny panel: DP Monitor Output ports (OUT A, OUT B), DP Input ports (INPUT A1, B1 for PC1; INPUT A2, B2 for PC2; INPUT A3, B3 for PC3), USB 3.0 Input ports (USB3.0 for PC1, PC2, PC3), DC12V power input.
5. Instrukcje konfiguracji
Aby skonfigurować przełącznik KVM, wykonaj następujące czynności:
- Wyłącz urządzenia: Ensure all computers and monitors are powered off before beginning the connection process.
- Podłącz monitory: Connect your two DisplayPort monitors to the 'DP MONITOR OUT A' and 'DP MONITOR OUT B' ports on the KVM switch using DisplayPort cables.
- Connect Computers (Video): For each computer (PC1, PC2, PC3), connect its DisplayPort outputs to the corresponding 'DP INPUT A' and 'DP INPUT B' ports on the KVM switch. For example, PC1's DisplayPort outputs connect to 'DP INPUT A1' and 'DP INPUT B1'. Notatka: Each computer requires two DisplayPort connections to the KVM switch for dual monitor support.
- Connect Computers (USB): For each computer (PC1, PC2, PC3), connect a USB 3.0 cable from a USB 3.0 port on your computer to the corresponding 'USB3.0 INPUT' port on the KVM switch (e.g., PC1's USB to 'USB3.0 INPUT 1').
- Podłącz urządzenia peryferyjne: Connect your keyboard, mouse, and any other USB 3.0 peripherals (e.g., printer, U disk) to the 'USB3.0' ports on the front panel of the KVM switch.
- Podłącz przewodowy pilot (opcjonalnie): If desired, connect the wired remote control to the 'Wired Remote' port on the front panel.
- Podłącz zasilanie: Plug the DC12V power adapter into the 'DC/12V' port on the KVM switch, then plug the adapter into a power outlet.
- Włączanie: Turn on the KVM switch using the ON/OFF switch, then power on your monitors and computers.

Image: An illustration demonstrating the connection of three computers to the KVM switch, two monitors, and shared USB peripherals like a keyboard, mouse, and printer.
5.1 Input and Output Compatibility
The KVM switch has specific requirements for input and output adapters:
- Supported Input Converters: MINI DP to DP Cable, USB-C to DP Adapter, USB-C to Dual DP Dock.
- Unsupported Input Converters: HDMI to DP, DVI/VGA to DP.
- Supported Output Converters: DP to HDMI Cable.
- Unsupported Output Converters: DP to USB-C/DVI/VGA.
Important: If your device lacks native DisplayPort outputs, ensure you use compatible adapters. Using unsupported adapters may result in display issues.
6. Instrukcja obsługi
Po skonfigurowaniu przełącznika KVM można łatwo przełączać się między podłączonymi komputerami.
6.1 Przełączanie się między komputerami
You have two methods to switch between PC1, PC2, and PC3:
- Przyciski fizyczne: Press the 'PC1', 'PC2', or 'PC3' button on the front panel of the KVM switch to select the desired computer.
- Pilot przewodowy: Press the button on the wired remote control to cycle through the connected computers.
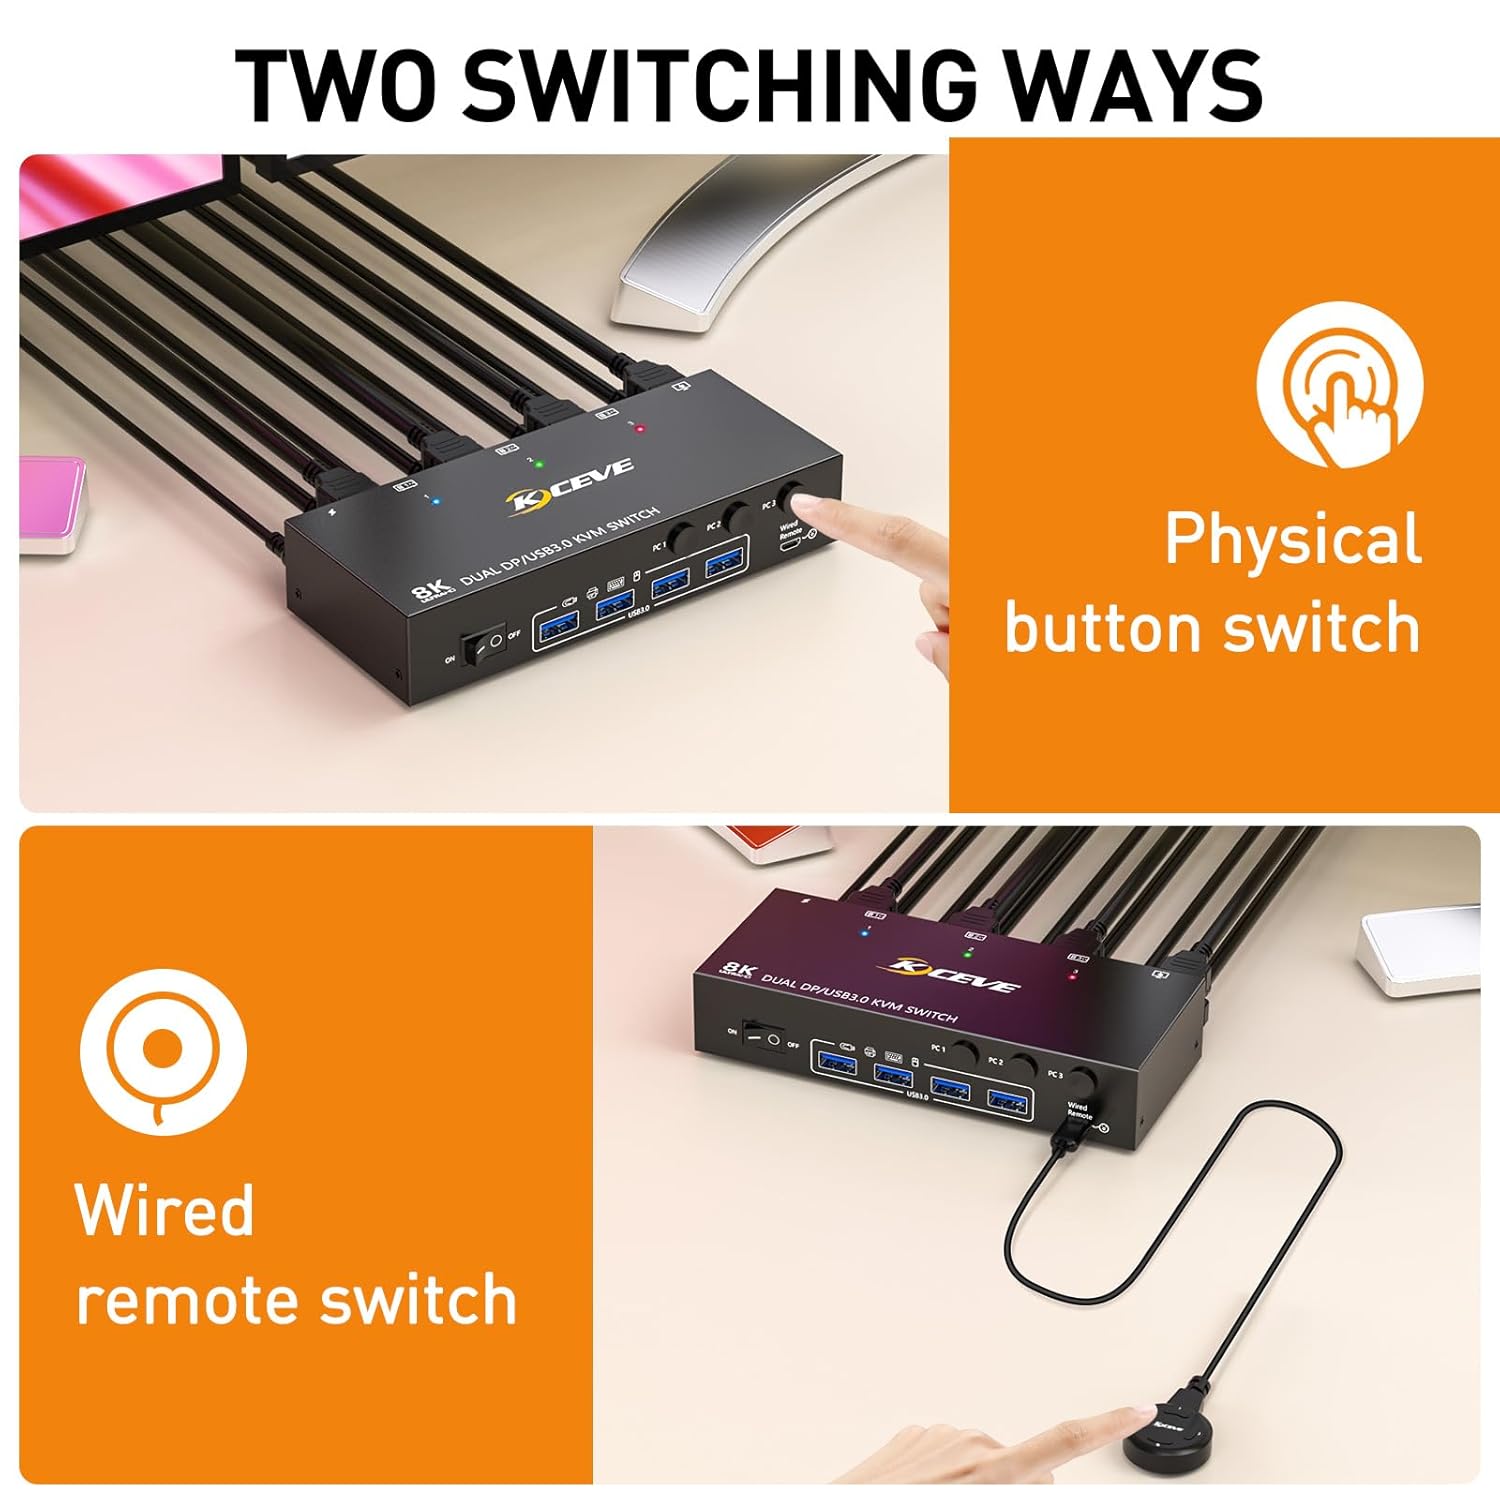
Image: Demonstrates the two methods for switching between computers: using the physical buttons on the KVM switch and using the wired remote control.
6.2 Wskaźniki LED
The KVM switch features LED indicators on the front panel to show which computer is currently active:

Image: Close-up of the KVM switch's LED indicators, showing distinct colors for each active PC (e.g., blue for PC1, green for PC2, red for PC3).
- A lit LED next to 'PC1', 'PC2', or 'PC3' indicates the currently selected computer.
7. Tryby wyświetlania
The KVM switch supports two primary display modes for your dual monitors:
- Copy Mode (Duplicate Mode): In this mode, the same image or content from the main screen is duplicated onto the second output screen. Both monitors display identical content.
- Tryb rozszerzania: In this mode, your desktop is extended across both monitors, allowing you to drag windows from one screen to the other. This provides a larger workspace.
To switch between Duplicate and Extend modes on Windows, press Klawisz Windows + P and select your preferred display option.

Image: Visual representation of Copy Mode, where both monitors show identical content, and Extend Mode, where the desktop spans across two monitors.
8. Resolution Support
The KVM switch supports high-definition video resolutions:
- Obsługuje do 8K@30Hz.
- Obsługuje do 4K@144Hz.
- Backward compatible with lower resolutions.
For achieving 8K@30Hz or 4K@144Hz resolutions, it is essential to use high-quality DisplayPort 1.4 cables. Ensure your graphics card and monitors also support these resolutions.

Image: A monitor displaying a high-resolution image, highlighting the KVM switch's support for 8K@30Hz and 4K@144Hz resolutions.
9. Konserwacja
To ensure the longevity and optimal performance of your KCEVE KVM switch, follow these maintenance guidelines:
- Czyszczenie: Do czyszczenia zewnętrznej części urządzenia należy używać miękkiej, suchej ściereczki. Unikaj stosowania płynnych środków czyszczących i materiałów ściernych.
- Wentylacja: Ensure the KVM switch is placed in a well-ventilated area to prevent overheating. Do not block any ventilation openings.
- Środowisko: Keep the device away from direct sunlight, heat sources, moisture, and dust.
- Zarządzanie kablami: Organize cables neatly to prevent strain on ports and accidental disconnections.
10. Rozwiązywanie Problemów
If you encounter issues with your KVM switch, please refer to the following troubleshooting steps:
- Brak obrazu na monitorze:
- Ensure the KVM switch is powered on and the power adapter is securely connected.
- Verify that all DisplayPort cables are securely connected between the computers, KVM switch, and monitors.
- Check if the correct input source is selected on your monitors.
- Confirm that your DisplayPort cables are DisplayPort 1.4 compliant, especially for high resolutions. Lower quality or older cables may not support the required bandwidth.
- If using adapters (e.g., USB-C to DP), ensure they are compatible as per the 'Input and Output Compatibility' section.
- Try connecting a computer directly to a monitor to rule out issues with the computer's video output or the monitor itself.
- Restart the KVM switch, monitors, and computers.
- Klawiatura/mysz nie odpowiada:
- Ensure the USB 3.0 cables are securely connected from each computer to the KVM switch.
- Verify that the keyboard and mouse are connected to the designated USB 3.0 peripheral ports on the KVM switch.
- Try connecting the keyboard and mouse directly to the computer to confirm they are functioning correctly.
- Some specialized gaming keyboards/mice with advanced features may require direct connection or specific drivers.
- Przerywane wyświetlanie/migotanie:
- This can often be caused by cable quality. Replace DisplayPort cables with certified DisplayPort 1.4 cables.
- Zmniejsz rozdzielczość ekranu lub częstotliwość odświeżania, aby sprawdzić, czy problem nadal występuje.
- Ensure there is no electromagnetic interference from other devices.
- USB 3.0 Devices Not Detected:
- Ensure the USB 3.0 cables from the computers to the KVM switch are connected to USB 3.0 ports on the computers.
- Some high-power USB devices may require an external power source or a powered USB hub.
11. Specyfikacje
| Funkcja | Specyfikacja |
|---|---|
| Numer modelu | KCDZUS302DP |
| Marka | KCEVE |
| Porty wejściowe | 3 x DisplayPort (Dual DP per PC), 3 x USB 3.0 (Type-B) |
| Porty wyjściowe | 2 x DisplayPort, 4 x USB 3.0 (Type-A) |
| Rozdzielczość wideo | Do 8K przy 30 Hz, 4K przy 144 Hz |
| Szybkość przesyłania danych USB | 5 Gb/s (USB 3.0) |
| Metody przełączania | Physical buttons, Wired remote |
| Objętość operacyjnatage | Prąd stały 12 V |
| Tworzywo | Metal |
| Wymiary (dł. x szer. x wys.) | 8.03 x 7.99 x 2.64 cala (w przybliżeniu) |
| Waga przedmiotu | 2.05 funta (w przybliżeniu) |
| UPC | 714855572840 |
12. Gwarancja i wsparcie
KCEVE provides a one-year professional warranty for this product. If you have any questions, encounter issues, or require technical assistance, please contact KCEVE customer support. Refer to the product packaging or the KCEVE official webwitryna do informacji kontaktowych.