1. Informacje dotyczące bezpieczeństwa
Przed użyciem produktu należy uważnie przeczytać wszystkie instrukcje bezpieczeństwa. Nieprzestrzeganie tych instrukcji może spowodować porażenie prądem, pożar lub inne zagrożenia.
- Nie wystawiaj projektora na działanie deszczu lub wilgoci, aby uniknąć pożaru lub porażenia prądem.
- Nie otwierać projektora casing. Wewnątrz nie ma żadnych części, które mogłyby być naprawiane przez użytkownika. Wszelkie prace serwisowe należy zlecać wykwalifikowanemu personelowi serwisowemu.
- Zapewnij odpowiednią wentylację. Nie blokuj otworów wentylacyjnych.
- Używaj wyłącznie zasilacza dołączonego do projektora.
- Unikaj bezpośredniego kontaktu oczu z obiektywem projektora podczasamp jest włączony.
- Trzymaj projektor z dala od źródeł ciepła i bezpośredniego światła słonecznego.
2. Zawartość opakowania
Sprawdź, czy w przesyłce znajdują się wszystkie elementy wymienione poniżej:
- 1 x Jectse Mini LED Projector
- 1 x Remote Control (2 AAA batteries not included)
- 1 x AV Line (3-in-1 RCA cable)
- 1 x Instrukcja obsługi
- 1 x zasilacz

Figure 2.1: Contents of the Jectse Mini LED Projector package.
3. Koniec produktuview
The Jectse Mini LED Projector is a compact and portable device designed for various multimedia applications. It features a 1080P resolution, LED light source, and multiple connectivity options.

Rysunek 3.1: Przód i góra view of the Jectse Mini LED Projector.
3.1 Komponenty projektora

Figure 3.2: Top panel controls of the Jectse Mini LED Projector.
- Obiektyw: Wyświetla obraz na ekranie.
- Kratka wentylacyjna: Zapewnia właściwy przepływ powietrza w celu chłodzenia.
- Przyciski sterujące: (Refer to Figure 3.2) For basic navigation and power control.
- Koło ostrości: Dostosowuje klarowność obrazu.
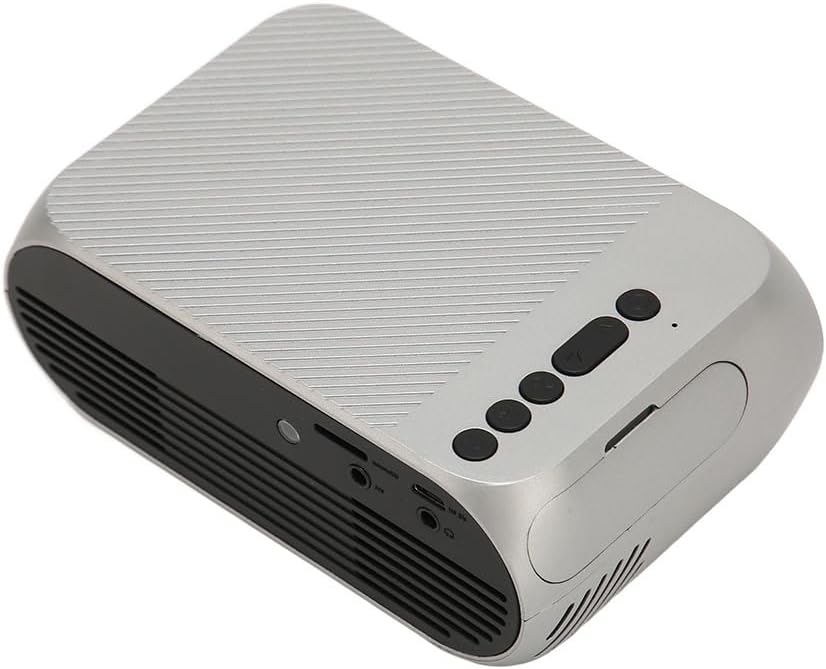
Rysunek 3.3: Tył i bok view z portami wejścia/wyjścia.
3.2 Porty wejścia/wyjścia
- HD Multimedia Interface (HDMI): For connecting devices like laptops, gaming consoles, and media players.
- Port AV: Do podłączania starszych urządzeń za pomocą dołączonego kabla AV.
- Port USB: Do podłączania dysków USB w celu odtwarzania multimediów files bezpośrednio.
- Pobór mocy: Do podłączenia zasilacza.
- Wyjście audio (gniazdo 3.5 mm): Do podłączenia zewnętrznych głośników lub słuchawek.
4. Konfiguracja
4.1 Umieszczenie
Place the projector on a stable, flat surface. Ensure there is adequate space around the projector for ventilation. The ideal projection distance is between 1.5 to 2 meters for optimal image size and clarity.

Figure 4.1: Recommended projection distance and screen sizes.
4.2 Połączenie zasilania
- Podłącz zasilacz do portu wejściowego zasilania projektora.
- Podłącz zasilacz do odpowiedniego gniazdka elektrycznego (100–240 V).
4.3 Podłączanie źródeł wejściowych
The projector supports HD Multimedia Interface, AV, and USB inputs.

Figure 4.2: Projector compatibility with various devices.
- HD Multimedia Interface: Connect an HD Multimedia Interface cable from your source device (e.g., laptop, game console) to the projector's HD Multimedia Interface port.
- AV: Connect the included AV cable to the projector's AV port and the corresponding audio/video output ports on your source device.
- USB: Insert a USB flash drive into the projector's USB port.
4.4 Regulacja ostrości
After powering on the projector, rotate the focus wheel (usually located near the lens) until the projected image appears clear and sharp.
5. Instrukcja obsługi
5.1 Włączanie/wyłączanie
- Włączanie: Press the Power Switch button on the projector or the power button on the remote control.
- Aby wyłączyć: Press the Power Switch button again. The projector will shut down.
5.2 Wybór źródła
After powering on, use the "Signal Source Button" on the projector or the "Source" button on the remote control to cycle through available input sources (HD Multimedia Interface, AV, USB).
5.3 Nawigacja po menu
Use the Direction Buttons and Confirm Button on the projector or the arrow keys and OK button on the remote control to navigate through the projector's on-screen menu for settings adjustments (e.g., picture mode, aspect ratio, sound settings).
5.4 Korzystanie z pilota zdalnego sterowania
Insert two AAA batteries (not included) into the remote control. Point the remote control towards the projector's IR receiver to operate functions such as power, source selection, volume, and menu navigation.
6. Konserwacja
6.1 Czyszczenie obiektywu
Do delikatnego przecierania soczewki projektora należy używać miękkiej, niepozostawiającej włókien ściereczki przeznaczonej specjalnie do soczewek optycznych. Nie należy używać szorstkich środków czyszczących ani nadmiernej siły, ponieważ może to porysować soczewkę.
6.2 Ogólne czyszczenie
Wipe the exterior of the projector with a soft, dry cloth. Do not use liquid cleaners or solvents. Ensure the ventilation grilles are free from dust and debris to maintain optimal cooling.
7. Rozwiązywanie Problemów
| Problem | Możliwa przyczyna | Rozwiązanie |
|---|---|---|
| Brak wyświetlanego obrazu |
|
|
| Obraz jest rozmazany |
|
|
| Brak dźwięku |
|
|
| Pilot nie działa |
|
|
8. Specyfikacje
| Funkcja | Szczegół |
|---|---|
| Marka | Wyciek |
| Numer modelu | Jectse3giz17bkpy |
| Rezolucja | 1920*1080p |
| Źródło światła | PROWADZONY |
| Życie diody LED | 3000 godziny |
| Odległość projekcji | 1.5-2m |
| Współczynnik projekcji | 1.6:1 |
| Proporcje obrazu | 16:9 |
| Moc wejściowa | 100-240 V |
| Rozmiar produktu | 13 x 8.5 x 5 cm (ok. 5.1 x 3.3 x 2 cala) |
| Waga przedmiotu | 1.1 funta |
| Technologia łączności | HD Multimedia Interface, AV, USB |
| Cechy specjalne | Adjustable, Portable Design |
9. Gwarancja i wsparcie
For warranty information or technical support, please refer to the contact details provided with your purchase or visit the official Jectse webZachowaj dowód zakupu na wypadek roszczeń gwarancyjnych.