1. Wprowadzenie
Thank you for choosing the Nictemaw AM453521 Automatic Bread Maker. This appliance is designed to simplify your bread-making process with its versatile features and user-friendly operation. This manual provides essential information for safe operation, proper use, and maintenance of your bread maker. Please read it thoroughly before first use and keep it for future reference.
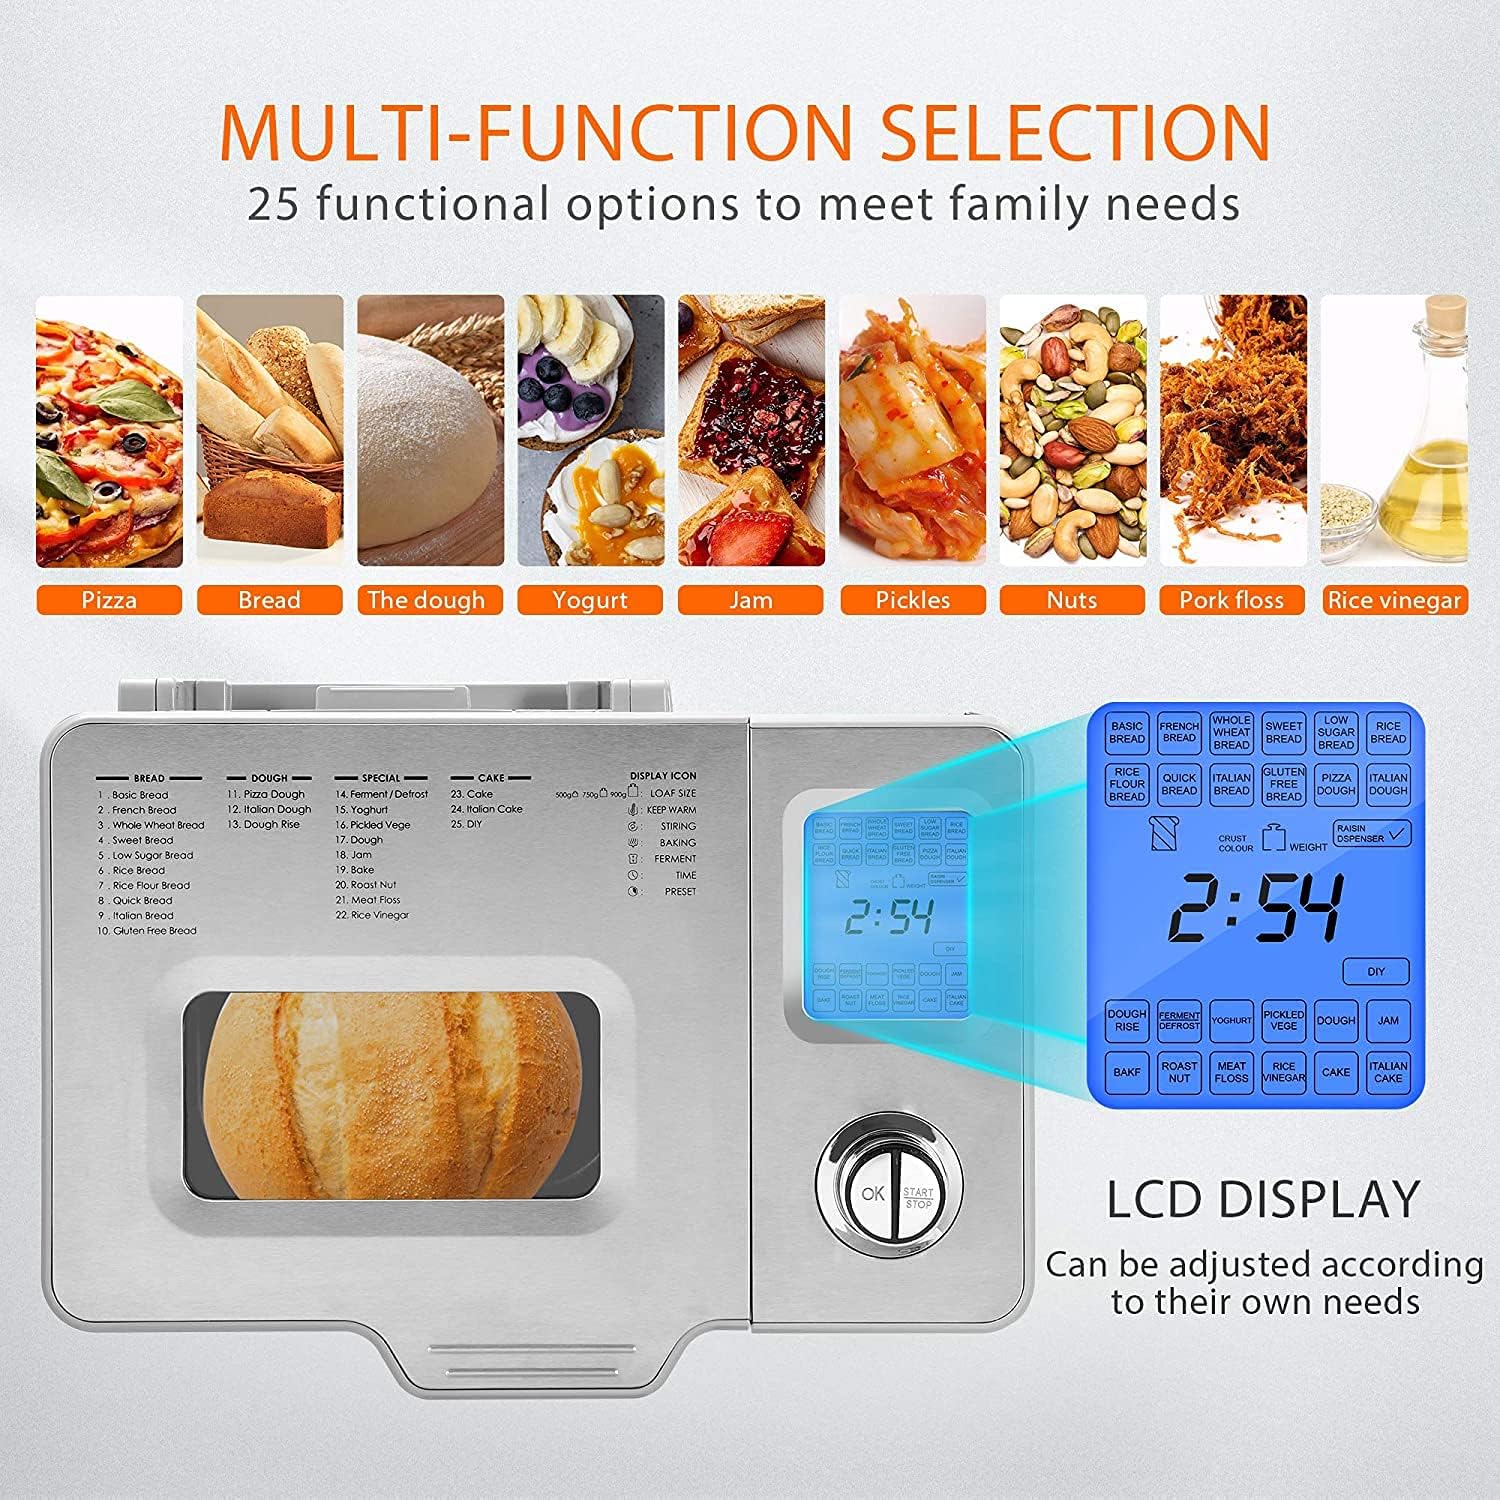
The Nictemaw AM453521 features 25 pre-programmed settings, allowing you to bake various types of bread, dough, cakes, and even jam. You can customize your baking experience by selecting from three loaf sizes (500g, 750g, 900g) and three crust colors (light, medium, dark). A 13-hour delay timer offers convenience for fresh bread whenever you desire.

Image 1.1: Nictemaw AM453521 Automatic Bread Maker.
2. Ważne instrukcje bezpieczeństwa
Podczas korzystania z urządzeń elektrycznych należy zawsze przestrzegać podstawowych zasad bezpieczeństwa, aby zminimalizować ryzyko pożaru, porażenia prądem i obrażeń ciała, w tym:
- Przeczytaj wszystkie instrukcje przed uruchomieniem urządzenia.
- Nie dotykaj gorących powierzchni. Używaj uchwytów lub gałek.
- Aby uniknąć porażenia prądem elektrycznym, nie zanurzaj przewodu zasilającego, wtyczek ani jednostki głównej w wodzie ani innej cieczy.
- Należy zachować ścisły nadzór, jeżeli z urządzenia korzystają dzieci lub w ich pobliżu.
- Odłącz od gniazdka, gdy nie jest używany i przed czyszczeniem. Pozostaw do ostygnięcia przed założeniem lub zdjęciem części.
- Nie używaj urządzenia z uszkodzonym przewodem lub wtyczką, ani po awarii lub uszkodzeniu urządzenia w jakikolwiek sposób. Skontaktuj się z obsługą klienta w celu sprawdzenia, naprawy lub regulacji.
- Stosowanie akcesoriów niezalecanych przez producenta urządzenia może spowodować obrażenia.
- Nie stosować na zewnątrz.
- Nie pozwól, aby przewód zwisał z krawędzi stołu lub blatu i dotykał gorących powierzchni.
- Nie umieszczać na gorącym palniku gazowym lub elektrycznym ani w jego pobliżu, a także w nagrzanym piekarniku.
- Należy zachować szczególną ostrożność podczas przenoszenia urządzenia zawierającego gorący olej lub inne gorące płyny.
- Aby odłączyć urządzenie, ustaw dowolny element sterujący w pozycji „wyłączone”, a następnie wyjmij wtyczkę z gniazdka ściennego.
- Nie używaj urządzenia niezgodnie z jego przeznaczeniem.
- Unikać kontaktu z ruchomymi częściami.
- To urządzenie jest wyposażone w wtyczkę z uziemieniem. Upewnij się, że gniazdko ścienne jest prawidłowo uziemione.
3. Składniki produktu
Familiarize yourself with the parts of your Nictemaw AM453521 Automatic Bread Maker:
- Jednostka główna: The primary housing containing the motor, heating element, and control panel.
- Forma do pieczenia chleba: Wyjmowana, nieprzywierająca patelnia, na której umieszczane są składniki i wypiekany jest chleb.
- Mieszadło do ugniatania: Detachable paddle inside the bread pan for mixing and kneading dough.
- Miarka: For accurate measurement of liquid ingredients.
- Łyżka miarowa: For accurate measurement of smaller ingredients like yeast, salt, or sugar.
- Hak: Tool for removing the kneading paddle from the baked bread.

Ilustracja 3.1: Jednostka główna i dołączone akcesoria.
4. Konfiguracja
4.1 Rozpakowanie
- Ostrożnie wyjmij maszynę do pieczenia chleba i wszystkie akcesoria z opakowania.
- Remove any packaging materials, stickers, or promotional labels.
- Sprawdź, czy urządzenie nie jest uszkodzone. Nie używaj go, jeśli jest uszkodzony.
4.2 Czyszczenie po pierwszym użyciu
- Wash the bread pan, kneading paddle, measuring cup, and measuring spoon with warm, soapy water. Rinse thoroughly and dry completely.
- Wytrzyj zewnętrzną część jednostki głównej za pomocąamp płótno. Nie zanurzaj jednostki głównej w wodzie.
- Before first use, it is recommended to run the BAKE program (Program 24) for 10 minutes without any ingredients to burn off any manufacturing residues. Ensure good ventilation during this process.
4.3 Umieszczenie
- Place the bread maker on a stable, flat, heat-resistant surface, away from direct sunlight and heat sources.
- Ensure there is adequate ventilation around the appliance, leaving at least 10-15 cm of space on all sides.
- Podłącz przewód zasilający do uziemionego gniazdka elektrycznego (220 V).
4.4 Assembling the Bread Pan and Kneading Paddle
- Insert the kneading paddle onto the shaft at the bottom of the bread pan. Ensure it clicks into place securely.
- Place the assembled bread pan into the main unit, pressing down firmly until it locks into position.
5. Instrukcja obsługi
5.1 Panel sterowania ponadview
The control panel consists of an LCD display and several buttons for program selection and settings adjustment.
Rysunek 5.1: Panel sterowania i wyświetlacz LCD.
- Wyświetlacz LCD: Shows program number, time remaining, loaf size, and crust color settings.
- Przycisk MENU: Naciśnij, aby przełączać się między 25 dostępnymi programami.
- Przycisk KOLOR: Wybierz pożądany kolor skórki (jasny, średni, ciemny).
- Przycisk ROZMIAR BOCHENKA: Selects the desired loaf weight (500g, 750g, 900g).
- TIMER Buttons (+/-): Adjusts the delay timer for delayed start.
- Przycisk START/STOP: Starts or stops the selected program. Press and hold for 3 seconds to stop a program.
5.2 Podstawowe kroki operacyjne
- Dodaj składniki: Open the lid and add ingredients to the bread pan in the order specified by your recipe (typically liquids first, then dry ingredients, with yeast last and separate from liquids/salt). Ensure the kneading paddle is in place.
- Wybierz program: Naciśnij MENU button repeatedly until the desired program number appears on the LCD display. Refer to the program list below for options.
- Wybierz rozmiar bochenka: Naciśnij ROZMIAR bochenka button to choose between 500g, 750g, or 900g.
- Wybierz kolor skórki: Naciśnij KOLOR przycisk, aby wybrać Jasną, Średnią lub Ciemną skórkę.
- Ustaw opóźnienie czasowe (opcjonalnie): If you want to delay the start of the baking process, use the TIMER (+/-) buttons to set the desired delay time. The time displayed includes the baking cycle duration.
- Rozpocznij pieczenie: Naciśnij START/STOP button once. The bread maker will beep, and the program will begin. The time remaining will be displayed.
- Koniec programu: Once the program is complete, the bread maker will beep and may enter a 'Keep Warm' cycle. Press and hold the START/STOP button for 3 seconds to stop the cycle.
- Usuń chleb: Using oven mitts, carefully remove the bread pan from the unit. Invert the pan onto a cooling rack to release the bread. If the kneading paddle remains in the bread, use the provided hook to remove it. Allow bread to cool before slicing.

Image 5.2: Loaf size and crust color options.
5.3 Program List (25 Programs)
The Nictemaw AM453521 offers 25 versatile programs for various baking needs. Below is a general overview. Refer to your recipe book for specific ingredient quantities for each program.

Image 5.3: Multi-function selection and program versatility.
- Chleb podstawowy: Do pieczywa białego i mieszanego, głównie z mąki pszennej.
- Chleb francuski: Do lekkich pieczywa z mąki pszennej.
- Chleb pełnoziarnisty: Do pieczywa z mąki pełnoziarnistej.
- Słodki chleb: For breads with high sugar and fat content.
- Chleb bezglutenowy: For gluten-free recipes.
- Ciasto: For preparing dough for rolls, pizza, or pasta without baking.
- Ugniatać: Tylko do wyrabiania ciasta.
- Ciasto: Do mieszania i pieczenia ciast.
- Dżem: Do przygotowywania domowych dżemów i marmolad.
- Jogurt: Do przygotowywania domowego jogurtu.
- Upiec: For additional baking of light or under-baked bread.
- And many more specialized programs for various bread types and preparations.
5.4 Fermentation Tips
Proper fermentation is crucial for good bread. The bread maker provides an optimal environment, but external factors can influence results.

Image 5.4: Ideal fermentation conditions.
- Idealna temperatura: Ensure ingredients are at room temperature unless specified otherwise. The bread maker maintains an optimal temperature during the fermentation cycles.
- Under-fermentation: If the dough temperature is too low, the dough may not rise sufficiently, resulting in dense bread.
- Over-fermentation: If the dough temperature is too high, the dough may rise too quickly and then collapse, leading to a coarse texture.
6. Konserwacja i czyszczenie
Regularne czyszczenie zapewnia długowieczność i optymalną wydajność Twojego wypieku chleba.
- Wyjąć wtyczkę: Przed przystąpieniem do czyszczenia należy zawsze odłączyć urządzenie od gniazdka elektrycznego i poczekać, aż całkowicie ostygnie.
- Forma do pieczenia chleba i mieszadło: Remove the bread pan. Fill it with warm, soapy water and let it soak for about 10-15 minutes to loosen any stuck-on dough or residue. Remove the kneading paddle. Wash both the pan and paddle with a soft sponge. Do not use abrasive cleaners or metal scouring pads, as this can damage the non-stick coating. Rinse thoroughly and dry completely. The bread pan is dishwasher safe.
- Zewnętrzny: Przetrzyj zewnętrzną część jednostki głównej miękką szmatką.amp Ściereczką. Nie używaj silnych środków chemicznych ani ściernych środków czyszczących. Nigdy nie zanurzaj jednostki głównej w wodzie ani innym płynie.
- Wnętrze: Gently wipe the interior of the baking chamber with a damp szmatką, aby usunąć okruszki lub rozlane płyny.
- Składowanie: Przed schowaniem wypiekacza do chleba w chłodnym i suchym miejscu należy upewnić się, że wszystkie części są czyste i suche.
7. Rozwiązywanie Problemów
Jeśli masz problemy z wypiekaczem do chleba, zapoznaj się z poniższymi, często występującymi problemami i ich rozwiązaniami:
| Problem | Możliwa przyczyna | Rozwiązanie |
|---|---|---|
| Chleb nie rośnie | Przeterminowane lub nieaktywne drożdże; niewłaściwa temperatura wody; zbyt dużo soli lub cukru. | Check yeast expiration date; use lukewarm water (38-43°C); ensure correct ingredient measurements. |
| Chleb jest zbyt gęsty/ciężki | Too much flour; not enough liquid; insufficient kneading. | Measure ingredients precisely; ensure correct program selection for dough type. |
| Chleb zapada się podczas pieczenia | Too much liquid; too much yeast; high humidity; over-proofing. | Reduce liquid slightly; ensure correct yeast amount; adjust recipe for humidity. |
| Maszyna się nie uruchamia | Niepodłączony; zasilanie wyłączonetage; program nie został wybrany. | Check power connection; ensure a program is selected and START/STOP button is pressed. |
| Mieszadło utknęło w chlebie | Zjawisko normalne. | Po lekkim ostygnięciu chleba ostrożnie wyjmij mieszadło za pomocą dołączonego haczyka. |
Jeśli po wypróbowaniu tych rozwiązań problem nadal występuje, skontaktuj się z obsługą klienta.
8. Specyfikacje
Technical specifications for the Nictemaw AM453521 Automatic Bread Maker:
| Funkcja | Specyfikacja |
|---|---|
| Marka | Nictemaw |
| Numer modelu | AM453521 |
| Moc | 500 watów |
| Tomtage | 220 wolty |
| Pojemność | 500g / 750g / 900g |
| Tworzywo | Stal nierdzewna |
| Wymiary (dł. x szer. x wys.) | Wymiary 36 x 22 x 30 cm |
| Waga | 7.1 kilograma |
| Liczba programów | 25 |
9. Gwarancja i wsparcie
The Nictemaw AM453521 Automatic Bread Maker is designed for reliability and performance. For specific warranty details, please refer to the warranty card included with your product or visit the official Nictemaw webZachowaj paragon jako dowód zakupu na wypadek ewentualnych roszczeń gwarancyjnych.
For technical support, troubleshooting assistance beyond this manual, or spare parts inquiries, please contact Nictemaw customer service through the contact information provided in your product packaging or on the manufacturer's official webstrona.