
1. Wprowadzenie
This manual provides detailed instructions for the safe and effective operation, maintenance, and care of your Singer C5650 and C5655 sewing machines. Please read this guide thoroughly before using your machine to ensure proper function and to prevent injury or damage.

Image: Front cover of the Singer C5650 / C5655 Instruction Manual, displaying the machine outline and Singer logo.
Ważne instrukcje bezpieczeństwa
When using an electrical appliance, basic safety precautions should always be followed, including:
- Always unplug the machine from the electrical outlet immediately after use and before cleaning, removing covers, lubricating, or when making any other user servicing adjustments mentioned in this instruction manual.
- Do not operate the machine with a damaged cord or plug. If it is not working properly, if it has been dropped or damaged, or dropped into water, return the machine to the nearest authorized service dealer for examination, repair, electrical or mechanical adjustment.
- Keep ventilation openings of the sewing machine clear.
- Use only attachments specified by the manufacturer in this manual.
- Nigdy nie wrzucaj i nie wkładaj żadnych przedmiotów do otworów.
- Do not use aerosol (spray) products where oxygen is being administered.

Image: A page from the instruction manual detailing important safety instructions for the sewing machine.
Video: A flip-through of the Singer C5650 Sewing Machine User's Manual, showcasing its contents and layout. This video is provided by TabSynth Design Works.
2. Konfiguracja
Nad maszynąview
Familiarize yourself with the main components of your sewing machine. Understanding each part's function is crucial for efficient operation.

Image: A diagram illustrating the main components of the Singer C5650/C5655 sewing machine, with numbered callouts for identification.
Obszar igłyview i akcesoria
The needle area is where most of the sewing action occurs. Proper understanding of its parts and the available accessories will enhance your sewing experience.

Obraz: szczegółowy view of the needle area components, including the needle plate, feed teeth, and presser foot, along with illustrations of various included accessories like bobbins, spool pins, and screwdrivers.
Nawijanie szpulki
Before you begin sewing, the bobbin must be properly wound with thread.
- Załóż szpulkę z nicią na trzpień szpulki.
- Przeprowadź nić przez prowadnik nici i wokół tarczy naprężającej szpulkę.
- Place the bobbin on the bobbin winding spindle.
- Przesuń wrzeciono nawijające szpulkę w prawo.
- Start winding by gently pressing the foot controller. Stop when the bobbin is full.
Wkładanie szpulki
Once wound, the bobbin needs to be correctly inserted into the bobbin case and then into the shuttle.
- Otwórz pokrywę szpulki.
- Insert the bobbin into the bobbin case, ensuring the thread unwinds in the correct direction.
- Pull the thread through the tension spring.
- Insert the bobbin case into the shuttle.
Picking Up Bobbin Thread
After inserting the bobbin, you need to bring the bobbin thread up through the needle plate.
- Podnieś stopkę dociskową.
- Hold the needle thread loosely with your left hand.
- Turn the hand wheel towards you, lowering and then raising the needle. This will catch the bobbin thread.
- Pull both threads to the back under the presser foot.
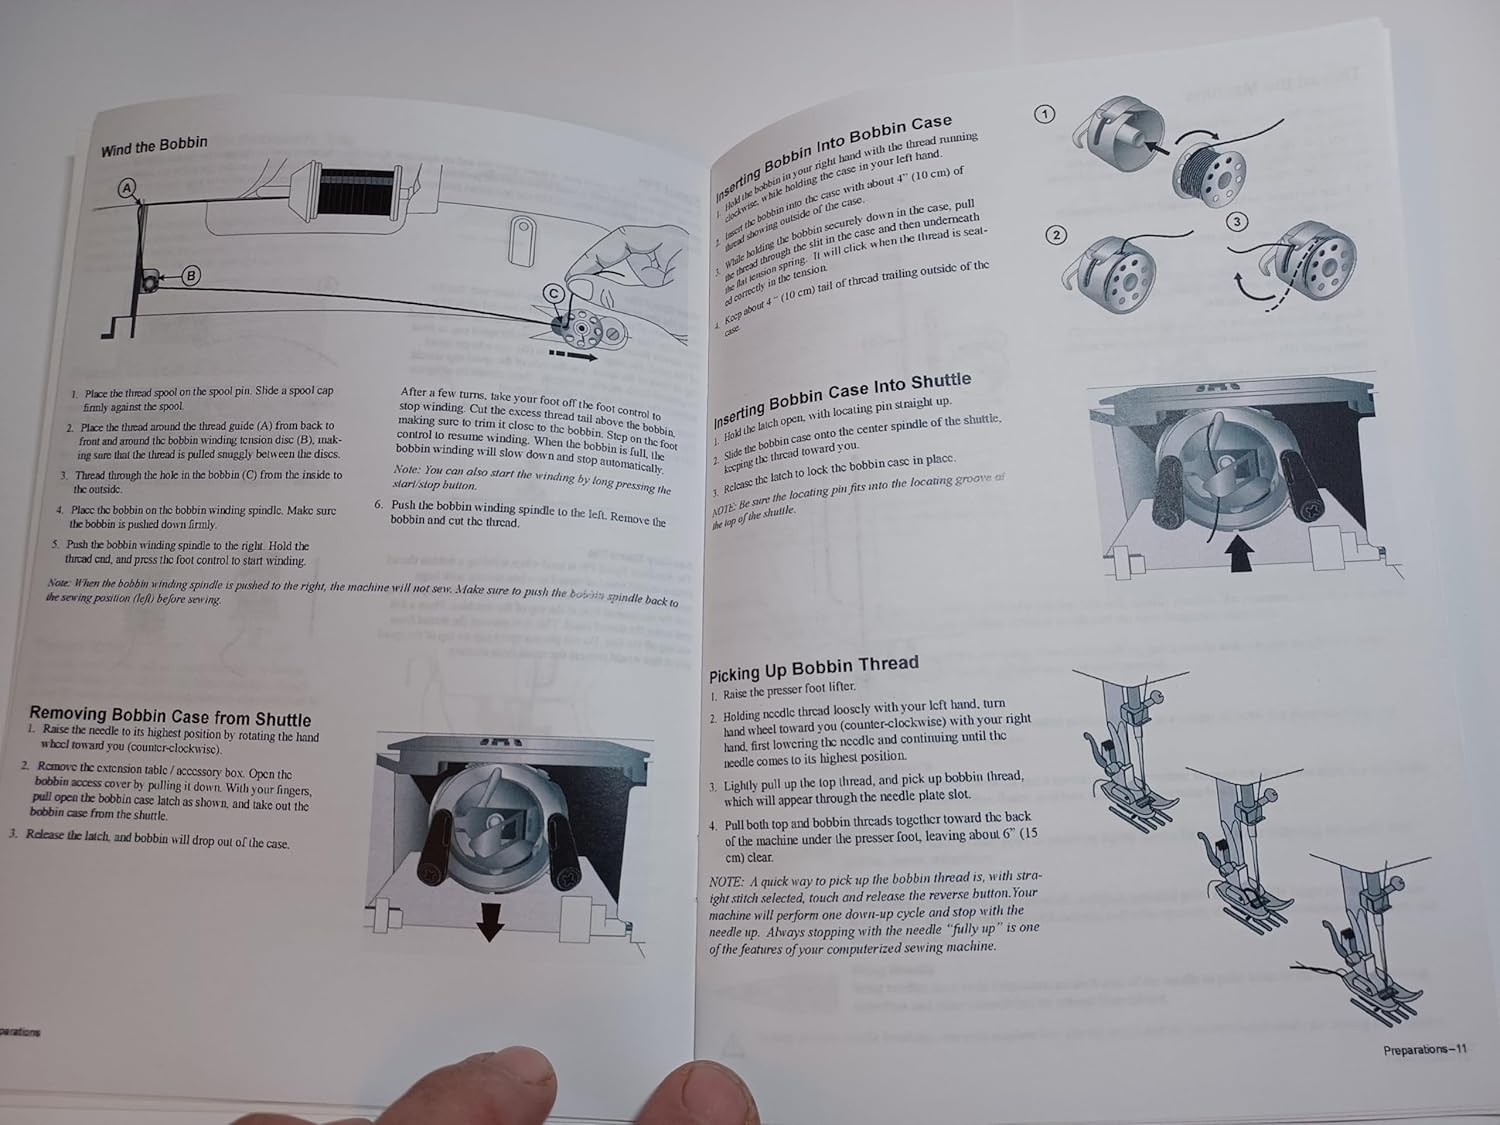
Image: Step-by-step diagrams illustrating how to wind the bobbin, insert the bobbin into the shuttle, and pick up the bobbin thread for the Singer C5650/C5655 sewing machine.
3. Obsługa maszyny
Sterowanie pracą maszyny
Your Singer C5650/C5655 machine features an intuitive control panel for selecting stitches and adjusting settings.
- Przycisk cofania: Used to sew in reverse, typically for securing stitches at the beginning and end of a seam.
- Guzik do wiązania: Automatically ties off stitches for a neat finish.
- Przyciski wyboru ściegu: Use the arrow buttons to navigate and select your desired stitch pattern from the available options.
- Regulacja długości i szerokości ściegu: Buttons to modify the length and width of selected stitches, allowing for customization.
- Pozycja igły: Adjusts the needle position for specific sewing tasks.

Image: A close-up of the Singer C5650/C5655 control panel, showing the display, stitch selection buttons, and other operational controls.
4. Szycie
Basic Stitch Functions
Your machine offers a variety of stitches for different sewing needs.
- Ścieg prosty: The most common stitch, used for basic seams and topstitching. Adjust length as needed.
- Ścieg zygzakowaty: Ideal for finishing raw edges, appliqué, and decorative stitching. Adjust width and length for desired effect.
- Overlock Stitch: Provides a professional finish to seams, preventing fraying.
- Butonierka: The machine can create various buttonhole styles automatically. Follow the specific instructions in the manual for precise buttonhole creation.
5. Konserwacja
Czyszczenie maszyny
Regular cleaning is essential to keep your sewing machine running smoothly and extend its lifespan.
- Usuwanie kłaczków: Use a small brush to remove lint and dust from the bobbin area, feed teeth, and needle plate.
- Olejowanie: Refer to your manual for specific oiling points and frequency. Use only recommended sewing machine oil.
Wymiana igły
Replace the needle regularly, especially when it becomes dull or bent, to prevent skipped stitches and fabric damage.
- Wyłącz i odłącz urządzenie.
- Poluzuj igłę clamp wkręt.
- Wyjmij starą igłę.
- Włóż nową igłę płaską stroną do tyłu i wsuń ją tak daleko, jak to możliwe.
- Dokręć igłęamp wkręt.
6. Rozwiązywanie Problemów
If you encounter issues with your sewing machine, consult this section for common problems and solutions.
| Problem | Możliwa przyczyna | Rozwiązanie |
|---|---|---|
| Pominięte ściegi | Niewłaściwa igła, wygięta igła, nieprawidłowe nawlekanie. | Replace needle, rethread machine. |
| Zrywanie wątku | Nieprawidłowe naprężenie, słaba jakość nici, zadziory na płytce ściegowej. | Wyreguluj naprężenie, użyj nici dobrej jakości, sprawdź, czy nie ma zadziorów. |
| Nierówne ściegi | Incorrect tension, improper presser foot pressure. | Adjust tension, adjust presser foot pressure. |
| Zacinanie się maszyny | Thread tangled in bobbin area, fabric caught. | Clear bobbin area, remove tangled thread/fabric. |
7. Specyfikacje
Key technical specifications for the Singer C5650/C5655 sewing machine:
- Wymiary produktu: 0.1 x 5.5 x 8.5 cala
- Waga przedmiotu: 3.2 uncji
- Tworzywo: Paper (for the manual)
- Kolor: Biały
- Źródło zasilania: AC
- jest elektryczny: Tak
- Numer modelu przedmiotu: C5650
8. Gwarancja i wsparcie
Specific warranty information for the Singer C5650 and C5655 sewing machines is typically provided with the original product purchase. This instruction manual is a reprint and does not contain warranty details. For warranty claims or technical support, please refer to the official Singer website or contact Singer customer service directly.


