1. Wprowadzenie i koniecview
The Morfone Electric Ear Cleaning Kit is designed to provide a safe and effective solution for ear wax removal. This device utilizes a gentle irrigation system with multiple pressure modes to ensure a comfortable and thorough cleaning experience. Its integrated design simplifies the process, making it suitable for home use by adults, teenagers, and children under adult supervision.
This manual provides essential information on how to properly set up, operate, and maintain your ear cleaning kit to ensure optimal performance and safety.
2. Funkcje produktu
- Safe and Effective Design: Engineered to fit the human ear comfortably with a flexible, compact nozzle and soft irrigation tip. Features 3-hole, 270° nozzles for comprehensive water flow and superior cleaning.
- Upgraded One-Piece System: Unique design integrates waste and clean water tanks, allowing for convenient one-hand operation and a mess-free cleaning process.
- 4 trybów czyszczenia: Choose from Gentle, Normal, Intensive, and Pulsating modes to suit individual needs and comfort levels.
- Wodoodporność IPX6: Allows for safe use even during showering.
- Smart Water Level Warnings: Features color-coded lights (green for ideal temperature, blue for low, red for high) to indicate water temperature for user safety.
- Mocny akumulator: Equipped with a 2000mAh battery, providing approximately 400 uses on a single charge. Convenient Type-C charging.
3. Zawartość opakowania
Po rozpakowaniu upewnij się, że w opakowaniu znajdują się wszystkie elementy:
- 1x Morfone Electric Ear Cleaner Device
- 6x Replaceable Nozzles (various colors for family use)
- 1x kabel ładujący USB-C
- 1x Instrukcja obsługi (ten dokument)

Video: Unboxing the Morfone Electric Ear Cleaning Kit, showing all included components.
4. Instrukcje bezpieczeństwa
- Do not use on individuals under 8 years of age without adult supervision.
- Always use warm water (between 27°C and 42°C) as indicated by the green light. Blue light indicates water is too cold, red light indicates water is too hot.
- Never insert the nozzle too deeply into the ear canal. The flexible tip is designed to prevent over-insertion.
- If you experience pain, discomfort, or dizziness, discontinue use immediately.
- Consult a medical professional if you have a perforated eardrum, ear infection, ear surgery, or any other ear condition before using this device.
- Przechowywać w miejscu niedostępnym dla dzieci.
5. Konfiguracja
- Naładuj urządzenie: Before first use, fully charge the device using the provided USB-C cable. The charging port is located on the side of the device.
- Podłącz dyszę: Select one of the replaceable nozzles and firmly attach it to the irrigation tip. Ensure it is securely in place.
- Napełnij ciepłą wodą: Open the water inlet cap and fill the clean water tank with warm water. The device will indicate the water temperature with a colored light (green for ideal).
Obraz: Szczegółowy view of the Morfone Electric Ear Cleaner components, including the clean water tank, sewage collection tank, nozzle, and control buttons.
6. Instrukcja obsługi
- Włączanie: Press and hold the power button (top button) for 3 seconds to turn on the device. The temperature indicator light will illuminate.
- Wybierz tryb: Briefly press the power button to cycle through the 4 cleaning modes: Soft, Normal, Strong, and Pulsating. Choose the mode that best suits your comfort and cleaning needs.
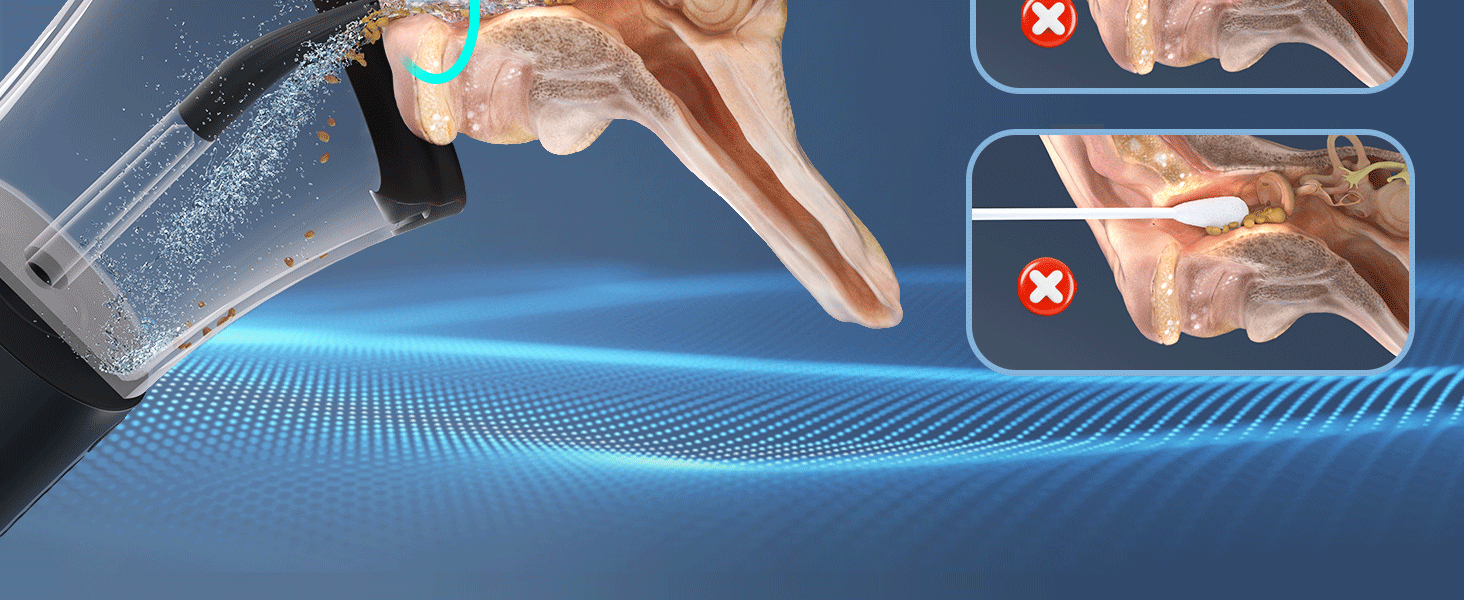
- Pozycja urządzenia: Gently insert the nozzle into your ear canal. Tilt your head slightly to the side to allow water to flow into the ear and then drain into the integrated waste tank.
- Zacznij sprzątać: Press the spray water key (bottom button) to begin the irrigation. The water will gently flush out earwax, which will be collected in the device's waste tank.
- Continue as Needed: Continue flushing until your ear feels clean. Do not over-irrigate.
- Wyłączone: Naciśnij i przytrzymaj przycisk zasilania przez 3 sekundy, aby wyłączyć urządzenie.

Image: Visual representation of the ear cleaning process, showing water flushing earwax out of the ear canal.
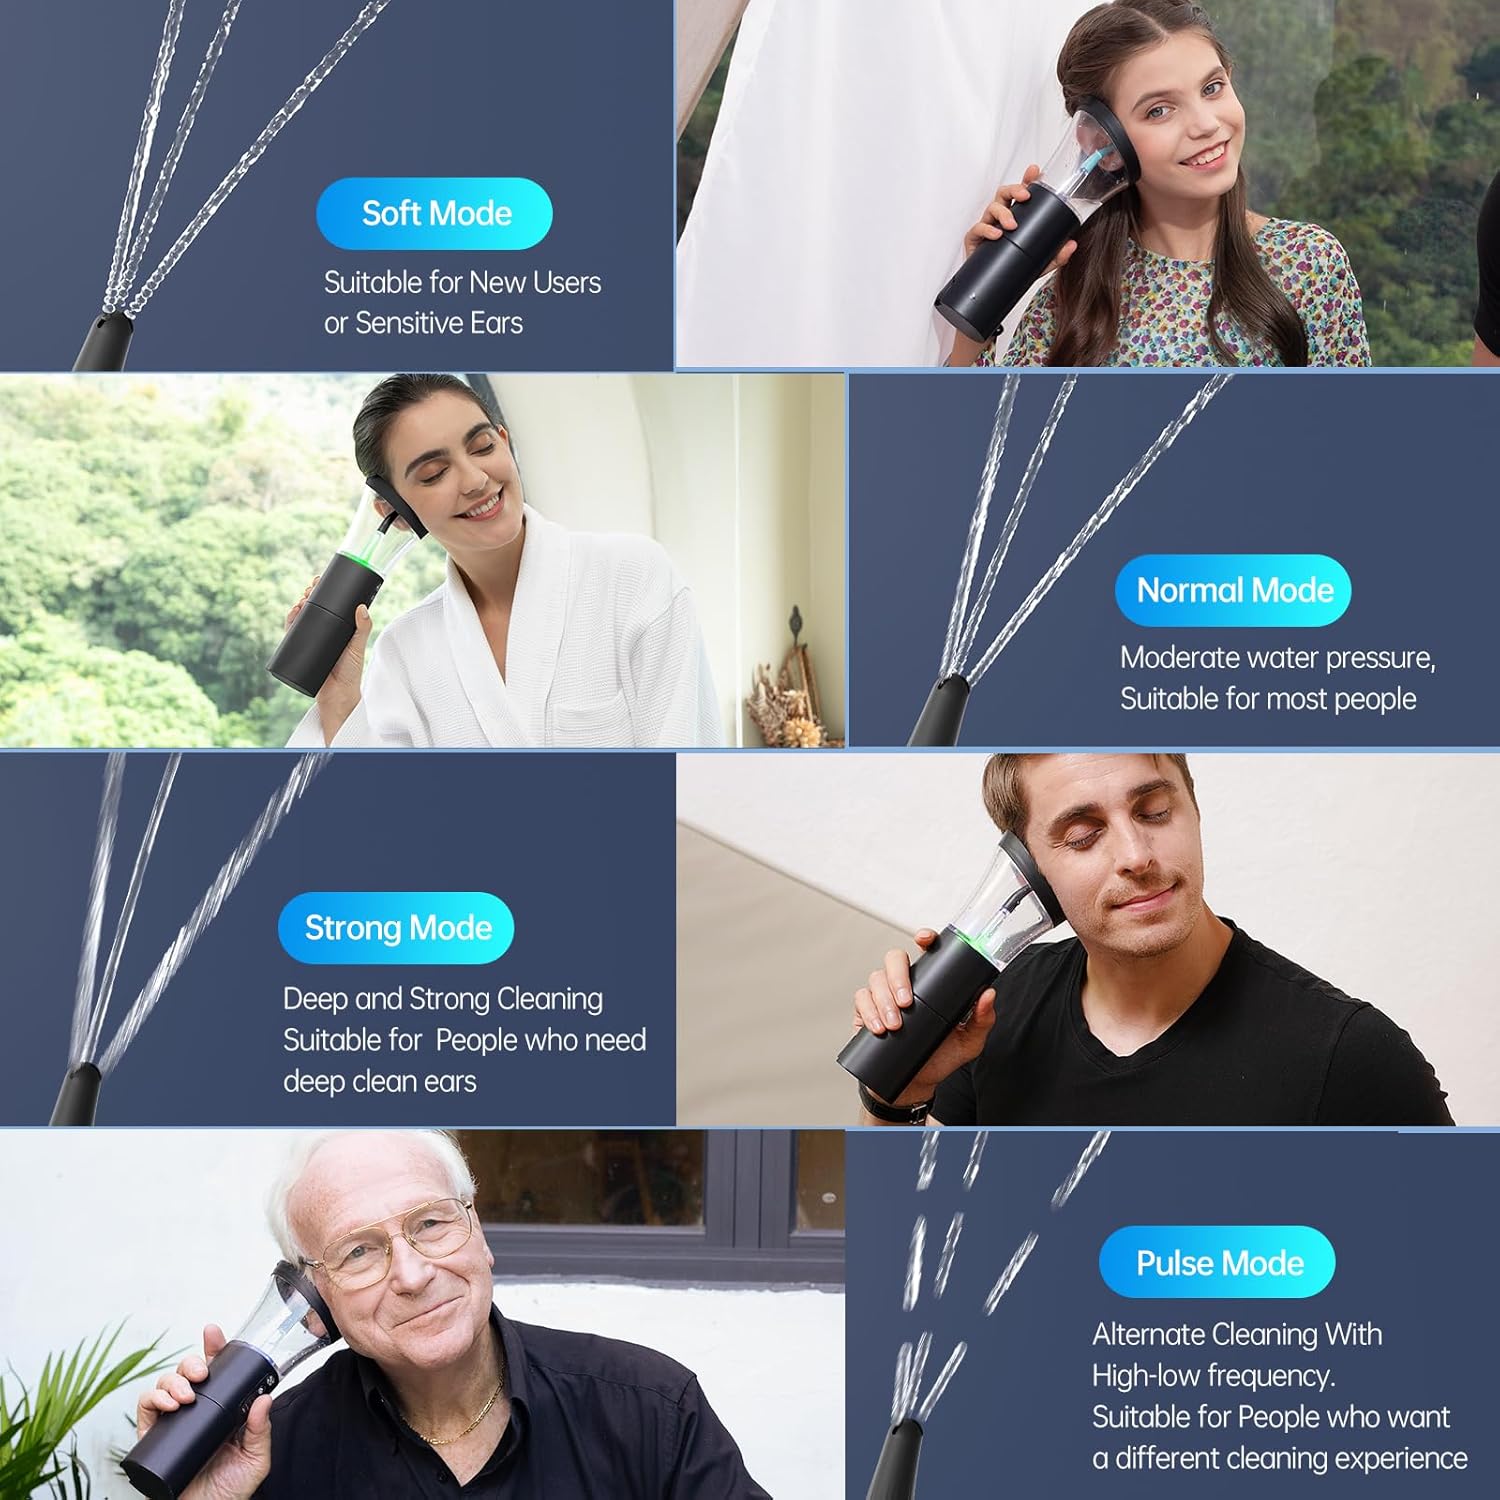
Image: Demonstration of the four cleaning modes (Soft, Normal, Strong, Pulse) and their recommended uses.
Video: A user demonstrates how to fill the device with water, select a mode, and use it for ear cleaning, showing the collected earwax.
7. Konserwacja
- Empty and Clean Tanks: After each use, detach the waste collection tank and empty its contents. Rinse both the clean water and waste tanks thoroughly with clean water.
- Czyste dysze: Remove the used nozzle and rinse it under running water. The kit includes multiple nozzles for hygienic use among family members.
- Dokładnie osuszyć: Przed ponownym montażem lub przechowywaniem urządzenia należy odczekać, aż wszystkie elementy całkowicie wyschną na powietrzu.
- Składowanie: Przechowuj urządzenie i jego akcesoria w czystym, suchym miejscu, z dala od bezpośredniego światła słonecznego i ekstremalnych temperatur.

Image: The device is shown being used in a shower, emphasizing its IPX6 water resistance for easy cleaning.
8. Rozwiązywanie Problemów
- Urządzenie się nie włącza: Ensure the device is fully charged. Connect it to the USB-C charger and allow it to charge for at least 1.5 hours.
- Brak rozpylania wody: Check if the clean water tank is filled. Ensure the nozzle is correctly attached and not clogged.
- Water Temperature Indicator Issues: If the light is blue, the water is too cold; add warmer water. If the light is red, the water is too hot; add cooler water. The ideal temperature is indicated by a green light.
- Nieskuteczne czyszczenie: Try a stronger pressure mode. Ensure the nozzle is positioned correctly in the ear canal. If earwax is severely impacted, consult a medical professional.
9. Specyfikacje
| Funkcja | Specyfikacja |
|---|---|
| Numer modelu | B0CS66MBXW |
| Wymiary | 11.26 x 4.76 x 4.45 cala |
| Waga | 1.06 funtów |
| Bateria | 1 bateria litowo-jonowa (2000 mAh) |
| Typ ładowania | USB-C |
| Odporność na wodę | IPX6 |
| Producent | Shenzhen Baria Technology CO., Ltd. |
10. Gwarancja i wsparcie
For warranty information and customer support, please refer to the contact details provided on the product packaging or visit the official Morfone webZachowaj paragon jako dowód zakupu na wypadek ewentualnych roszczeń gwarancyjnych.