Wstęp
This manual provides detailed instructions for the installation, operation, and maintenance of your XTRONS IQ72DLRP Car Stereo GPS unit. Please read this manual thoroughly before using the product to ensure proper functionality and to prevent damage. Keep this manual for future reference.
Informacje dotyczące bezpieczeństwa
- Do not attempt to operate the unit while driving. Distracted driving can lead to accidents.
- Ensure all wiring is correctly connected before powering on the unit to avoid short circuits or damage.
- Consult a professional for installation if you are unsure about any steps. Incorrect installation can void your warranty.
- Unikaj wystawiania urządzenia na działanie ekstremalnych temperatur, długotrwałego bezpośredniego światła słonecznego i nadmiernej wilgoci.
- Do not disassemble the unit. This may cause damage and will void the warranty.
Zawartość opakowania
Przed przystąpieniem do instalacji sprawdź, czy w opakowaniu znajdują się wszystkie elementy.
- XTRONS IQ72DLRP Head Unit
- Antena GPS
- Wiązka zasilania
- Kable USB
- Kable RCA
- Mikrofon zewnętrzny
- Instrukcja obsługi (ten dokument)
- Other accessories as pictured below.

Rysunek 1: Dołączone akcesoria
Organizować coś
1. Koniec instalacjiview
The XTRONS IQ72DLRP is designed for specific integration with the Land Rover Freelander 2. Professional installation is recommended. Ensure the vehicle's battery is disconnected before starting any electrical work.
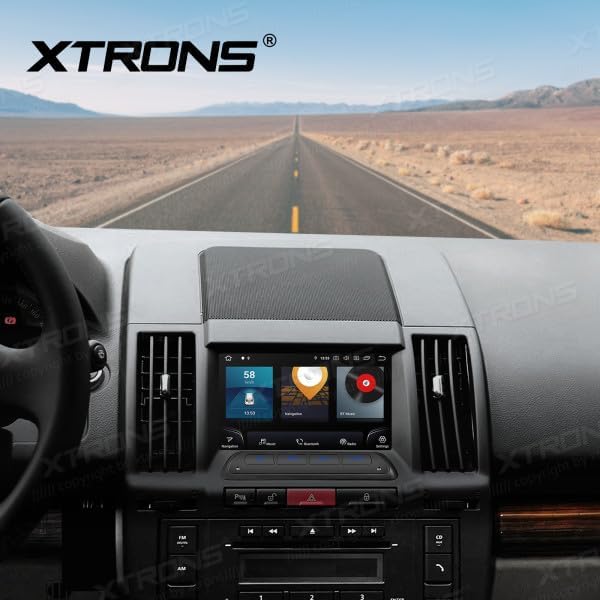
Figure 2: Unit installed in Land Rover Freelander 2 dashboard
2. Połączenia okablowania
Connect the main power harness, speaker wires, and other auxiliary cables according to your vehicle's wiring diagram and the provided XTRONS harness. Pay close attention to the following connections:
- Moc: Podłącz żółty przewód (stałe 12 V), czerwony przewód (akcesoria 12 V) i czarny przewód (uziemienie).
- Prelegenci: Connect the speaker wires to the corresponding vehicle speaker wires (e.g., Front Left +, Front Left -).
- Antena GPS: Zamontuj antenę GPS w miejscu z wolnym dostępem view nieba, zazwyczaj na desce rozdzielczej lub pod przednią szybą.
- USB: Connect the USB cables for external storage or smartphone connectivity.
- Mikrofon zewnętrzny: Podłącz zewnętrzny mikrofon, aby poprawić jakość rozmów.
3. Pierwsze włączenie zasilania
After all connections are secure, reconnect the vehicle's battery. Turn on the ignition. The unit should power on automatically. Follow any on-screen prompts for initial setup, such as language selection and time zone.
Instrukcja obsługi
1. Funkcje podstawowe
- Włączanie/wyłączanie: Naciśnij i przytrzymaj przycisk zasilania (jeśli jest dostępny) lub włącz/wyłącz zapłon pojazdu.
- Regulacja głośności: Use the volume knob or on-screen controls to adjust audio levels.
- Ekran główny: Kliknij ikonę domu, aby powrócić do głównego interfejsu Androida.

Figure 3: Main Android Home Screen
2. Nawigacja w systemie Android
The unit runs on Android 12. Navigate through menus and applications by tapping, swiping, and dragging on the touchscreen, similar to a smartphone or tablet.

Figure 4: Application Drawer
3. Obsługa radia
Access the "Radio" application from the home screen. You can scan for stations, save presets, and switch between AM/FM bands.
4. Łączność Bluetooth
Aby sparować telefon:
- Idź do Ustawienia > Bluetooth.
- Enable Bluetooth on both the head unit and your mobile device.
- Szukaj available devices on your mobile phone and select "XTRONS IQ72DLRP" (or similar name).
- Potwierdź kod parowania na obu urządzeniach.
Po sparowaniu możesz wykonywać połączenia bez użycia rąk i przesyłać strumieniowo dźwięk.
5. CarPlay / Android Auto
Connect your compatible smartphone via USB to use Apple CarPlay or Android Auto. The system will automatically detect and launch the respective interface, allowing access to navigation, music, messages, and more directly from your phone.
6. Nawigacja GPS
The unit comes with a built-in GPS module and antenna. You can use pre-installed navigation apps or download others from the Google Play Store. Ensure the GPS antenna is properly installed for optimal signal reception.
7. USB / Media Playback
Insert a USB drive into one of the provided USB ports. Use the "Music" or "Video" applications to browse and play media files. Urządzenie obsługuje różne formaty audio i wideo.
8. Ustawienia DSP
The Digital Sound Processor (DSP) allows for advanced audio customization. Access the "DSP" application to adjust equalizer settings, balance, fader, and other sound effects to optimize your listening experience.

Figure 5: DSP Settings Interface
9. Wi-Fi and 4G Connectivity
Connect to a Wi-Fi network via Ustawienia > Sieć i Internet > Wi-Fi. For 4G connectivity, insert a compatible SIM card (if the unit supports it and a slot is available) or use a USB 4G dongle (sold separately) and configure network settings.
Konserwacja
1. Czyszczenie urządzenia
Do czyszczenia ekranu i zewnętrznej części urządzenia należy używać miękkiej, suchej ściereczki. W przypadku uporczywych plam, należy delikatnie przetrzećamp cloth with a mild, non-abrasive cleaner can be used. Avoid spraying liquids directly onto the unit.
2. Aktualizacje oprogramowania
Periodically check for software updates to ensure optimal performance and access to new features. Updates can usually be found in the system settings or on the official XTRONS website. Follow the instructions provided with the update package carefully.
Rozwiązywanie problemów
| Problem | Możliwa przyczyna | Rozwiązanie |
|---|---|---|
| Urządzenie nie włącza się. | Nieprawidłowe okablowanie; Przepalony bezpiecznik; Odłączony akumulator pojazdu. | Check power connections (yellow, red, black wires). Inspect vehicle fuses. Ensure battery is connected. |
| Brak dźwięku z głośników. | Nieprawidłowo podłączone przewody głośnikowe; Zbyt niski poziom głośności; Aktywna funkcja wyciszenia. | Verify speaker wiring. Increase volume. Check if the unit is muted. |
| Sygnał GPS jest słaby lub niedostępny. | Nieprawidłowo zainstalowana lub zasłonięta antena GPS. | Upewnij się, że antena GPS ma czyste pole widzenia view nieba. Sprawdź połączenie antenowe. |
| Parowanie Bluetooth nie powiodło się. | Bluetooth not enabled; Incorrect pairing code; Device out of range. | Enable Bluetooth on both devices. Re-enter pairing code. Ensure devices are close. |
| Ekran dotykowy nie reaguje. | Temporary software glitch; Unit frozen. | Restart the unit (turn vehicle ignition off and on). If issue persists, perform a factory reset (refer to settings). |
Specyfikacje
- Numer modelu: IQ72DLRP
- Marka: XTRONY
- System operacyjny: Android 12
- Rozmiar ekranu: 7 cali
- Łączność: Bluetooth, Wi-Fi, 4G (optional), Apple CarPlay, Android Auto, USB
- Zgodne urządzenia: Telefon komórkowy
- Kolor: Czarny
- Edytor: Ośmiordzeniowy
- BARAN: 8 GB pamięci LPDDR4
- ROM: Dysk SSD 256 GB
- Technologia wyświetlania: QLED
- Wyjście audio: Optical Coaxial, RCA Audio Out
Note: Specifications are subject to change without prior notice. Some product images may show Android 13, but the product title specifies Android 12.
Gwarancja i wsparcie
1. Informacje o gwarancji
XTRONS products typically come with a limited warranty covering manufacturing defects. Please refer to the warranty card included with your product or visit the official XTRONS webAby zapoznać się ze szczegółowymi warunkami gwarancji obowiązującymi w Twoim regionie, odwiedź naszą witrynę.
2. Obsługa klienta
If you encounter any issues not covered in the troubleshooting section or require further assistance, please contact XTRONS customer support. You can usually find contact information (email, phone, or support portal) on the official XTRONS webstrona:
When contacting support, please have your product model number (IQ72DLRP) and purchase details ready.