WORKPRO 1
WORKPRO Cordless Rotary Tool Kit
Instrukcja obsługi
Model: 1
Wstęp
Thank you for choosing the WORKPRO Cordless Rotary Tool Kit. This manual provides essential information for the safe and effective operation, maintenance, and troubleshooting of your new rotary tool. Please read this manual thoroughly before first use and keep it for future reference.
Zawartość opakowania
Upon opening the package, please verify that all items listed below are present and in good condition. If any items are missing or damaged, contact customer support.

Image: The WORKPRO Cordless Rotary Tool, its carrying case, Type-C charging cables, and a wide array of 117 accessories including various grinding, polishing, cutting, sanding, carving, and drilling bits.
- WORKPRO Cordless Rotary Tool (Pink)
- 117 Accessories (various grinding, carving, polishing, milling, cutting, sanding, collet, and drilling attachments)
- Kabel ładujący typu C.
- Tool Bag/Carrying Case
- Instrukcja obsługi (ten dokument)

Image: A visual guide detailing the 117 accessories, categorized by function such as grinding/sharpening, carving, polishing, milling, cutting, sanding, collet, and drilling, showing quantities for each type.
Organizować coś
Charging the Rotary Tool
The WORKPRO Cordless Rotary Tool is equipped with a Type-C charging port and built-in rechargeable batteries. Before first use, fully charge the tool.
- Connect the provided Type-C charging cable to the tool's charging port.
- Podłącz drugi koniec kabla do kompatybilnego zasilacza USB (nie ma go w zestawie).
- Charging typically takes 1.5 to 2 hours. The five indicator lights will turn white when fully charged.
- A full charge provides up to 200 minutes of continuous operation.
- Ważny: For safety, do not operate the tool while it is charging.
Instalowanie akcesoriów
The tool features an automatic shaft locking design for easy and secure accessory replacement.

Image: A visual comparison highlighting the WORKPRO tool's automatic shaft locking design, which eliminates the need to press a button during accessory changes, contrasting it with other tools that require a button press.

Image: A detailed three-step guide demonstrating how to install accessories: 1. Unscrew the collet nut. 2. Choose the suitable collet and insert the accessory. 3. Tighten the collet nut. It also shows specific instructions for fitting sanding bands and cutting discs/sanding paper.
- Unscrew the collet nut at the tip of the rotary tool.
- Select the appropriate collet size for your desired accessory (two collet sizes are included: 0.235mm and 0.32mm).
- Włóż trzonek akcesoryjny do tulei zaciskowej.
- Tighten the collet nut securely to hold the accessory in place.
- To replace accessories, simply unscrew the collet nut. The automatic locking mechanism will engage, allowing for easy removal and insertion.

Obraz: Zbliżenie view of the two different collet sizes (0.235mm and 0.32mm) provided with the WORKPRO rotary tool, along with various compatible accessory shanks.
Instrukcja obsługi
Nadrzędne narzędzieview
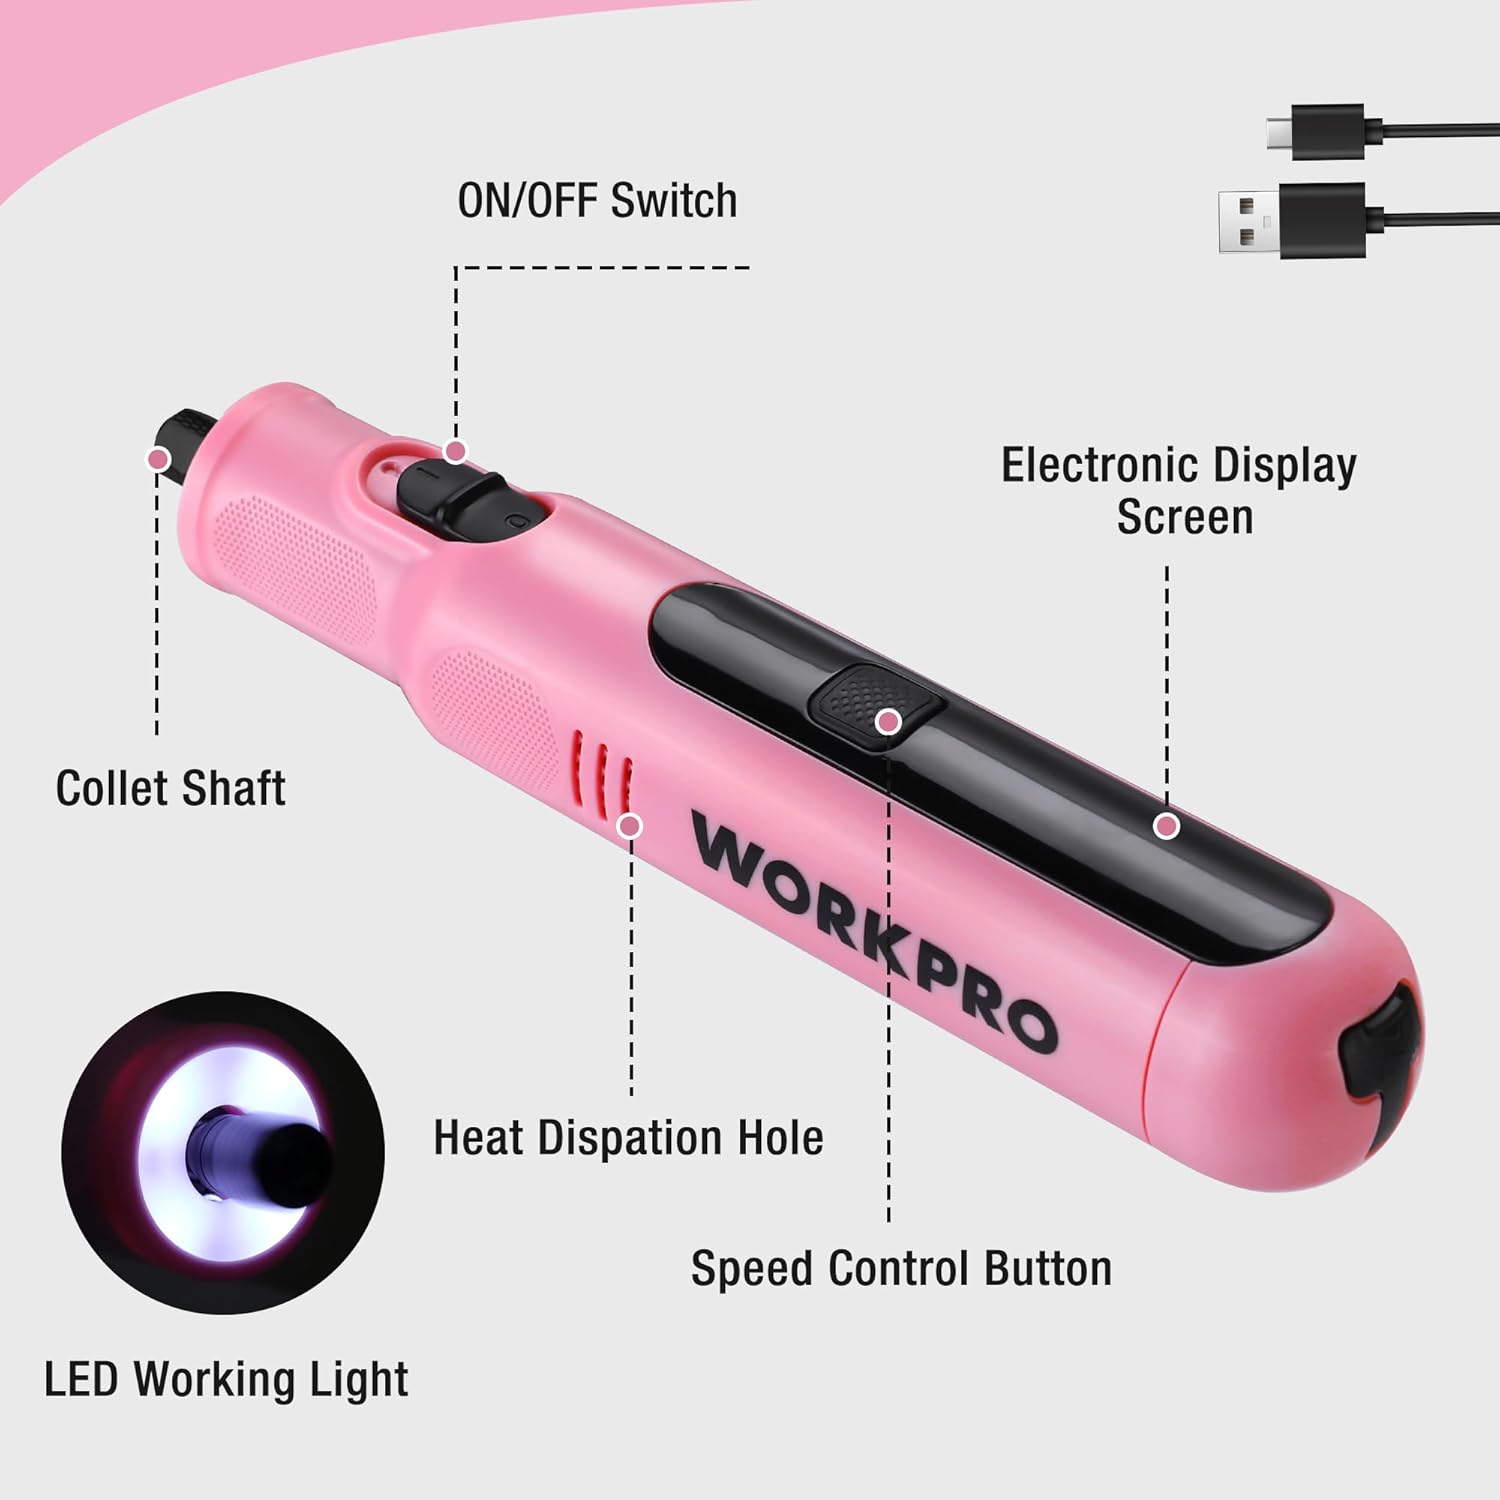
Image: An annotated diagram of the WORKPRO rotary tool, pointing out key features such as the ON/OFF switch, electronic display screen, collet shaft, heat dissipation hole, speed control button, and LED working light.
- Przełącznik włącz / wyłącz: Located on the side, controls power to the tool.
- Electronic Display Screen: Pokazuje aktualne ustawienie prędkości.
- Przycisk kontroli prędkości: Adjusts the rotational speed.
- Światło robocze LED: Zapewnia oświetlenie umożliwiające precyzyjną pracę.
- Collet Shaft: Where accessories are inserted and secured.
- Otwór odprowadzający ciepło: Helps maintain optimal operating temperature.
Włączanie/wyłączanie i regulacja prędkości
The tool features 6 variable speed settings for diverse applications.
- To turn on the tool, slide the ON/OFF switch to the "ON" position. The LED work light will illuminate.
- Press the Speed Control Button to cycle through the 6 available speed settings: 5000 RPM, 10000 RPM, 15000 RPM, 20000 RPM, 25000 RPM, and 30000 RPM. The electronic display will show the current speed.
- Select the appropriate speed for your task. Lower speeds are suitable for delicate work, while higher speeds are for more robust applications.
- Aby wyłączyć narzędzie, przesuń przełącznik WŁ./WYŁ. do pozycji „WYŁ.”.
- Notatka: When turned off, the product automatically locks the shaft, which may cause a slight clicking sound. This is normal and indicates the safety locking mechanism is engaged.

Obraz: przekrój view of the WORKPRO rotary tool highlighting its powerful motor and variable speed capabilities, indicating a maximum speed of 30000 RPM.

Image: A close-up of the rotary tool's electronic display, clearly showing the selectable speed settings: 5000RPM, 10000RPM, 15000RPM, 20000RPM, 25000RPM, and 30000RPM.
Aplikacje
The WORKPRO Cordless Rotary Tool is versatile and suitable for a wide range of home projects and crafts, including but not limited to:
- Szlifowanie/Ostrzenie: For shaping and sharpening various materials.
- Rytownictwo: Creating intricate designs on surfaces like wood, metal, or plastic.
- Cięcie: Precision cutting of light materials.
- Wiercenie: Creating small holes.
- Szlifowanie: Smoothing rough surfaces.
- Polerowanie: Bringing a shine to finished pieces.

Image: A collage demonstrating the versatility of the 8V Cordless Rotary Tool, showing it in use for cutting, carving, polishing, sanding, and drilling various materials.

Image: A person using the WORKPRO rotary tool with a carving bit to engrave a design onto a clear acrylic sheet, demonstrating its precision for detailed work.
Konserwacja
Czyszczenie
Regularne czyszczenie zapewnia optymalną wydajność i wydłuża żywotność narzędzia.
- Przed przystąpieniem do czyszczenia należy zawsze odłączyć narzędzie od źródła zasilania.
- Use a soft, dry cloth to wipe down the tool's exterior.
- Remove any dust or debris from the heat dissipation holes using a soft brush or compressed air.
- Clean accessories after each use to prevent buildup that could affect performance.
Pielęgnacja i przechowywanie baterii
Proper battery care is crucial for maintaining battery health and longevity.
- It is recommended to charge the battery periodically, even if the tool is not used for a long time, to protect the battery's lifespan.
- Store the rotary tool and its accessories in the provided tool bag in a cool, dry place, away from direct sunlight and extreme temperatures.

Image: A hand placing the compact WORKPRO rotary tool carrying case onto a shelf, demonstrating its portability and ease of storage.
Rozwiązywanie problemów
| Problem | Możliwa przyczyna | Rozwiązanie |
|---|---|---|
| Narzędzie nie włącza się. | Bateria jest rozładowana. | Charge the tool fully using the Type-C cable. |
| Tool makes a clicking sound when turned off. | Normal operation of the automatic shaft locking mechanism. | No action required; this is a normal function for safety. |
| Akcesorium jest luźne lub chwieje się. | Nakrętka tulei zaciskowej nie jest odpowiednio dokręcona lub zastosowano niewłaściwy rozmiar tulei zaciskowej. | Ensure the collet nut is securely tightened. Verify that the correct collet size is used for the accessory shank. |
| Obniżona wydajność lub prędkość. | Niski poziom naładowania baterii lub nieprawidłowe ustawienie prędkości. | Recharge the battery. Adjust the speed setting to a higher RPM if needed for the task. |
Specyfikacje
| Funkcja | Szczegół |
|---|---|
| Marka | WORKPRO |
| Numer modelu | 1 |
| Kolor | Różowy |
| Styl | Ołówek |
| Źródło zasilania | Zasilany bateryjnie |
| Tomtage | 8 wolty |
| Typ baterii | Litowo-jonowy (1 w zestawie) |
| Czas ładowania | Approx. 1.5 - 2 hours (Type-C) |
| Czas działania | Do 200 minut |
| Ustawienia zmiennej prędkości | 6 (5000/10000/15000/20000/25000/30000 RPM) |
| Maksymalna prędkość obrotowa | 30000 obr./min. |
| Waga | 227 g (0.5 funta) |
| Wymiary | 19 x 3.61 x 3.61 cm (7.48 inches length) |
| Cechy specjalne | Lightweight, Cordless, Rechargeable, LED Work Light, Auto-Locking Protection |
| Zawarte komponenty | Rotary Tool, 117 Accessories, Type-C Cable, Tool Bag |
| Kraj pochodzenia | Chiny |

Image: A visual representation of the WORKPRO rotary tool's compact size (7.48 inches in length) and lightweight design (0.5 lbs), shown resting in a hand.
Informacje o gwarancji
This WORKPRO Cordless Rotary Tool comes with a 2-letnia gwarancja od daty zakupu, obejmujące wady produkcyjne. Dodatkowo 30-dniowa polityka zwrotów is available for refunds or replacements through the retailer.
Proszę zachować dowód zakupu na wypadek ewentualnych roszczeń gwarancyjnych.
Obsługa klienta
For any questions, concerns, or technical assistance regarding your WORKPRO Cordless Rotary Tool, please contact the manufacturer or your point of purchase. Refer to the product packaging or the retailer's webodwiedź naszą stronę, aby uzyskać szczegółowe dane kontaktowe.
You can also visit the official WORKPRO store on Amazon for more product information and support resources: WORKPRO Store
Ask a question about this manual
Ask about setup, troubleshooting, compatibility, parts, safety, or missing instructions. Manuals+ will review the question and use this page’s manual context to help answer it.