1. Wprowadzenie
This manual provides detailed instructions for the setup, operation, and maintenance of your Bmax B6 Power Mini PC. This compact desktop computer is designed for various applications, from office tasks to multimedia consumption, offering a balance of performance and space efficiency.

Image 1.1: The Bmax B6 Power Mini PC, showcasindzięki kompaktowej konstrukcji i przednim portom.
2. Co znajduje się w pudełku
Sprawdź zawartość paczki, aby upewnić się, że znajdują się w niej wszystkie elementy:
- 1 x Bmax B6 Power Mini PC (16GB+1TB configuration)
- 1 x kabel HDMI
- 1 x Instrukcja obsługi
- Zasilacz 1 x US
- 1 x mocowanie VESA ze śrubami
3. Koniec produktuview
The Bmax B6 Power Mini PC is equipped with advanced components for efficient performance.

Obraz 3.1: Koniecview of key features including processor, memory, storage, and connectivity.
3.1 Główne cechy
- Edytor: Intel Core i7-1060NG7, 4 Cores/8 Threads, up to 3.8GHz.
- Pamięć: 16 GB pamięci RAM LPDDR4.
- Składowanie: 1TB NVMe SSD, with support for dual NVMe SSDs and expandable up to 2TB via 2.5" HDD (SATA cable included).
- Grafika: Intel Iris Xe Graphics, supporting 4K@60Hz output.
- Wyjście wyświetlacza: Supports three simultaneous displays via 2x HDMI 2.0 and 1x Full-Featured Type-C port.
- Połączenie bezprzewodowe: Wi-Fi 6 (2.4G/5G 802.11a/b/g/n/ac) and Bluetooth 5.2.
- Łączność przewodowa: 1x Gigabit Ethernet (RJ45).
- Porty: 3x USB 3.0, 1x Full-Featured Type-C, 2x HDMI 2.0, 1x Earphone/Microphone Jack, 1x DC Power Input.
- Dodatkowe funkcje: VESA mount compatibility, Wake On LAN, PXE Boot, RTC Wake, Auto Power On, One-key Smart Recovery.

Image 3.2: Detailed diagram of the front and rear ports and their functions.
4. Przewodnik konfiguracji
4.1 Podłączanie urządzeń peryferyjnych
- Podłącz wyświetlacz: Use the provided HDMI cable to connect your monitor or TV to one of the HDMI ports on the Mini PC. Alternatively, use a compatible USB-C to display cable for the Type-C port.
- Podłącz klawiaturę i mysz: Plug your USB keyboard and mouse into the available USB 3.0 ports. For wireless devices, ensure Bluetooth is enabled and pair them as per their instructions.
- Połącz sieć (opcjonalnie): For a wired internet connection, connect an Ethernet cable from your router or modem to the RJ45 port on the Mini PC.
- Podłącz zasilanie: Plug the US Power Adapter into the DC power input port on the Mini PC, then plug the adapter into a power outlet.
4.2 Pierwsze włączenie zasilania
- Ensure all peripherals are connected.
- Naciśnij przycisk zasilania znajdujący się z przodu komputera Mini PC.
- The system will boot up. Follow the on-screen instructions to complete the Windows setup process. It is recommended to keep the Ethernet cable unplugged during the first boot for faster setup if prompted.
5. Instrukcja obsługi
5.1 Podstawowa obsługa
- Włączanie/wyłączanie: Press the power button to turn on the PC. To turn off, use the Windows Shut Down option or press and hold the power button for 5 seconds.
- Uruchom ponownie: Użyj opcji ponownego uruchomienia systemu Windows.
- Tryb uśpienia: Użyj opcji Uśpienie systemu Windows lub naciśnij krótko przycisk zasilania.
5.2 Konfiguracja wyświetlacza
The Bmax B6 Power supports up to three 4K@60Hz displays simultaneously.
- Connect your displays to the available HDMI 2.0 ports and the Full-Featured Type-C port.
- In Windows, right-click on the desktop and select "Display settings" to configure multiple displays (extend, duplicate, or show only on one).

Image 5.1: Illustration of the Mini PC connected to multiple displays, demonstrating its multi-tasking capabilities.
5.3 Łączność sieciowa
- Wi-Fi: Aby połączyć się z siecią bezprzewodową, kliknij ikonę Wi-Fi na pasku zadań, wybierz swoją sieć i wprowadź hasło.
- Ethernet: Jeżeli podłączony jest kabel Ethernet, komputer automatycznie nawiąże przewodowe połączenie sieciowe.
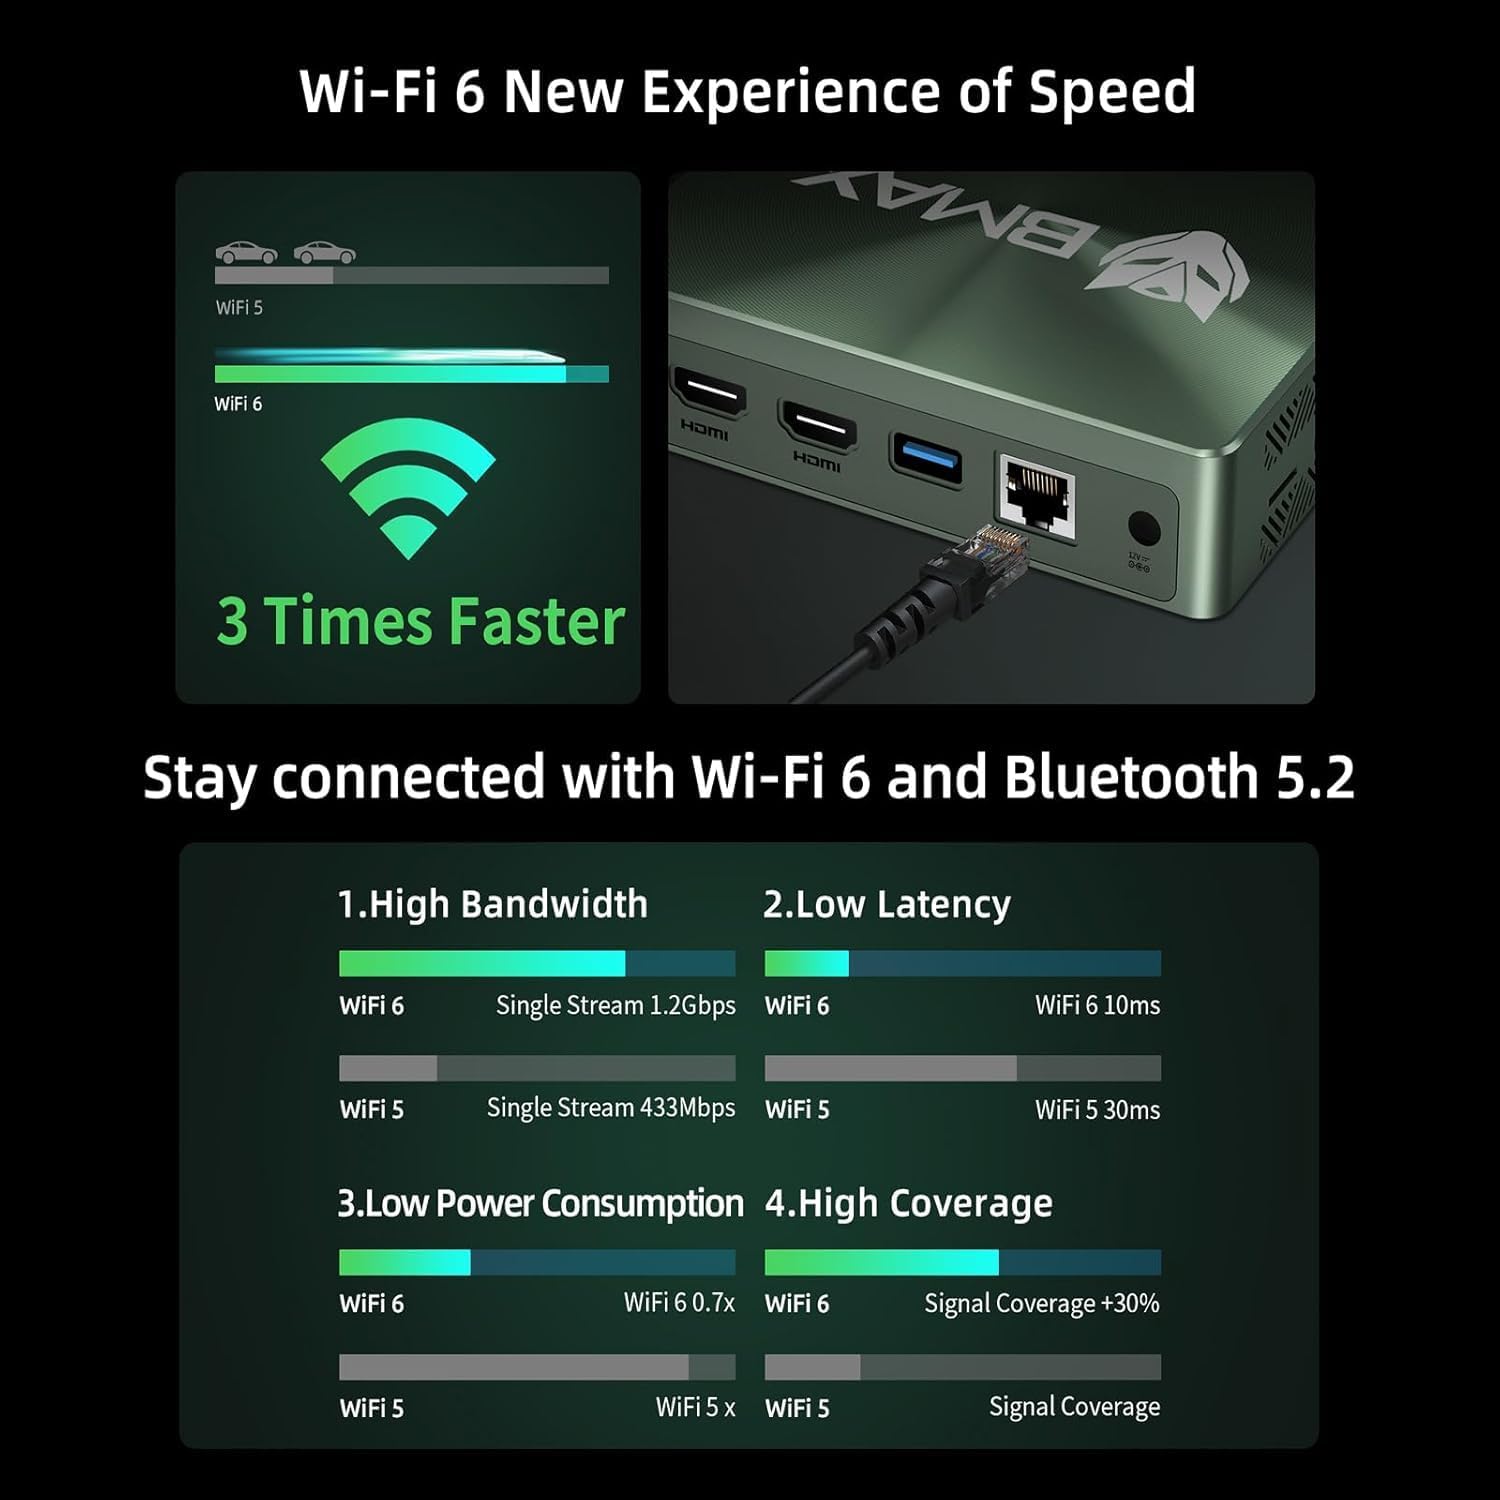
Image 5.2: Visual representation of Wi-Fi 6 and Bluetooth 5.2 capabilities, highlighting speed and connectivity benefits.
6. Konserwacja
6.1 Czyszczenie
- Przed czyszczeniem upewnij się, że komputer Mini PC jest wyłączony i odłączony od zasilania.
- Do czyszczenia powierzchni zewnętrznych należy używać miękkiej i suchej ściereczki.
- W celu usunięcia kurzu z otworów wentylacyjnych należy użyć sprężonego powietrza. Nie wkładać żadnych przedmiotów do otworów wentylacyjnych.
6.2 Rozszerzenie pamięci masowej
The Bmax B6 Power supports additional storage. You can install a second M.2 NVMe SSD or a 2.5-inch HDD/SSD.
- Refer to the detailed instructions in the included user manual for safe installation of additional storage devices.
- Ensure the device is powered off and unplugged before opening the chassis.

Image 6.1: Diagram illustrating the M.2 NVMe SSD slot and the option for expanded storage.
7. Rozwiązywanie Problemów
7.1 Brak zasilania
- Sprawdź, czy zasilacz jest prawidłowo podłączony do komputera Mini PC i gniazdka elektrycznego.
- Sprawdź, czy gniazdko elektryczne jest sprawne.
- Spróbuj użyć innego gniazdka elektrycznego.
7.2 Brak wyjścia wyświetlacza
- Verify that the HDMI or USB-C cable is securely connected to both the Mini PC and the monitor.
- Sprawdź, czy monitor jest włączony i ustawiony na prawidłowe źródło sygnału wejściowego.
- Jeśli to możliwe, wypróbuj inny kabel wyświetlacza lub monitor.
7.3 System Recovery (One-key Smart Recovery)
If your Windows operating system encounters issues, the Bmax B6 Power features a "Smart Recovery" environment to restore factory settings.
- Step 1: Power On Mini PC.
- Step 2: Enter Recovery Mode. As soon as the screen lights up, immediately and repeatedly press the F9 key until the System Recovery menu appears.
- Step 3: Start the Recovery. Masz dwie możliwości:
- Using Keyboard: Press the 'Y' key to begin the Factory Reset.
- Using Mouse: Click the [Restore System] button.
- Step 4: Set Up Windows Once Complete. You will be greeted by the initial Windows setup screen. Simply follow the on-screen instructions to set up your fresh system.

Image 7.1: Screenshot of the Bmax Smart Recovery environment, showing options for Factory Reset and Exit.
8. Specyfikacje
| Funkcja | Szczegół |
|---|---|
| Marka | Bmax |
| Numer modelu | Moc B6 |
| Edytor | Intel Core i7-1060NG7 (4C/8T, up to 3.8 GHz) |
| BARAN | 16 GB pamięci LPDDR4 |
| Składowanie | 1 TB NVMe SSD (expandable up to 2 TB via 2.5" HDD/SSD) |
| Grafika | Karta graficzna Intel Iris Xe (zintegrowana) |
| Maksymalna rozdzielczość ekranu | 3840 x 2160 pikseli (4K) |
| Wyświetl wyjście | 2x HDMI 2.0, 1x Full-Featured Type-C (supports triple 4K@60Hz displays) |
| Łączność bezprzewodowa | Wi-Fi 6 (802.11a/b/g/n/ac), Bluetooth 5.2 |
| Łączność przewodowa | 1x Gigabit Ethernet (RJ45) |
| Porty USB | 3x USB 3.0, 1x Full-Featured Type-C |
| Audio | 1x Earphone/Microphone Jack |
| System operacyjny | OS (Typically Windows, specific version may vary) |
| Waga przedmiotu | 1.61 funta |
| Kolor | Czarny |
| Cechy specjalne | VESA Mount, Wake On LAN, PXE Boot, RTC Wake, Auto Power On, Smart Recovery |
9. Gwarancja i wsparcie
Bmax provides comprehensive support for your Mini PC.
- Gwarancja: Your Bmax Mini PC comes with a 12-month warranty.
- Zwroty: Obowiązuje 30-dniowy okres zwrotu.
- Obsługa klienta: 7x24-hour customer service support is provided.
- Wsparcie techniczne: Dostępne jest dożywotnie wsparcie techniczne.
9.1 Jak skontaktować się z pomocą techniczną
For inquiries, system updates, or troubleshooting assistance, please contact customer service through your Amazon account:
- Log in to Amazon.
- Przejdź do zakładki „Twoje konto”.
- Przejdź do zakładki „Twoje zamówienia”.
- Select the Bmax B6 Power Mini PC order and click "Ask Product Question".

Image 9.1: Information on contacting Bmax after-sales support via Amazon.