
1. Wprowadzenie
Thank you for choosing the Zapco ST-1000XM III Monoblock Class D Amplifier. Ten amplifier is designed to deliver high-quality audio performance for your vehicle's sound system. Please read this manual thoroughly before installation and operation to ensure proper use and to maximize the amplifier's potential.
The ST-1000XM III is a single-channel, Class D bass amplifier featuring a new aluminum chassis, variable input gain control, variable electronic crossover, variable subsonic filter, variable bass boost control, variable center frequency for bass boost, and variable phase control. It is also strappable for use with a second amplifier on a single voice coil and includes a dash-mount remote gain control.
2. Informacje dotyczące bezpieczeństwa
Podczas instalacji i obsługi należy zawsze przestrzegać następujących środków ostrożności:
- Disconnect the vehicle's battery negative terminal before starting any installation.
- Upewnij się, że wszystkie przewody są prawidłowo poprowadzone i zabezpieczone, aby zapobiec ich uszkodzeniom lub zwarciom.
- Do podłączenia zasilania, uziemienia i głośników należy stosować przewody o odpowiednim przekroju, zgodnie ze specyfikacją.
- Zainstaluj ampPrzechowywać w suchym i dobrze wentylowanym miejscu, z dala od bezpośredniego światła słonecznego, źródeł ciepła i wilgoci.
- Nie uruchamiaj amplifier if it is damaged or malfunctioning. Refer servicing to qualified personnel.
- High sound pressure levels can cause permanent hearing loss. Adjust volume levels responsibly.
3. Konfiguracja i instalacja
Prawidłowy montaż ma kluczowe znaczenie dla optymalnej wydajności i bezpieczeństwa. W razie wątpliwości co do któregokolwiek etapu procesu instalacji, skonsultuj się z profesjonalnym instalatorem.
3.1 Montaż Ampżywsze
Choose a secure, dry, and well-ventilated location for mounting the amplifier. Ensure there is sufficient airflow around the heatsink. Use the provided mounting hardware to secure the ampDociśnij mocno urządzenie do twardej powierzchni w pojeździe.
3.2 połączeń przewodów
Refer to the diagram below for proper wiring connections.
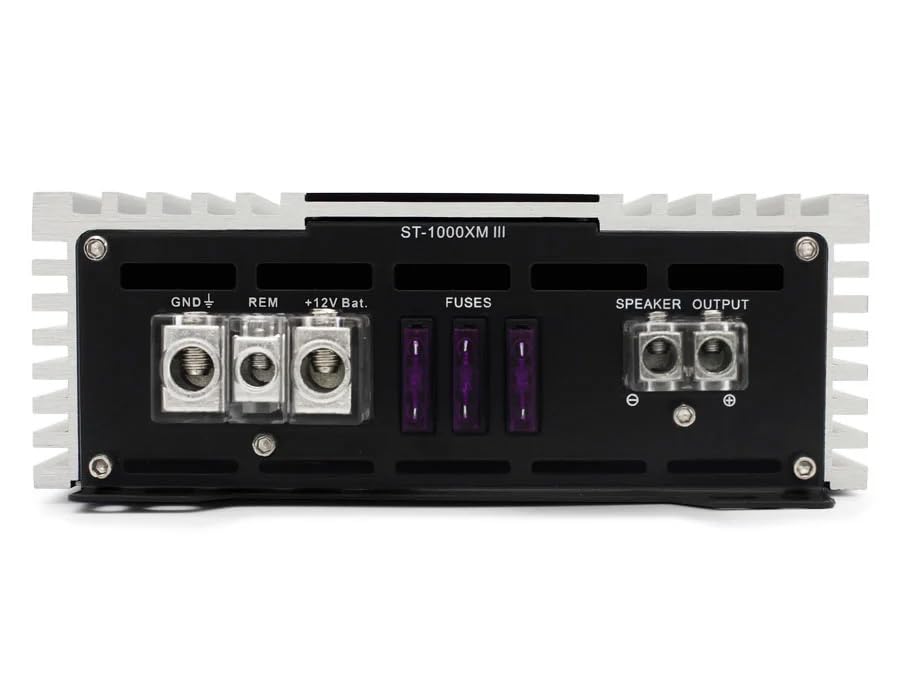
Figure 1: Rear panel connections for power, ground, remote, fuses, and speaker output.
- Moc (BATT +12V): Connect a heavy-gauge wire (e.g., 4 AWG or larger, depending on cable length) directly from the vehicle's positive battery terminal to the +12V terminal on the amplifier. Install an appropriate fuse holder (not supplied) within 18 inches (45 cm) of the battery.
- Masa (GND): Connect a heavy-gauge wire of the same size as the power wire from the GND terminal on the ampPrzymocuj przewód do czystej, niemalowanej, metalowej powierzchni podwozia pojazdu. Upewnij się, że połączenie elektryczne jest prawidłowe.
- Zdalny (REM): Podłącz przewód o mniejszym przekroju (np. 18 AWG) do zacisku REM na amplifier do wyjścia zdalnego włączania jednostki głównej. Ten przewód włącza ampwłączanie i wyłączanie filtra za pomocą stereo.
- Bezpieczniki: Ten amplifier is equipped with internal fuses. Ensure these are correctly rated (refer to specifications). Do not replace with higher-rated fuses.
- Wyjście głośnika: Connect your subwoofer(s) to the SPEAKER OUTPUT terminals. Observe correct polarity (+ to + and - to -). This is a monoblock amplifier, zaprojektowany dla wyjścia jednokanałowego.
- Wejście (RCA): Connect RCA cables from your head unit's subwoofer or full-range pre-out to the IN (RCA) terminals on the ampliyfikator.
- Zdalna kontrola wzmocnienia: Connect the included remote gain control to the 'REMOTE' port on the amplifier's front panel. This allows for convenient bass level adjustment from the driver's seat.
4. Operating Controls and Adjustments
The Zapco ST-1000XM III features several controls to fine-tune your audio system. Refer to the diagram below for control locations.
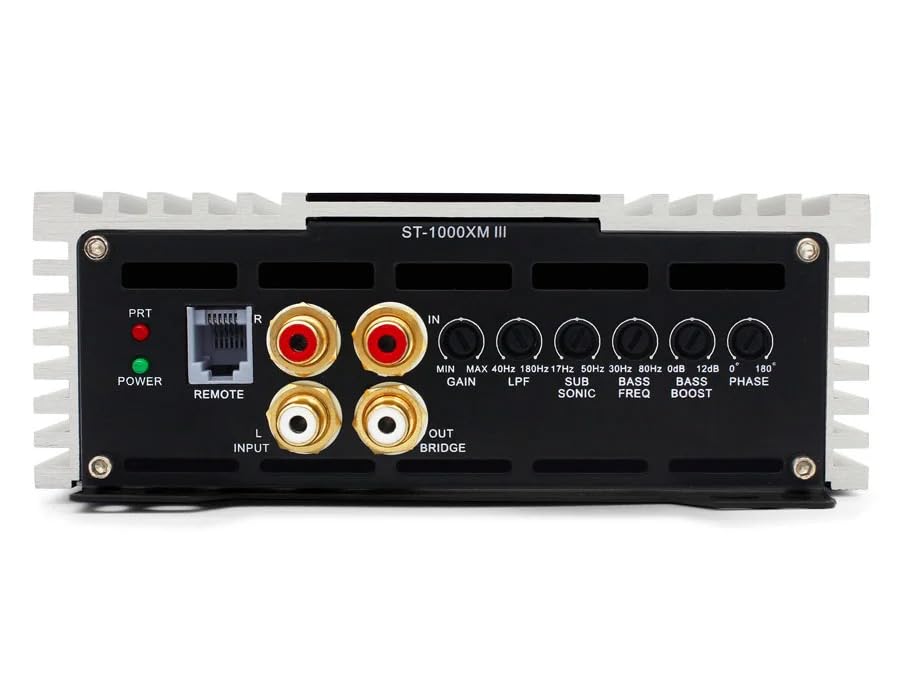
Figure 2: Front panel controls for audio adjustments.
- POWER/PRT Indicators: The POWER LED indicates the amplifier is on. The PRT (Protection) LED illuminates if the amplifier enters protection mode due to overheating, low impedance, or other faults.
- GAIN (czułość wejściowa): Dostosowuje amplifier's input sensitivity to match the output voltage of your head unit. Start with the gain at minimum and slowly increase until desired volume is achieved without distortion. Range: 0.25V to 5V.
- LPF (filtr dolnoprzepustowy): This control sets the upper frequency limit for the amplifier's output. Only frequencies below the set point will pass through. Typically set between 50Hz and 200Hz for subwoofers.
- SUB SONIC (Subsonic Filter): Filters out extremely low frequencies that are inaudible and can damage subwoofers. Typically set below the port tuning frequency of a ported enclosure, or around 20-30Hz for sealed enclosures. Range: 17Hz to 50Hz.
- PODBICIE BASÓW: Increases the output level at a specific bass frequency. Use sparingly to avoid distortion. Range: 0dB to 12dB.
- BASS FREQ (Bass Boost Frequency): Selects the center frequency for the bass boost control.
- FAZA: Adjusts the phase of the subwoofer output relative to the main speakers. This helps to ensure all sound waves arrive at the listener's ears in sync, improving bass impact and clarity. Adjustable from 0° to 180°.
5. Konserwacja
The Zapco ST-1000XM III ampLifier wymaga minimalnej konserwacji. Aby zapewnić długowieczność, postępuj zgodnie z poniższymi wskazówkami:
- Zachowaj ampUtrzymuj filtr w czystości, bez kurzu i zanieczyszczeń. Do czyszczenia używaj miękkiej, suchej ściereczki.
- Zapewnij odpowiednią wentylację wokół amplifier at all times. Do not block cooling fins.
- Okresowo sprawdzaj wszystkie połączenia przewodów pod kątem szczelności i korozji.
- Unikaj narażania ampnarażać na działanie ekstremalnych temperatur i wilgoci.
6. Rozwiązywanie Problemów
Jeśli masz problemy z urządzeniem amplifier, consult the following troubleshooting guide before contacting support.
- Brak zasilania:
- Sprawdź bezpiecznik w linii w pobliżu akumulatora i bezpieczniki na ampliyfikator.
- Verify all power, ground, and remote turn-on connections are secure and have proper voltage.
- Ensure the head unit is on and sending a remote signal.
- Brak dźwięku:
- Check RCA input cables for proper connection and damage.
- Sprawdź, czy przewody głośnikowe są prawidłowo podłączone i nie są zwarte.
- Dostosuj regulator GAIN.
- Check head unit settings (e.g., subwoofer output enabled, volume up).
- Zniekształcony dźwięk:
- Zmniejsz ustawienie GAIN.
- Sprawdź impedancję głośnika; upewnij się, że mieści się w ampograniczenia znamionowe lifiera.
- Adjust LPF, Subsonic, and Bass Boost settings.
- Ensure speaker wires are not shorted or damaged.
- Amplifier Goes into Protection Mode (PRT LED on):
- Check for speaker wire shorts or impedance too low.
- Zapewnij odpowiednią wentylację, aby zapobiec przegrzaniu.
- Check for proper power and ground connections.
7. Specyfikacje
| Funkcja | Specyfikacja |
|---|---|
| AmpTyp lifier | Single channel, Class D, Bass Ampżywsze |
| Moc @ 1Ω | 1 x 1050 W RMS |
| Moc @ 2Ω | 1 x 750 W RMS |
| Moc @ 4Ω | 1 x 450 W RMS |
| THD przy mocy znamionowej | <0.2% |
| Stosunek sygnału do szumu | > 100dB |
| THD + hałas | <0.1% |
| Efektywność | > 85% |
| Odpowiedź częstotliwościowa | 10 Hz do 30 000 Hz ±1 dB |
| Czułość wejściowa | 0.25V do 5V |
| Wymiary (szer. X wys. X dł.) | 160mm x 58mm x 300mm (Chassis) |
| Overall Dimensions (W x H x L) | 160mm x 58mm x 325mm |
| Waga przedmiotu | 8 funtów |
| Typ montażu | Montaż powierzchniowy |
| Specyfikacja Met | FCC |
8. Gwarancja i wsparcie
The Zapco ST-1000XM III amplifier jest dostarczany z 1-letnia gwarancja Gwarancja obowiązuje od daty zakupu i obejmuje wady materiałowe i wykonawcze wynikające z normalnego użytkowania. Niniejsza gwarancja nie obejmuje uszkodzeń spowodowanych nieprawidłową instalacją, wypadkiem, niewłaściwym użytkowaniem, nadużyciem, zaniedbaniem lub nieautoryzowaną modyfikacją.
For technical support or warranty claims, please contact your authorized Zapco dealer or visit the official Zapco website for contact information. Please have your product model number and proof of purchase ready.