
1. Wprowadzenie
This manual provides detailed instructions for the installation, operation, and maintenance of your UNITOPSCI Android Car Stereo, Model A7321A2516KTA3. Please read this manual thoroughly before use to ensure proper functionality and safety.

Figure 1.1: UNITOPSCI Android Car Stereo with accessories.
2. Zgodność i ważne uwagi
This UNITOPSCI Android Car Stereo is specifically designed for the following vehicle models:
- Subaru Legacy (2010, 2011, 2012, 2013, 2014)
- Subaru Outback (2010, 2011, 2012, 2013, 2014)
Ważna uwaga dotycząca zgodności:
- Ta jednostka jest niekompatybilny with vehicles equipped with the original Harman Kardon Sound System. If your vehicle has this system, please contact customer support for guidance on suitable wiring harnesses.
- For vehicles without an OEM sound system, the provided wire harness is typically plug-and-play.
- This unit is suitable for vehicles with a small original screen. If your vehicle has a large original screen, a different frame may be required.

Figure 2.1: Vehicle compatibility overview.
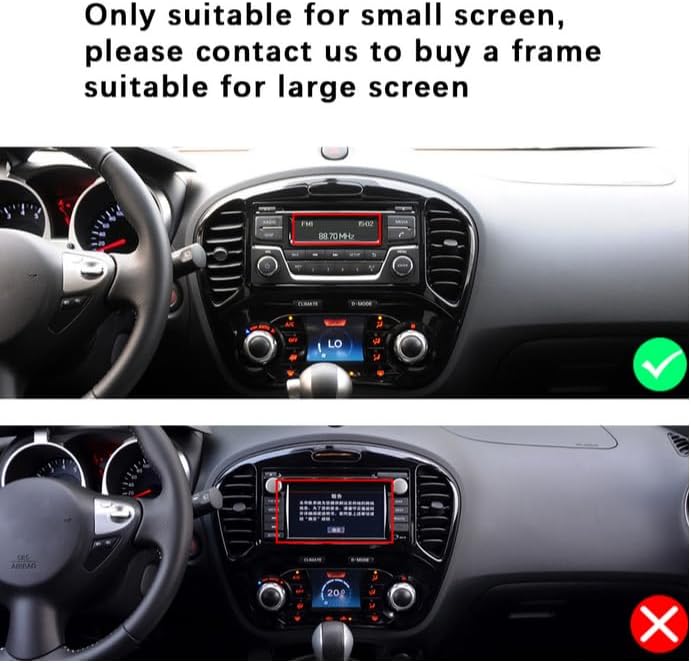
Figure 2.2: Visual guide for screen size compatibility.
3. Zawartość opakowania
Sprawdź, czy w przesyłce znajdują się wszystkie elementy wymienione poniżej:
- Android Car Stereo Unit (9-inch display)
- Tył View Camera (12 LEDs, night vision, waterproof, 170-degree angle)
- Kabel RCA
- Kabel zasilający
- Narzędzie instalacyjne
- Kabel wejściowy kamery
- Antena GPS
- Kable USB (6-pinowe i 4-pinowe)
- Instrukcja obsługi (ten dokument)

Rysunek 3.1: Zawartość opakowania i wymiary produktu.
4. Instrukcja instalacji
Zaleca się zlecenie instalacji profesjonalnemu instalatorowi. Przed rozpoczęciem instalacji należy upewnić się, że akumulator pojazdu jest odłączony.
4.1. Kontrola przed instalacją
- Verify vehicle compatibility (refer to Section 2).
- Sprawdź, czy cała zawartość opakowania jest obecna.
4.2. Removal of Original Unit
- Carefully remove the trim panels surrounding the original car stereo.
- Unscrew and detach the original stereo unit.
- Disconnect all wiring harnesses and antenna cables from the original unit.
4.3. Instalacja nowego urządzenia
- Connect the provided power cable and other necessary harnesses to the UNITOPSCI Android Car Stereo.
- Connect the GPS antenna and route it to a suitable location (e.g., dashboard, A-pillar) for optimal signal reception.
- If installing the backup camera, route its cable from the rear of the vehicle to the head unit's camera input. Refer to Section 4.4 for wiring details.
- Carefully slide the new stereo unit into the dashboard opening.
- Przymocuj urządzenie za pomocą śrub i ponownie zamontuj panele wykończeniowe.

Rysunek 4.1: Porównanie wizualne pulpitu nawigacyjnego przed i po instalacji.

Figure 4.2: Installation comparison for proper fitment.
4.4. Tył View Schemat okablowania kamery
To connect the backup camera:
- Podłącz wyjście wideo kamery do portu „CAM IN” lub „REVERSE IN” w jednostce głównej.
- Connect the camera's power wire (red) to the vehicle's reverse light positive (+12V).
- Connect the camera's ground wire (black) to a suitable chassis ground (GND).
- Connect the trigger wire (labeled 'back' or 'reverse' on the power cable) from the head unit to the reverse light positive. This signals the head unit to switch to the camera view gdy włączony jest bieg wsteczny.

Rysunek 4.3: Tył View Schemat okablowania kamery.
5. Konfiguracja początkowa
After installation, turn on your vehicle's ignition to power on the stereo. The unit will boot into the Android operating system.
- Ustawienia języka i czasu: Przejdź do „Ustawień”, aby ustawić preferowany język, strefę czasową i datę.
- Połączenie Wi-Fi: Go to 'Settings' > 'Network & Internet' > 'Wi-Fi' to connect to an available Wi-Fi network. This is necessary for online maps, app downloads, and internet browsing.
- Konfiguracja GPS: Ensure the GPS antenna is properly connected. The system should automatically detect GPS signals. You can verify this in the GPS settings.
- Nauka sterowania za pomocą kierownicy: If your vehicle supports steering wheel controls, go to 'Settings' > 'Steering Learn' to program the buttons. Follow the on-screen instructions to assign functions to each button.
6. Instrukcja obsługi
6.1. Funkcja Bluetooth
The built-in Bluetooth 4.2 module allows for hands-free calling and audio streaming.
- Łączenie w pary: On your mobile device, search for Bluetooth devices and select 'UNITOPSCI' (or similar name). Confirm the pairing code if prompted.
- Rozmowy bez użycia rąk: Once paired, you can make and receive calls directly from the stereo's touch screen. The unit supports automatic phone book download.
- Strumieniowe przesyłanie dźwięku: Play music from your paired phone through the car stereo speakers.

Rysunek 6.1: Interfejs Bluetooth do połączeń i słuchania muzyki.

Figure 6.2: Bluetooth handsfree calling in use.
6.2. Nawigacja GPS
The unit comes with built-in GPS and preloaded offline maps. Online navigation is also supported via Wi-Fi.
- Mapy offline: The stereo includes free offline maps. You can download additional maps via Wi-Fi using applications like 'Here WeGo'.
- Nawigacja online: Connect to Wi-Fi to use online navigation apps for real-time traffic updates and more detailed mapping.

Rysunek 6.3: Nawigacja GPS w działaniu.

Figure 6.4: Built-in WiFi and GPS Navigation features.
6.3. Łączność Wi-Fi
Connect the stereo to a Wi-Fi hotspot (e.g., from your phone) to access online features.
- Browse the internet, watch real-time TV shows, use social media, and download apps from the app store.
6.4 Funkcja łącza lustrzanego
Mirror Link allows you to display your smartphone's screen on the car stereo.
- Dla iPhone'a (iOS): One-way operation via Wi-Fi. The phone screen is mirrored to the stereo.
- Dla telefonów z systemem Android: Two-way operation via Wi-Fi or USB. You can control your phone from the stereo's touch screen.

Rysunek 6.5: Funkcjonalność Mirror Link.

Rysunek 6.6: Mirror Link dla urządzeń z systemem iOS i Android.
6.5. Radio FM/RDS
Access local radio stations and enjoy news, music, and weather broadcasts.
- The unit supports FM radio with 18 preset stations.
- System RDS (Radio Data System) dostarcza dodatkowych informacji, takich jak nazwa stacji i tytuł utworu, jeśli są dostępne.

Rysunek 6.7: Interfejs radia FM/RDS.
6.6. Sterowanie z kierownicy (SWC)
Control basic functions of the stereo using your vehicle's existing steering wheel buttons for convenience and safety.
- Refer to Section 5 for initial setup of SWC.
- Functions typically include volume control, track skipping, mode switching, and answering/ending calls.

Rysunek 6.8: Konfiguracja sterowania z kierownicy.
6.7. Wejście kamery cofania
The included 12LEDs rear view aparat zapewnia wyraźne view podczas cofania.
- The stereo automatically switches to display the HD reversing image when the vehicle is put into reverse gear.
- Features include night vision, a 170-degree viewing angle, and waterproof design for enhanced parking safety.

Rysunek 6.9: Kamera cofania view na ekranie stereo.

Figure 6.10: Parking Assistant features.
6.8. Ustawienia korektora dźwięku
Dostosuj wyjście audio do swoich preferencji za pomocą wbudowanego korektora.
- The digital chip allows adjustment of delay time, loudness, equalizer settings (e.g., Jazz, Pop, Rock, Classical), and balance.

Figure 6.11: EQ Sound Settings interface.
6.9. Funkcja podzielonego ekranu
The unit supports split-screen display, allowing you to run two applications simultaneously.
- Na przykładampnp. korzystaj z nawigacji po jednej stronie i odtwarzania muzyki po drugiej.

Rysunek 6.12: Funkcjonalność podzielonego ekranu.
7. Rozwiązywanie Problemów
If you encounter issues, please refer to the following common problems and solutions before contacting support.
| Problem | Możliwa przyczyna | Rozwiązanie |
|---|---|---|
| Head unit not turning on when car starts | Pink wire or KEY 1 blocking electricity. | Locate the pink wire or KEY 1 wire. Cut it off and ensure it is isolated. This wire may be designed to prevent operation while driving, but can interfere with normal power-on. |
| Brak wyjścia audio | Incorrect wiring; volume too low; mute function active; incompatible sound system. | Check all speaker wire connections. Ensure volume is up and not muted. Verify compatibility with your vehicle's sound system (especially Harman Kardon). Check EQ settings. |
| Problemy z połączeniem Bluetooth | Phone not paired; interference; unit/phone software glitch. | Ensure Bluetooth is enabled on both devices. Delete previous pairings and re-pair. Restart both the stereo and your phone. |
| Sygnał GPS jest słaby lub niedokładny | GPS antenna placement; environmental interference. | Ensure the GPS antenna is mounted in a clear, unobstructed location (e.g., dashboard, not under metal). Check antenna connection. |
| Kamera cofania nie jest wyświetlana | Nieprawidłowe okablowanie; awaria kamery. | Verify all camera wiring connections, especially the trigger wire and power supply to the reverse light. Check camera for damage. |
8. Specyfikacje

Figure 8.1: Core system specifications.
| Funkcja | Szczegół |
|---|---|
| Numer modelu | A7321A2516KTA3 |
| System operacyjny | Android |
| Procesor | Czterordzeniowy |
| BARAN | 1 GB |
| ROM | 32 GB |
| Rozmiar wyświetlacza | 9 cali |
| Rezolucja | 1024x600 |
| Moc wyjściowa | 4 x 45W |
| Wersja Bluetooth | 4.2 |
| Technologia łączności | Bezprzewodowy (Wi-Fi, Bluetooth) |
| Cechy specjalne | Backup Camera Input, Bluetooth, FM Radio, Mirror Link, Touchscreen, GPS Navigation, Steering Wheel Control |
| Tryb wyjścia audio | Stereofoniczny |
| Waga przedmiotu | 3.78 funta |
| Wymiary opakowania | 16.73 x 13.07 x 4.06 cala |

Figure 8.2: Display resolution comparison.
9. Gwarancja i wsparcie
UNITOPSCI is committed to providing high-quality products and satisfactory services.
- Gwarancja: Ten produkt jest objęty 1-letnią gwarancją.
- Zasady wymiany: Replacement available within 24 months for eligible issues.
- Zasady zwrotu: 60-day no-worry return period.
- Wsparcie techniczne: Zapewniamy dożywotnią obsługę posprzedażową i wsparcie techniczne.
- Skontaktuj się z pomocą techniczną: For any inquiries or technical assistance, please contact UNITOPSCI customer support via email at UNITOPSCI@126.com. Expect a quick response within 16 hours.

Figure 9.1: UNITOPSCI Customer Support Information.