1. Wprowadzenie
This manual provides detailed instructions for the safe and effective use of your Godox Speedlight TT685IIC Flash and Godox Flash Trigger X2T-C. Please read this manual thoroughly before use to ensure optimal performance and to prevent damage to the product or injury to yourself.
The Godox TT685IIC is a versatile speedlight designed for Canon cameras, offering advanced features such as TTL auto-flash, manual flash, multi-flash, high-speed sync (HSS), and a built-in 2.4G wireless X system. The included X2T-C trigger allows for seamless wireless control of compatible Godox flashes.
2. Co znajduje się w pudełku
- 1x Godox TT685II-C Camera Flash
- 1x Godox X2T-C Wireless Trigger
- 1x Instrukcja obsługi
- 1x Mini stojak
- 1x etui ochronne

Image: Contents of the Godox Speedlight TT685IIC and X2T-C package, including the flash unit, wireless trigger, mini stand, and protection case.
3. Koniec produktuview
3.1. Główne cechy
- Optimized for Canon Cameras: Designed for seamless integration with Canon's hot shoe system.
- Enhanced Flash Head Flexibility: Flash head tilts from -7° to 120° and rotates 0° to 330° for versatile lighting angles.
- Seamless TCM Conversion Mode: Allows instant conversion from TTL to manual mode while retaining exposure values.
- Quick-Release Hot Shoe Lock: Ensures fast and secure mounting to your camera.
- Support for External Power Packs: Compatible with Godox PB960 power pack (sold separately) for reduced recycling times and extended battery life.
- Versatile Flash Modes and High-Speed Sync: Supports TTL, Manual, Multi-flash modes, and High-Speed Sync up to 1/8000s.
- Built-in 2.4G Wireless X System: Provides stable wireless signal transmission up to 100 meters for multi-flash setups.
3.2. Flash Head Flexibility
The TT685IIC features an adjustable flash head that can tilt from -7° to 120° vertically and rotate 0° to 330° horizontally. This broad range of movement allows for precise control over light direction, enabling bounce flash and other creative lighting techniques.

Image: The Godox TT685IIC flash head shown in various tilted and rotated positions, highlighting its flexibility for directing light.
4. Konfiguracja
4.1. Instalacja baterii
- Uncover the battery compartment on the side of the flash unit.
- Włóż cztery baterie AA, zwracając uwagę na prawidłową biegunowość.
- Close the battery compartment by pushing it upwards until it clicks securely.
4.2. Montaż na kamerze
- Slide the TT685IIC flash onto your camera's hot shoe.
- Rotate the quick-release lock clockwise to secure the flash firmly to the hot shoe.

Obraz: Zbliżenie view of the quick-release hot shoe lock on the Godox TT685IIC, designed for fast and secure attachment to a camera.
4.3. Connecting External Power Pack (PB960)
For faster recycling times and extended shooting sessions, the TT685IIC can be connected to an external power pack like the Godox PB960 (sold separately). Ensure batteries are installed in the flash even when using an external power pack.
- Uncover the socket on the PB960 power pack.
- Plug the ProPac cable from the PB960 into the power port on the TT685IIC.
- Screw the knob on the PB960 cable to fix the connection securely.
4.4. Porty i połączenia
- Gniazdo kabla synchronizacyjnego 3.5 mm: For wired synchronization with cameras or other flash units.
- Port USB typu C: Do aktualizacji oprogramowania sprzętowego.
Video: Godox TT685II Operation Tutorial. This video demonstrates battery installation, mounting the flash on a camera, connecting an external power pack, and an overview of the flash's ports and physical features. (Relevant sections: 0:39-1:21)
5. Tryby pracy
5.1. Wprowadzenie do panelu sterowania
The TT685IIC features an intuitive control panel with an LCD display and various buttons and dials for easy operation. Familiarize yourself with the layout:
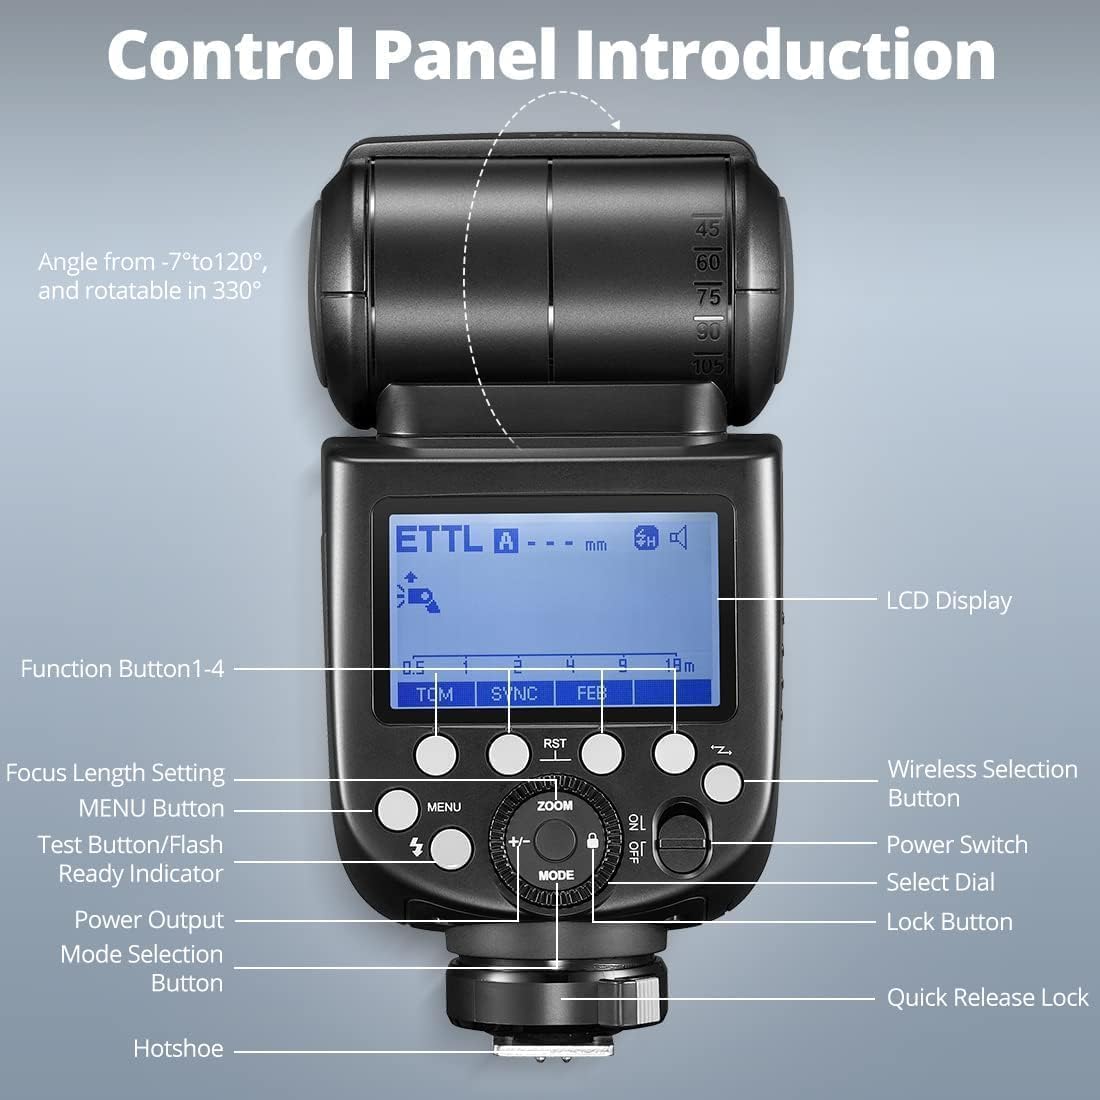
Image: Detailed diagram of the Godox TT685IIC control panel, labeling the LCD display, function buttons, menu button, test button/flash ready indicator, power output, mode selection button, focus length setting, wireless selection button, power switch, select dial, and lock button.
Video: Godox TT685II Operation Tutorial. This segment provides a detailed introduction to the control panel, including button functions and display elements. (Relevant sections: 2:38-2:51)
5.2. Włączanie/wyłączanie i wybór trybu
- Push the power switch to turn the unit on or off.
- Naciśnij krótko TRYB button to cycle through ETTL, Manual (M), and Multi-flash modes.
5.3. Wireless X System Operation (2.4G)
The TT685IIC and X2T-C utilize the Godox 2.4G Wireless X System for remote flash control. The TT685IIC can function as both a transmitter (TX) and a receiver (RX) unit, while the X2T-C acts as a dedicated transmitter.

Image: Illustration of the Godox 2.4G Wireless X System, showing a flash unit and a trigger communicating wirelessly.
5.3.1. Setting up as a Transmitter Unit (TX)
- Short press the Wireless Selection Button on the TT685IIC until 'TX' is displayed.
- Set the channel (CH) and ID on the TT685IIC to match your receiver flashes (e.g., CH 28, ID 23).
- Select the desired group (e.g., 'A') and mode (M or TTL) for the receiver flashes.
- Adjust the flash output or FEC amount for each group as needed.
- To use the TT685IIC as a trigger without flashing itself, select '--' mode for its own output.
5.3.2. Setting up as a Receiver Unit (RX)
- Short press the Wireless Selection Button on the TT685IIC until 'RX' is displayed.
- Set the channel (CH) and ID on the TT685IIC to match your transmitter (e.g., X2T-C).
- Set the group (e.g., 'E') on the TT685IIC to match the group assigned by the transmitter.
- Adjust the FEC amount or flash output as controlled by the transmitter.
Video: Godox TT685II Operation Tutorial. This segment demonstrates configuring the TT685IIC as both a transmitter (TX) and receiver (RX) unit within the 2.4G wireless system, including setting channels, IDs, and groups. (Relevant sections: 1:22-2:34)
5.4. TTL Auto-Flash Mode
In TTL mode, the flash automatically adjusts its output to achieve correct exposure. You can fine-tune the exposure using Flash Exposure Compensation (FEC).
- Select ETTL mode using the TRYB przycisk.
- Press the '+/-' button and turn the dial to set the FEC amount (e.g., +1.3).
5.5. Manual Flash Mode (M)
Manual mode allows you to set the flash output power manually from 1/1 (full power) to 1/128 in 0.1-stop increments.
- Select M mode using the TRYB przycisk.
- Press the '+/-' button and turn the dial to set the desired flash output.
5.6. Multi-Flash Mode (Stroboscopic Flash)
Multi-flash mode fires a series of rapid flashes within a single exposure, useful for capturing multiple stages of movement in one image.
- Select MULTI mode using the TRYB przycisk.
- Press the '+/-' button and turn the dial to set the flash output.
- Press the 'Times' button and turn the dial to set the number of flashes.
- Press the 'Hz' button and turn the dial to set the flash frequency (flashes per second).
5.7. High-Speed Sync (HSS) and Rear-Curtain Sync
The TT685IIC supports High-Speed Sync (HSS) up to 1/8000s, allowing you to use flash with fast shutter speeds. Rear-curtain sync fires the flash just before the second curtain closes, creating a light trail behind moving subjects.
- Naciśnij krótko SYNCHRONIZACJA button to cycle through High-Speed Sync and Rear-Curtain Sync options.
5.8. Funkcja TCM (TTL przekonwertowane na ręczne)
The TCM function allows for instant conversion of a TTL exposure value into a manual flash output. This is useful for locking in a desired exposure and then fine-tuning it manually.
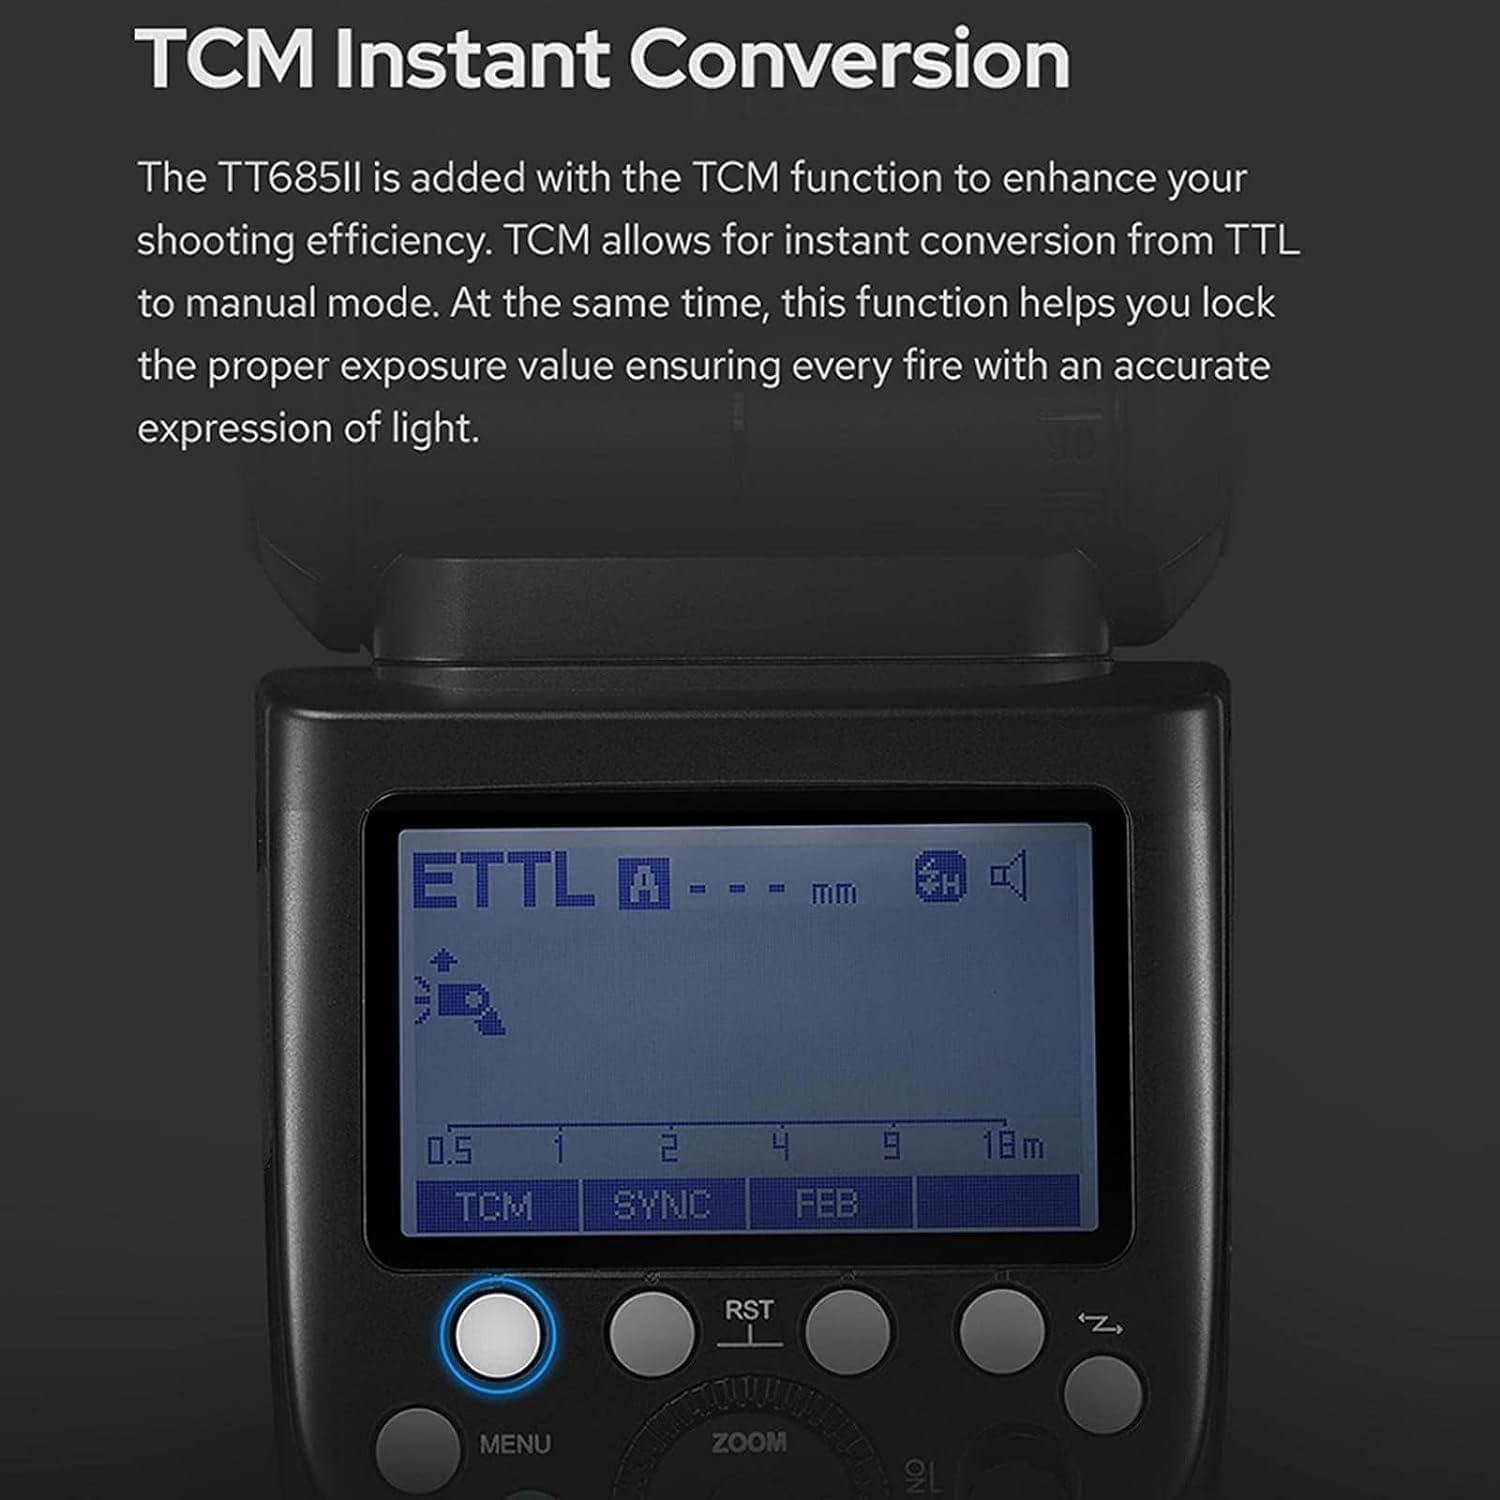
Image: The LCD screen of the Godox TT685IIC displaying the TCM function, indicating the conversion from TTL to manual mode.
- Take a shot in ETTL mode to determine the correct exposure.
- Naciśnij krótko TCM button. The flash output will convert to a manual value based on the TTL reading.
- You can then adjust the manual output as desired.
Video: Godox TT685II Operation Tutorial. This segment demonstrates the TCM function, showing how to convert a TTL exposure to a manual setting and adjust it. (Relevant sections: 0:22-0:25, 4:44-5:03)
5.9. FEB Function (Flash Exposure Bracketing)
FEB automatically takes three shots with varying flash exposures (correct, underexposed, and overexposed), allowing you to choose the best result.

Image: A photographer using the Godox TT685IIC flash on a camera, with text indicating the FEB function for capturing multiple exposures.
- Naciśnij krótko LUTY przycisk.
- Turn the dial to set the FEB amount (e.g., +/-1.3 stops).
- Naciśnij USTAWIĆ przycisk aby potwierdzić.
- Take three shots; the flash will automatically adjust output for each.
Video: Godox TT685II Operation Tutorial. This segment demonstrates the FEB function, showing how to set the bracketing amount and the resulting exposure variations. (Relevant sections: 0:20-0:22, 5:04-5:17)
5.10. Zoom Function (Focal Length)
The ZOOM button allows you to adjust the flash coverage to match the focal length of your lens, optimizing light distribution.
- Naciśnij krótko BRZĘCZENIE przycisk.
- Turn the dial to set the desired focal length.
- Naciśnij krótko USTAWIĆ przycisk aby potwierdzić.
5.11. Przycisk blokady
The lock button prevents accidental changes to your settings.
- Naciśnij krótko Zamek button to lock or unlock the control panel.
6. Main Menu Navigation (Custom Functions - C.Fn)
The TT685IIC offers various custom functions (C.Fn) that can be accessed and adjusted through the main menu. These functions allow for personalized settings to suit your shooting style.
- Naciśnij krótko MENU przycisk, aby wejść do głównego menu.
- Turn the dial to navigate through the menu options.
- Naciśnij krótko USTAWIĆ przycisk umożliwiający wybór opcji lub potwierdzenie ustawienia.
6.1. Common C.Fn Settings
- m/ft: Selects distance display unit (meters or feet).
- AF: Turns the AF assist beam ON or OFF.
- STBY: Sets the auto-standby time for the flash.
- RX STBY: Sets the auto-standby time for the flash when in receiver mode.
- SKANDOWAĆ: Scans for available wireless channels.
- CH: Sets the wireless channel (1-32).
- ID: Sets the wireless ID (OFF/01-99).
- BRZĘCZYK: Turns the beep sound ON or OFF.
- ŚWIATŁO: Sets the duration for the LCD backlight.
- LCD: Adjusts the LCD contrast.
- ACL LUTY: Turns FEB auto-cancel ON or OFF.
- Teksas: Turns the flash function of the transmitter unit ON or OFF (when TT685IIC is used as a transmitter).
Video: Godox TT685II Operation Tutorial. This segment guides you through the main menu navigation and adjustment of various custom functions (C.Fn) on the flash unit. (Relevant sections: 5:18-6:34)
7. Specyfikacje
| Funkcja | Specyfikacja |
|---|---|
| Marka | GODOX |
| Numer modelu | TT685 |
| Wymiary opakowania | 9.44 x 6.22 x 5.11 cala |
| Waga przedmiotu | 1.87 funta |
| Kompatybilne mocowania | Canon Hotshoe |
| Typ lampy błyskowej aparatu | Gorący but |
| Prędkość synchronizacji błysku | 1/200 or 1/250 (up to 1/8000s with HSS) |
| Zawarte komponenty | Godox TT685II-C Camera Flash, Godox X2T-C Wireless Trigger, Instruction Manual, Mini Stand, Protection Case |
8. Rozwiązywanie Problemów
- Lampa błyskowa nie działa: Ensure batteries are correctly installed and charged. Check that the flash is securely mounted on the camera hot shoe or that wireless connection settings (channel, ID, group) are correctly matched between the transmitter and receiver. Verify the camera's flash settings.
- Niespójna ekspozycja: Check camera and flash exposure compensation settings. In wireless mode, ensure the transmitter and receiver are within range and free from interference. Consider using TCM mode to convert TTL readings to manual for consistent output.
- Flash not syncing with high shutter speeds: Ensure High-Speed Sync (HSS) mode is activated on both the flash and the camera (if applicable).
- Problemy z połączeniem bezprzewodowym: Verify that the channel and ID settings on both the flash and trigger are identical. Ensure both units are set to the correct TX/RX mode. Try scanning for clear channels in the C.Fn menu.
- Flash head not rotating/tilting smoothly: Check for any obstructions. If the movement is stiff, ensure no debris is present in the mechanism. Do not force movement.
9. Konserwacja
- Czyszczenie: Do czyszczenia lampy błyskowej użyj miękkiej, suchej ściereczki. W przypadku uporczywych zabrudzeń, delikatnie przetrzyjamp cloth can be used, followed by a dry cloth. Avoid using solvents or abrasive cleaners.
- Składowanie: When not in use for extended periods, remove batteries to prevent leakage. Store the flash in its protective case in a cool, dry place away from direct sunlight and extreme temperatures.
- Obsługiwanie: Avoid dropping the unit or subjecting it to strong impacts. Do not expose the flash to water or high humidity.
- Aktualizacje oprogramowania układowego: Okresowo sprawdzaj oficjalne informacje o Godox website for firmware updates. Updates can improve performance, add new features, or fix bugs. Use the Type-C USB port for updates as instructed by Godox.
10. Gwarancja i wsparcie
Your Godox Speedlight TT685IIC Flash and X2T-C Trigger are covered by a manufacturer's warranty. Please refer to the warranty card included in your product packaging for specific terms and conditions, including the warranty period and coverage details.
W celu uzyskania pomocy technicznej, serwisu lub zgłoszenia roszczeń gwarancyjnych skontaktuj się z autoryzowanym dealerem Godox lub odwiedź oficjalną stronę internetową Godox website for customer service information. Keep your proof of purchase for warranty validation.
Ważny: Nieautoryzowane naprawy lub modyfikacje mogą spowodować unieważnienie gwarancji.


