
Wstęp
Dziękujemy za zakupasing the mooas Wooden Frame LED Silent Wall Clock. This manual provides detailed instructions for setting up, operating, and maintaining your new clock. Please read this manual thoroughly before use to ensure proper functionality and to maximize your product experience.
Informacje dotyczące bezpieczeństwa
- Ensure the clock is powered by the provided adapter only.
- Nie wystawiaj urządzenia na działanie wody ani nadmiernej wilgoci.
- Unikaj umieszczania zegara w bezpośrednim świetle słonecznym lub w pobliżu źródeł ciepła.
- Przechowywać w miejscu niedostępnym dla dzieci.
- Nie próbuj samodzielnie demontować ani naprawiać urządzenia. Skontaktuj się z obsługą klienta, aby uzyskać pomoc.
Zawartość opakowania
Sprawdź, czy w przesyłce znajdują się wszystkie elementy:
- mooas Wooden Frame LED Silent Wall Clock
- Zdalne sterowanie
- Kabel zasilający USB-C
- US (110V) Power Adapter
- Wooden Desk Stand
- Wall Mounting Accessories (Wall mount pin, Art wall hook, Cable clip, Screw anchor, Wall mount screw)
- Instrukcja obsługi

Rysunek 1: Zawartość opakowaniaview
Organizować coś
1. Podłączenie zasilania
Connect the provided USB-C power cable to the clock and plug the US (110V) power adapter into a wall outlet. The clock requires continuous power via the adapter to function. The built-in CR2032 battery is for time memory only and does not power the clock.

Figure 2: Updated US Power Adapter
2. Remote Control Activation
Before first use, remove the protective film from the back of the remote control. If the remote control does not respond, separate both the battery and cable from the clock and remote control, then reconnect them. This will reset the time, which you will need to set again.
3. Opcje montażu
The clock offers two display options: wall mounting or desk standing.
- Montaż na ścianie: Use the hanging hole on the back of the clock and the provided wall mounting accessories (wall mount pin, art wall hook, screw anchor, wall mount screw) to securely hang the clock on a wall.
- Desk Standing: Insert the clock into the included wooden desk stand for stable placement on any flat surface.

Figure 3: Wall Mounting and Desk Standing Options
4. Zarządzanie kablami
The clock features a thin cable (0.043 inch) designed for neat installation, making it less visible when the clock is set up.

Figure 4: Thin Cable for Discreet Installation
Instrukcja obsługi
1. Basic Display
The LED display shows the time, date, and day of the week. The day of the week can be set in 8 languages: English, German, Italian, French, Dutch, Spanish, Danish, and Russian.

Figure 5: Display Elements
2. Tryby pracy
The clock features three operating modes:
- Tryb zegara: Wyświetla czas, datę i dzień.
- Tryb nocny: Activates the backlight nightlight only.
- Nightlight & Clock Mode: Displays time, date, day with the backlight nightlight active.

Rysunek 6: Trzy tryby pracy
3. Nightlight Features
The backlight nightlight offers three color options to suit your preference:
- Yellow (Warm White): 2700 tys.
- White (Daylight): 4000 tys.
- Blue (Cool White): 5500 tys.
You can also set a nightlight timer for automatic shut-off, with a maximum setting of 120 minutes and a default of 30 minutes.

Figure 7: Nightlight Color Options
4. Regulacja jasności
The LED display and mood light brightness can be adjusted to 5 levels. The clock also features an automatic brightness adjustment function controlled by an illuminance sensor. To activate auto-brightness, long-press the display brightness button on the remote; the display will blink twice to confirm activation.
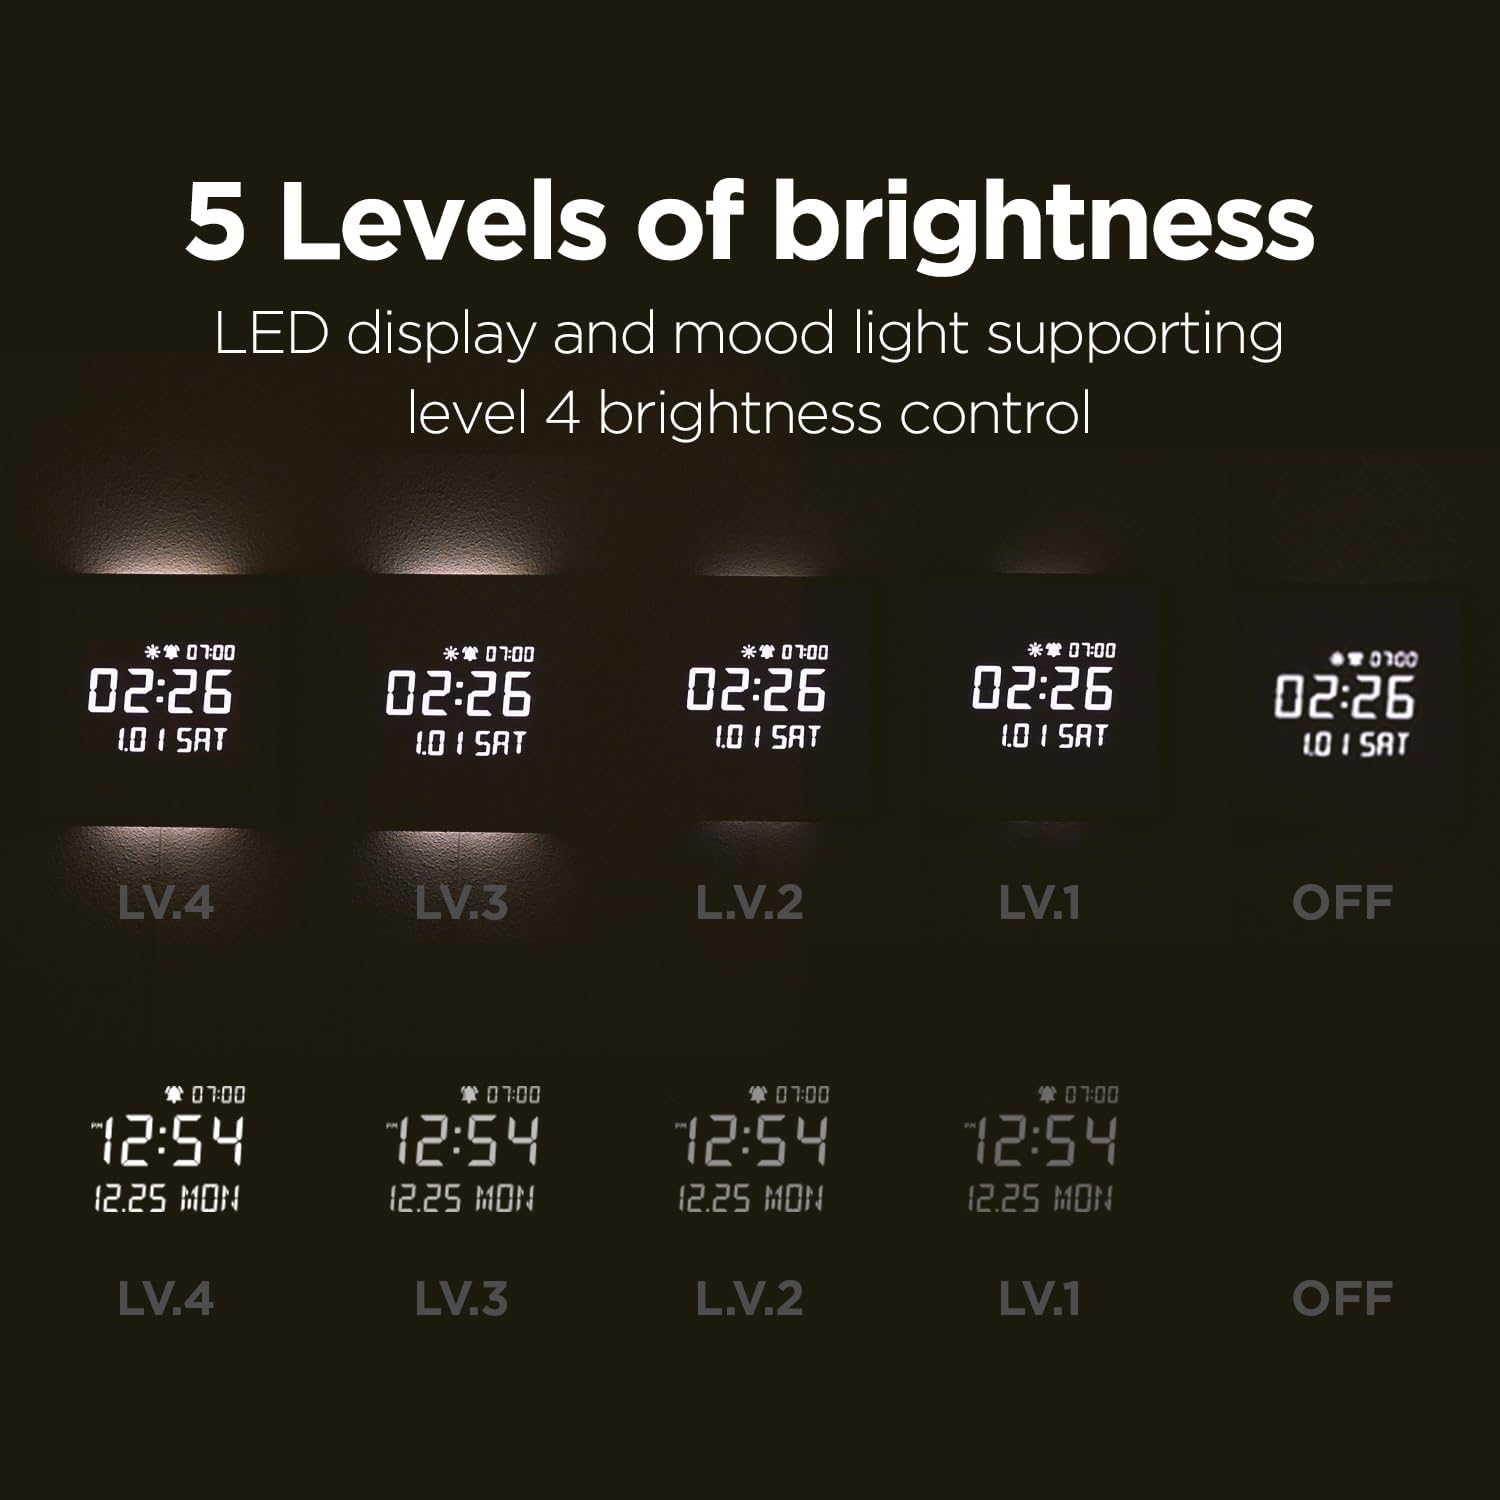
Figure 8: 5 Levels of Brightness

Figure 9: Auto Brightness Control
5. Funkcje alarmu
- Alarm wschodu słońca: Set a 10, 20, or 30-minute sunrise mode where the backlight gradually brightens before the alarm time, providing a gentle wake-up experience.
- Weekday Alarm: Configure alarms to activate only on weekdays, allowing for uninterrupted rest on weekends.
- Melodie: Choose from 5 available melodies, including bird sounds, rain sounds, and a standard beep.
- Alarm Volume Control: Adjust the alarm volume to High (03), Mid (02), Low (01), or Off. The sequence for adjustment is High (03) → Off → Low (01) → Mid (02).

Figure 10: Melody Alarm Feature

Figure 11: Alarm Volume Control
6. Zdalne sterowanieview
The remote control provides easy access to all clock functions. Refer to the diagram below for button functions:
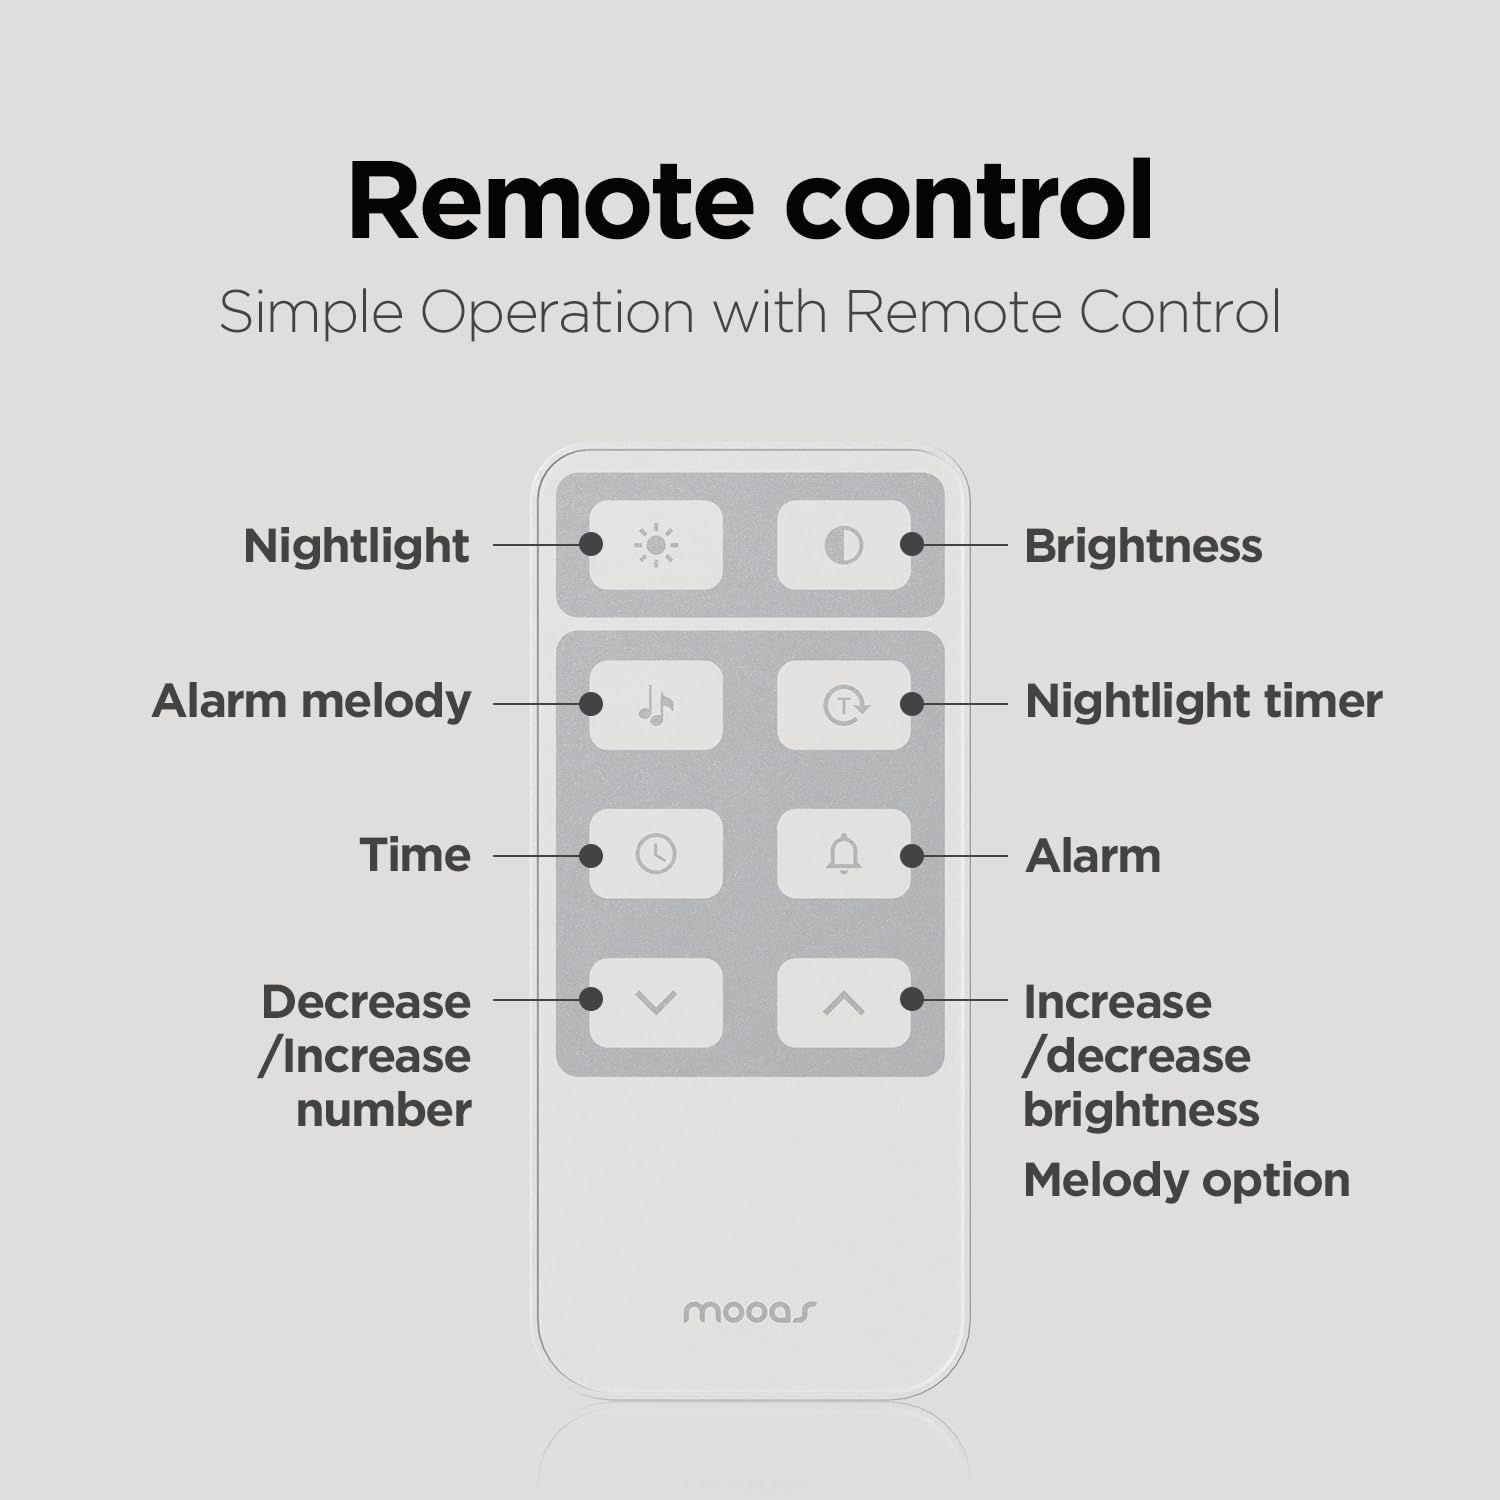
Rysunek 12: Funkcje pilota zdalnego sterowania
7. Wyświetlacz temperatury (stopnie Celsjusza/Fahrenheita)
To switch between Celsius (C) and Fahrenheit (F) temperature display, short press the UP przycisk na pilocie.
Konserwacja
To maintain your mooas clock, gently wipe the surface with a soft, dry cloth. Avoid using abrasive cleaners or solvents, as these may damage the wooden frame or LED display. Ensure the clock is unplugged before cleaning.
Rozwiązywanie problemów
- Zegar się nie włącza: Upewnij się, że zasilacz jest prawidłowo podłączony do zegara i do sprawnego gniazdka elektrycznego.
- Pilot nie odpowiada: Remove the protective film from the remote. If issues persist, disconnect and reconnect the battery and cable from both the clock and remote to reset.
- Display too bright: Adjust the brightness manually using the remote control or activate the auto-brightness function.
- Nieprawidłowa godzina/data: Reset the time and date using the remote control. The internal CR2032 battery helps retain settings during brief power outagt.j.
Specyfikacje
| Funkcja | Specyfikacja |
|---|---|
| Marka | mouas |
| Numer modelu | MC-L8 |
| Wymiary produktu | 11.4" szer. x 11.4" wys. |
| Typ materiału | Drewno |
| Typ wyświetlacza | Cyfrowa dioda LED |
| Źródło zasilania | Przewodowy (adapter 5 V 2 A) |
| Cechy specjalne | Alarm, Backlit Nightlight, Remote Control, Auto Brightness Adjustment, Sunrise Alarm, Nightlight Timer |
| Typ montażu | Uchwyt ścienny, stojak na biurko |
Produkt ponadview Wideo
Obejrzyj ten oficjalny film, aby zobaczyć wizualny podglądview of the mooas Wooden Frame LED Silent Wall Clock's features and design.
Video 1: mooas Wooden Frame LED Clock Overview
Gwarancja i wsparcie
For warranty information or technical support, please refer to the product packaging or contact mooas customer service directly. Keep your purchase receipt for warranty claims.