Wstęp
This manual provides essential information for the proper handling, installation, and general understanding of the Xprjnter 360 Print Head XP360B. This product is a replacement part designed for compatibility with various Xprjnter 360 series printers, including models XP-350B, XP-350BM, XP-358B, and XP-370B. Please read this manual thoroughly before attempting any installation or operation.
Konfiguracja i instalacja
1. Pre-Installation Inspection
Before proceeding with installation, carefully inspect the received print head for any visible damage. While products undergo inspection before shipping, it is crucial to verify the item's condition upon arrival. This print head is a replacement part and may be compatible new or original refurbished, sent at random.
2. Weryfikacja zgodności
It is imperative to compare the appearance and part number of this replacement print head with your original print head before installation. Ensure that the item is compatible with your specific printer model to guarantee proper function. This product is a replacement part and not a genuine OEM part.

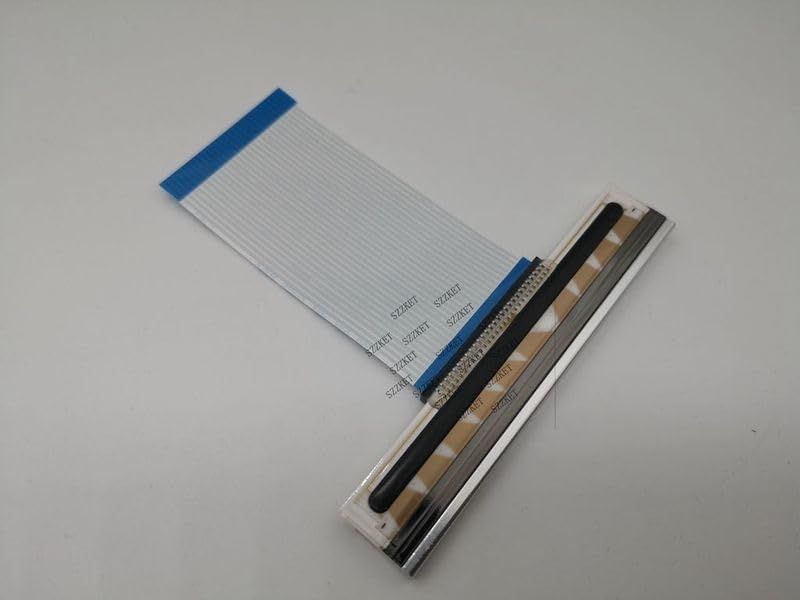
Rysunek 1: Góra view of the XP360B Printhead with its flexible ribbon cable connector. This image shows the main body of the printhead, which is metallic, and the attached white ribbon cable with multiple conductive traces.
Rysunek 2: Kątowy view of the XP360B Printhead, highlighting the print nozzle area and the connection point for the ribbon cable. The printhead's metallic casing and the flat, flexible cable are clearly visible.
3. Kroki instalacji (wskazówki ogólne)
- Wyłączone: Ensure your printer is completely powered off and unplugged from the power source before beginning any installation.
- Dostęp do głowicy drukującej: Refer to your printer's specific user manual for instructions on how to access the print head compartment.
- Wyjmij starą głowicę drukującą: Carefully disconnect any cables or locking mechanisms securing the old print head and remove it. Note its orientation.
- Zainstaluj nową głowicę drukującą: Gently insert the new XP360B print head into the designated slot, ensuring it is seated correctly. Reconnect any cables or secure any locking mechanisms.
- Zamknij przedział: Close the print head compartment and any printer covers securely.
- Włączanie: Plug in and power on your printer. The printer may perform an initialization cycle.
Note: For detailed, model-specific installation instructions, always consult the original user manual provided with your Xprjnter 360 series printer.
Zasady działania
The XP360B Printhead functions as a critical component within your Xprjnter 360 series printer, responsible for transferring ink onto the printing medium. Once correctly installed, its operation is integrated with the printer's internal systems. There are no direct user controls for the print head itself; its function is managed by the printer's firmware and software during printing tasks.
Ensure that appropriate printer drivers are installed on your computer for optimal performance. The print head will activate automatically when print jobs are sent to the printer.
Konserwacja
To ensure the longevity and optimal performance of your XP360B Printhead, consider the following general maintenance guidelines:
- Środowisko drukarki: Operate your printer in a clean, dust-free environment to prevent debris from accumulating on the print head.
- Prawidłowe przechowywanie: If the print head is not immediately installed or if the printer will be stored for an extended period, keep the print head in its original protective packaging to prevent damage and exposure to dust.
- Unikać kontaktu: Do not touch the print head nozzles or electrical contacts with bare hands, as oils and dirt can affect performance.
- Printer Cleaning Cycles: Utilize your printer's built-in cleaning cycles as recommended by the printer manufacturer to maintain print head health.
Rozwiązywanie problemów
If you encounter issues after installing the XP360B Printhead, consider the following common troubleshooting steps:
- Print Quality Issues (Streaks, Missing Lines):
- Ensure the print head is securely seated and all ribbon cables are properly connected.
- Run the printer's head cleaning utility multiple times.
- Verify that the correct ink cartridges are installed and have sufficient ink.
- Printer Not Recognizing Print Head:
- Power off the printer, unplug it, wait a few minutes, then plug it back in and power on.
- Re-seat the print head, ensuring all connections are firm.
- Check for any error codes on the printer's display and consult your printer's manual for their meaning.
- Rozbieżności kolorystyczne:
Note that due to variations in display settings and lighting conditions during photography, the actual color of the item may appear slightly different from the images. This is generally not an indication of a defect.
- Measurement Variations:
A small measurement error is allowed in product dimensions. This typically does not affect functionality.
If issues persist after attempting these steps, please refer to your printer's comprehensive troubleshooting guide or contact the seller for further assistance.
Specyfikacje
| Funkcja | Szczegół |
|---|---|
| Typ produktu | Replacement Printer Part (not Genuine) |
| Zgodność modelu | Xprjnter 360 series (XP-350B, XP-350BM, XP-358B, XP360B, XP-370B) |
| Tomtage Kompatybilność | 110V, 220V |
| Tworzywo | High quality, durable |
| Orzecznictwo | None / Other |
| Condition Note | Compatible New or Original Refurbished (sent by random) |
| Producent | Ogólny |
| ASIN | B0CP72GMLP |
| Pierwsza dostępna data | 30 listopada 2023 r. |
Gwarancja i wsparcie
As this product is a replacement part from a generic manufacturer, specific warranty terms may vary. Please refer to the purchase agreement or contact the seller directly for information regarding return policies, replacements, or any applicable warranty coverage.
For technical support related to the integration of this print head with your specific printer model, it is recommended to consult the original printer manufacturer's support resources or contact the seller for assistance.


