
1. Wprowadzenie
This manual provides comprehensive instructions for the operation and maintenance of your OBSBOT Tail Series Smart Remote Controller. This device is designed to enhance your control over compatible OBSBOT Tail series cameras, including Tail 2 and Tail Air, offering precise Pan-Tilt-Zoom (PTZ) functionality and other advanced features.
2. Koniec produktuview
The OBSBOT Tail Series Smart Remote Controller features an intuitive layout for seamless interaction with your camera. Below is a visual guide to its components and controls.

Rycina 2.1: Przód view of the OBSBOT Tail Series Smart Remote Controller.
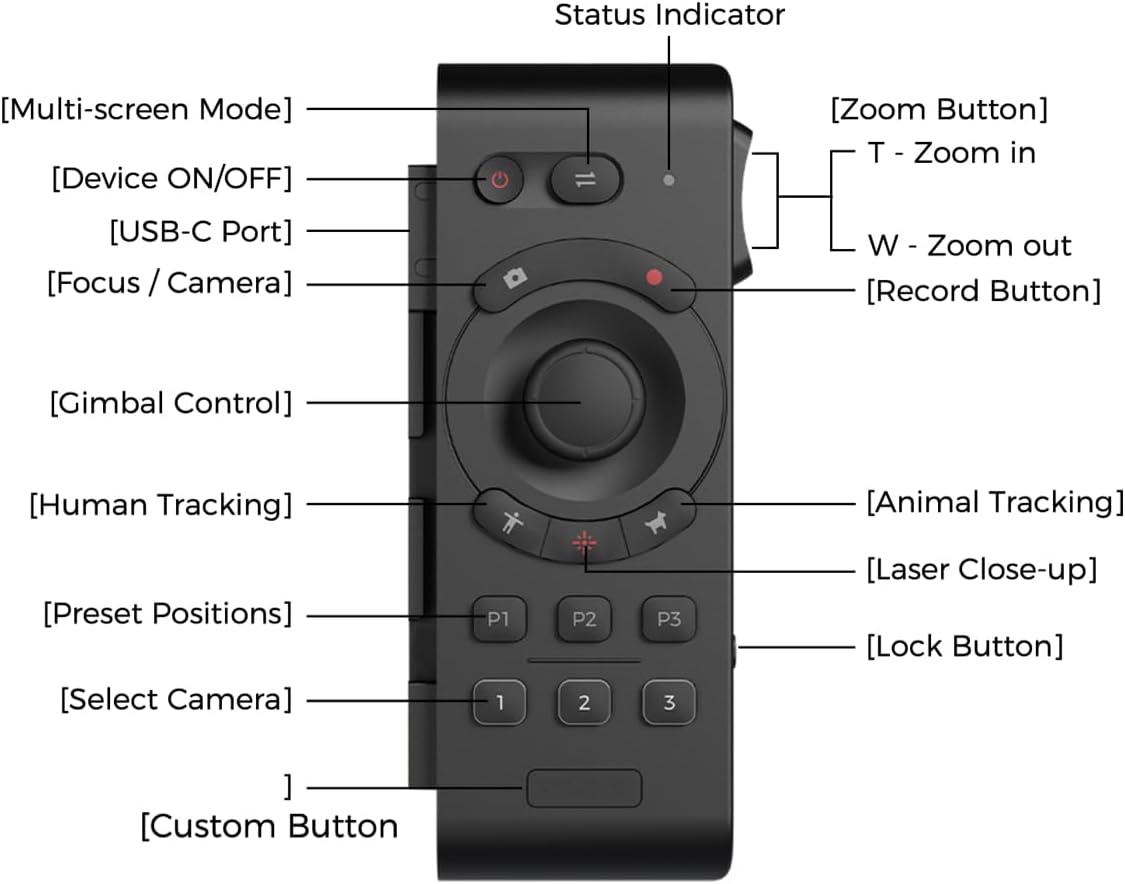
Figure 2.2: Labeled diagram of the remote controller's buttons and features.
- Device ON/OFF Button: Powers the remote controller on or off.
- Multi-screen Mode Button: Przełącza między różnymi trybami wyświetlania.
- Wskaźnik statusu: Displays the current status of the remote controller.
- Focus / Camera Button: Controls camera focus or switches camera modes.
- Przycisk nagrywania: Rozpoczyna lub zatrzymuje nagrywanie wideo.
- Gimbal Control Joystick: Provides precise control over the camera's pan, tilt, and zoom.
- Human Tracking Button: Activates human subject tracking.
- Animal Tracking Button: Activates animal subject tracking.
- Laser Close-up Button: Double-press to activate the laser pointer for quick close-up tracking.
- Preset Positions (P1, P2, P3): Stores and recalls up to three custom camera positions.
- Select Camera (1, 2, 3): Switches control between up to three paired OBSBOT Tail series devices.
- Przycisk niestandardowy: A programmable button for user-defined functions.
- Zoom Button (T/W): Rocker switch for zooming in (T) or out (W).
- Przycisk blokady: Zapobiega przypadkowemu naciśnięciu przycisków.
- Port USB-C: For charging the remote controller.
3. Konfiguracja i parowanie
3.1 Ładowanie pilota zdalnego sterowania
Before initial use, ensure the remote controller is fully charged. Connect the supplied USB-A to USB-C cable to the USB-C port on the side of the remote controller and to a compatible USB power source.

Figure 3.1: USB-C charging port location on the remote controller.
3.2 Pairing with OBSBOT Tail Series Camera
The remote controller can be wirelessly connected to up to three OBSBOT Tail series devices via Bluetooth. Follow these steps to pair your remote controller with your camera:
- Ensure your OBSBOT Tail series camera (e.g., Tail 2/Air) is powered on.
- On the camera, quickly press the power button three times. The camera's indicator light will begin to flash blue, indicating it is in pairing mode.
- On the remote controller, press and hold the Human Tracking button (person icon) and the '1' button simultaneously. The remote's indicator light will also flash blue.
- Once successfully paired, both the camera and remote controller indicator lights will turn green.
- To pair additional cameras (up to three), repeat steps 2 and 3, using the '2' or '3' button on the remote controller for each subsequent camera.
Video 3.2: Official demonstration of OBSBOT Tail Air Remote Controller features, including pairing and control. This video is provided by the seller.
Note: If the remote is unresponsive, check the lock switch on the side. Slide it to the unlocked position to enable control.

Figure 3.3: Remote controller lock switch in locked (red) and unlocked positions.
4. Instrukcja obsługi
4.1 Sterowanie PTZ
The remote offers two methods for PTZ control:
- Sterowanie joystickiem: Use the central joystick to pan, tilt, and zoom the camera.
- Wrist Movements (Motion Control): With the built-in gyroscope, you can control the camera's gimbal by moving your wrist while holding down the joystick.

Figure 4.1: Demonstrating joystick control for camera movement.
4.2 Tracking Functions
- Śledzenie ludzi: Press the button with the 'person' icon to activate human subject tracking.
- Śledzenie zwierząt: Press the button with the 'paw print' icon to activate animal subject tracking.
- Laser Close-up: Double-press the Laser Close-up button. The camera will instantly follow and zoom in on the area pointed by the remote's laser.
4.3 Pozycje predefiniowane
The remote allows you to save and recall up to three camera positions:
- Zapisywanie ustawienia wstępnego: Position the camera as desired, then press and hold one of the P1, P2, or P3 buttons until the indicator confirms the position is saved.
- Przywoływanie ustawienia wstępnego: Briefly press the desired P1, P2, or P3 button to move the camera to the saved position.
4.4 Przycisków niestandardowych
The Custom Button can be configured via the OBSBOT app to perform a specific function tailored to your needs.

Figure 4.2: Location of the customizable button.
5. Konserwacja
- Czyszczenie: Use a soft, dry cloth to clean the remote controller. Avoid using harsh chemicals or abrasive materials.
- Składowanie: Przechowuj pilota w chłodnym, suchym miejscu, z dala od bezpośredniego światła słonecznego i ekstremalnych temperatur.
- Pielęgnacja baterii: To prolong battery life, avoid fully discharging the remote frequently. Charge it regularly, even if not in constant use.
6. Rozwiązywanie Problemów
| Wydanie | Możliwa przyczyna | Rozwiązanie |
|---|---|---|
| Pilot nie odpowiada. | Pilot jest zablokowany. | Check the lock switch on the side of the remote and slide it to the unlocked position. |
| Unable to pair with camera. | Camera or remote not in pairing mode; out of range. | Ensure both devices are powered on and in pairing mode (camera indicator flashing blue, remote indicator flashing blue). Bring devices closer together. |
| PTZ control is erratic or unresponsive. | Low battery; interference; remote not properly paired. | Charge the remote. Re-pair the remote with the camera. Ensure no strong wireless interference. |
7. Specyfikacje
| Funkcja | Szczegół |
|---|---|
| Wymiary produktu | 7.9 x 4.8 x 6.3 cala |
| Waga przedmiotu | 7.4 uncji |
| Numer modelu przedmiotu | OBSBOT_TAIL SERIES_REMOTE |
| Marka | OBOBOT |
| Funkcja specjalna | Możliwość ładowania |
| Kolor | Czarny |
| Maksymalna liczba obsługiwanych urządzeń | 3 |
| Kompatybilne urządzenia | Tail Series (Tail 2/ Tail Air) |
8. Gwarancja i wsparcie
For warranty information and technical support, please refer to the official OBSBOT webOdwiedź stronę internetową lub skontaktuj się bezpośrednio z działem obsługi klienta. Zachowaj paragon zakupu na wypadek reklamacji.