1. Wprowadzenie
This manual provides essential information for the safe operation, maintenance, and troubleshooting of your VITO 1800W 2-in-1 Combined Circular Saw and Miter Saw, model VISCC18250. This versatile tool is designed for precise cutting of wood and aluminum materials, offering both miter saw and table saw functionalities. Please read this manual thoroughly before operating the machine to ensure safe and efficient use.

Rysunek 1: Koniecview of the VITO 2-in-1 Combined Circular Saw and Miter Saw.
2. Instrukcje bezpieczeństwa
Zawsze przestrzegaj podstawowych zasad bezpieczeństwa, aby zmniejszyć ryzyko pożaru, porażenia prądem i obrażeń ciała. Zachowaj tę instrukcję do wykorzystania w przyszłości.
2.1 Ogólne bezpieczeństwo elektronarzędzi
- Bezpieczeństwo w miejscu pracy: Utrzymuj miejsce pracy w czystości i dobrym oświetleniu. Zagracone lub ciemne pomieszczenia sprzyjają wypadkom. Nie używaj elektronarzędzi w atmosferach wybuchowych, takich jak łatwopalne ciecze, gazy lub pyły.
- Bezpieczeństwo elektryczne: Wtyczki elektronarzędzi muszą pasować do gniazdek. Nigdy nie modyfikuj wtyczki w żaden sposób. Unikaj kontaktu fizycznego z uziemionymi powierzchniami, takimi jak rury, grzejniki, kuchenki i lodówki.
- Bezpieczeństwo osobiste: Zawsze noś okulary ochronne, ochronniki słuchu i maskę przeciwpyłową. Ubieraj się odpowiednio; unikaj luźnej odzieży i biżuterii. Trzymaj włosy, ubranie i rękawice z dala od ruchomych części.
- Używanie i konserwacja narzędzia: Nie używaj elektronarzędzia na siłę. Używaj elektronarzędzia odpowiedniego do danego zastosowania. Odłącz wtyczkę od źródła zasilania przed dokonywaniem jakichkolwiek regulacji, wymianą akcesoriów lub przechowywaniem elektronarzędzia.
2.2 Specific Saw Safety
- Always use the blade guard. Ensure it operates correctly before each use.
- Secure the workpiece firmly. Do not hold small pieces by hand.
- Nigdy nie sięgaj w okolice ostrza, gdy piła jest uruchomiona lub podłączona do zasilania.
- Use only blades specified for this tool and suitable for the material being cut.
- Maintain a safe distance from the blade. Keep hands clear of the cutting path.
3. Koniec komponentówview
Familiarize yourself with the main components of your VITO combined saw:
- Obudowa silnika: Zawiera silnik o mocy 1800W.
- Osłona ostrza: Chroni użytkownika przed obracającym się ostrzem.
- Ostrze tnące: 250mm diameter, 30mm bore, 36 teeth.
- Stół ukosowy: Rotates for angle adjustments in miter saw mode.
- Table Saw Top: Upper cutting surface for table saw mode.
- Zerwij ogrodzenie: Adjustable guide for straight cuts in table saw mode.
- Miernik kątowy: For angled cuts in table saw mode (not explicitly shown but implied).
- Regulacja skosu: Mechanism to tilt the blade for angled cuts.
- Port zbierania kurzu: Do podłączenia systemu odsysania pyłu.
- Przełącznik włączania/wyłączania: Power control for the tool.

Rysunek 2: Strona view of the saw in miter saw configuration, showing blade guard and motor.

Rysunek 3: Góra view of the saw in table saw configuration, showing the rip fence and table surface.
4. Konfiguracja
4.1 Rozpakowanie i kontrola
Carefully remove the saw from its packaging. Inspect for any damage that may have occurred during shipping. Ensure all components listed in the packing list are present. Do not operate the tool if any damage is found.
4.2 Securing the Saw
For stable and safe operation, the saw must be securely mounted to a workbench or a dedicated saw stand. Use appropriate bolts and nuts to fasten the saw through the mounting holes in its base.
4.3 Montaż/wymiana ostrza
- Odłącz zasilanie: Always unplug the saw from the power source before performing any maintenance or blade changes.
- Dostęp do ostrza: Depending on the mode (miter or table saw), lift or remove the necessary guards to access the blade.
- Odkręć nakrętkę trzpienia: Use the provided wrench to loosen the arbor nut while holding the arbor lock button.
- Usuń stare ostrze: Ostrożnie wyjmij stare ostrze, zwracając uwagę na kierunek jego obrotu.
- Zainstaluj nowe ostrze: Place the new 250mm blade onto the arbor, ensuring the teeth are oriented correctly for cutting (usually indicated by an arrow on the blade matching an arrow on the guard).
- Dokręć nakrętkę trzpienia: Securely tighten the arbor nut with the wrench while holding the arbor lock.
- Wymień strażników: Ensure all guards are properly reinstalled and functioning before reconnecting power.
5. Instrukcja obsługi
This saw offers two primary modes of operation: miter saw and table saw. Ensure the saw is in the correct configuration for your desired cut.
5.1 Switching Between Miter Saw and Table Saw Modes
The saw features a 2-in-1 design. To switch modes, carefully follow the instructions in your saw's specific manual for unlocking and rotating the cutting head assembly. Ensure the mechanism is fully locked in place for the chosen mode before operation.
5.2 Obsługa piły ukosowej
- Set Miter Angle: Loosen the miter lock knob, rotate the miter table to the desired angle (from -45° to 45°), and tighten the knob securely.
- Set Bevel Angle: For bevel cuts, loosen the bevel lock, tilt the motor/blade assembly to the desired angle (from 0° to 45°), and tighten the lock.
- Pozycja przedmiotu obrabianego: Place the workpiece firmly against the fence and the miter table. Use clampjeśli to konieczne.
- Rozpocznij piłę: Press the ON switch. Allow the blade to reach full speed.
- Make Cut: Slowly and steadily bring the blade down through the workpiece. Do not force the cut.
- Return Blade: Once the cut is complete, release the switch and allow the blade to stop before raising it.
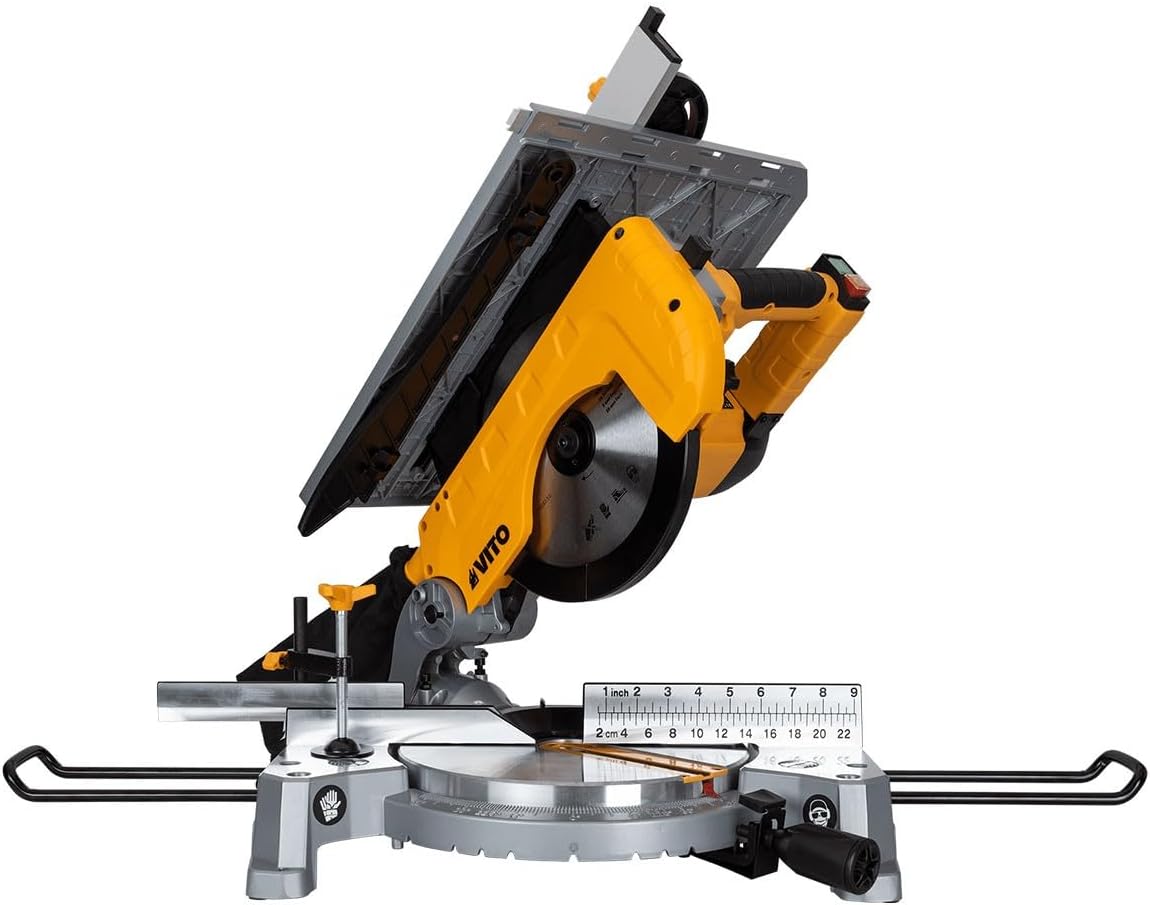
Figure 4: Miter saw configuration demonstrating blade tilt for bevel cuts.
5.3 Obsługa piły stołowej
- Configure for Table Saw: Ensure the saw head is locked in the upright table saw position.
- Adjust Rip Fence: Position the rip fence to the desired cutting width. Lock it securely.
- Regulacja wysokości ostrza: Use the blade height adjustment mechanism to set the blade exposure slightly above the workpiece thickness.
- Pozycja przedmiotu obrabianego: Place the workpiece flat on the table, against the rip fence.
- Rozpocznij piłę: Press the ON switch. Allow the blade to reach full speed.
- Make Cut: Using a push stick, slowly and steadily feed the workpiece into the blade. Keep hands clear of the blade path.
- Kompletne cięcie: Continue feeding until the cut is complete. Turn off the saw and wait for the blade to stop before removing the workpiece.

Figure 5: Table saw configuration, showing the rip fence and cutting surface.
6. Konserwacja
Regular maintenance ensures the longevity and safe operation of your saw. Always disconnect the power before performing any maintenance.
- Czyszczenie: After each use, clean the saw thoroughly. Remove sawdust and debris from the motor vents, blade guard, and table surfaces. Use a brush or compressed air. Do not use solvents that could damage plastic parts.
- Kontrola ostrza: Regularly inspect the blade for sharpness, missing teeth, or cracks. A dull or damaged blade can cause kickback and poor cut quality. Replace damaged blades immediately.
- Funkcjonalność Strażnika: Ensure all blade guards move freely and return to their protective position automatically.
- Elementy złączne: Sprawdź dokręcenie wszystkich nakrętek, śrub i wkrętów. Dokręć wszystkie luźne elementy mocujące.
- Szczotki węglowe: If the motor performance decreases, the carbon brushes may need inspection and replacement. This should ideally be done by a qualified service technician.
7. Rozwiązywanie Problemów
Zapoznaj się z tą sekcją, aby poznać typowe problemy i ich rozwiązania. Jeśli problem będzie się powtarzał, skontaktuj się z obsługą klienta.
| Problem | Możliwa przyczyna | Rozwiązanie |
|---|---|---|
| Piła się nie uruchamia | Brak zasilania, uszkodzony przełącznik, zużyte szczotki węglowe. | Check power connection and circuit breaker. Test switch. Replace carbon brushes (professional service recommended). |
| Słaba jakość cięcia (szorstkie, rozszczepiające się) | Tępe lub nieprawidłowe ostrze; niewłaściwa prędkość posuwu; obrabiany przedmiot nie jest zabezpieczony. | Replace blade with a sharp, appropriate one. Adjust feed rate. Secure workpiece firmly. |
| Nadmierne wibracje | Loose blade; damaged blade; saw not securely mounted. | Check blade for tightness and damage. Ensure saw is securely mounted to a stable surface. |
| Przegrzanie silnika | Blocked ventilation slots; continuous heavy use; dull blade. | Clean ventilation slots. Allow motor to cool. Use a sharp blade to reduce motor strain. |
8. Specyfikacje
| Funkcja | Wartość |
|---|---|
| Numer modelu | VISCC18250 |
| Moc wejściowa | 1800 W |
| Prędkość bez obciążenia | 4500 obr./min |
| Średnica ostrza | 250 mm |
| Otwór ostrza | 30 mm |
| Liczba zębów | 36 |
| Zakres kąta ukosu | -45° do 45° |
| Zakres kąta skosu | 0° do 45° |
| Waga | 13.9 kilogramów |
| Zalecane powierzchnie | Wood, Aluminum |
9. Gwarancja i wsparcie
This VITO product is covered by a manufacturer's warranty against defects in materials and workmanship. For specific warranty terms and conditions, please refer to the warranty card included with your product or visit the official VITO website. For technical support, spare parts, or service inquiries, please contact your retailer or the authorized VITO service center in your region. Always provide the model number (VISCC18250) and serial number when contacting support.