
1. Koniec produktuview
The LFF Weather Station (Model LWS163) is a comprehensive device designed to provide accurate indoor and outdoor environmental data, timekeeping, and weather forecasting. It features a large 7.5-inch color LCD touchscreen display, offering clear visibility of various metrics including temperature, humidity, barometric pressure, moon phase, and dynamic weather icons. The integrated atomic clock ensures precise time synchronization, and the system supports up to three wireless remote sensors for monitoring multiple locations.

Figure 1.1: LFF Weather Station Main Unit and Remote Sensor
2. Konfiguracja
2.1 Zasilanie
The main weather station unit can be powered by either the included AC power cord or by 2 AAA batteries (not included). The remote sensor requires 2 AAA batteries (not included).
- Jednostka główna (odbiornik wewnętrzny): Use the provided power adapter for continuous backlight display. When powered by batteries only, the screen will automatically turn off after 10 seconds to conserve power.
- Czujnik zdalny: Insert 2 AAA batteries into the remote sensor. Ensure correct polarity.

Figure 2.1: Power Supply Connections

Figure 2.2: Backlight Behavior with Different Power Modes
2.2 Umiejscowienie czujnika zdalnego
Place the wireless remote sensor outdoors in a shaded, dry location, away from direct sunlight and precipitation, to ensure accurate temperature and humidity readings. The transmission range is up to 100 meters (328 feet) in an open area. The main unit supports up to 3 remote sensors (one included).

Figure 2.3: Wireless Transmission Range and Sensor Placement
2.3 Initial Setup and Synchronization
After powering on both the main unit and the remote sensor, the main unit will automatically attempt to synchronize with the remote sensor and the atomic clock signal (WWVB). This process may take 10-15 minutes. Ensure the main unit is placed in an area where it can receive a clear signal for atomic time synchronization.

Figure 2.4: WWVB Signal Function
3. Instrukcja obsługi
3.1 Wyświetl ponadview
The 7.5-inch color display provides a clear layout of all information. Key areas include:
- Temperatura i wilgotność na zewnątrz: Znajduje się po lewej stronie.
- Temperatura i wilgotność w pomieszczeniu: Znajduje się po prawej stronie.
- Weather & Pressure: Central top section, showing current weather forecast and barometric pressure trend.
- Time, Moon Phase, & Date: Lower central and right sections.
- Przyciski sterujące: Touch-sensitive buttons at the bottom for Mode, Set, Alarm, Channel, Down, and Up.
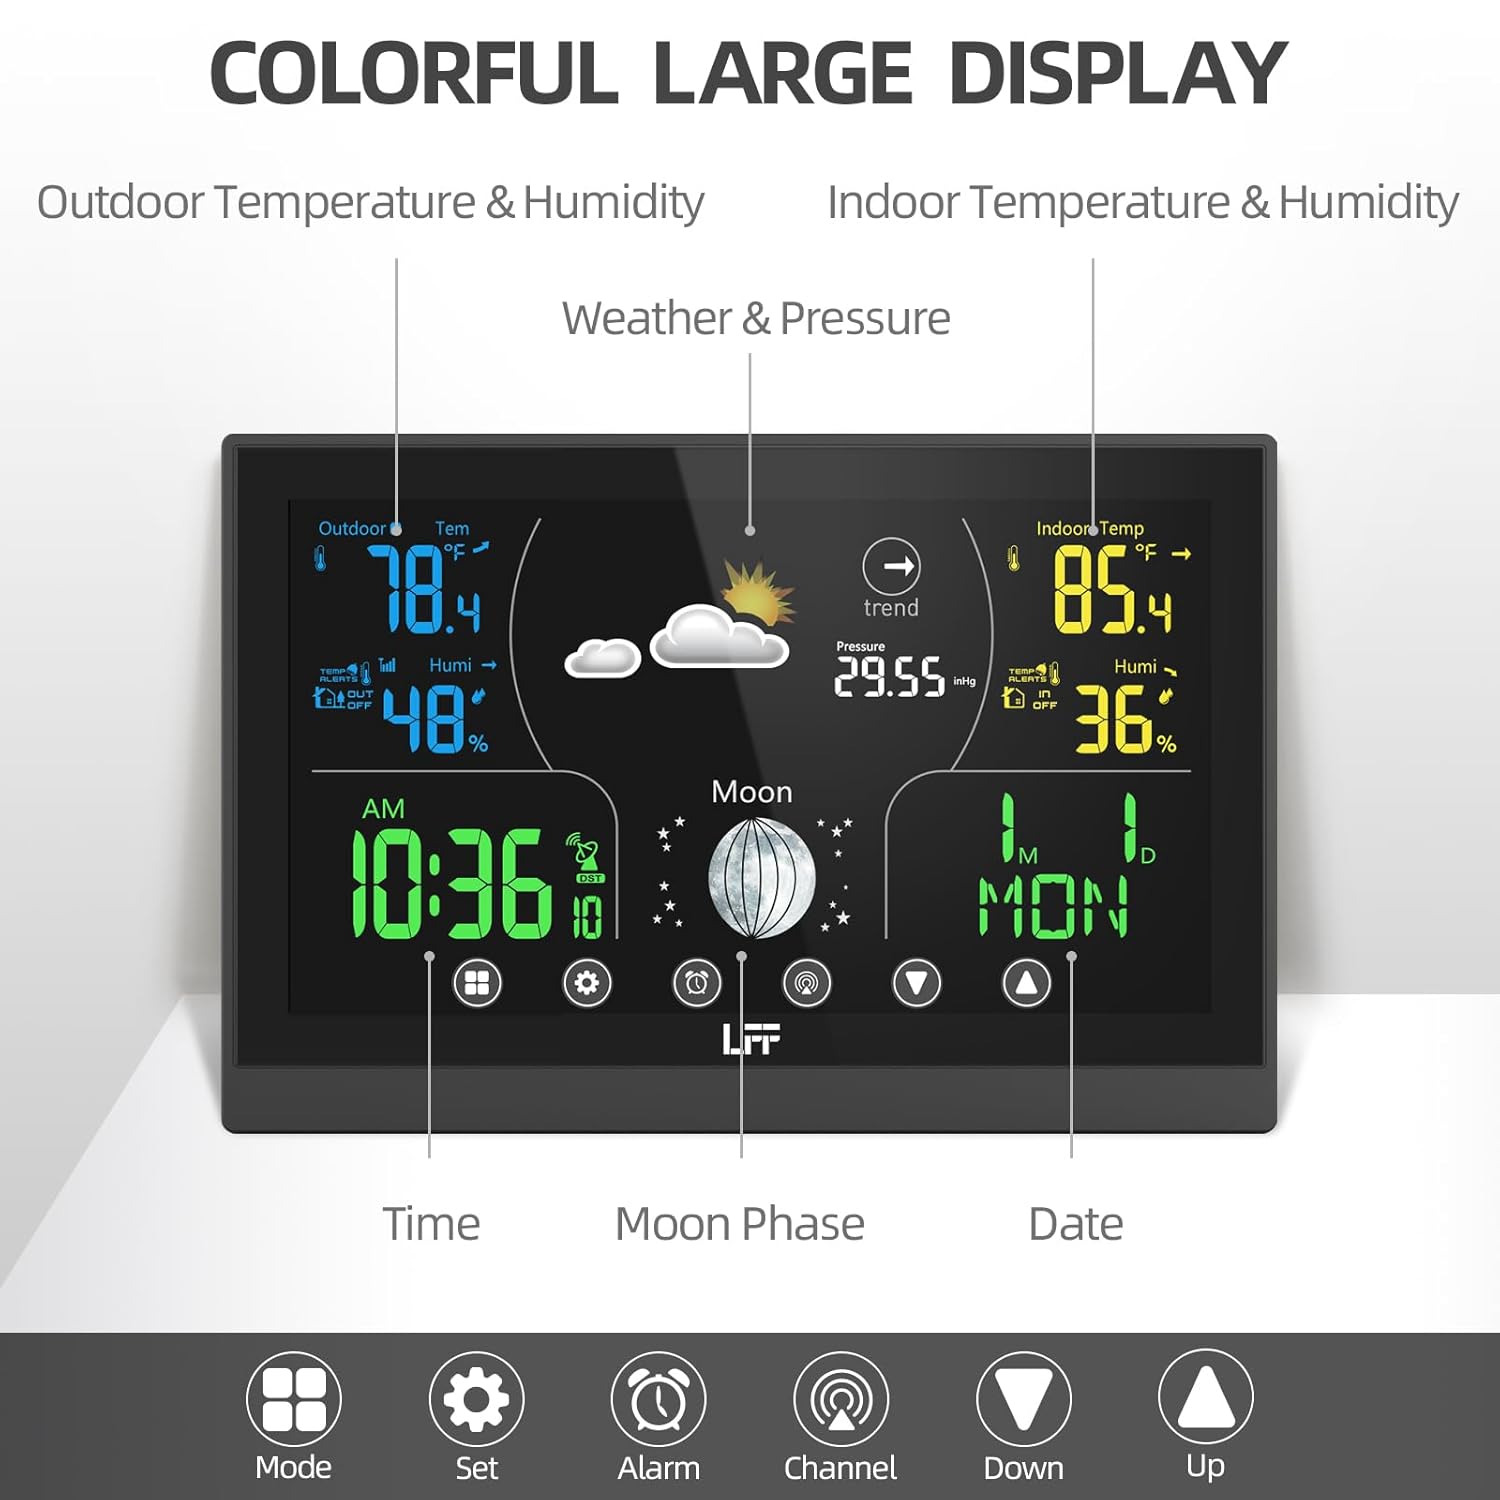
Figure 3.1: Detailed Display Layout
3.2 Ustawienia czasu i daty
The atomic clock feature automatically synchronizes the time and date. If manual adjustment is needed or preferred, use the "Set" button to enter time/date setting mode. You can adjust the 12H/24H format and select from 8 available time zones (AST, NST, EST, CST, MST, PST, AKT, HAT).
3.3 Ustawienia alarmu
The weather station includes two independent alarm clocks with a snooze function. Press the "Alarm" button to set or activate alarms. Follow the on-screen prompts to adjust alarm times and enable/disable them.

Figure 3.2: Dual Alarm Feature
3.4 Wybór kanału
If you have multiple remote sensors, press the "Channel" button to cycle through the readings from each connected sensor (CH1, CH2, CH3). The display will show the data for the selected channel.
3.5 Regulacja podświetlenia
When the main unit is powered by the AC cord, there are 3 adjustable backlight modes. Use the appropriate control button (refer to the specific icon on the unit) to cycle through the brightness levels.
3.6 Interpretacja prognozy pogody
The weather station provides a dynamic weather forecast for the next 8 hours, based on barometric pressure changes. The forecast is calibrated over 10 to 14 days for accuracy specific to your location. Interpret the weather icons as follows:
 Sunny, Partly Sunny, Cloudy, Light Rain, Heavy Rain, Light Snow, Heavy Snow

Figure 3.3: Weather Forecast Icons
4. Konserwacja
- Wymiana baterii: Replace batteries in both the main unit (if used) and remote sensor when the low battery indicator appears on the display. Use fresh AAA batteries.
- Czyszczenie: Przetrzyj wyświetlacz i powierzchnię urządzenia miękką szmatką.amp ściereczka. Nie należy używać środków czyszczących o właściwościach ściernych ani rozpuszczalników.
- Pielęgnacja czujnika: Periodically check the outdoor sensor for debris or obstructions that might affect readings.
5. Rozwiązywanie Problemów
If you encounter issues with your LFF Weather Station, please refer to the following common problems and solutions:
| Problem | Możliwa przyczyna / rozwiązanie |
|---|---|
| Brak wyświetlacza na jednostce głównej | Check power adapter connection or replace AAA batteries. |
| Temperatura/wilgotność zewnętrzna nie jest wyświetlana lub jest niedokładna |
|
| Zegar atomowy nie synchronizuje się |
|
| Niedokładna prognoza pogody | The weather forecast is based on barometric pressure changes and requires 10-14 days of calibration for optimal local accuracy. Ensure the unit has been operating continuously for this period. |
For more detailed troubleshooting or specific issues, please refer to the Oficjalna instrukcja obsługi (PDF).
6. Specyfikacje
| Funkcja | Szczegół |
|---|---|
| Wymiary produktu | 7.4 x 0.55 x 4.95 cala |
| Waga | 1.21 funtów |
| Numer modelu | LWS163 |
| Źródło zasilania (jednostka główna) | AC/DC Adapter (included) or 2 AAA Batteries (not included) |
| Źródło zasilania (czujnik zdalny) | 2 baterie AAA (brak w zestawie) |
| Typ wyświetlacza | 7.5-calowy kolorowy ekran dotykowy LCD |
| Technologia łączności | Bezprzewodowy |
| Zasięg transmisji bezprzewodowej | Do 100 metrów (328 stóp) w terenie otwartym |
| Obsługiwane czujniki | Up to 3 wireless remote sensors (one included) |
| Dokładność temperatury | 1 stopni Celsjusza |
| Cechy specjalne | Adjustable Brightness, Hygrometer, Thermometer, Atomic Clock, Dual Alarms, Moon Phase, Weather Forecast |
| Tworzywo | Plastikowy |
| Zawarte komponenty | Main Weather Station Unit, 1 Wireless Remote Sensor, Power Cord |
7. Gwarancja i wsparcie
LFF stands behind the quality of its products. For warranty information, technical support, or service inquiries, please contact LFF customer service. Keep your purchase receipt for warranty claims.
For comprehensive details and additional assistance, please download the Official LFF Weather Station User Manual (PDF).


