1. Ważne instrukcje bezpieczeństwa
Przed użyciem produktu prosimy o zapoznanie się ze wszystkimi instrukcjami bezpieczeństwa. Zachowaj instrukcję do wykorzystania w przyszłości.
- Nie wystawiaj urządzenia na działanie deszczu, wilgoci ani ekstremalnych temperatur.
- Należy unikać umieszczania urządzenia w pobliżu źródeł ciepła, takich jak grzejniki, kratki wentylacyjne, piece i inne urządzenia wytwarzające ciepło.
- Stosować wyłącznie dodatki/akcesoria wskazane przez producenta.
- Odłączaj urządzenie od zasilania podczas burzy z piorunami lub jeśli nie używasz go przez dłuższy czas.
- Wszelkie czynności serwisowe należy powierzyć wykwalifikowanemu personelowi serwisowemu. Serwis jest wymagany, gdy urządzenie zostało w jakikolwiek sposób uszkodzone.
- Zapewnij odpowiednią wentylację wokół urządzenia. Nie blokuj żadnych otworów wentylacyjnych.
- Chroń przewód zasilający przed deptaniem i przytrzaśnięciem.
2. Zawartość opakowania
Sprawdź, czy w przesyłce znajdują się wszystkie elementy wymienione poniżej:
- 1x syitren PARON II Record Player
- 1x Instrukcja obsługi
- 1x Osłona przeciwpyłowa
- 1x 12V AC Power Adapter

3. Koniec produktuview
Familiarize yourself with the main components of your syitren PARON II Record Player.


4. Konfiguracja
- Rozpakuj jednostkę: Ostrożnie wyjmij gramofon i wszystkie akcesoria z opakowania.
- Place the Dust Cover: Position the dust cover onto the hinges at the back of the unit.
- Podłącz zasilanie: Plug the 12V AC power adapter into the DC IN port on the back of the record player, then plug the adapter into a wall outlet.
- Regulacja przeciwwagi: The tonearm features an adjustable counterweight. Carefully balance the tonearm so it floats horizontally. Then, rotate the counterweight to the recommended tracking force (refer to cartridge specifications, typically around 2.5g for the AT3600L). This ensures optimal sound quality and prevents record damage.
- Regulacja antypoślizgowości: The anti-skating system helps prevent the stylus from skipping. Adjust this setting according to the instructions provided with the cartridge or by testing with a blank record.

5. Instrukcja obsługi
5.1 Odtwarzanie płyty winylowej
- Włączanie: Aby włączyć urządzenie, przekręć pokrętło zasilania.
- Wybierz prędkość: Choose the appropriate speed (33 or 45 RPM) for your vinyl record using the speed selector switch.
- Miejsce zapisu: Carefully place your vinyl record on the platter. If playing a 45 RPM single, use the included adapter.
- Podnoszenie ramienia: Użyj dźwigni podnoszenia ramienia, aby podnieść ramię.
- Pozycja rysika: Delikatnie przesuń ramię gramofonu nad wybranym rowkiem początkowym płyty.
- Dolne ramię gramofonu: Slowly lower the tonearm using the lift lever. The stylus will make contact with the record and playback will begin.
- Dostosuj głośność: Use the volume knob to set the desired listening level.
The record player features an auto-stop function that will stop the platter approximately three minutes after the record ends. The tonearm will not auto-return.

5.2 Łączność Bluetooth
The syitren PARON II Record Player can receive audio wirelessly from Bluetooth-enabled devices.
- Włącz Bluetooth: Switch the function selector to Bluetooth mode. The indicator light will flash, indicating it's in pairing mode.
- Paruj urządzenie: On your smartphone, tablet, or other Bluetooth device, enable Bluetooth and search for available devices. Select "syitren PARON II" (or similar name) from the list.
- Potwierdzenie: Once paired, the indicator light on the record player will stop flashing and remain solid. You can now stream audio from your device to the record player's built-in speakers.
5.3 Zewnętrzne połączenia audio
The unit supports both Aux-in and RCA output for versatile audio connections.
- Hormon: Connect an external audio source (e.g., MP3 player, CD player) to the AUX IN port using a 3.5mm audio cable. Select AUX mode on the record player to play audio from the connected device.
- Wyjście RCA: Connect the RCA output jacks on the back of the record player to an external amplifier or powered speakers using RCA cables. This allows you to use the record player as a source for a larger audio system.
6. Konserwacja
6.1 Czyszczenie rysika
A clean stylus ensures optimal sound quality and extends the life of your records. Use a soft brush designed for stylus cleaning, brushing gently from back to front.
6.2 Czyszczenie urządzenia
Wipe the unit with a soft, dry cloth. For stubborn marks, a slightly damp Można użyć ściereczki, a następnie wytrzeć do sucha. Unikać środków czyszczących o działaniu ściernym i rozpuszczalników.
6.3 Pielęgnacja pokrowca przeciwkurzowego
The dust cover protects your turntable. Clean it with a soft, lint-free cloth. Avoid harsh chemicals that may scratch or cloud the plastic.
7. Rozwiązywanie Problemów
Jeśli napotkasz problemy, zapoznaj się z poniższymi typowymi problemami i rozwiązaniami:
| Problem | Możliwe rozwiązanie |
|---|---|
| Brak zasilania | Upewnij się, że zasilacz jest prawidłowo podłączony do urządzenia i do działającego gniazdka elektrycznego. |
| Brak dźwięku z głośników | Check volume level. Ensure correct input mode (Phono, Aux, Bluetooth) is selected. |
| Przeskakujący lub zniekształcony dźwięk | Clean the record and stylus. Re-adjust the tonearm counterweight and anti-skating. Ensure the record player is on a stable, level surface. |
| Bluetooth nie łączy się | Ensure the record player is in Bluetooth pairing mode. Disable and re-enable Bluetooth on your device. Move closer to the record player. |
Jeśli problem nadal występuje, skontaktuj się z obsługą klienta, aby uzyskać pomoc.
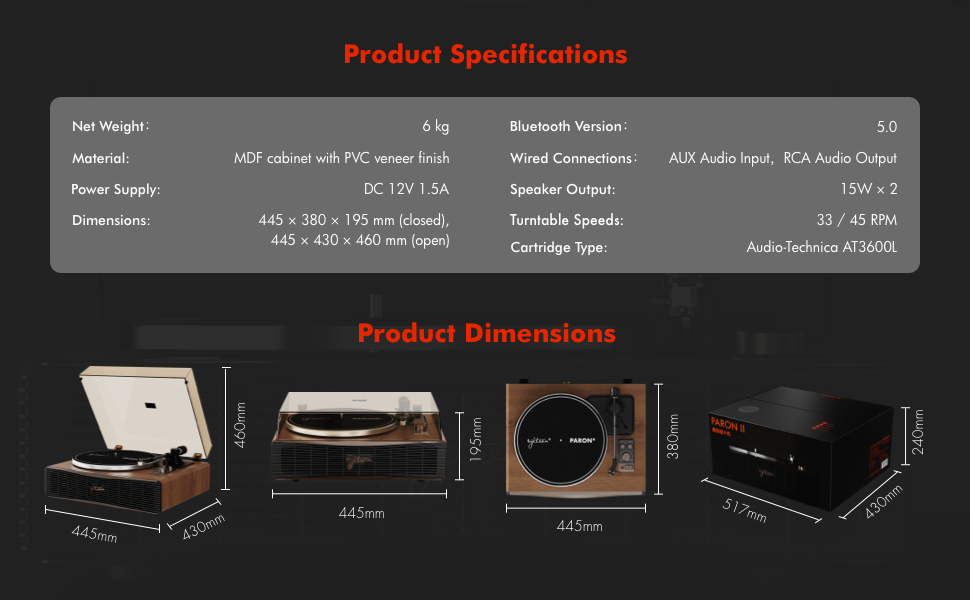
8. Specyfikacje
| Funkcja | Szczegół |
|---|---|
| Nazwa modelu | PARON II |
| Numer modelu przedmiotu | SN13 |
| Wymiary produktu | 17.4 x 14.96 x 7.48 inches (445 x 380 x 195 mm closed) |
| Waga przedmiotu | 16 funtów (6 kg) |
| Tworzywo | MDF cabinet with PVC veneer finish (Wood, Metal, Plastic) |
| Prędkości gramofonu | 33 1/3, 45 obr/min |
| Rodzaj kasety | Audio-Technica AT3600L (Magnet-type) |
| Wersja Bluetooth | 5.0 |
| Połączenia przewodowe | AUX Audio Input, RCA Audio Output |
| Wyjście głośnika | 15W x 2 (Built-in 2.5" woofer and 2" tweeter) |
| Zasilacz | Prąd stały 12 V 1.5 A |
| Cechy specjalne | Adjustable Counterweight, Built-In Speaker, Built-In Bluetooth Receiver, RCA Output, Suspension Shock Absorption System, S5 Motor System |
9. Gwarancja i wsparcie
The syitren PARON II Record Player is designed for reliable performance. For warranty information or technical support, please refer to the contact details provided with your purchase documentation or visit the official syitren webstrona.
Proszę zachować dowód zakupu na wypadek ewentualnych roszczeń gwarancyjnych.