1. Wprowadzenie
This manual provides essential information for the safe operation, assembly, maintenance, and troubleshooting of your new Electric Scooter with Seat. Please read this manual thoroughly before your first ride to ensure proper use and to maximize the lifespan of your scooter.
The WINDHORSE C2 Electric Scooter is designed for adult commuters, featuring a comfortable seat, a powerful 672W brushless hub motor, and a foldable design for easy transport and storage. It offers a maximum speed of 20 MPH and a range of 15-20 miles, making it an efficient solution for urban travel.

Image: The Generic Electric Scooter with Seat in black, showcasing its overall design with the integrated seat and front headlight.
2. Wytyczne bezpieczeństwa
Your safety is paramount. Always adhere to the following guidelines when operating the electric scooter:
- Noś sprzęt ochronny: Zawsze noś kask, nakolanniki i nałokietniki.
- Sprawdź przed jazdą: Przed każdym użyciem należy sprawdzić hamulce, opony i wszystkie podzespoły, aby mieć pewność, że są w dobrym stanie technicznym.
- Przestrzegaj przepisów ruchu drogowego: Przestrzegaj wszystkich lokalnych przepisów ruchu drogowego. Jedź ostrożnie i bądź świadomy otoczenia.
- Unikaj niebezpiecznych warunków: Do not ride in heavy rain, on slippery surfaces, or in low visibility conditions.
- Limit wagowy: Nie przekraczać maksymalnego udźwigu wynoszącego 120 kg (265 funtów).
- Ograniczenie wiekowe: This scooter is intended for adult riders.
- Prawidłowe hamowanie: Use both front and rear disc brakes for effective and safe stopping.
- Widoczność: Utilize the high-brightness headlight for improved visibility during low-light conditions.
3. Zawartość opakowania
Po otwarciu opakowania należy sprawdzić, czy zawiera ono wszystkie poniższe elementy:

Image: A visual representation of the items included in the product package, showing the scooter, charger, charger cable, tools, keys, and the user manual.
- Electric Scooter (Main Unit)
- Rumak
- Kabel ładowarki
- Tools (for assembly)
- Keys (if applicable for ignition/battery lock)
- Instrukcja obsługi
4. Instalacja i montaż
The scooter comes largely pre-assembled. Minimal setup is required before your first ride.

Image: A diagram illustrating the simple assembly process, highlighting that only the saddle and basket need to be attached after unfolding the handlebar.
- Rozłóż kierownicę: Carefully unfold the handlebar stem until it locks securely into place. Ensure all locking mechanisms are engaged.
- Attach the Saddle: Insert the seat post into the designated slot and secure it firmly. Adjust the saddle height for comfortable riding.
- Montaż tylnego kosza: Attach the rear cargo basket to the designated mounting points at the back of the scooter. Ensure it is securely fastened.
- Opłata początkowa: Before first use, fully charge the scooter's battery. Refer to the "Charging the Battery" section under Maintenance.
5. Instrukcja obsługi
5.1 Włączanie/wyłączanie
- Włączanie: Insert the key (if applicable) and turn it to the ON position, or press and hold the power button on the display.
- Aby wyłączyć: Press and hold the power button until the display turns off, or turn the key to the OFF position.
5.2 Jazda na hulajnodze
Familiarize yourself with the controls before riding in an open, safe area.
- Przyśpieszenie: Use the throttle control (typically a thumb lever or twist grip) to accelerate. Apply power gradually.
- Hamowanie: The scooter is equipped with dual disc braking systems (front and rear). Use both brake levers simultaneously for effective stopping.
- Reflektor: Activate the high-brightness LED headlight for improved visibility, especially in low-light conditions.
- Wyświetlacz: The LED display shows battery power level and other relevant information. Monitor the battery level and charge as needed.

Image: A close-up of the LED power display on the handlebar, showing the battery level indicator. It is important to monitor this display to know when to charge the scooter.

Image: A graphic detailing the 672W peak power motor, highlighting its capabilities including 20 MPH max speed, 20 miles max range, and 30° slope climbing ability.
5.3 Składanie skutera
The scooter features a foldable design for convenient storage and transportation.
- Upewnij się, że hulajnoga jest wyłączona.
- Znajdź mechanizm składania na trzpieniu.
- Follow the instructions specific to your model's folding latch to collapse the handlebar stem towards the deck.
- Ensure the folding mechanism is securely latched to prevent accidental unfolding.
6. Konserwacja
6.1 Ładowanie akumulatora
The scooter is equipped with a 36V 8AH battery. Proper charging extends battery life.

Image: An illustration of the scooter's rechargeable battery, highlighting its built-in smart protections including 288 Wh capacity, 3-4 hours charging time, short circuit protection, overcurrent protection, temperature abnormal protection, and overcharge protection.
- Use only the original charger provided with your scooter.
- Podłącz ładowarkę do portu ładowania hulajnogi, a następnie do standardowego gniazdka ściennego.
- Gdy ładowanie będzie pełne, kontrolka ładowania na ładowarce zmieni kolor (np. z czerwonego na zielony).
- Czas ładowania wynosi około 3-4 godzin. Nie przeładowuj.
- Store the scooter in a cool, dry place when not in use, and ensure the battery is charged periodically if stored for long periods.
6.2 Ogólna opieka
- Czyszczenie: Wytrzyj skuter reklamąamp szmatką. Nie używaj wody pod wysokim ciśnieniem ani nie zanurzaj żadnej części hulajnogi w wodzie.
- Opony: Regularly check tire pressure and inflate to the recommended PSI (refer to tire sidewall or specifications).
- Hamulce: Okresowo sprawdzaj zużycie klocków hamulcowych i upewnij się, że dźwignie hamulców działają płynnie. W razie potrzeby dostosuj.
- Elementy złączne: Ensure all screws and bolts are tightened before each ride.
7. Rozwiązywanie Problemów
W tej sekcji omówiono typowe problemy, które mogą wystąpić. W przypadku problemów, których tutaj nie wymieniono, prosimy o kontakt z obsługą klienta.
| Problem | Możliwa przyczyna | Rozwiązanie |
|---|---|---|
| Hulajnoga się nie włącza. | Battery is low or depleted; Power button not pressed correctly; Key not in ON position. | Charge the battery; Press and hold power button firmly; Ensure key is turned to ON. |
| Zmniejszony zasięg lub prędkość. | Low battery charge; Overload (exceeding weight limit); Low tire pressure; Riding uphill frequently. | Fully charge battery; Reduce load; Inflate tires to correct pressure; Adjust riding style. |
| Hamulce wydają się luźne i nieskuteczne. | Linka hamulcowa wymaga regulacji; zużyte klocki hamulcowe. | Adjust brake cable tension; Replace worn brake pads. Consult a professional if unsure. |
| Nietypowe dźwięki podczas pracy. | Luźne elementy; Zanieczyszczenia w kołach/silniku; Zużyte łożyska. | Check all fasteners; Inspect for debris and remove; Contact support for bearing issues. |
8. Specyfikacje
Detailed technical specifications for the Electric Scooter with Seat:
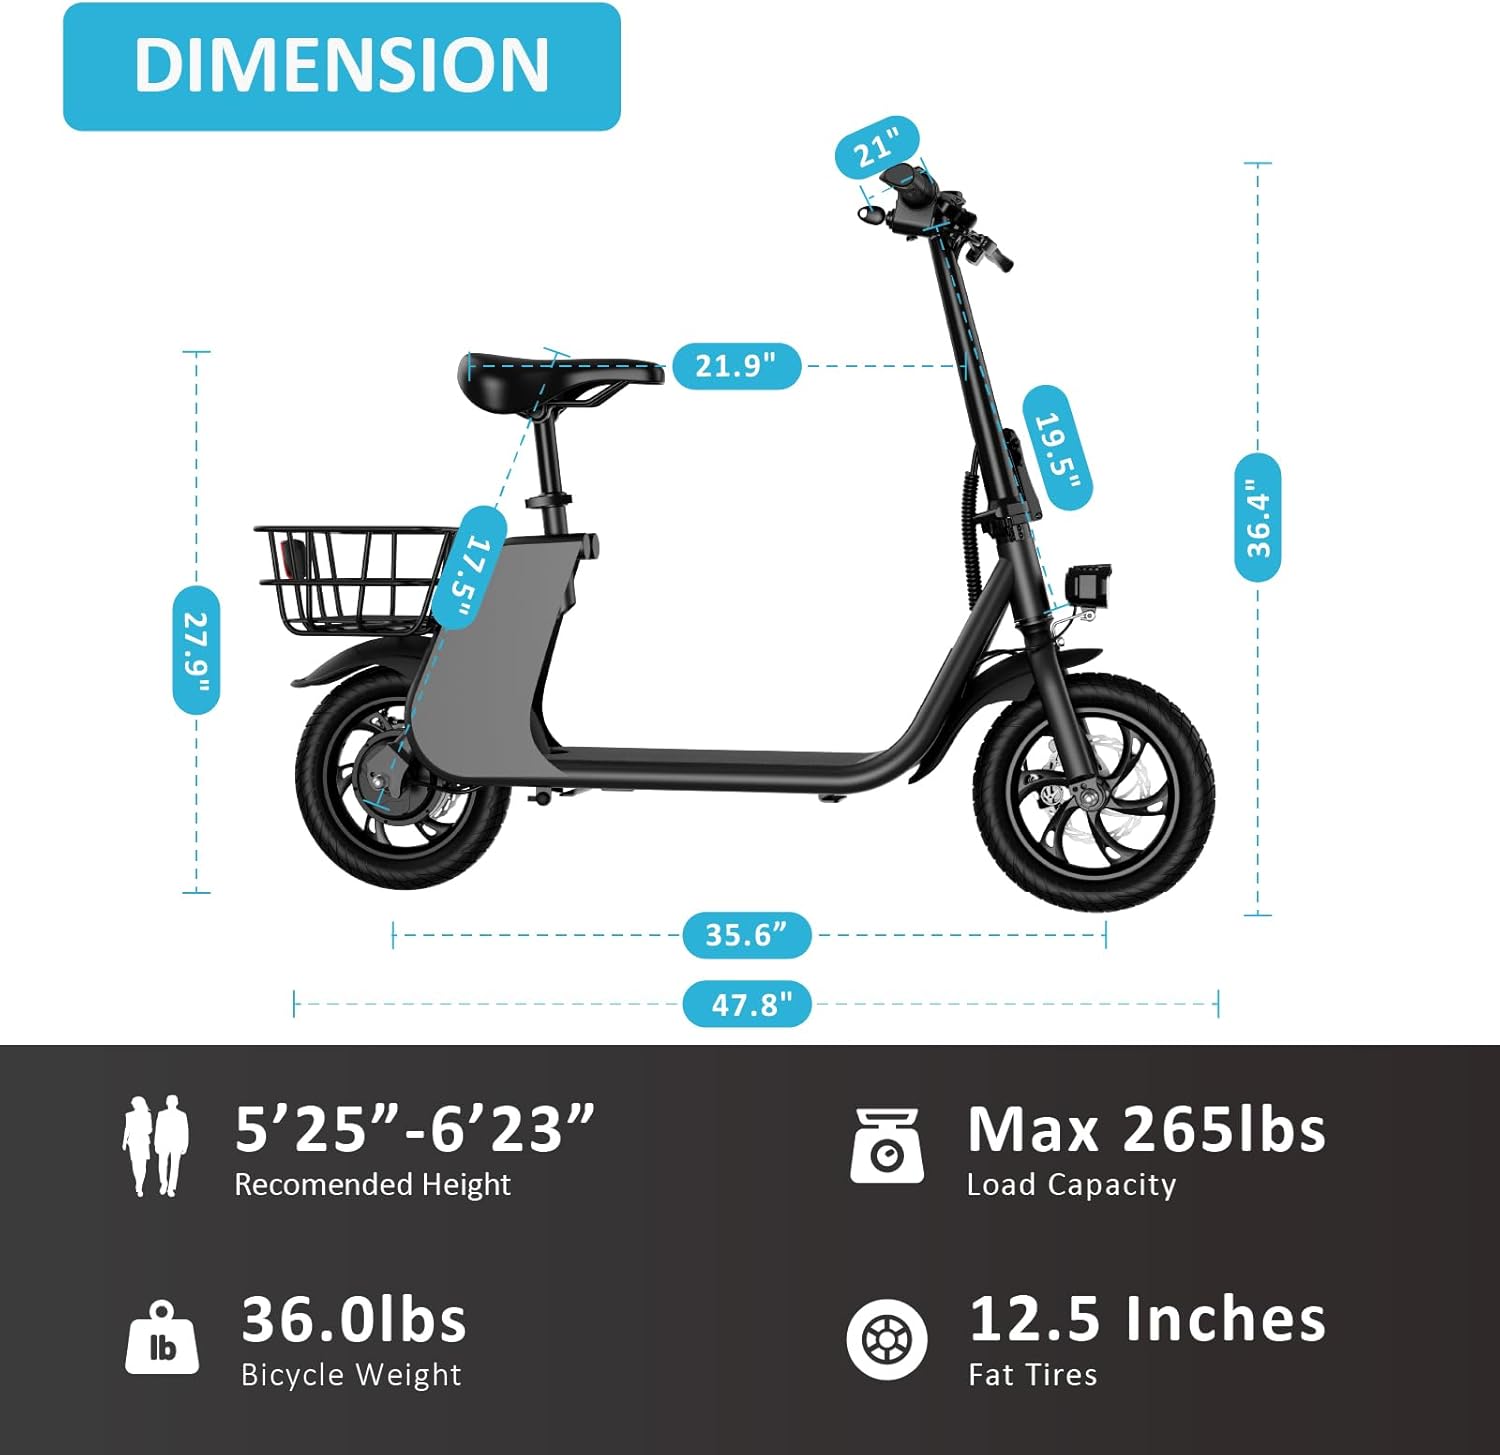
Image: A detailed dimension diagram of the electric scooter, showing various measurements such as height, length, and width, along with recommended rider height, max load capacity, weight, and tire size.
| Funkcja | Szczegół |
|---|---|
| Marka | Generic (WINDHORSE) |
| Numer modelu | R1 Pro (C2) |
| Materiał ramy | Carbon Alloy / Alloy Steel |
| Silnik | Silnik bezszczotkowy w piaście o mocy 672 W (moc szczytowa 680 W) |
| Bateria | 36V 8AH (288Wh) |
| Czas ładowania | 3-4 Hours (approx. 4.5 hours for full charge) |
| Maksymalna prędkość | 20 mil na godzinę |
| Maksymalny zasięg | 15-20 Miles (up to 30 kilometers) |
| Wyświetlacz | Wyświetlacz LED |
| Waga przedmiotu | 36 funtów |
| Maksymalne obciążenie | 265 funtów |
| Rozmiar opony | 12.5 cali (pneumatyczne) |
| Wymiary produktu (dł. x szer. x wys.) | 10" x 22" x 48" (1214*537*925 mm) |
| Styl hamulca | Podwójny hamulec tarczowy (przód i tył) |
| Typ zawieszenia | Zawieszenie przednie |
| Zalecana wysokość | 130-190cm (5'25"-6'23") |
9. Gwarancja i pomoc techniczna
Your Electric Scooter with Seat comes with a comprehensive warranty and dedicated customer support.
- Okres gwarancji: The e-scooter comes with a 12-miesięczna gwarancja od daty zakupu.
- Serwis posprzedażowy: We have after-sale services located in the USA.
- Skontaktuj się z pomocą techniczną: If you have any after-sales questions, issues, or require technical assistance, please contact our professional after-sales team.
- Czas reakcji: Our customer service team aims to reply within 24 hours after receiving your feedback.
- Wykluczenia: Kindly note that our warehouse is located in California, and some remote areas like Hawaii and Alaska may not include freight. Please contact customer service to discuss freight in advance for these areas.
For warranty claims or support, please refer to the contact information provided on the product packaging or the official brand webstrona.


