
1. Wprowadzenie
Thank you for choosing the Grundig KSM 4330 Delisia Coffee Espresso Machine. This semi-automatic espresso machine is designed to provide a premium coffee experience at home. With a powerful 1628 W and 15 bar pump pressure, it allows you to prepare barista-quality coffee. This manual provides essential information for the safe and efficient use of your appliance, including setup, operation, maintenance, and troubleshooting.
2. Informacje dotyczące bezpieczeństwa
Przed użyciem urządzenia należy uważnie przeczytać wszystkie instrukcje bezpieczeństwa. Zachowaj tę instrukcję do wykorzystania w przyszłości.
- Zawsze podłączaj urządzenie do uziemionego gniazdka elektrycznego o odpowiednim napięciu.tagi (220-240 V).
- Nie zanurzaj urządzenia, przewodu zasilającego ani wtyczki w wodzie ani innych płynach.
- Przechowuj urządzenie poza zasięgiem dzieci i osób o ograniczonych zdolnościach fizycznych, sensorycznych lub umysłowych.
- Nie należy używać urządzenia, jeśli przewód zasilający lub wtyczka są uszkodzone lub jeśli urządzenie działa nieprawidłowo lub zostało w jakikolwiek sposób uszkodzone.
- Exercise caution when handling hot surfaces, hot water, and steam. The cup warming plate and steam wand can become very hot.
- Przed użyciem należy upewnić się, że zbiornik na wodę jest napełniony świeżą, zimną wodą.
- Przed czyszczeniem i gdy nie używasz urządzenia, odłącz je od gniazdka elektrycznego.
3. Koniec produktuview
The Grundig KSM 4330 features an intuitive touch display for easy operation and a semi-automatic milk frother for various coffee specialties.
Składniki:
- Main Unit with Touch Display
- Portafiltr
- Single and Double Shot Filter Baskets
- Wyjmowany zbiornik na wodę (pojemność 1.1 litra)
- Dysza parowa / spieniacz do mleka
- Wyjmowana tacka ociekowa
- Płyta do podgrzewania filiżanek
- Łyżka miarowa / Tamper Accessory

Rycina 3.1: Przód view of the espresso machine with its touch control panel.

Rysunek 3.2: Eksplodowany view showing the main components of the espresso machine.
4. Konfiguracja
- Rozpakowywanie: Ostrożnie usuń wszystkie materiały opakowaniowe i sprawdź, czy wszystkie elementy są obecne.
- Czyszczenie wstępne: Przed pierwszym użyciem umyj zbiornik na wodę, uchwyt filtra, koszyki filtra i tackę ociekową ciepłą wodą z mydłem. Dokładnie wypłucz i osusz. Przetrzyj zewnętrzną część urządzenia miękką szmatką.amp płótno.
- Napełnij zbiornik na wodę: Remove the water tank from the back of the machine. Fill it with fresh, cold water up to the 'MAX' level indicator. Place the tank back securely.
- Pierwszy cykl użycia: To prime the pump and clean internal components, perform a rinse cycle without coffee. Attach the portafilter (without coffee) to the group head. Place a cup under the portafilter and another under the steam wand. Turn on the machine. Once heated, press the 'Espresso' button to dispense water. Repeat this process for the steam wand by activating the steam function.
- Podłączenie zasilania: Podłącz przewód zasilający do odpowiedniego, uziemionego gniazdka elektrycznego.

Rysunek 4.1: Strona view illustrating the water tank and steam wand placement.
5. Instrukcja obsługi
5.1 Przygotowanie espresso
- Ensure the water tank is filled and the machine is plugged in. Press the power button to turn on the machine. Wait for the machine to heat up (indicator light will stop flashing).
- Wybierz odpowiedni koszyk filtra (pojedynczy lub podwójny) i umieść go w uchwycie filtra.
- Add ground coffee to the filter basket. Use the measuring spoon to ensure the correct amount. Level the coffee and tamp mocno z tampjej koniec łyżki.
- Attach the portafilter to the group head by aligning it and rotating it to the right until it is secure.
- Umieść jedną lub dwie filiżanki do espresso na tacce ociekowej, bezpośrednio pod wylewką uchwytu filtra.
- Press the 'Espresso' button for a single shot or 'Double' for a double shot. The machine will automatically brew and stop.
- To customize the coffee quantity, use the Memory function. Press and hold the desired espresso button until the desired amount of coffee is dispensed, then release. The machine will remember this setting for future use.

Figure 5.1: Espresso brewing process.
5.2 Korzystanie ze spieniacza do mleka
- Fill a milk pitcher with cold milk (dairy or non-dairy). Do not fill more than one-third of the pitcher.
- Ensure the machine is on and heated. Press the steam button on the touch display. The indicator light will flash while heating and become solid when ready.
- Umieść dyszę pary w mleku, tuż pod jego powierzchnią.
- Obróć pokrętło regulacji pary, aby wypuścić parę. Poruszaj dzbankiem w górę i w dół, aby wytworzyć pianę.
- Once the desired texture and temperature are reached, turn off the steam control knob and then press the steam button on the display to deactivate.
- Natychmiast wytrzyj dyszę parową wodą.amp szmatką, aby zapobiec zasychaniu resztek mleka.
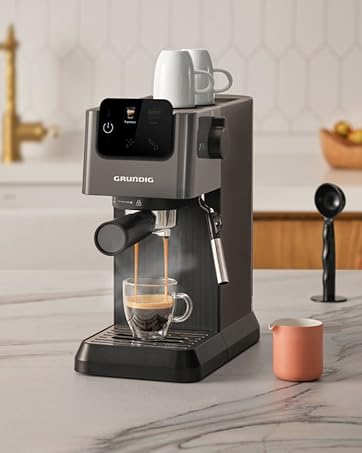
Figure 5.2: Using the milk frother.
5.3 Cup Warming Plate
The top surface of the machine acts as a cup warming plate. Place your espresso cups here before brewing to ensure your coffee stays warm longer.
6. Konserwacja i czyszczenie
Regularne czyszczenie i konserwacja zapewniają optymalną wydajność i długowieczność ekspresu do kawy.
- Codzienne sprzątanie: After each use, remove and empty the portafilter. Rinse the filter basket and portafilter under running water. Empty and clean the drip tray. Wipe down the exterior of the machine with a soft, damp płótno.
- Czyszczenie dyszy parowej: Po spienieniu mleka natychmiast przetrzyj dyszę pary wodą.amp cloth. Periodically, remove the tip of the steam wand and clean any dried milk residue with a small brush or needle.
- Czyszczenie zbiornika na wodę: Regularnie czyść zbiornik na wodę ciepłą wodą z mydłem i dokładnie płucz.
- Odwapnianie: The machine features an automatic descaling alarm. When the descaling indicator lights up, it's time to descale the machine. Follow the instructions in the descaling solution package and the machine's specific descaling procedure (refer to the full manual for detailed steps). Descaling removes mineral buildup, which is crucial for machine performance and coffee taste.
7. Rozwiązywanie Problemów
If you encounter issues with your Grundig KSM 4330, refer to the following common problems and solutions:
| Problem | Możliwa przyczyna | Rozwiązanie |
|---|---|---|
| Brak dozowania kawy | Water tank empty; machine not heated; clogged filter basket. | Fill water tank; wait for heating indicator; clean filter basket. |
| Coffee is too weak or watery | Insufficient coffee grounds; coffee too coarsely ground; not tamped wystarczająco mocno. | Zwiększ ilość kawy; użyj drobniejszego zmielenia; tamp mocniej. |
| Brak pary z dyszy | Funkcja pary nie jest aktywowana; dysza jest zatkana; urządzenie nie jest nagrzane do temperatury pary. | Activate steam function; clean steam wand; wait for steam indicator. |
| Z maszyny wycieka woda | Zbiornik na wodę nie jest prawidłowo osadzony; tacka ociekowa jest pełna; problem z uszczelką. | Reseat water tank; empty drip tray; contact support if issue persists. |
| Descaling alarm active | Gromadzenie się minerałów w systemie. | Perform a descaling cycle as per the instructions in Section 6. |
Jeśli po wypróbowaniu tych rozwiązań problem nadal występuje, skontaktuj się z obsługą klienta firmy Grundig.
8. Specyfikacje
| Funkcja | Szczegół |
|---|---|
| Marka | Grundig |
| Numer modelu | KSM 4330 (GMS7000) |
| Typ | Semi-automatic Espresso Machine |
| Kolor | Czarny |
| Pojemność | 1.1 litra (zbiornik na wodę) |
| Wymiary (gł. x szer. x wys.) | Wymiary: 41 cm x 18.6 cm x 32 cm |
| Waga | 3.9 kilograma |
| Cotage | 1350 Watts (Operating), 1628 Watts (Max) |
| Tomtage | 220-240 V |
| Ciśnienie pompy | 15 Pasek |
| Coffee Type Used | Kawa mielona |
| Interfejs użytkownika | Ekran dotykowy |
| Cechy specjalne | Milk Frother, Automatic Descaling Alarm, Cup Warming Plate, Memory Function |

Figure 8.1: Dimensions of the espresso machine.
9. Gwarancja i wsparcie
The Grundig KSM 4330 Delisia Coffee Espresso Machine comes with a 3-letnia gwarancja, ensuring high standards of quality and reliability.
For technical assistance, warranty claims, or further inquiries, please contact Grundig customer support through their official webstronę lub dane kontaktowe podane w dokumentacji zakupu.
Please have your model number (KSM 4330 or GMS7000) and proof of purchase ready when contacting support.