Wstęp
This manual provides detailed instructions for the installation, operation, and maintenance of your Gavigain KL 180 1000W 2-Channel Car Audio Amplifier Board. Designed for car audio enthusiasts, this amplifier delivers powerful and clear sound, enhancing your in-car audio experience. Please read this manual thoroughly before installation and use to ensure proper function and safety.
Informacje dotyczące bezpieczeństwa
- Zalecana profesjonalna instalacja: Due to the complexity of car electrical systems, professional installation is highly recommended to prevent damage to the ampuszkodzenie pojazdu, uszkodzenie ciała lub obrażenia ciała.
- Źródło zasilania: Ten amplifier is designed for 12V DC car electrical systems. Connecting it to other voltagŹródła elektroniczne mogą powodować szkody.
- Okablowanie: Ensure all wiring is correctly connected and insulated to prevent short circuits. Use appropriate gauge wires for power and ground connections.
- Wentylacja: Zainstaluj amplifier in a location with adequate ventilation to prevent overheating. Do not cover the heat sink fins.
- Wilgoć: Zachowaj amplifier away from moisture and water to prevent electrical hazards.
- Zabezpieczenie bezpiecznika: Ten amplifier includes fuse protection. Always replace fuses with the correct type and rating.
- Poziomy głośności: Długotrwałe narażenie na wysoki poziom głośności może spowodować uszkodzenie słuchu. Dostosuj głośność odpowiedzialnie.
Produkt ponadview
The Gavigain KL 180 is a powerful 1000W 2-channel car audio amplifier board, crafted from premium aluminum alloy for efficient heat dissipation and durability. It supports a wide range of speaker sizes (8, 10, and 12-inch bass speakers) and features multiple protection mechanisms for reliable performance.

Obraz: The Gavigain KL 180 amppłyta główna, pokażasing its robust aluminum alloy heat sink design, with a subtle background of a car interior, indicating its intended use.

Obraz: Od góry do dołu view of the Gavigain KL 180 amplifier board, highlighting the control knobs for Level, LPF/FULL/SELECTION, and Volume, along with the power and audio input terminals.
Specyfikacje
| Funkcja | Specyfikacja |
|---|---|
| Model | KL 180 |
| Moc wyjściowa | 1000 W (szczyt) |
| Kanały | Kanał 2 |
| Tomtage | 12V prądu stałego |
| Impedancja | 4Ω |
| THD (całkowite zniekształcenia harmoniczne) | Mniej niż 0.1% |
| Odpowiedź częstotliwościowa | 20Hz-250KHz |
| Tworzywo | Stop aluminium |
| Typ montażu | Montaż powierzchniowy |
| Waga przedmiotu | 1.91 funta |
Konfiguracja i instalacja
Proper installation is critical for optimal performance and safety. Ensure the vehicle's battery is disconnected before beginning any wiring.
1. Okablowanie zasilania i uziemienia
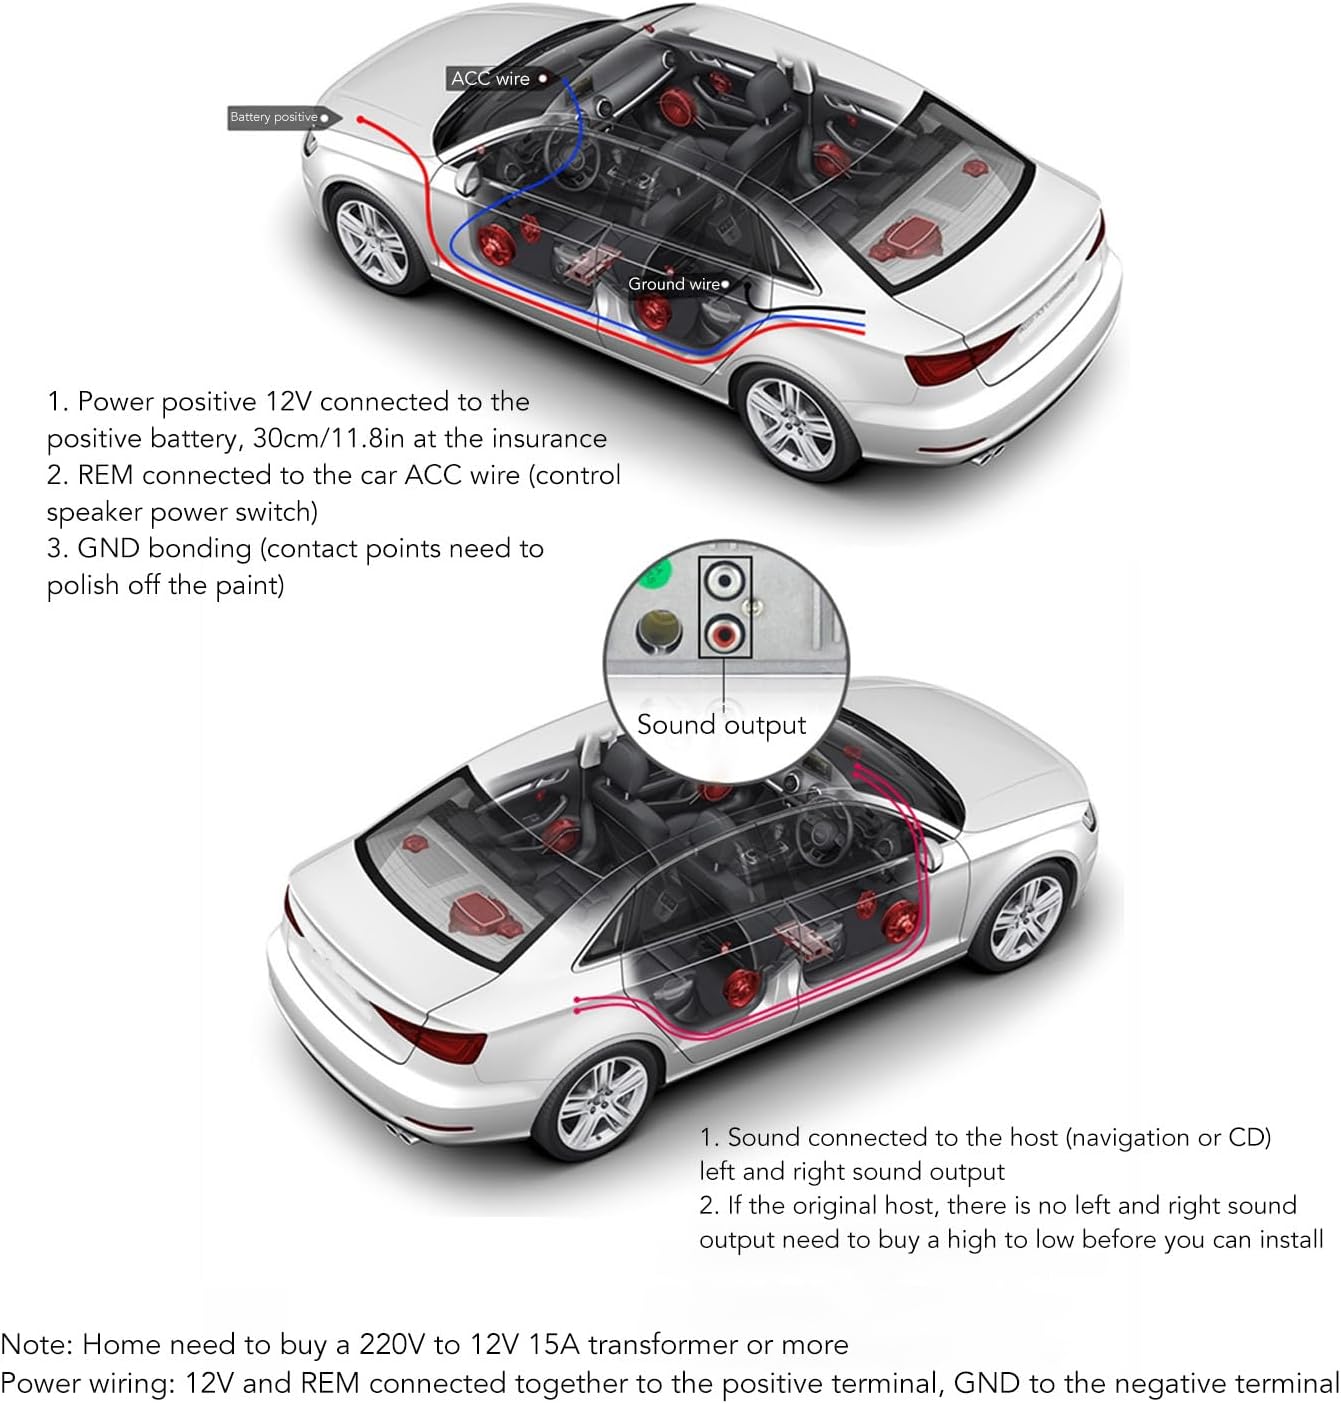
Obraz: Diagram illustrating the power, ground, and remote wire connections from the car battery and ACC wire to the amplifier, along with sound output connections to the car's head unit.
- Power Positive (12V): Connect the 12V power positive wire to the positive terminal of the car battery. Install an inline fuse holder within 30cm (11.8 inches) of the battery for protection.
- Zdalny (REM): Connect the REM wire to the car's ACC (Accessory) wire or the remote output from your head unit. This wire turns the amplifier on and off with the car's ignition or head unit.
- Masa (GND): Connect the GND wire to a clean, unpainted metal surface on the car chassis. Ensure good electrical contact by sanding off any paint or rust at the connection point.
- Wyjście dźwięku: Connect the sound output from your car's head unit (navigation or CD player) to the amplifier's audio input (RCA L/R). If your original head unit lacks dedicated left and right sound outputs, you may need a high-to-low level converter before connecting to the ampliyfikator.
Notatka: For home use, a 220V to 12V 15A (or higher) transformer is required to power the amplifier. This product is primarily designed for automotive 12V systems.
2. Subwoofer Control Installation Methods

Obraz: Diagrams illustrating three different methods for connecting the amplifier to control a subwoofer, including scenarios where the subwoofer is not controlled by the car key, controlled by the car key, and audio is sent from the original CD player.
- Method 1: Subwoofer Not Controlled by Car Key:
- Connect the +12V, REM, and GND terminals of the amplifier directly to the car battery (positive, remote, and ground respectively).
- Connect the sound input to the amplifier and the sound output from the ampdo subwoofera.
- In this setup, the amplifier will be continuously powered when the car battery is connected, regardless of the car key position.
- Method 2: Car Key Controlled Subwoofer Switch:
- Connect the +12V terminal to the car battery positive.
- Connect the REM terminal to the car's ACC wire (which is controlled by the car key).
- Connect the GND terminal to the car chassis.
- Connect the sound input to the amplifier and the sound output from the ampdo subwoofera.
- This method ensures the amplifier powers on and off with the car's ignition.
- Method 3: Original CD Player Audio Sent to Subwoofer:
- Connect the +12V, REM, and GND terminals as described in Method 2 (car key controlled).
- Connect the audio output from the original car CD player directly to the amplifier's sound input.
- Ten amplifier will then power the subwoofer using the audio signal from the CD player.
Instrukcja obsługi
Once installed, operate your Gavigain KL 180 amplifier using the controls on the board.

Obraz: Szczegółowy view of the control panel on the Gavigain KL 180 amplifier, showing the Level, LPF/FULL/SELECTION, and Volume knobs, along with the power LED and fuse holder.
- Dioda LED zasilania: A green LED light indicates that the ampLififier jest włączony i działa prawidłowo.
- Kontrola poziomu (wzmocnienia): Dostosuj to pokrętło do głośności wyjściowejtage of your head unit. Start with the gain at minimum and slowly increase it until the desired volume is achieved without distortion.
- LPF (Low Pass Filter) / FULL / SELECTION Switch:
- LPF: Activates the Low Pass Filter, allowing only low frequencies (bass) to pass through to the speakers. This is typically used for subwoofers.
- PEŁNY: Allows the full range of frequencies to pass through. Use this setting for full-range speakers.
- WYBÓR: This likely refers to the frequency adjustment for the LPF.
- Frequency Adjustment (30Hz - 280Hz): When LPF is selected, use this knob to set the cutoff frequency for the low pass filter. Frequencies below this setting will be ampskonsolidowany.
- Regulacja głośności: This knob provides an additional level of volume adjustment for the ampwyjście lifiera.
Always make small adjustments and listen carefully to avoid damaging your speakers or ampliyfikator.
Konserwacja
- Czyszczenie: Zachowaj amplifier clean and free from dust. Use a soft, dry cloth to wipe the surface. Do not use liquid cleaners or solvents.
- Wentylacja: Ensure the heat sink fins remain clear of obstructions to allow for proper airflow and heat dissipation.
- Znajomości: Okresowo sprawdzaj wszystkie połączenia przewodów, aby upewnić się, że są solidne i nie mają śladów korozji. Luźne połączenia mogą prowadzić do pogorszenia wydajności lub uszkodzenia.
- Sprawdzenie bezpiecznika: Jeśli amplifier stops working, check the fuse. If blown, replace it with a fuse of the exact same rating (e.g., 15A). Never use a higher-rated fuse.
Rozwiązywanie problemów
| Problem | Możliwa przyczyna | Rozwiązanie |
|---|---|---|
| Brak zasilania / Dioda LED zasilania wyłączona |
|
|
| Brak wyjścia dźwięku |
|
|
| Zniekształcony dźwięk |
|
|
| Ampprzegrzanie lifiera |
|
|
Gwarancja i wsparcie
Gavigain products are manufactured to high-quality standards. For specific warranty information, please refer to the product packaging or contact your retailer. If you encounter any issues not covered in this troubleshooting guide, please contact Gavigain customer support or your authorized dealer for assistance.
Additional protection plans may be available for purchase from your retailer to extend coverage beyond the standard warranty period.