1. Wprowadzenie
Thank you for choosing the WORKPRO 1500W Rotary Hammer Drill. This heavy-duty tool is designed for demanding tasks such as drilling in concrete, wood, and steel, as well as chiseling applications. This manual provides essential information for the safe and efficient operation, maintenance, and troubleshooting of your rotary hammer drill. Please read it thoroughly before first use and keep it for future reference.

Image 1.1: WORKPRO 1500W Rotary Hammer Drill and included accessories.
2. Ogólne instrukcje bezpieczeństwa
Zawsze przestrzegaj podstawowych zasad bezpieczeństwa, aby zmniejszyć ryzyko pożaru, porażenia prądem i obrażeń ciała. Nieprzestrzeganie tych instrukcji może spowodować poważne obrażenia.
- Bezpieczeństwo w miejscu pracy: Utrzymuj miejsce pracy w czystości i dobrym oświetleniu. Zagracone lub ciemne pomieszczenia sprzyjają wypadkom. Nie używaj elektronarzędzi w atmosferach wybuchowych, takich jak łatwopalne ciecze, gazy lub pyły.
- Bezpieczeństwo elektryczne: Wtyczki elektronarzędzi muszą pasować do gniazdka. Nigdy nie modyfikuj wtyczki w żaden sposób. Unikaj kontaktu ciała z powierzchniami uziemionymi. Nie wystawiaj elektronarzędzi na działanie deszczu ani wilgoci.
- Bezpieczeństwo osobiste: Always wear eye protection. Use hearing protection when operating the tool for extended periods. Wear a dust mask if drilling in dusty conditions. Dress properly; avoid loose clothing or jewelry.
- Używanie i konserwacja narzędzia: Nie używaj elektronarzędzia na siłę. Używaj elektronarzędzia odpowiedniego do danego zastosowania. Odłącz wtyczkę od źródła zasilania przed dokonywaniem jakichkolwiek regulacji, wymianą akcesoriów lub przechowywaniem elektronarzędzia.
- Konserwacja: Utrzymuj elektronarzędzia. Sprawdź, czy nie ma niewspółosiowości lub zakleszczenia ruchomych części, uszkodzeń części i innych stanów, które mogą mieć wpływ na działanie elektronarzędzia.
3. Product Components and Included Items
Familiarize yourself with the parts of your WORKPRO Rotary Hammer Drill and the accessories provided.

Image 3.1: Key components of the rotary hammer drill, including SDS-PLUS Chuck, Four Functions Switch, Grease Pot, Shock Absorber, On/Off Switch, Cushioned Handle, Variable Speed Control, 360° Rotatable Handle, and Heat Outlet.
Dołączone akcesoria:

Image 3.2: The complete set of accessories includes a carrying case, rotary hammer drill, SDS-plus point flat bit (250mm), SDS-plus point chisel bit (250mm), wrench, grease, SDS-plus drill bits (8mm, 10mm, 12mm), and a dust collector.
- 1 x Heavy-duty Rotary Hammer Drill
- 3 x SDS-plus Drill Bits (8 mm, 10 mm, 12 mm)
- 1 x Round Shank Chisel (Φ14 × 250 mm)
- 1 x Flat Chisel (Φ14 × 250 mm)
- 1 x Grease container
- 1 x Carbon Brush set
- 1 x osłona przeciwpyłowa
- 1 x Klucz
- 1 x Etui transportowe
4. Instalacja i montaż
4.1 Montaż uchwytu pomocniczego
The 360° rotatable handle provides better control and comfort. Loosen the handle clamp, ustaw uchwyt pod żądanym kątem i dokręć zaciskamp bezpiecznie.
4.2 Inserting and Removing SDS-plus Bits
The SDS-plus chuck allows for quick and secure bit changes.
- Wstawianie: Clean the bit shank. Pull back the chuck collar, insert the bit into the chuck until it clicks into place. Release the collar. Pull on the bit to ensure it is securely locked.
- Usuwanie: Pull back the chuck collar and pull the bit out.

Image 4.1: Illustration of the auto-lock SDS-plus chuck for secure bit clamping.
4.3 Attaching the Dust Collector
For cleaner operation and to protect the user, attach the dust collector to the front of the tool when drilling.

Image 4.2: The anti-dust cover protects users and the machine from dust and debris.
5. Instrukcja obsługi
The WORKPRO Rotary Hammer Drill features four operating modes and variable speed control for versatile applications.
5.1 Wybór trybu
Use the four-function switch located on the side of the tool to select the desired operating mode:
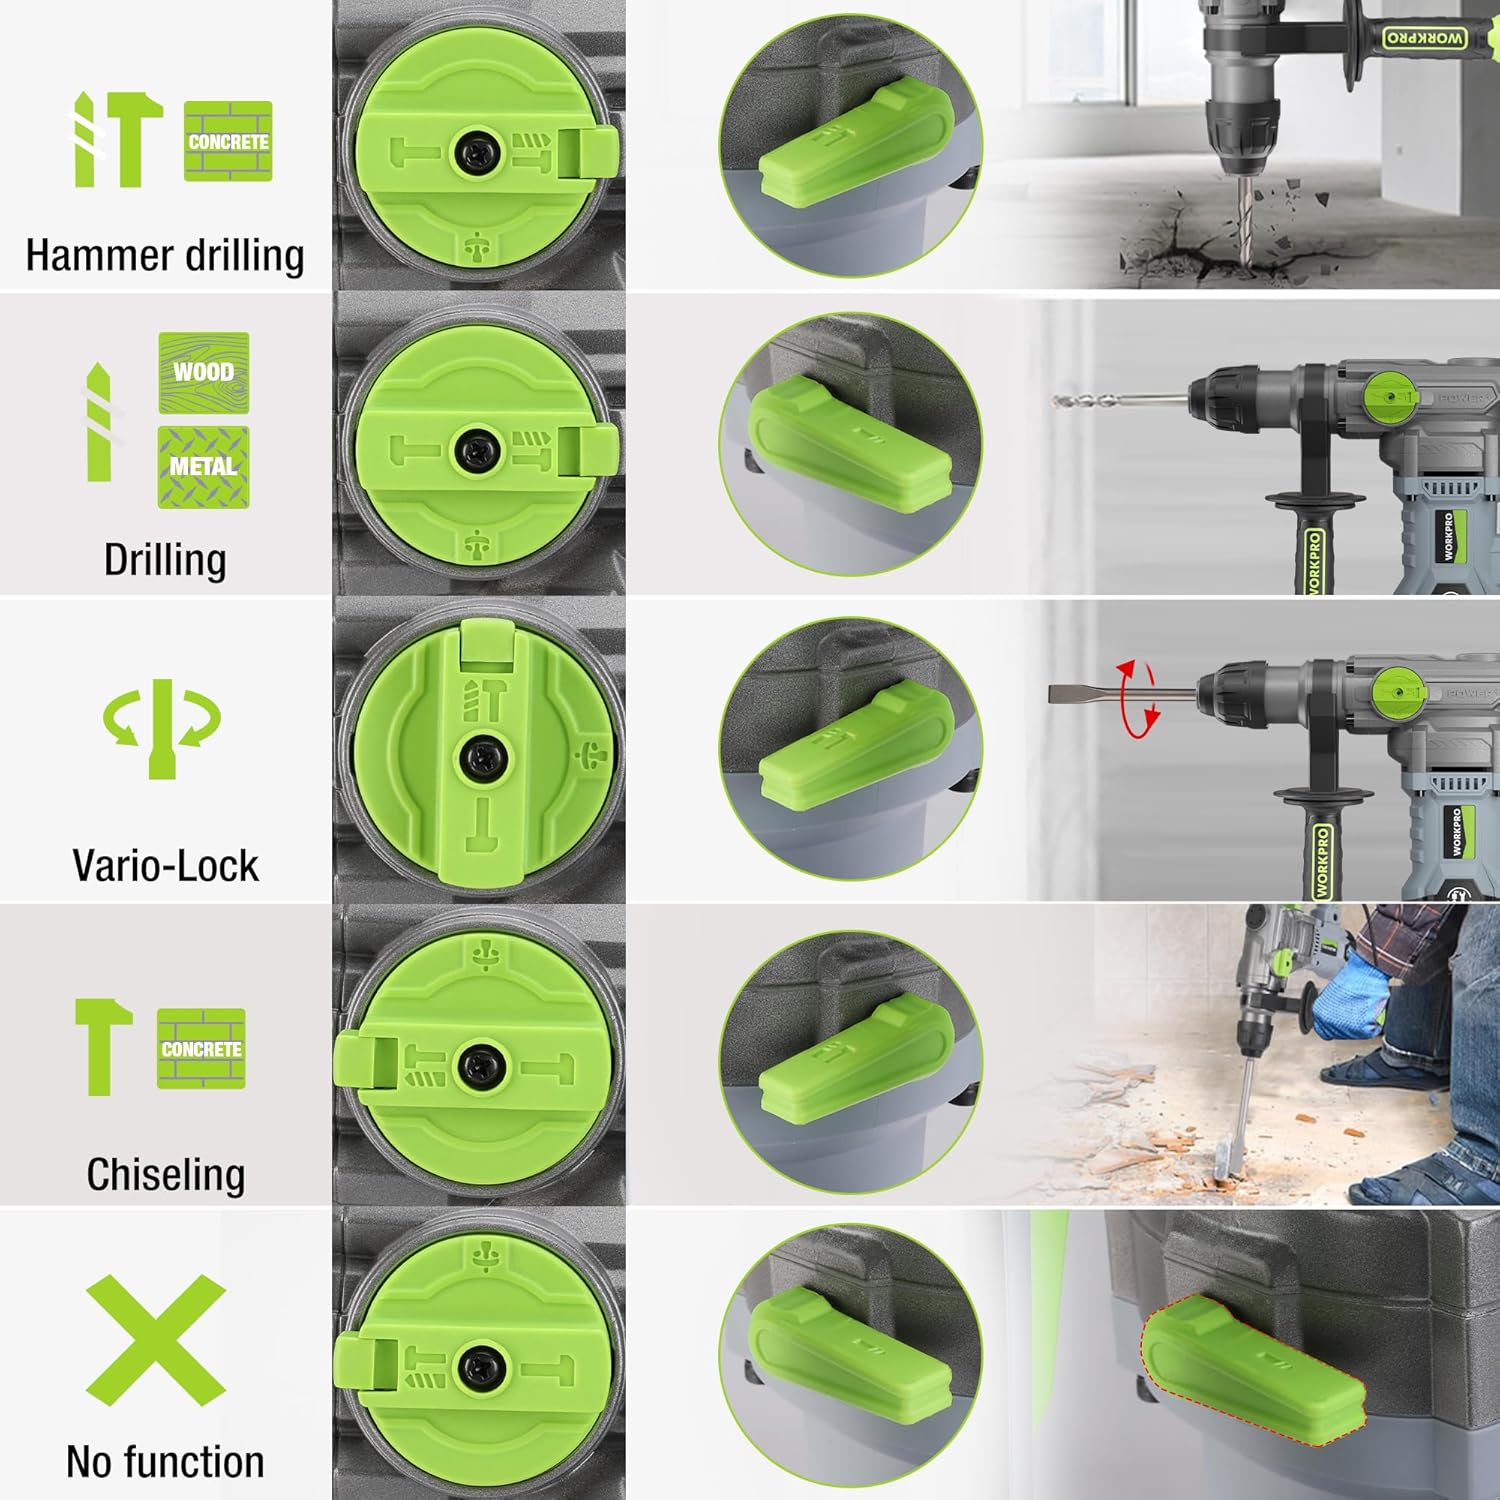
Image 5.1: The four-function switch allows selection between Hammer Drilling, Drilling, Vario-Lock (Chisel Adjust), and Chiseling modes.
- Wiercenie udarowe: For drilling in concrete and masonry with impact.
- Wiercenie: Do wiercenia bez udaru w drewnie, metalu i tworzywach sztucznych.
- Chiseling (Hammer Only): For light chiseling work in concrete and masonry.
- Vario-Lock (Chisel Adjust): Allows you to rotate and lock the chisel in various positions to optimize the working angle.

Image 5.2: Visual representation of the hammer drilling, drilling, hammer, and chisel adjust modes.
5.2 Regulacja prędkości zmiennej
The variable speed control allows you to adjust the rotation speed (0-930 RPM) and impact frequency (0-4300 BPM) to match the material and application.
- Rotate the speed adjustment dial to increase or decrease the speed.
- Start with a lower speed for precise drilling and increase as needed.
5.3 Drilling Capacities
The tool offers excellent drilling performance across various materials:
- Beton: Do 32 mm
- Drewno: Do 42 mm
- Stal: Do 13 mm
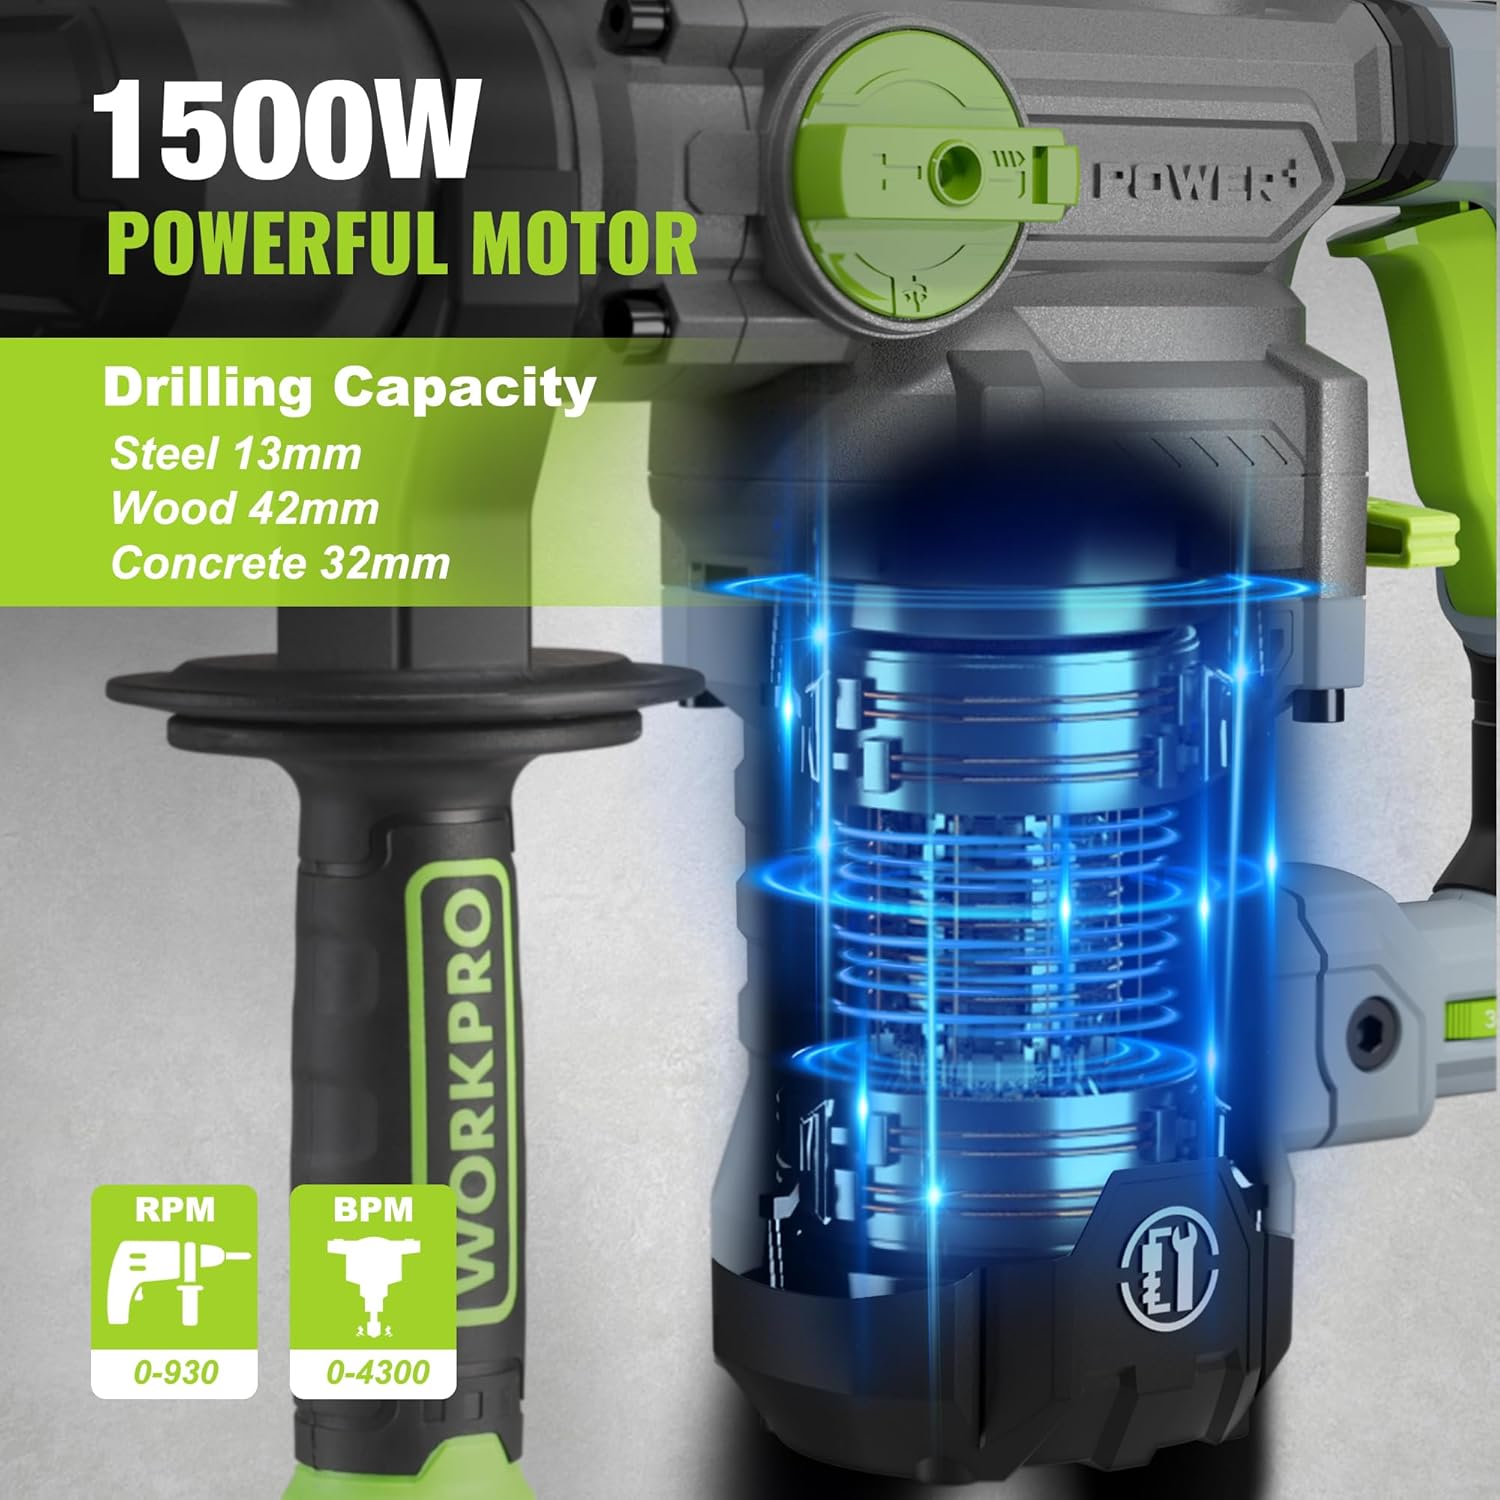
Image 5.3: The 1500W motor provides sufficient power for drilling in steel, wood, and concrete.
5.4 Zastosowanie Examples

Image 5.4: The tool is suitable for various tasks including chiseling concrete, removing tiles, concrete drilling, and floor breaking.
6. Konserwacja
Regularna konserwacja zapewnia długowieczność i optymalną wydajność narzędzia.
6.1 Czyszczenie
- Przed przystąpieniem do czyszczenia należy zawsze odłączyć narzędzie od zasilania.
- Regularnie czyść otwory wentylacyjne, aby zapobiegać przegrzaniu.
- Wytrzyj obudowę narzędzia miękką ściereczką.amp płótno. Nie używaj ostrych środków chemicznych ani ściernych środków czyszczących.
- The tool features a dust-proof design and anti-dust bottom structure to extend its service life.
6.2 Grease Replenishment
To maintain optimal performance and durability, replenish the grease every 30-40 hours of cumulative use.
- Use the provided wrench to open the grease pot.
- Apply the advanced lubricant (grease) as instructed.
- Securely close the grease pot after replenishment.
Image 6.1: Instructions for grease replenishment using the provided spanner and grease.
6.3 Wymiana szczotek węglowych
Carbon brushes are wear parts and should be checked periodically. Replace them when they are worn down to their limit to ensure consistent motor performance.
7. Rozwiązywanie Problemów
W tej sekcji omówiono typowe problemy, które mogą wystąpić. W przypadku problemów, których tutaj nie wymieniono, skontaktuj się z obsługą klienta.
| Problem | Możliwa przyczyna | Rozwiązanie |
|---|---|---|
| Narzędzie nie uruchamia się | Brak zasilania; Wadliwy przełącznik; Zużyte szczotki węglowe | Sprawdź połączenie zasilania; Przetestuj przełącznik; Wymień szczotki węglowe |
| Zmniejszona wydajność wiercenia | Dull drill bit; Incorrect mode selected; Insufficient grease | Replace or sharpen drill bit; Select correct mode; Replenish grease |
| Nadmierne wibracje/hałas | Loose components; Damaged bit; Internal issue | Check all connections; Replace bit; Contact service center |
| Przegrzanie | Zablokowane otwory wentylacyjne; Długotrwałe, intensywne użytkowanie | Wyczyść otwory wentylacyjne; pozwól narzędziu ostygnąć |
8. Specyfikacje techniczne
| Funkcja | Specyfikacja |
|---|---|
| Numer modelu | W125244A |
| Wejście Voltage | 230-240 V |
| Częstotliwość | 50 Hz |
| Moc znamionowa wejściowa | 1500 W |
| Prędkość bez obciążenia | 0-930 rpm ±10% |
| Częstotliwość uderzeń | 0-4300 bpm ±10% |
| Single Impact Force | 5.5 J |
| Wydajność wiercenia (beton) | 32 mm |
| Wydajność wiercenia (drewno) | 42 mm |
| Wydajność wiercenia (stal) | 13 mm |
| Rodzaj uchwytu | SDS-plus |
| Wymiary produktu (dł. x szer. x wys.) | Wymiary 38.6 x 10.4 x 26.4 cm |
| Waga | 8.34 kilogramów |
| Źródło zasilania | Elektryczny przewodowy |
| Liczba biegów | 6 (zmienna prędkość) |
9. Informacje o gwarancji i wsparciu
For warranty details, product support, or service inquiries, please refer to the warranty card included with your purchase or contact WORKPRO customer service directly. Keep your proof of purchase for any warranty claims.