1. Wprowadzenie
This manual provides detailed instructions for the assembly, operation, and maintenance of your FLEXISPOT Height-Adjustable Electric Desk, Model QS2LW-1811. Please read this manual thoroughly before use to ensure proper function and safety. This L-shaped desk features a robust 4-leg design with dual motors for stable height adjustment, offering a versatile workspace for various activities.

Figure 1: FLEXISPOT L-shaped Height-Adjustable Electric Desk.
2. Instrukcje bezpieczeństwa
Aby zapobiec obrażeniom ciała lub uszkodzeniu produktu, należy stosować się do następujących wskazówek bezpieczeństwa:
- Zasilanie: Use only AC100-240V, Frequency 50/60Hz.
- Środowisko operacyjne: Suitable for indoor use only, within a temperature range of 0-40°C.
- Zagrożenie pożarem: Keep the desk away from open flames and heat sources.
- Czyszczenie: Always unplug the desk before cleaning. Use a damp cloth and avoid water entering electrical components. Regularly check and tighten all screws.
- Instalacja: Ensure correct installation using only manufacturer-provided accessories. Maintain a safety gap around moving parts.
- Bezpieczeństwo dzieci: Trzymaj małe części z dala od dzieci, aby zapobiec ryzyku zadławienia.
- Środki czyszczące: Use only non-corrosive, non-abrasive cleaners.
- Opakowanie: Handle packaging cautiously to avoid suffocation risks. Retain packaging for future reference.
- Transport: For transportation, secure all parts, unplug the desk, and use multiple people for lifting.

Figure 2: Important safety warnings in multiple languages.
3. Instalacja i montaż
The FLEXISPOT Height-Adjustable Electric Desk is designed for quick and straightforward assembly. It comes with detailed step-by-step instructions and a complete set of tools. Pre-drilled holes simplify the process significantly.
3.1 Zawartość opakowania
Before beginning assembly, ensure all components are present and undamaged. The package typically includes:
- Desktop sections (L-shaped)
- Lifting columns (4 legs)
- Feet for the lifting columns
- Elementy poprzeczki/ramy
- Skrzynka sterownicza
- Hand control panel
- Zasilacz i kable
- Sprzęt montażowy (śruby, nakrętki itp.)
- Narzędzia do montażu
3.2 Etapy montażu
Follow the included graphical instructions for precise assembly. A general overview Proces przebiega następująco:
- Attach the feet to the bottom of each lifting column.
- Connect the lifting columns to the main crossbar and frame components.
- Secure the control box to the designated area on the frame.
- Carefully place the desktop sections onto the assembled frame and secure them using the provided screws and pre-drilled holes.
- Connect all necessary cables from the motors to the control box and then to the hand control panel.
- Mount the hand control panel in an easily accessible location on the desk.

Figure 3: Assembly diagram for the desk frame and desktop.
The desk features strong steel legs and a solid 4-leg structure, ensuring stability even at its highest settings.

Figure 4: Detail of the headphone hook and robust steel legs.

Figure 5: The desk's dual-stage legs provide continuous height adjustment.

Figure 6: The 4-leg solid structure ensures stability and safety, tested for over 20,000 cycles.
4. Instrukcja obsługi
Your FLEXISPOT electric desk offers flexible height adjustment and smart control features.
4.1 Regulacja wysokości
The desk's height can be adjusted from 72 cm to 117 cm (approximately 28.3 inches to 46 inches). This range allows for comfortable sitting or standing positions for various users and activities.
4.2 Smart Hand Control Panel
The intelligent hand control panel allows for precise height adjustments and memory presets.
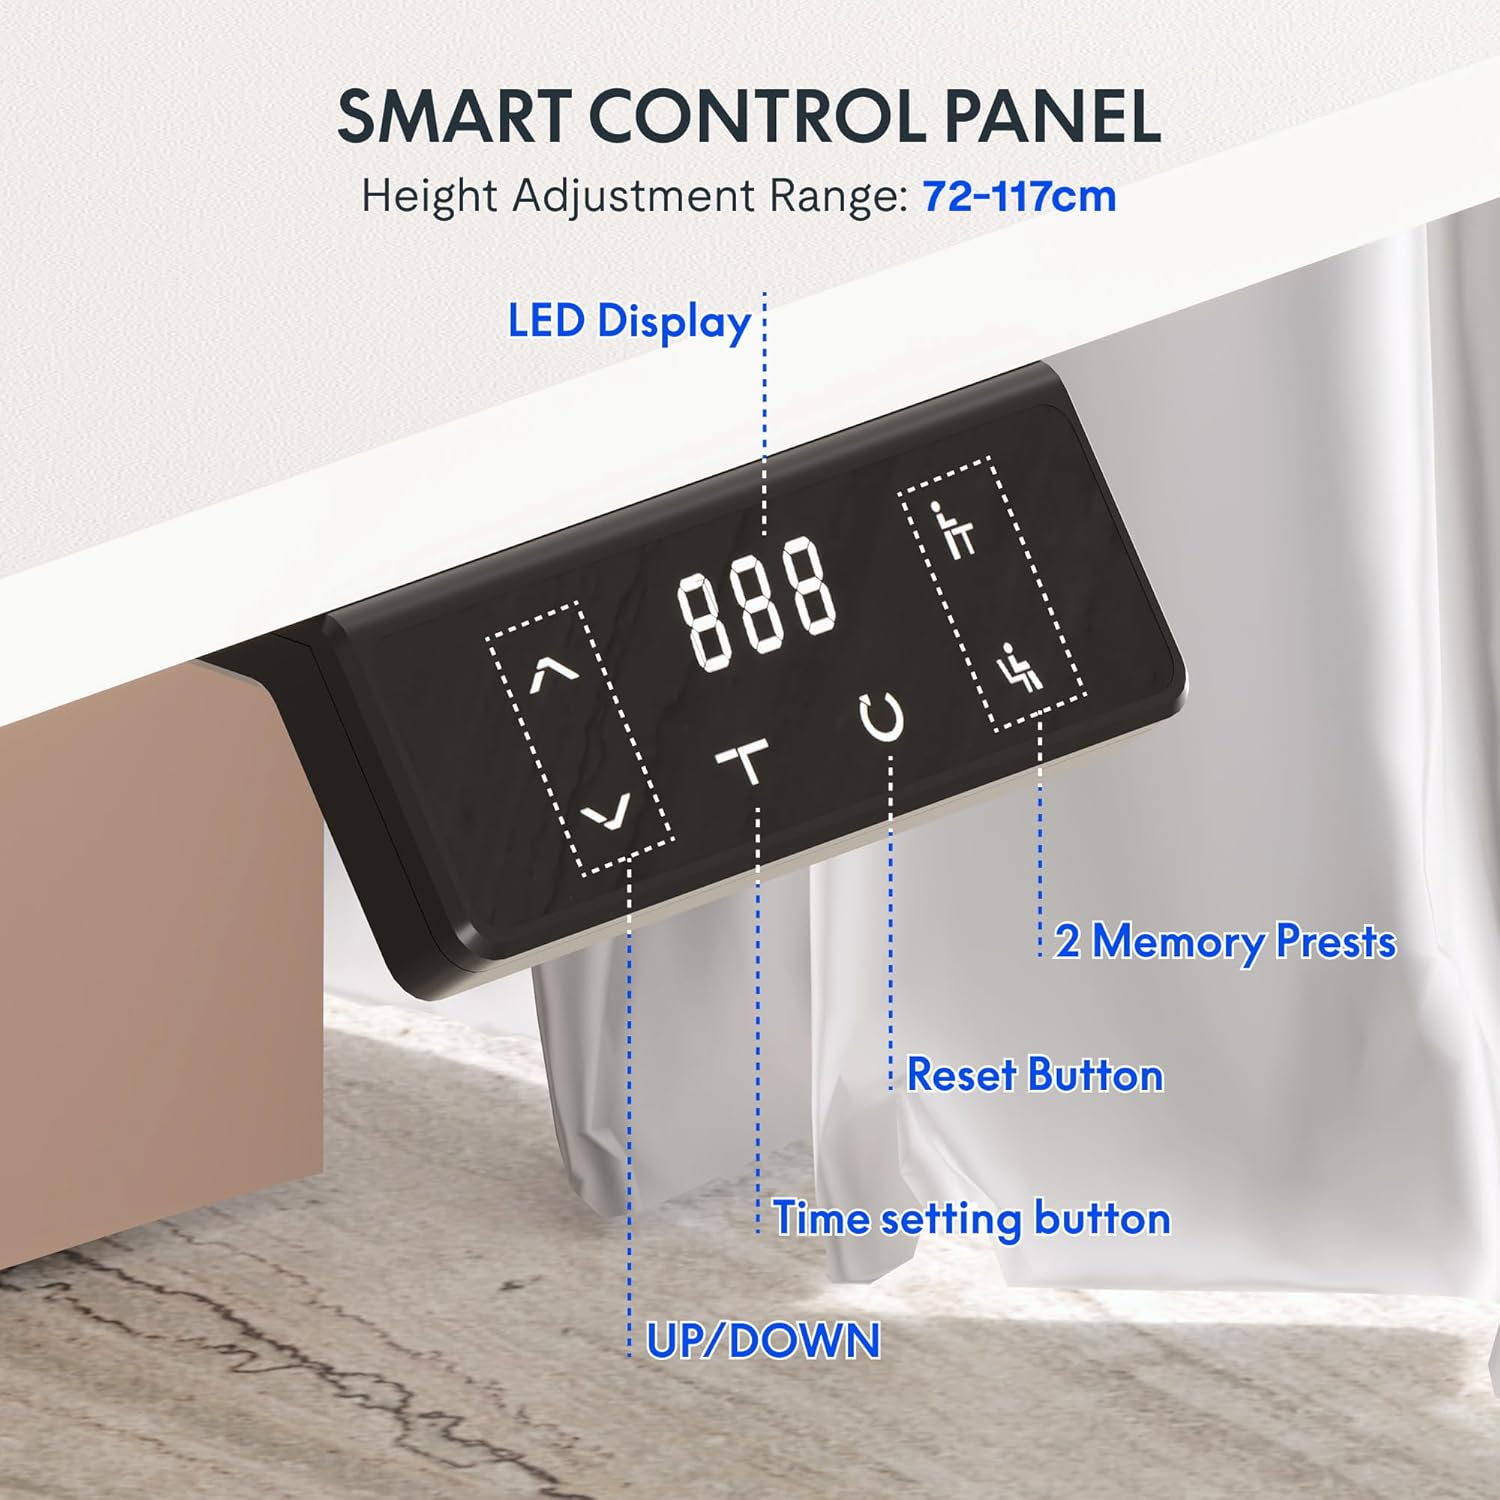
Figure 7: Smart Control Panel features.
- Wyświetlacz LED: Pokazuje aktualną wysokość biurka w centymetrach.
- UP/DOWN Buttons (< / >): Press and hold to move the desk up or down to your desired height.
- Ustawienia pamięci (1, 2): To save a preferred height, adjust the desk to the desired position, then press and hold one of the memory buttons (1 or 2) until the display flashes or beeps. To recall a saved height, simply press the corresponding memory button.
- Reset Button (C): Used to reset the desk to its lowest position or clear error codes. Typically, press and hold until the desk moves to its lowest point and resets.
- Przycisk ustawiania czasu (T): This button may be used for setting reminders to stand or sit, depending on the specific model's features. Refer to the detailed manual for specific time setting functions.
4.3 Dual Motor Stabilization
The desk is equipped with advanced dual motor technology, providing an impressive load capacity of up to 80 kg. This ensures smooth, even, and stable height adjustment, even when the desk is fully loaded with equipment.
5. Konserwacja
Regular maintenance ensures the longevity and optimal performance of your electric desk.
- Czyszczenie: Unplug the desk before cleaning. Use a soft, damp cloth to wipe down surfaces. Avoid harsh chemicals or abrasive cleaners.
- Dokręcenie śrub: Okresowo sprawdzaj i dokręcaj wszystkie śruby i nakrętki, aby zapewnić integralność konstrukcji.
- Zarządzanie kablami: Upewnij się, że wszystkie kable są starannie ułożone i nie są ściśnięte ani naciągnięte.
- Nośność: Do not exceed the maximum weight recommendation of 80 kg to prevent damage to the motors and frame.
The desktop features protective rounded edges, which also contribute to durability and user safety.

Figure 8: Protective rounded edges of the desktop.
6. Rozwiązywanie Problemów
Jeśli masz problemy z biurkiem, zapoznaj się z poniższymi typowymi problemami i ich rozwiązaniami:
- Biurko się nie rusza:
- Sprawdź, czy kabel zasilający jest prawidłowo podłączony do biurka i gniazdka ściennego.
- Ensure all motor cables are properly connected to the control box.
- Press the Reset button (C) and hold until the desk moves to its lowest position and resets.
- Nierównomierny ruch:
- Perform a reset procedure as described above.
- Ensure the desk is not overloaded and weight is evenly distributed.
- Kod błędu na wyświetlaczu:
- Refer to the specific error code in the detailed manual provided with your product. Often, a reset (pressing and holding 'C') can clear minor errors.
- Odłącz biurko od zasilania na 10 minut, następnie podłącz je ponownie i spróbuj jeszcze raz.
- Hałas podczas pracy:
- A slight motor sound is normal during adjustment.
- If the noise is excessive or unusual, check for loose screws or obstructions.
If problems persist after attempting these solutions, please contact FLEXISPOT customer support.
7. Specyfikacje
| Funkcja | Specyfikacja |
|---|---|
| Marka | ELASTYCZNI |
| Numer modelu | QS2LW-1811 |
| Rozmiar pulpitu | 180 x 110 cm (L-shaped) |
| Zakres regulacji wysokości | 72 cm - 117 cm |
| Wymiary produktu (całkowite) | 110 x 180 x 71 cm (at lowest height) |
| Waga przedmiotu | 30 kilograma |
| Maksymalna zalecana waga | 80 kilograma |
| Materiał bazowy | Stal stopowa |
| Cechy specjalne | Electric Height Adjustment, Dual Motors, Memory Presets |
| Kolor | Biały |
| Wymagany montaż | Tak |

Figure 9: Desk dimensions and adjustable height range.
8. Gwarancja i wsparcie
8.1 Informacje o gwarancji
For detailed warranty information, please refer to the warranty card included with your product or visit the official FLEXISPOT website. Warranty terms typically cover manufacturing defects and motor malfunctions under normal use conditions.
8.2 Obsługa klienta
If you have any questions, require technical assistance, or need to report an issue, please contact FLEXISPOT customer support through their official website or the retailer from whom you purchased the product. Please have your model number (QS2LW-1811) and purchase date ready when contacting support.