1. Wprowadzenie
Thank you for choosing the Crivit Auriol Radio-Controlled Projection Alarm Clock. This device combines a precise radio-controlled clock with a clear LCD display, dual alarms, and a convenient projection feature. This manual will guide you through the setup, operation, and maintenance of your new alarm clock.

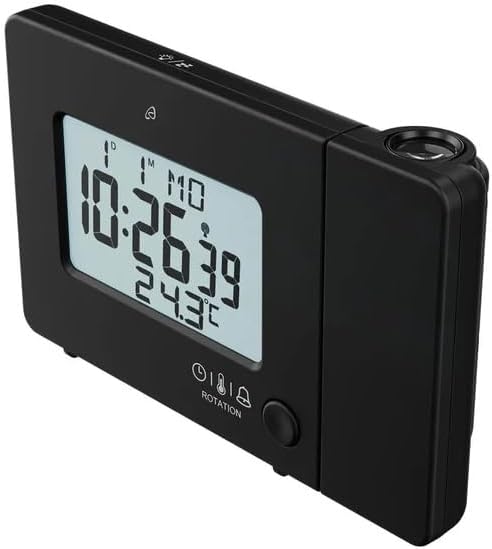
Przód view of the alarm clock displaying time, date, and temperature.
2. Instrukcje bezpieczeństwa
- Przeczytaj uważnie wszystkie instrukcje przed użyciem i zachowaj je na przyszłość.
- Nie wystawiaj urządzenia na działanie ekstremalnych temperatur, bezpośredniego światła słonecznego i wysokiej wilgotności.
- Unikaj upuszczania i narażania urządzenia na silne uderzenia.
- Nie próbuj samodzielnie demontować ani naprawiać urządzenia. Skontaktuj się z wykwalifikowanym personelem serwisowym.
- Przechowuj baterie poza zasięgiem dzieci. Zużyte baterie utylizuj zgodnie z lokalnymi przepisami.
- Use only the provided AC adapter or one with identical specifications.
3. Zawartość opakowania
Proszę sprawdzić, czy w paczce znajdują się następujące elementy:
- Crivit Auriol Radio-Controlled Projection Alarm Clock (Model 373928)
- Zasilacz sieciowy
- Baterie (wstępnie zainstalowane lub osobne)
- Instrukcja obsługi (ten dokument)

Included AC power adapter.
4. Funkcje produktu
- Radio-Controlled Time: Automatic time synchronization for precise timekeeping.
- Funkcja projekcji: Projects time, alarm times, or ambient temperature onto a wall or ceiling.
- Pivoting Projection Arm: Adjustable projection angle with easy focus adjustment.
- Wyświetlacz LCD: Clear screen showing time, day, month, week number/day of the week, and indoor temperature.
- Podwójne alarmy: Two independent alarm settings with snooze function.
- Czujnik dotykowy: Activates short-term projection and screen backlight.
- Opcje zasilania: Operates via AC adapter or batteries.
- Port ładowania USB-A: Convenient 5V, 800mA output for charging external devices.
- Regulowana jasność: Customizable display brightness.
5. Identyfikacja komponentów
Przód View:
Przód view z wyświetlaczem LCD.
- Wyświetlacz LCD: Shows time, date, temperature, alarm status, and radio control signal.
- Touch Sensor Area: Located above the display, for temporary backlight and projection.
- Projection Indicator: Icon indicating projection is active.
- Wskaźniki alarmu: Ikony alarmu 1 i alarmu 2.
- Przycisk obrotu: Adjusts projection orientation.
Strona View (Projection Arm):
Strona view with projection arm extended.
- Ramię projekcyjne: Pivots to direct the projection.
- Koło ostrości: Dostosowuje klarowność wyświetlanego obrazu.
- Soczewka projekcyjna: Emits the time/temperature display.
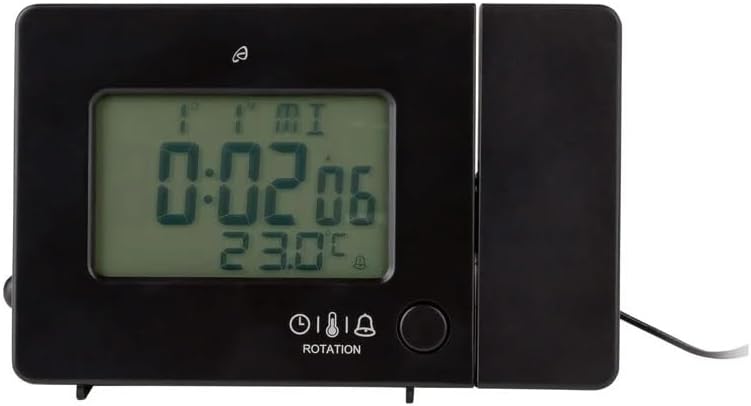
Tył View:

Tył view with control buttons and ports.
- -/WEEK Button: Decreases values, sets week display.
- +/ZONE Button: Increases values, sets time zone.
- Przycisk °C/°F: Toggles temperature unit.
- LANG Button: Selects display language for day of the week.
- Przycisk 12/24: Toggles 12/24 hour format.
- Przycisk TRYB: Cycles through settings modes (Time, Alarm 1, Alarm 2).
- Przycisk SET: Enters setting mode for current display.
- Przycisk reset: Resets the device to factory defaults (use a pointed object).
- Komora baterii: Do baterii zapasowych.
- Port DC IN: Do podłączenia zasilacza sieciowego.
- Port wyjściowy USB-A: Do ładowania urządzeń zewnętrznych.
6. Konfiguracja
6.1. Włączanie
The alarm clock can be powered by either the included AC adapter or batteries for backup.
- Montaż baterii: Open the battery compartment on the rear of the unit. Insert the included batteries, observing the correct polarity (+/-). Batteries primarily serve as backup in case of power outage.
- Podłączenie zasilacza sieciowego: Connect the small plug of the AC adapter into the DC IN port on the back of the alarm clock. Plug the AC adapter into a standard wall outlet. The display will light up.
Alarm clock connected to power.
6.2. Initial Setup and Radio Control Synchronization
Upon first power-up or after a reset, the clock will automatically attempt to synchronize with the radio-controlled time signal (DCF77). This process can take several minutes to an hour, depending on your location and signal strength. During synchronization, a radio tower icon will flash on the display.
- Aby uzyskać lepszy odbiór sygnału, ustaw zegar w pobliżu okna.
- Unikaj umieszczania go w pobliżu urządzeń elektronicznych, które mogą powodować zakłócenia.
- Once synchronized, the radio tower icon will appear solid on the display.
If the radio signal is not received, you may need to set the time manually (see Section 7.1).
6.3. Basic Settings (if not automatically set or for adjustment)
Naciśnij USTAWIĆ button to enter setting mode. Use the -/WEEK I +/ZONE buttons to adjust values, and USTAWIĆ aby potwierdzić i przejść do następnego ustawienia.
- Strefa czasowa: Adjust if you are not in the standard time zone for the radio signal.
- Format 12/24-godzinny: Naciśnij 12/24 button to toggle between 12-hour (with AM/PM) and 24-hour formats.
- Jednostka temperatury: Naciśnij ° C / ° F przycisk do przełączania pomiędzy stopniami Celsjusza i Fahrenheita.
- Język wyświetlacza: Naciśnij JĘZYK button to select the language for the day of the week display (5 languages available).
7. Instrukcja obsługi
7.1. Ręczne ustawianie czasu
If the radio-controlled time signal is weak or unavailable, you can set the time manually:
- Naciśnij i przytrzymaj USTAWIĆ Naciskaj przycisk, aż zaczną migać cyfry godziny.
- Użyj -/WEEK I +/ZONE przyciski do regulacji godziny.
- Naciskać USTAWIĆ to confirm and move to minutes, then year, month, and day.
- Naciskać USTAWIĆ again to exit manual time setting.
7.2. Ustawianie alarmów (Alarm 1 i Alarm 2)
Zegar posiada dwa niezależne alarmy.
- Naciśnij TRYB button once to display Alarm 1 time, or twice for Alarm 2 time. The corresponding alarm icon (e.g., A1) will flash.
- Podczas wyświetlania godziny alarmu naciśnij i przytrzymaj USTAWIĆ Naciskaj przycisk, aż zaczną migać cyfry godziny.
- Użyj -/WEEK I +/ZONE przyciski do regulacji godziny.
- Naciskać USTAWIĆ to confirm and move to minutes. Adjust minutes using -/WEEK I +/ZONE.
- Naciskać USTAWIĆ ponownie, aby potwierdzić i wyjść z ustawień alarmu.
- Aby aktywować/dezaktywować alarm, naciśnij przycisk TRYB button to display the desired alarm, then press the +/ZONE button. The alarm icon (bell) will appear/disappear on the display.
7.3. Funkcja drzemki
Gdy zabrzmi alarm, dotknij Obszar czujnika dotykowego lub naciśnij SNOOZE / LIGHT button (if available, otherwise use the touch sensor) to activate the snooze function. The alarm will pause for approximately 5 minutes and then sound again. To stop the alarm completely, press any other button.
7.4. Funkcja projekcji
The alarm clock can project the time, alarm times, or ambient temperature onto a wall or ceiling.
- Aktywuj projekcję: The projection is continuously active when powered by the AC adapter. If running on batteries, touch the Obszar czujnika dotykowego for short-term projection.
- Dostosuj kąt projekcji: Pivot the projection arm to direct the image to your desired location.
- Dostosuj ostrość: Użyj Koło ostrości on the projection arm to sharpen the projected image.
- Change Projected Content: Naciśnij TRYB button repeatedly to cycle through projecting Time, Alarm 1, Alarm 2, or Temperature.
- Obróć projekcję: Naciśnij OBRÓT button to rotate the projected image by 90-degree increments (4 orientations available).

Time projected onto a surface.
7.5. Podświetlenie wyświetlacza
When powered by the AC adapter, the display backlight is continuously on. When running on batteries, touch the Obszar czujnika dotykowego to activate the backlight for a few seconds.
7.6. Wyjście ładowania USB
The USB-A port on the back of the unit provides a 5V, 800mA output for charging small electronic devices like smartphones or tablets. Connect your device's USB charging cable to this port.
8. Konserwacja
- Czyszczenie: Przetrzyj urządzenie miękką, suchą ściereczką. Nie używaj środków czyszczących o właściwościach ściernych ani rozpuszczalników.
- Wymiana baterii: If using batteries for backup, replace them annually or when the display becomes dim during power outages. Upewnij się, że polaryzacja jest prawidłowa.
- Składowanie: Jeśli urządzenie będzie przechowywane przez dłuższy czas, należy wyjąć baterie, aby zapobiec wyciekowi.
9. Rozwiązywanie Problemów
| Problem | Możliwa przyczyna | Rozwiązanie |
|---|---|---|
| Wyświetlacz jest pusty lub przyciemniony. | No power, dead batteries, or AC adapter not connected. | Ensure AC adapter is securely connected. Replace batteries if using for backup. |
| Radio-controlled time not synchronizing. | Weak signal, interference, or incorrect time zone. | Move the clock to a window or open area. Avoid electronic devices. Manually set time if necessary. Check time zone setting. |
| Projekcja jest rozmazana. | Ostrość nie została ustawiona. | Dostosuj Koło ostrości on the projection arm. |
| Alarm nie włącza się. | Alarm nie został aktywowany lub został nieprawidłowo ustawiony. | Ensure the alarm icon is visible on the display. Recheck alarm time settings. |
| Ładowanie przez USB nie działa. | Device not properly connected, or device requires more power than 800mA. | Ensure the USB cable is securely connected. Check if your device's charging requirements exceed 5V/800mA. |
10. Specyfikacje

Wymiary produktu.
- Numer modelu: 373928
- Wymiary (dł. x szer. x wys.): 15 x 3.81 x 9.5 cm (approx. 15l x 9.5H centimeters)
- Tworzywo: Plastikowy
- Typ wyświetlacza: Cyfrowy LCD
- Źródło zasilania: AC Adapter (included) or Batteries (included)
- Wyjście USB: 5V, 800mA
- Cechy szczególne: Adjustable brightness, Snooze, Projection, Radio-controlled time
- Typ ruchu: Kwarc
- Typ montażu: Blat stołu
- Zastosowanie wewnątrz / na zewnątrz: Wnętrz
11. Gwarancja i wsparcie
This Crivit Auriol Projection Alarm Clock comes with a standard manufacturer's warranty. Please refer to the warranty card included in your package or contact your retailer for specific warranty terms and conditions.
For technical support or inquiries, please contact the customer service department of your retailer or the Crivit support line as indicated on the product packaging or official webstrona.