
1. Wprowadzenie
The AOPUTTRIVER AP-189A is a high-precision digital manometer designed for measuring differential, positive, and negative pressure. It is widely used in various applications including flow measurement, air quality monitoring, level measurement, gas temperature measurement, and HVAC system control. This manual provides detailed instructions for the safe and effective use of your device.
The device features a large LCD with backlight, data hold function, automatic power-off, and the ability to record maximum, minimum, and average values, as well as differential pressure (DIF). It supports 11 selectable pressure units for versatility in professional applications.
2. Funkcje produktu
- Wysoka precyzja: Measurement range of ±2.000psi with an accuracy of ±0.3%FSO (at 25°C).
- Wiele jednostek: Easily switch between 11 pressure units: Psi, kPa, Kgfcm2, ozin2, Bar, mbar, inHg, mmHg, inH2O, ftH2O, cmH2O.
- Rejestracja danych: Records MAX/MIN/AVG values for easy data analysis.
- Ustawienie zerowe: Allows for precise zero calibration before measurements.
- Wyświetlacz wielofunkcyjny: Large LCD with backlight for clear readings.
- Zarządzanie energią: Low battery indicator and automatic power-off after 25 minutes of inactivity to conserve battery life.
- DIF Function: Measures differential pressure.

Obraz: Ponadview of the AP-189A Digital Manometer's key features and specifications, including accuracy, repeatability, maximum pressure, and various functions like data hold, auto-off, and unit selection.
3. Zawartość opakowania
Sprawdź, czy wszystkie elementy znajdują się w opakowaniu i są w dobrym stanie po jego otwarciu:
- 1 x AP-189A Digital Manometer
- 1 x Torba ochronna
- 1 x mały śrubokręt
- 2 baterie AAA 1.5 V
- 1 x User Manual (Japanese)

Image: The complete package contents of the AP-189A Digital Manometer, showing the device, a protective carrying bag, a small screwdriver, two AAA batteries, and the user manual.
4. Konfiguracja
4.1 Instalacja baterii
- Znajdź pokrywę komory baterii z tyłu urządzenia.
- Use the provided small screwdriver to open the battery compartment.
- Włóż dwie baterie AAA 1.5 V, zwracając uwagę na prawidłową biegunowość (+/-).
- Załóż pokrywę komory baterii i zabezpiecz ją śrubą.
4.2 Podłączanie węży
The AP-189A features dual ports for differential pressure measurement. Connect the hoses to the appropriate ports (+ and -) based on your measurement requirements. Ensure a secure connection to prevent leaks.

Obraz: szczegółowy view of the AP-189A Digital Manometer, highlighting its dimensions and the dual port connections at the top for pressure hoses.
5. Instrukcja obsługi
5.1 Włączanie/wyłączanie zasilania
- Naciśnij Przycisk zasilania (
 ) aby włączyć urządzenie.
 - Naciśnij i przytrzymaj Przycisk zasilania for a few seconds to turn the device OFF.
5.2 Ustawienie zerowe
Before taking any measurements, it is crucial to perform a zero setting to ensure accuracy. Disconnect all pressure hoses from the device before performing this step.
- Ensure the device is powered on and no pressure is applied to the ports.
- Naciśnij i przytrzymaj TRZYMAĆ Naciśnij przycisk i przytrzymaj przez około 5 sekundy.
- The display will show "----" indicating that the zero setting is complete.

Image: Visual guide demonstrating how to perform a zero setting on the manometer by long-pressing the HOLD button until the display shows dashes.
5.3 Wybór jednostki
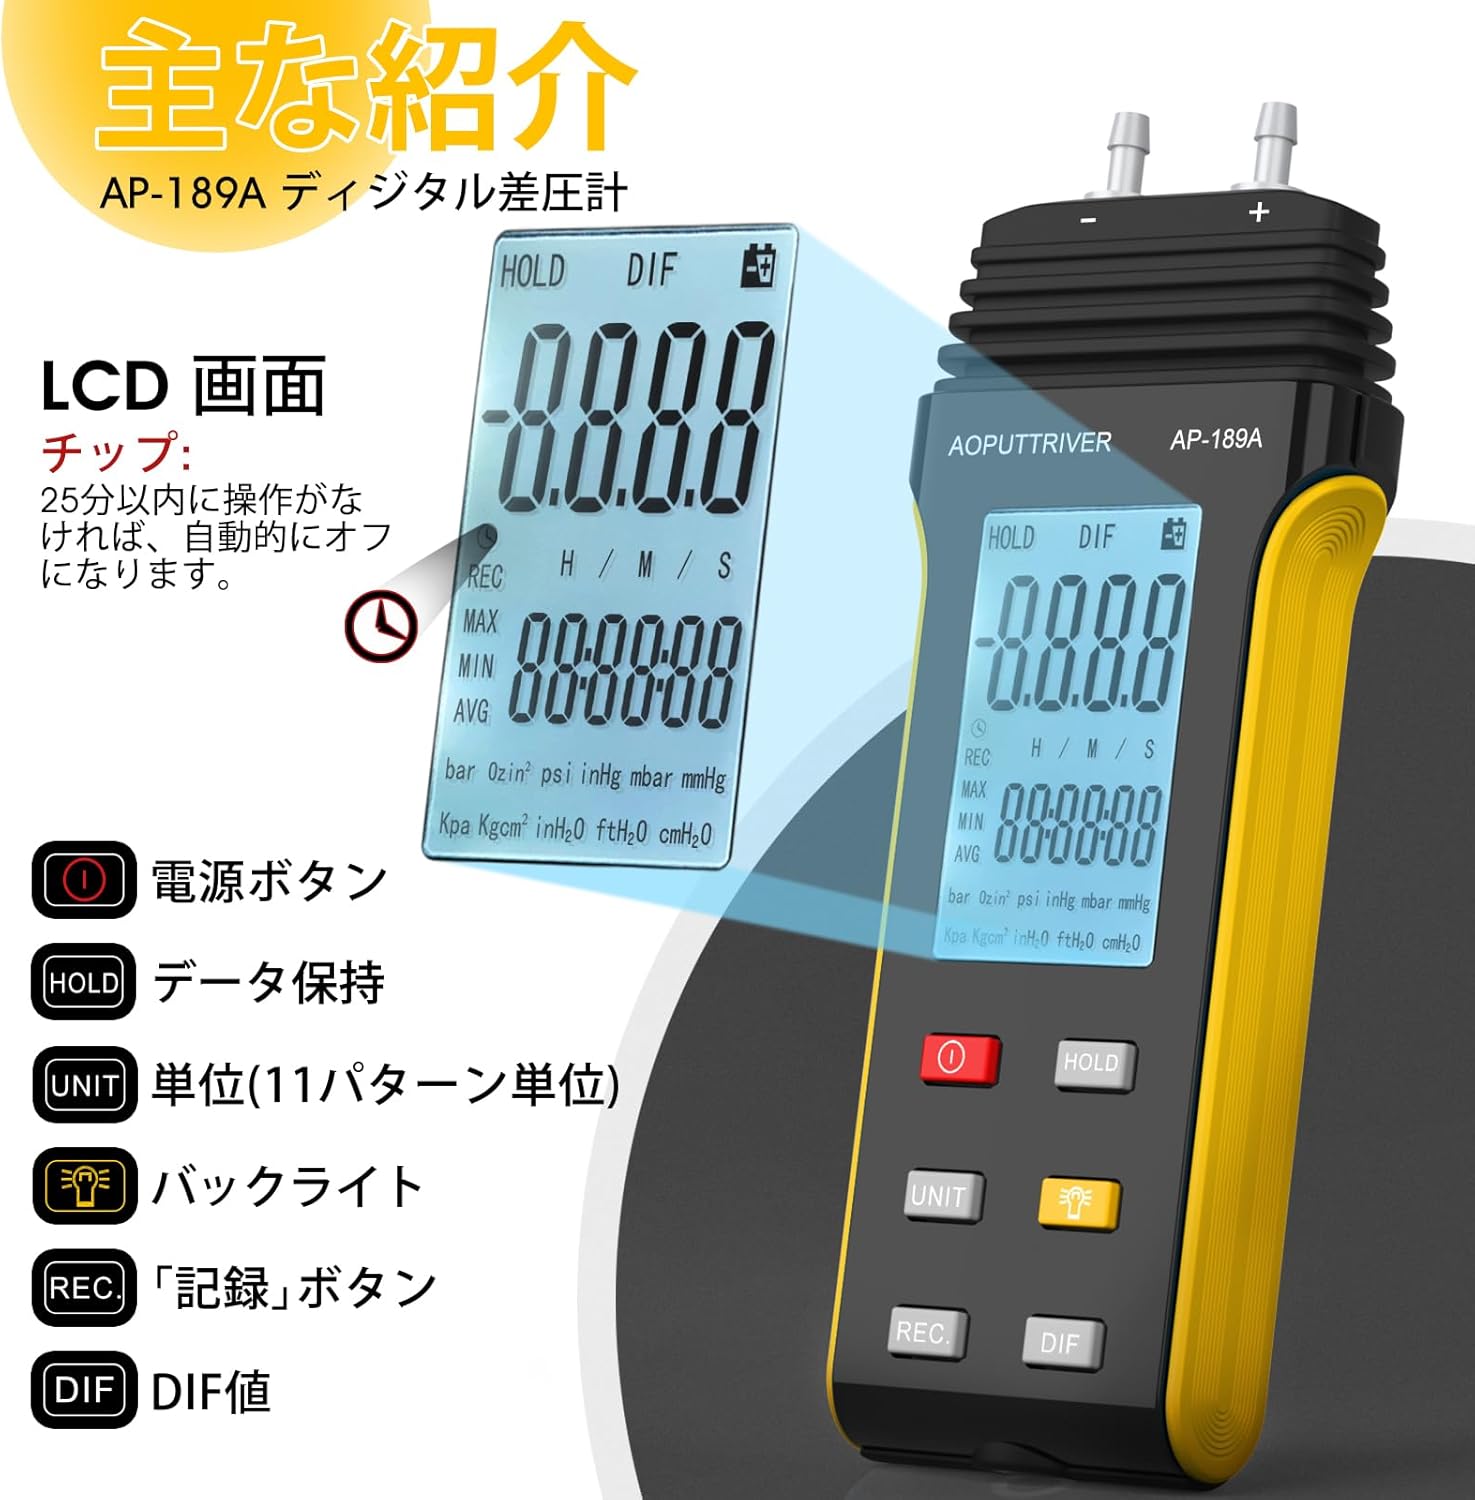
Naciśnij JEDNOSTKA button to cycle through the 11 available pressure units (Psi, kPa, Kgfcm2, ozin2, Bar, mbar, inHg, mmHg, inH2O, ftH2O, cmH2O) until your desired unit is displayed.
5.4 Funkcja podświetlenia
Naciśnij Przycisk podświetlenia () to turn the LCD backlight ON or OFF for improved visibility in low-light conditions.
5.5 Zatrzymanie danych
Naciśnij TRZYMAĆ button briefly to freeze the current reading on the display. Press it again to release the hold function and resume live readings.
5.6 MAX/MIN/AVG/DIF Recording
Naciśnij REK button to enter recording mode. In this mode, the device will track the maximum, minimum, and average pressure values. Press REK repeatedly to cycle through MAX, MIN, AVG, and DIF displays. To exit recording mode, press and hold the REK przycisk.
5.7 Automatyczne wyłączanie zasilania
The device will automatically power off after 25 minutes of inactivity to save battery life. This feature can typically be disabled or adjusted by pressing and holding specific buttons during power-on, as detailed in the full manual.
Image: A close-up of the AP-189A's LCD screen and control buttons, illustrating the functions of the Power, Hold, Unit, Backlight, Record, and DIF buttons.
6. Konserwacja
- Czyszczenie: Przetrzyj urządzenie miękką, suchą ściereczką. Nie używaj środków czyszczących o właściwościach ściernych ani rozpuszczalników.
- Składowanie: Store the manometer in its protective bag in a cool, dry place when not in use. Remove batteries if storing for extended periods to prevent leakage.
- Kalibrowanie: Regular calibration by a qualified technician is recommended to maintain measurement accuracy, especially for critical applications.
- Wymiana baterii: Replace batteries promptly when the low battery indicator appears to ensure continuous operation and prevent data loss.
7. Rozwiązywanie Problemów
| Problem | Możliwa przyczyna | Rozwiązanie |
|---|---|---|
| Urządzenie nie włącza się | Wyczerpane lub nieprawidłowo zainstalowane baterie | Sprawdź biegunowość baterii; wymień baterie. |
| Niedokładne odczyty | No zero setting performed; sensor obstruction; device not calibrated | Perform zero setting; ensure ports are clear; consider professional calibration. |
| Display shows "OL" or "Err" | Overload (pressure exceeds maximum limit) | Remove pressure immediately. Ensure pressure does not exceed 6 Psi. |
| Podświetlenie nie działa | Backlight function off; low battery | Press the backlight button; replace batteries. |
8. Specyfikacje
- Zakres pomiarowy: ± 2.000 psi
- Dokładność: ±0.3%FSO (at 25°C)
- Powtarzalność: ±0.25%FSO
- Linearity/Hysteresis: ±0.1%FSO
- Limited Maximum Pressure: 6 psi
- Jednostki: Psi, kPa, Kgfcm2, ozin2, Bar, mbar, inHg, mmHg, inH2O, ftH2O, cmH2O
- Funkcje: Backlight, Data Hold, Auto Power Off (25 min), MAX/MIN/AVG/DIF, Zero Setting
- Zasilanie: 2 baterie AAA 1.5 V
- Wymiary: Około 166 mm x 62 mm x 31 mm (6.29 cala x 2.44 cala x 1.22 cala)
- Waga: Około 250g
Image: A diagram illustrating the physical dimensions of the AP-189A Digital Manometer, including length, width, and thickness.
9. Gwarancja i wsparcie
The AOPUTTRIVER AP-189A Digital Manometer comes with a 365-day warranty and lifetime technical support. If you encounter any quality issues with the product, please contact our customer support team. We are committed to resolving any problems as quickly as possible.
Aby uzyskać pomoc techniczną, zapoznaj się z informacjami kontaktowymi podanymi na opakowaniu produktu lub odwiedź oficjalną stronę AOPUTTRIVER webstrona.