1. Wprowadzenie
Thank you for choosing the Paulmann 71076 Selection Bathroom Luena Wall Lamp. This manual provides important information regarding the installation, operation, and maintenance of your new wall lamp. Please read these instructions carefully before installation and keep them for future reference. This product is designed for indoor use, specifically in bathrooms and other damp areas, thanks to its IP44 splash water protection rating.
2. Instrukcje bezpieczeństwa
- Bezpieczeństwo elektryczne: Installation must be carried out by a qualified electrician in accordance with local wiring regulations. Ensure the main power supply is switched off before commencing any installation or maintenance work.
- Tomtage: To jestamp operates on 230V AC.
- Typ żarówki: Stosuj wyłącznie żarówki E14 o maksymalnej mocytage 20 W. Nie przekraczać określonej mocytage.
- Stopień ochrony IP44: This product is splash-proof (IP44) and suitable for use in bathroom zones 2 and 3. Do not install in zone 1 (inside the shower or bath).
- Obsługiwanie: Aby zapobiec stłuczeniu elementów szklanych, należy obchodzić się z nimi ostrożnie.
- Czyszczenie: Przed czyszczeniem odłącz zasilanie. Użyj miękkiej, suchej ściereczki. Nie używaj środków czyszczących ani rozpuszczalników o działaniu ściernym.

Figure 2.1: IP Protection Zones in a Bathroom. The Paulmann 71076 lamp is suitable for IP44 zones.
3. Zawartość opakowania
Przed montażem należy sprawdzić, czy wszystkie elementy są obecne i nieuszkodzone:
- Paulmann 71076 Selection Bathroom Luena Wall Lamp osprzęt
- Instrukcja montażu
- Sprzęt montażowy (śruby, kołki rozporowe)
Notatka: The light bulb (E14, max. 20W) is not included and must be purchased separately.
4. Konfiguracja i instalacja
Aby przeprowadzić prawidłową instalację, wykonaj następujące czynności:
- Przygotuj miejsce instalacji: Upewnij się, że zasilanie w miejscu instalacji jest wyłączone za pomocą głównego wyłącznika.
- Zaznacz punkty wiercenia: Trzymaj lamp's mounting plate against the wall at the desired installation height and mark the drilling points.
- Wiercenie otworów: Wywierć otwory w zaznaczonych punktach i włóż odpowiednie kołki rozporowe.
- Podłącz okablowanie: Podłącz lamp's wires to the 230V wall outlet wiring. Ensure correct polarity (Live, Neutral, Earth). Secure connections properly.
- Zamontuj oprawę: Podłącz lamp's mounting plate to the wall using the provided screws.
- Zainstaluj żarówkę: Carefully screw an E14 bulb (max. 20W) into the lamp uchwyt.
- Zamontuj klosz szklany: The bayonet glass shade can be attached and removed without tools. Align the glass shade with the fixture and twist to secure it.
- Przywróć zasilanie: Po zakończeniu instalacji i bezpiecznym umieszczeniu wszystkich komponentów należy przywrócić zasilanie za pomocą głównego wyłącznika.

Rysunek 4.1: Zbliżenie lamp's chrome base and glass shade, showing mounting points.
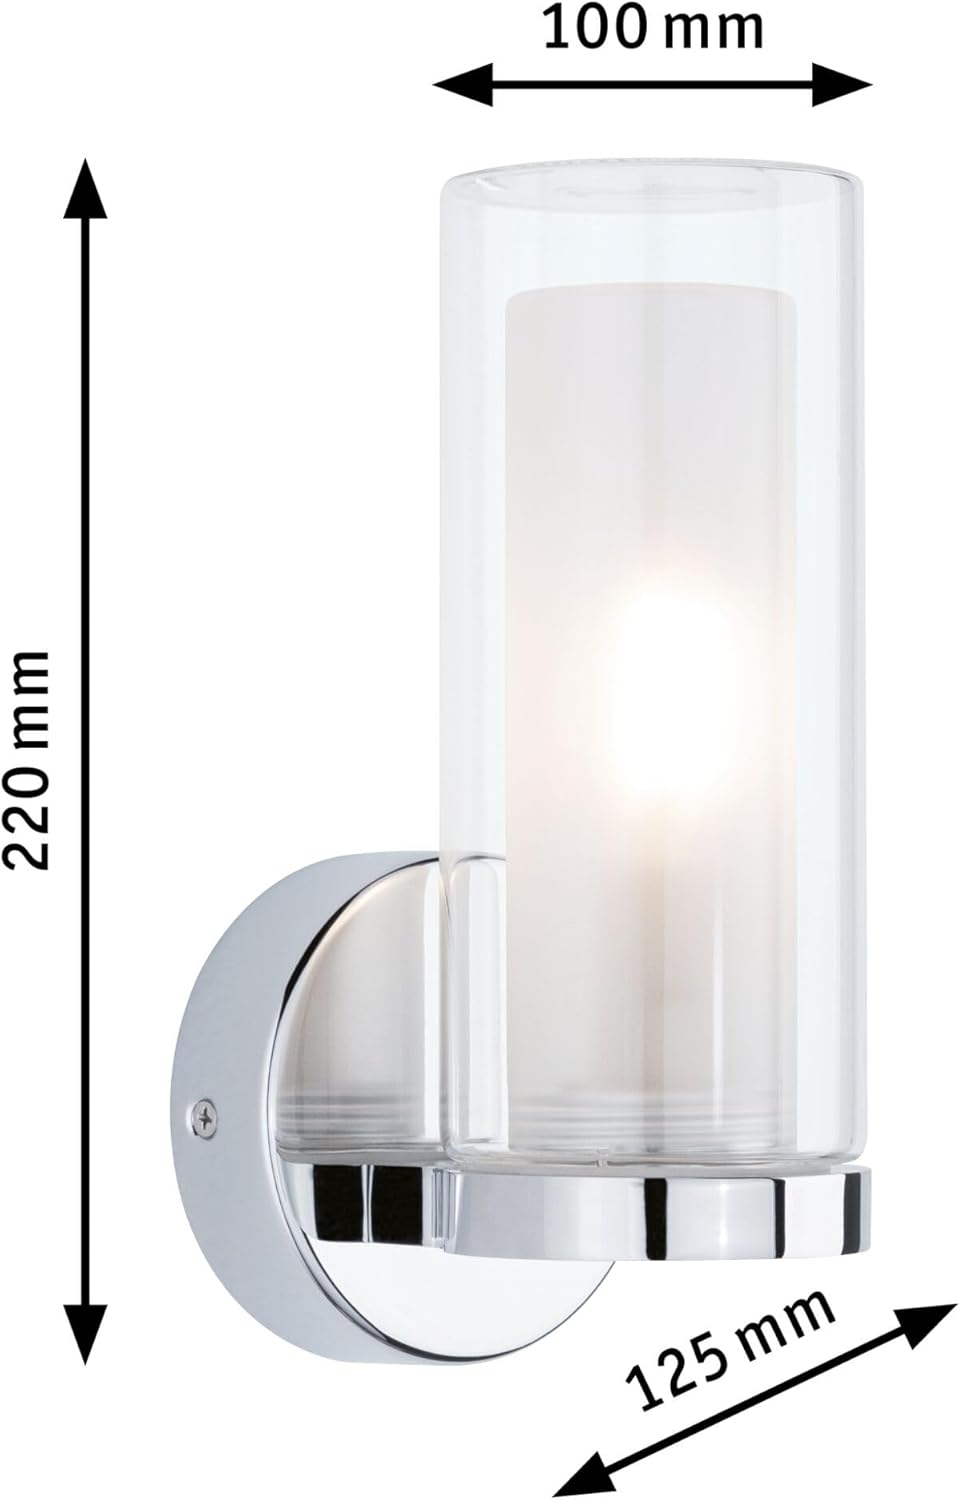
Rysunek 4.2: Wymiary produktu do planowania instalacji.
5. Instrukcja obsługi
Once installed and powered, the Paulmann 71076 wall lamp operates via your standard wall switch. If a dimmable E14 bulb is used and connected to a compatible dimmer switch, the light intensity can be adjusted. The lamp provides decorative light effects, enhancing the ambiance of your bathroom.

Figure 5.1: The E14 bulb socket, ready for bulb insertion.

Figure 5.2: The Paulmann Luena Wall Lamp in an installed setting.
6. Konserwacja
To ensure the longevity and appearance of your Paulmann wall lamp, postępuj zgodnie z poniższymi wytycznymi dotyczącymi konserwacji:
- Czyszczenie: Always switch off the power supply before cleaning. Use a soft, dry, or slightly damp cloth to wipe the chrome finish and glass shade. Avoid harsh chemicals, abrasive cleaners, or scouring pads, as these can damage the surfaces.
- Wymiana żarówki: Ensure the power is off and the bulb has cooled down before attempting to replace it. The bayonet glass shade can be easily removed without tools to access the E14 bulb.
- Kontrola: Okresowo sprawdzaj lamp Sprawdź, czy nie ma śladów uszkodzeń lub luźnych połączeń. W przypadku stwierdzenia jakichkolwiek problemów odłącz zasilanie i skonsultuj się z wykwalifikowanym elektrykiem.
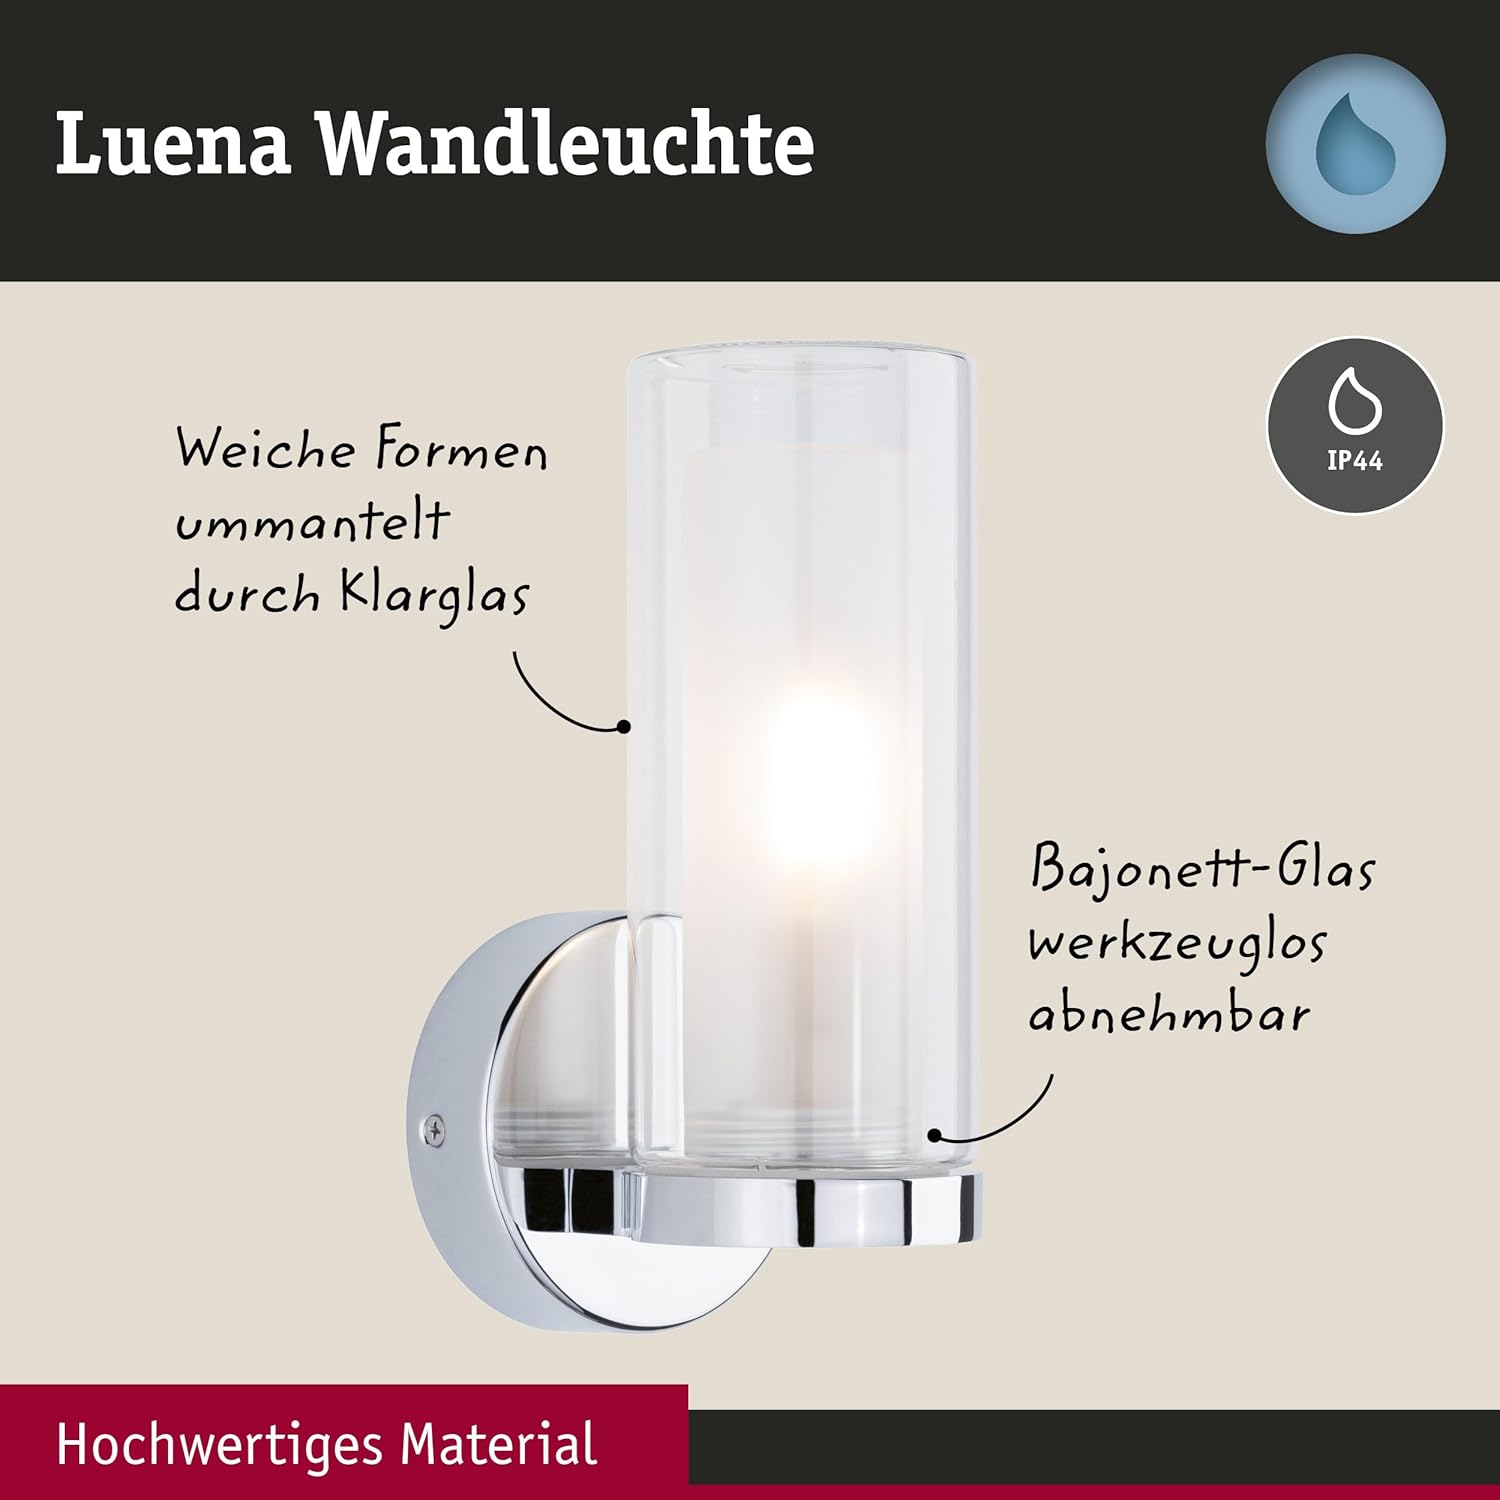
Figure 6.1: The bayonet glass shade can be removed without tools for easy bulb replacement and cleaning.
7. Rozwiązywanie Problemów
If you encounter issues with your Paulmann 71076 wall lamp, rozważ następujące kwestie:
- Lamp nie świeci:
- Check if the power supply is switched on at the wall switch and the main circuit breaker.
- Ensure the bulb is correctly screwed in and not faulty. Try replacing the bulb with a new one.
- Verify that the wiring connections are secure. If unsure, consult a qualified electrician.
- Migotanie światła:
- Sprawdź, czy żarówka jest całkowicie dokręcona.
- Jeśli używasz żarówki z funkcją ściemniania, upewnij się, że jest ona kompatybilna z Twoim ściemniaczem.
- Sprawdź, czy połączenia przewodów nie są luźne.
- Glass shade is loose:
- Ensure the bayonet glass shade is properly aligned and twisted into its locked position.
If problems persist, contact Paulmann customer support or a qualified electrician.
8. Specyfikacje
| Funkcja | Specyfikacja |
|---|---|
| Numer modelu | 71076 |
| Marka | Paulman |
| Wymiary produktu | 12.5 cm (dł.) x 10 cm (szer.) x 22 cm (wys.) |
| Waga przedmiotu | 850 gram |
| Tworzywo | Glass, Chrome |
| Kolor | Chrome, Glass |
| Skończyć | Chrom |
| Styl | Nowoczesny/Minimalistyczny |
| Typ pokoju | Łazienka |
| Konkretne zastosowanie | Łazienka |
| Do użytku wewnątrz/na zewnątrz | Wnętrz |
| Źródło zasilania | AC |
| Tomtage | 230 V |
| Typ żarówki | E14 (brak w zestawie) |
| Maks. Wattage | 20 W |
| Możliwość ściemniania | Tak (z kompatybilną żarówką i ściemniaczem) |
| Stopień ochrony IP | IP44 (odporny na zachlapanie) |
| Certyfikaty | CE |
| Wymagane baterie | NIE |
9. Gwarancja i wsparcie
Paulmann products are manufactured to high-quality standards and come with a manufacturer's warranty. For specific warranty terms and conditions, please refer to the documentation provided with your purchase or visit the official Paulmann website. For technical support, spare parts, or any questions not covered in this manual, please contact Paulmann customer service directly.