1. Wprowadzenie
This manual provides detailed instructions for the safe and proper installation, operation, and maintenance of your YHTAUTO 6x5.5 Wheel Spacers. These spacers are designed to increase your vehicle's track width, potentially improving stability and allowing for larger tire fitment. Please read all instructions carefully before beginning installation.
2. Informacje dotyczące bezpieczeństwa
Proper installation is critical for safety. Incorrect installation can lead to wheel detachment, loss of vehicle control, and serious injury or death. If you are unsure about any step, consult a qualified mechanic.
- A minimum of 12 mm (1/2 inch) clearance to the fender is required after installation.
- Always use a hand wrench and thread locker for installation. Impact wrenches are not recommended for final torquing.
- Ensure wheel backs have sufficient clearance for the original studs to avoid contact with the spacer.
- Thoroughly clean all studs, hubs, and mating surfaces to remove dirt, rust, and grease before installation.
- Check all lug nuts and re-torque them after 20-60 miles of driving, and then periodically (e.g., every 2,000-3,000 miles).
- Never use damaged or worn spacers or lug nuts.
For a visual guide on installation and safety, please refer to the following video:
Video: How to install Wheel Spacers? This video demonstrates the general process of installing wheel spacers, including important safety considerations.
3. Specyfikacje produktu
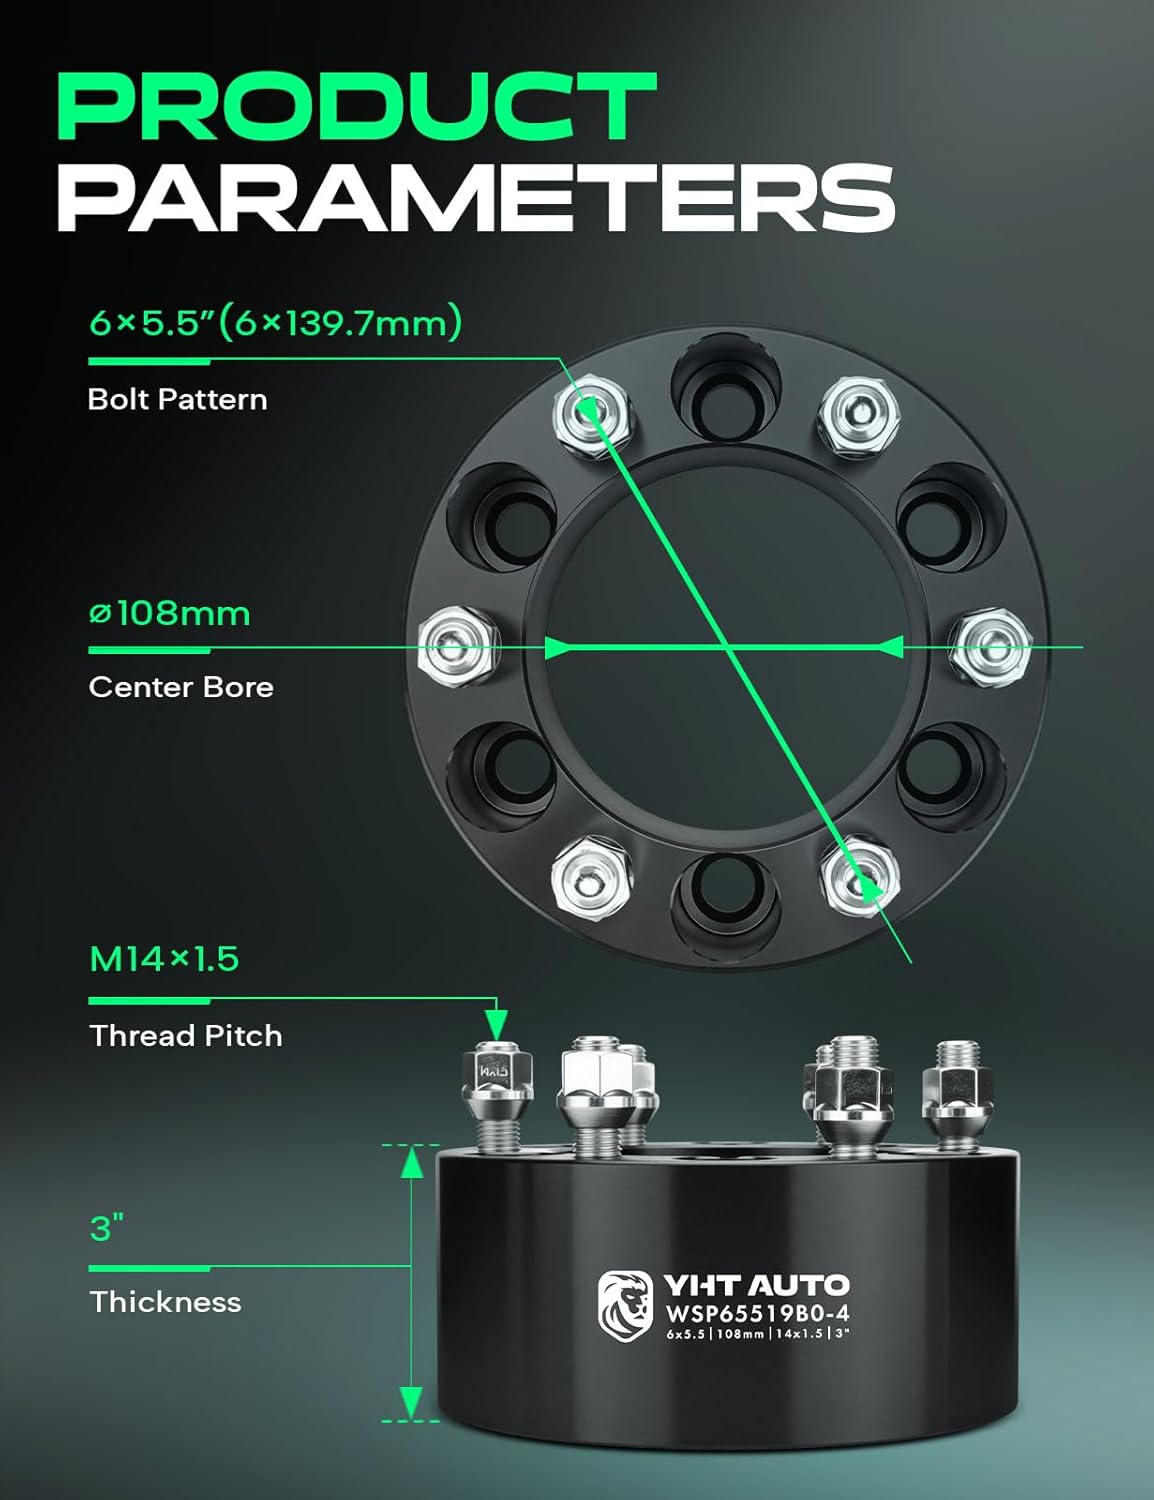
Image: Detailed diagram of the YHTAUTO wheel spacer with key dimensions and specifications.
| Funkcja | Specyfikacja |
|---|---|
| Bolt Pattern (Vehicle) | 6x139.7mm (6x5.5) |
| Otwór środkowy | 108mm (without lip) |
| Grubość | 3 cali |
| Studs & Lug Nuts | M14x1.5, 12.9 Grade Studs |
| Zalecany moment obrotowy | 85-90 FT/LBS |
| Tworzywo | Forged 6061-T6 Aircraft-Grade Aluminum |
| Wytrzymałość na rozciąganie | 42,000-45,000 PSI |
| Wytrzymałość na rozciąganie | 35,000-40,000 PSI |
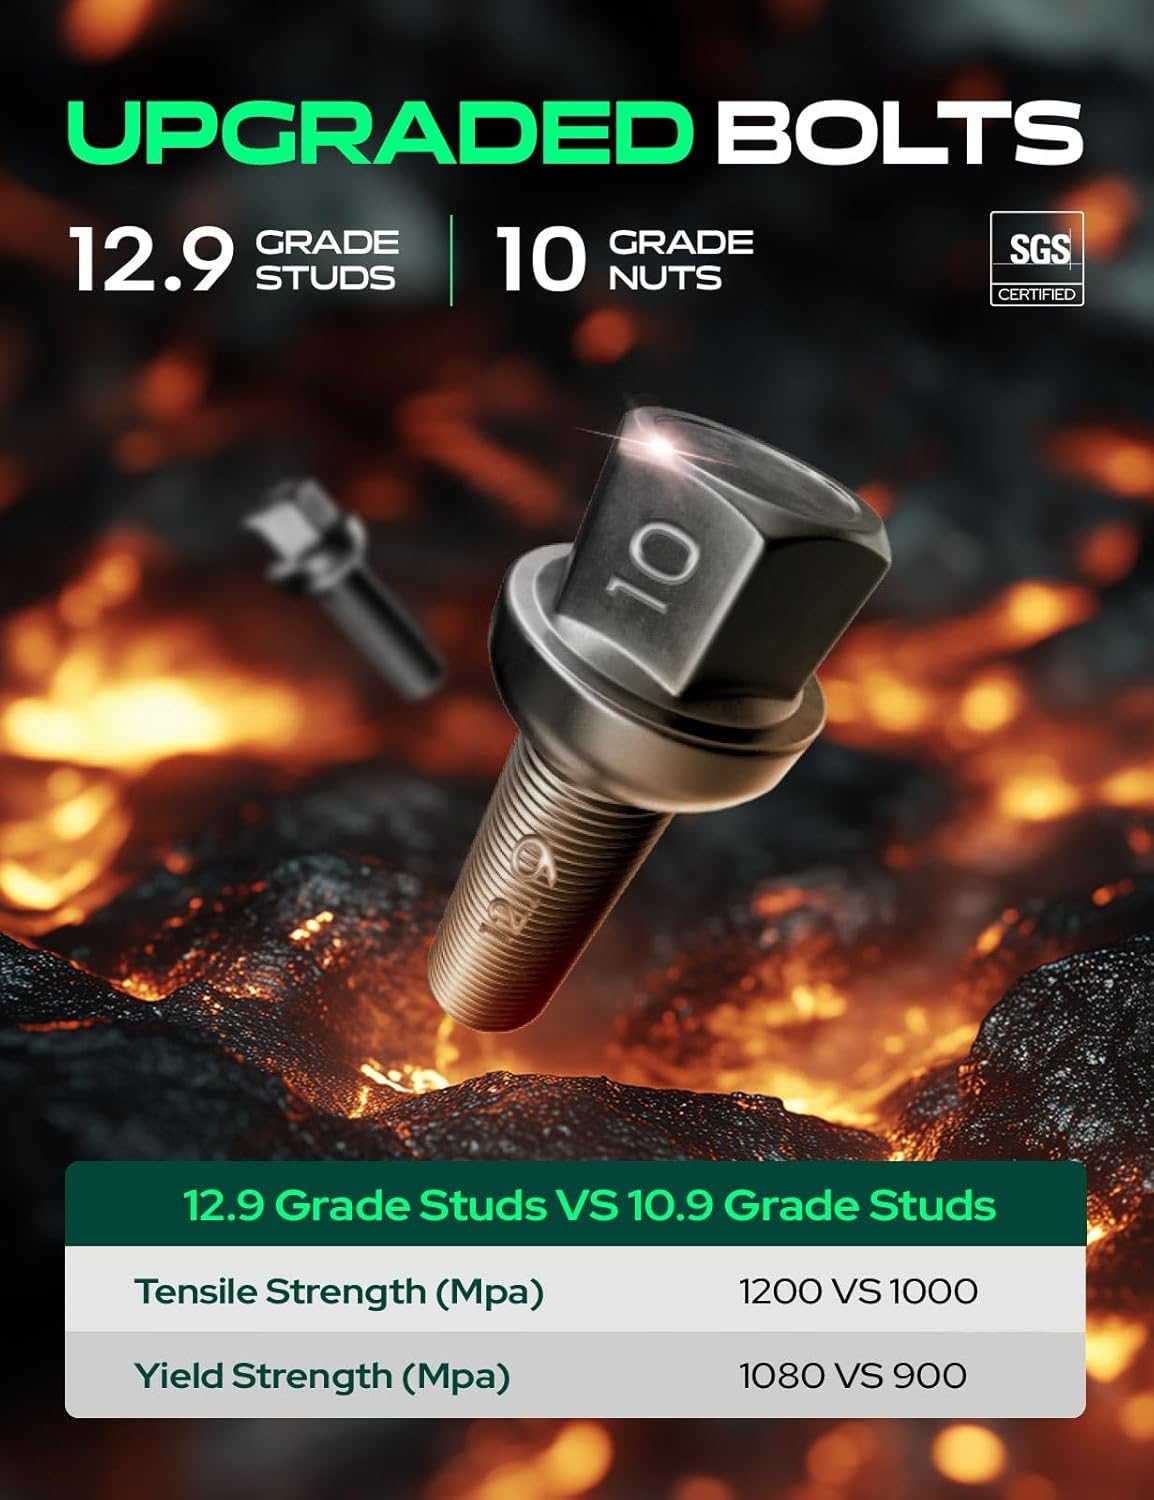
Image: Illustration of the high-grade studs and nuts used in the wheel spacers.

Image: Visual representation of the aerospace-grade aluminum construction and its strength properties.
4. Wyposażenie pojazdu
These YHTAUTO 6x5.5 Wheel Spacers are compatible with various 6-lug Chevrolet, GMC, and Cadillac models. Always verify compatibility with your specific vehicle year, make, and model before installation.

Image: Compatibility chart for various vehicle models.
Kompatybilne modele obejmują:
- Cadillac: Escalade (1999-2000, 2002-2023)
- Chevrolet: Silverado 1500 (1999-2022), Suburban 1500 (2000-2014), Express 1500 (2003-2014), Avalanche (2007-2013), Avalanche 1500 (2002-2006), Tahoe (1995-2000 4WD Only, 2001-2024)
- GMC: Sierra 1500 (1999-2022), Yukon (1992-2022 4WD Only), Yukon XL 1500 (2000-2013), Savana 1500 (2003-2014)
For a complete list of compatible models, please refer to the Amazon garage tool or the product images.
5. Zawartość opakowania
Your YHTAUTO Wheel Spacers package includes:
- 4x 6x5.5 Wheel Adapters & Spacers
- 2x High-Strength Thread-Locking Adhesive
- 1x Installation Instructions (this manual)
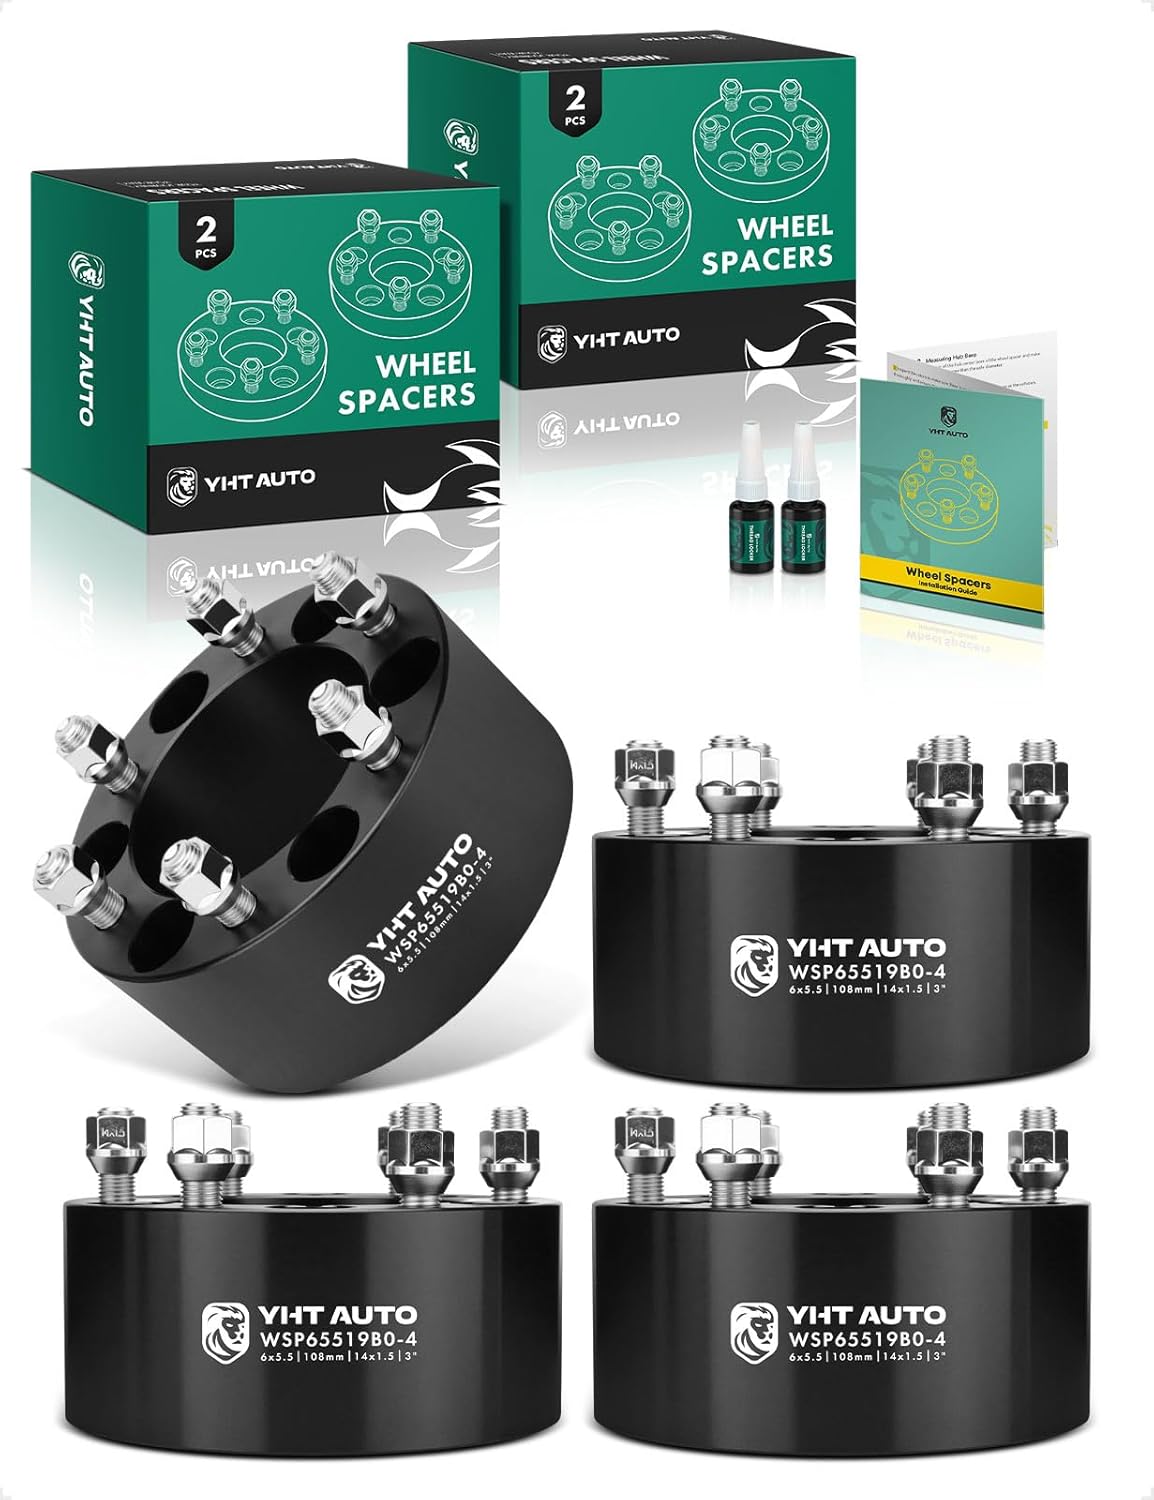
Image: Contents of the YHTAUTO wheel spacer package.
6. Instrukcje instalacji
Follow these steps carefully for proper installation. Professional installation is highly recommended.
Wymagane narzędzia:
- Podnośniki samochodowe i podstawki pod podnośniki
- Lug Wrench or Torque Wrench
- Wire Brush (for cleaning)
- Środek do czyszczenia lub odtłuszczania hamulców
- Included Thread-Locking Adhesive
Przewodnik krok po kroku:
- Przygotuj pojazd: Park the vehicle on a flat, stable surface. Engage the parking brake. Loosen the lug nuts on the wheel you intend to work on, but do not remove them completely.
- Lift and Secure the Vehicle: Safely jack up the vehicle until the wheel is off the ground. Place jack stands under the vehicle's frame for support. Remove the lug nuts and then the wheel.
- Clean Hub and Studs: Use a wire brush and brake cleaner to thoroughly clean the vehicle's hub and studs. Ensure all rust, dirt, and debris are removed from the mating surfaces.
- Check Stud Length: Verify that your vehicle's factory studs do not protrude past the surface of the wheel spacer. If they do, ensure there are sufficient cavities on the back of your wheel to accommodate them without touching. If not, the studs may need to be shortened or a different spacer thickness used.
- Install the Spacer: Apply a small amount of the included thread-locking adhesive to the vehicle's original studs. Place the wheel spacer onto the vehicle's hub, aligning the holes with the studs.
- Secure the Spacer: Use the provided lug nuts to secure the wheel spacer to the vehicle's hub. Hand-tighten all lug nuts, then use a torque wrench to tighten them in a criss-cross pattern to the recommended torque of 85-90 FT/LBS.
- Reinstall the Wheel: Place your wheel back onto the newly installed wheel spacer, aligning the wheel's bolt pattern with the spacer's studs.
- Zabezpiecz koło: Hand-tighten your wheel's lug nuts onto the spacer's studs. Then, using a torque wrench, tighten them in a criss-cross pattern to your vehicle manufacturer's specifications.
- Opuść pojazd: Carefully lower the vehicle off the jack stands and remove the jack.
- Repeat for Other Wheels: Repeat the process for all other wheels where spacers are to be installed.
For a visual demonstration of the installation process, please watch the following video:
Video: YHTAUTO Wheel Spacers installation guide, demonstrating the steps for installing the product.
To understand how to measure for wheel spacers, refer to this video:
Video: YHTAUTO 4/6/8 Lug Wheel Spacer Measurement Method, explaining how to correctly measure your vehicle for appropriate wheel spacers.
7. Operating and Post-Installation Checks
After successful installation, your vehicle will have an increased track width, which can enhance its appearance and potentially improve stability and handling. It is crucial to perform post-installation checks to ensure safety.
- Jazda początkowa: Drive the vehicle for 20-60 miles at moderate speeds.
- Re-torque Lug Nuts: After the initial drive, re-torque all lug nuts (both the spacer-to-hub and wheel-to-spacer connections) to the specified values. This is critical as components can settle.
- Kontrole okresowe: Continue to check and re-torque the lug nuts every 2,000-3,000 miles or during routine maintenance.
- Nasłuchuj nieprawidłowości: Pay attention to any unusual noises, vibrations, or changes in handling. If any issues arise, stop driving immediately and inspect the installation.
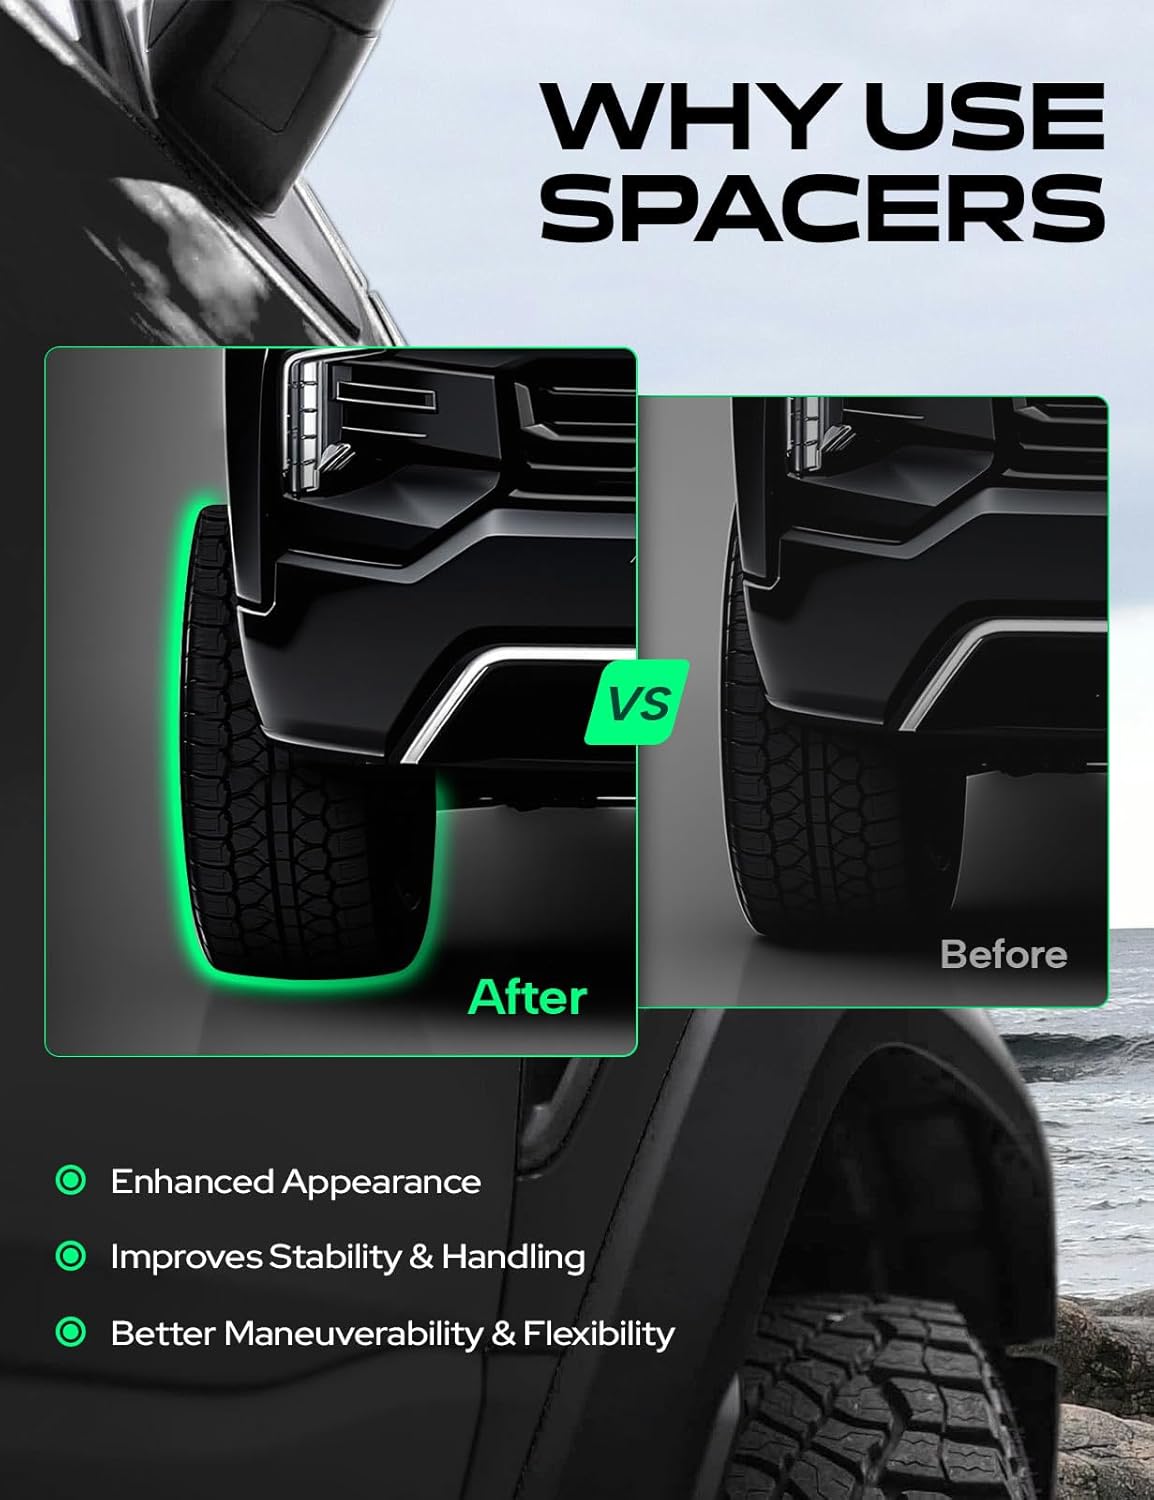
Image: Visual comparison of a vehicle's stance before and after installing wheel spacers.
8. Konserwacja
Regular maintenance ensures the longevity and safe operation of your wheel spacers.
- Rutynowa kontrola: Periodically inspect the wheel spacers for any signs of damage, cracks, or corrosion.
- Lug Nut Condition: Check the condition of all lug nuts and studs. Replace any that show signs of wear, stripping, or damage.
- Czystość: Keep the wheel spacers and mating surfaces clean from dirt, salt, and other corrosive materials.
9. Rozwiązywanie Problemów
If you encounter any issues after installing your wheel spacers, consider the following:
- Wibracje: The most common cause of vibrations is improper installation, particularly incorrect torquing or unclean mating surfaces. Re-check all lug nuts for proper torque and ensure all surfaces are clean and flat.
- Rubbing/Clearance Issues: If tires are rubbing against fenders or suspension components, re-evaluate the fender clearance (minimum 12mm required) and ensure the wheel back has adequate clearance for original studs.
- Loose Wheels: Immediately pull over and check all lug nuts. Re-torque to specifications. If the issue persists, discontinue use and seek professional assistance.
If troubleshooting steps do not resolve the issue, consult a professional mechanic.
10. Gwarancja i wsparcie
For any questions regarding product warranty, technical support, or assistance with your YHTAUTO Wheel Spacers, please contact YHTAUTO customer service directly. Refer to your purchase documentation for specific warranty terms and contact information.