
Della 048-OPAC-6H
Della 10000 BTU Portable Air Conditioner User Manual
Model: 048-OPAC-6H | Brand: Della
1. Ważne informacje dotyczące bezpieczeństwa
Please read this manual carefully before operating your portable air conditioner. Keep this manual for future reference. Always follow basic safety precautions to reduce the risk of fire, electric shock, or injury.
- Aby zapobiec przewróceniu się urządzenia, należy upewnić się, że jest ono umieszczone na płaskiej i stabilnej powierzchni.
- Nie używaj urządzenia z uszkodzonym przewodem lub wtyczką.
- Nie wkładaj palców ani żadnych przedmiotów do wlotu lub wylotu powietrza.
- Trzymaj urządzenie z dala od materiałów łatwopalnych i otwartego ognia.
- Zawsze odłączaj urządzenie od zasilania przed czyszczeniem lub jakąkolwiek konserwacją.
- Urządzenie to nie jest przeznaczone do użytku przez osoby (w tym dzieci) o ograniczonej sprawności fizycznej, sensorycznej lub umysłowej, a także osoby nieposiadające odpowiedniego doświadczenia lub wiedzy, chyba że znajdują się one pod nadzorem osoby odpowiedzialnej za ich bezpieczeństwo lub otrzymały od niej instrukcje dotyczące korzystania z urządzenia.
2. Koniec produktuview
The Della 10000 BTU Portable Air Conditioner is a versatile unit designed to provide cooling, heating, dehumidification, and fan functions for spaces up to 450 sq. ft. It features smart WiFi connectivity for convenient control via a mobile app, a remote control, and an intuitive soft-touch control panel.

Image: Della Portable Air Conditioner unit, remote control, and smartphone displaying the control app.
Key components include the main unit with integrated handle, exhaust hose, window installation kit, and remote control.

Image: Diagram showing the dimensions of the portable air conditioner: 12.2 inches (width) x 12.2 inches (depth) x 27.6 inches (height).
3. Konfiguracja
3.1 Rozpakowanie
Carefully remove the unit and all accessories from the packaging. Retain the original packaging for future storage or transport. Allow the unit to stand upright for at least 24 hours before initial use to allow the refrigerant to settle.
3.2 Umieszczenie
Place the air conditioner on a firm, level surface in a location that allows for proper air circulation. Ensure there is at least 20 inches (50 cm) of space from walls or other objects to allow for adequate airflow around the unit.
3.3 Montaż zestawu okiennego
The included window kit is designed for easy installation in both horizontal and vertical sliding windows. No drilling is required.

Image: Diagrams illustrating the installation of the window kit in both horizontal and vertical sliding windows, showing compatibility with window openings from 25.5 to 64.1 inches.
- Assemble the window slider kit by sliding the adjustable panels together to fit your window opening. The kit is compatible with window sizes from 25.5 to 64.1 inches.
- Secure the panels with the provided screws.
- Open the window and place the assembled window kit into the window frame. Extend the panels to fit snugly and close the window against the kit to secure it.
- Ensure the window kit is sealed properly to prevent air leakage. Use foam seals if necessary.
3.4 Złącze węża wydechowego
- Attach the exhaust hose connector to one end of the exhaust hose.
- Podłącz adapter do zestawu okiennego do drugiego końca węża wydechowego.
- Insert the exhaust hose connector into the exhaust outlet on the back of the air conditioner unit.
- Insert the window kit adapter into the opening on the window slider kit.
- Sprawdź, czy wszystkie połączenia są solidne, aby zapobiec przedostawaniu się gorącego powietrza do pomieszczenia.
3.5 Połączenie zasilania
Podłącz przewód zasilający do uziemionego gniazdka elektrycznego 115 V/60 Hz. Nie używaj przedłużaczy ani listew zasilających.
4. Instrukcja obsługi
4.1 Panel sterowania
The unit features an intuitive soft-touch control panel on the top of the unit.
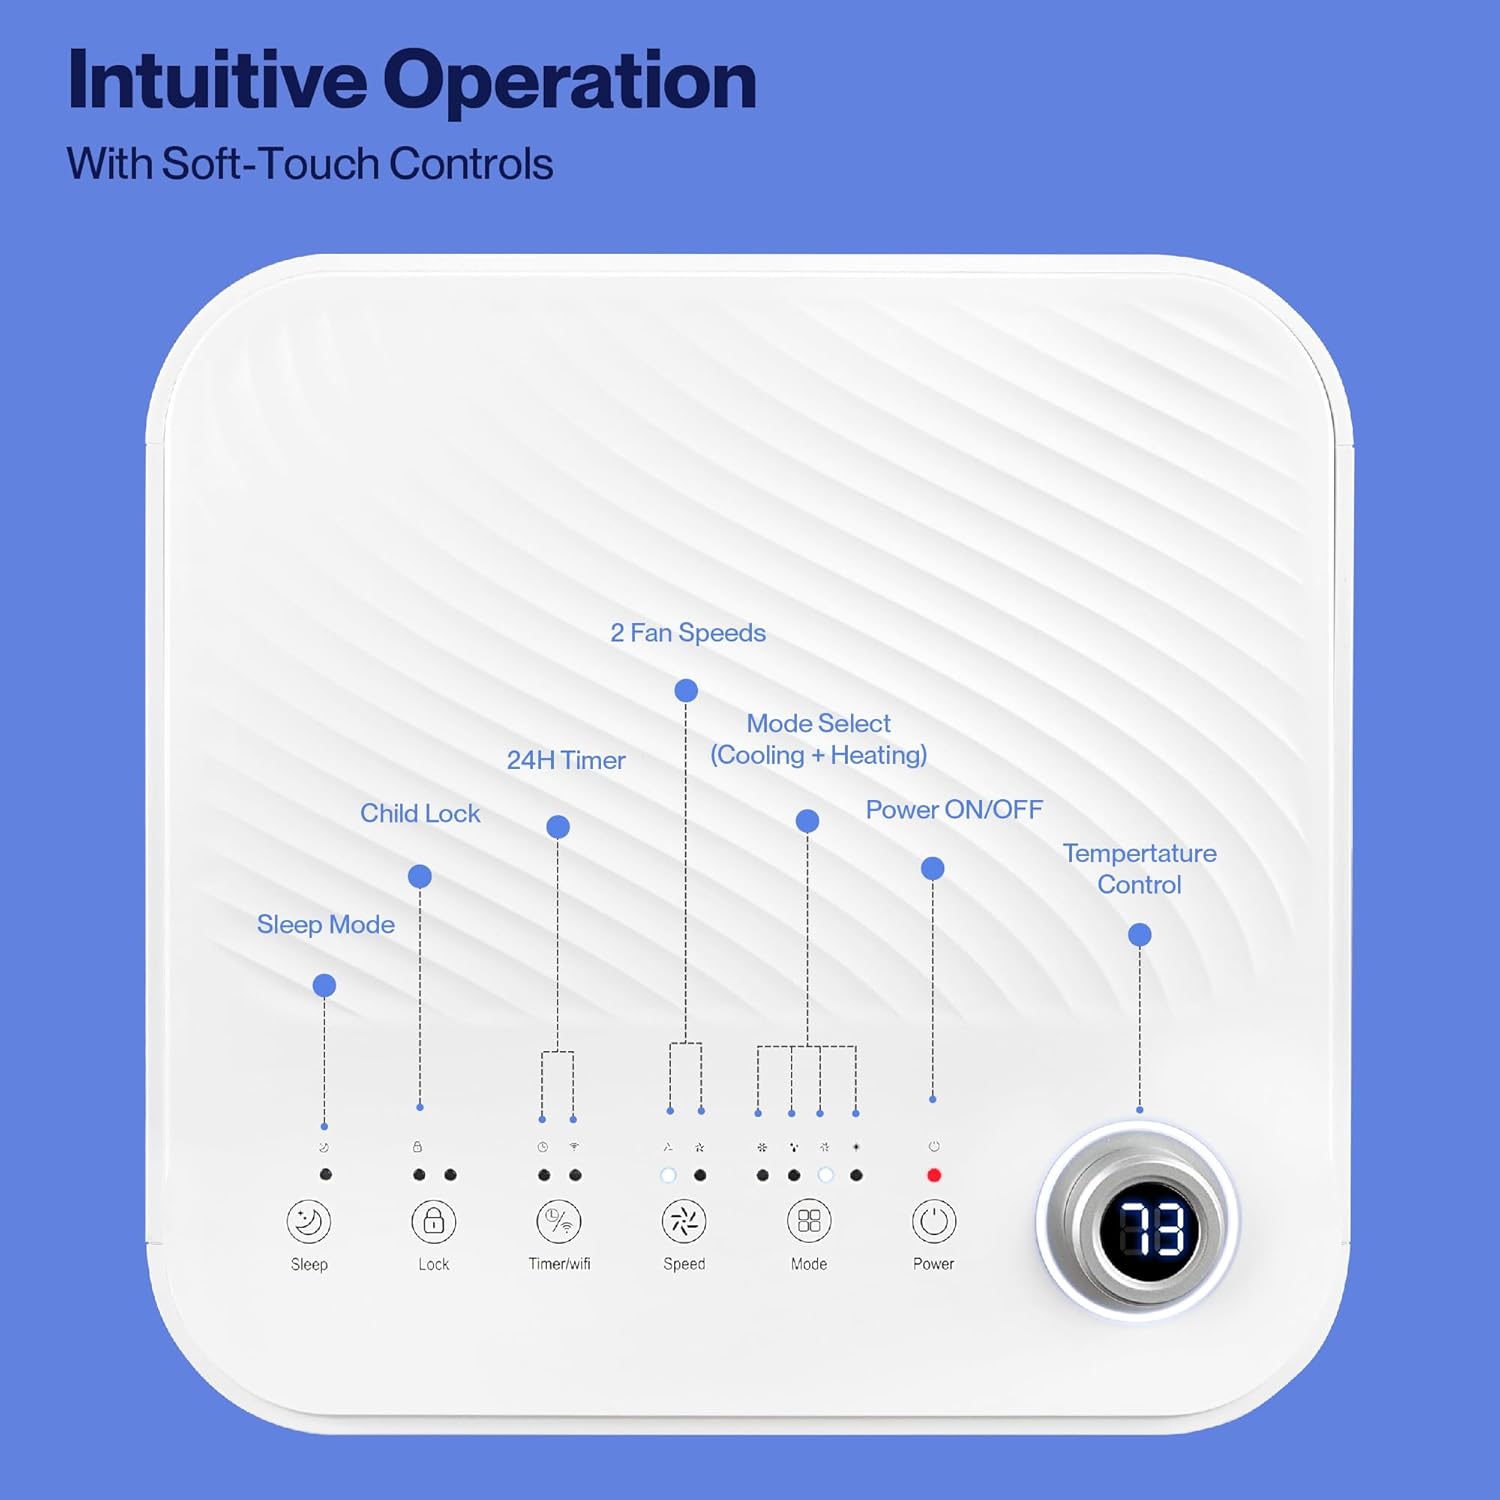
Image: Detailed diagram of the control panel with labels for each button: Sleep, Child Lock, Timer/WiFi, Fan Speed, Mode Select (Cooling + Heating), Power ON/OFF, and Temperature Control with digital display.
- Włączanie/wyłączanie zasilania: Naciśnij, aby włączyć lub wyłączyć urządzenie.
- Wybór trybu: Cycle through Cooling, Heating, Dehumidification, Ventilation (Fan), and Sleep modes.
- Kontrola temperatury: Użyj strzałek w górę/w dół, aby ustawić żądaną temperaturę.
- Prędkość wentylatora: Select between 2 fan speeds (Low, High).
- Regulator czasowy: Ustaw 24-godzinny timer, aby automatycznie włączać i wyłączać urządzenie.
- Blokada dziecięca: Włącza lub wyłącza funkcję blokady dziecięcej.
- Tryb uśpienia: Aktywuje tryb uśpienia zapewniający cichszą pracę urządzenia i stopniową regulację temperatury.
4.2 Pilot zdalnego sterowania
The unit comes with a remote control for convenient operation from a distance. All functions available on the control panel can be accessed via the remote.
4.3 WiFi/Smart App Control
Control your Della Portable Air Conditioner from anywhere using the free DELLA+ app on your smartphone. The unit is compatible with Google Assistant and Amazon Alexa for voice control.

Image: A person relaxing on a couch, using a smartphone to control the air conditioner, with text indicating compatibility with Google Assistant and Amazon Alexa.
- Download the DELLA+ app from your smartphone's app store.
- Postępuj zgodnie z instrukcjami w aplikacji, aby podłączyć klimatyzator do domowej sieci Wi-Fi.
- Once connected, you can control modes, temperature, fan speed, and set schedules remotely.
The app also supports Smart Geo Location, allowing the unit to automatically turn on or off based on your proximity to home.

Image: A smartphone screen showing a map with a car icon and a notification indicating the AC unit automatically turned on due to Smart Geo Location.
5. Konserwacja
Regular maintenance ensures optimal performance and extends the lifespan of your unit. Always unplug the unit before cleaning.
5.1 Czyszczenie filtra powietrza
Filtr powietrza należy czyścić co dwa tygodnie lub częściej, w zależności od intensywności użytkowania i jakości powietrza.
- Znajdź panel filtra powietrza (zazwyczaj z tyłu lub z boku urządzenia).
- Wyjmij filtr.
- Umyj filtr ciepłą wodą z mydłem. Dokładnie wypłucz i pozostaw do całkowitego wyschnięcia przed ponownym włożeniem.
5.2 Odprowadzanie wody
The unit has a self-evaporating system, but in high humidity conditions, water may accumulate. The "Water-full indicator" will illuminate when the water tank needs draining.
- Umieść płytką miskę lub tackę pod otworem odpływowym (znajdującym się z tyłu, u dołu urządzenia).
- Wyjmij korek spustowy.
- Pozwól, aby cała nagromadzona woda odpłynęła.
- Dokładnie zakręć korek spustowy.
5.3 Przechowywanie
W przypadku przechowywania urządzenia przez dłuższy okres:
- Odcedź całą nagromadzoną wodę.
- Wyczyść filtr powietrza.
- Uruchom urządzenie na kilka godzin w trybie samego wentylatora, aby osuszyć wnętrze.
- Odłącz przewód zasilający i starannie go zwiń.
- Przechowuj urządzenie w chłodnym i suchym miejscu, najlepiej w oryginalnym opakowaniu.
6. Rozwiązywanie Problemów
W tej sekcji znajdziesz informacje o typowych problemach i ich rozwiązaniach.
| Problem | Możliwa przyczyna | Rozwiązanie |
|---|---|---|
| Jednostka się nie włącza | Brak zasilania; Odłączony przewód zasilający; Wyłącznik automatyczny zadziałał; Pełny zbiornik na wodę | Check power outlet; Plug in power cord; Reset circuit breaker; Drain water tank |
| Jednostka nie chłodzi skutecznie | Air filter dirty; Exhaust hose not properly installed; Room too large; Doors/windows open; Temperature setting too high | Clean air filter; Ensure exhaust hose is sealed; Close doors/windows; Lower temperature setting |
| Urządzenie jest głośne | Unit not on level surface; Air filter dirty; Obstruction in fan | Place unit on level surface; Clean air filter; Check for obstructions |
| Wyciek wody | Drain plug loose or missing; Unit tilted | Secure drain plug; Ensure unit is level |
| Problemy z połączeniem Wi-Fi | Incorrect WiFi password; Unit too far from router; Router issues | Zweryfikuj hasło; Przenieś urządzenie bliżej routera; Uruchom ponownie router |
Jeśli po wypróbowaniu tych rozwiązań problem nadal występuje, skontaktuj się z obsługą klienta.
7. Specyfikacje
| Funkcja | Specyfikacja |
|---|---|
| Numer modelu | 048-OPAC-6H |
| Wydajność chłodzenia | 10000 BTU |
| Obszar zasięgu | Do 450 mkw. Ft. |
| Funkcje | Cooling, Heating, Dehumidifier, Fan, Sleep Mode |
| Tomtage | 115 wolty |
| Poziom hałasu | 54dB |
| Chłodziwo | R410A |
| Wymiary (dł. x szer. x wys.) | 12.2 x 12.2 x 27.6 cala |
| Tworzywo | Tworzywo ABS |
| Cechy specjalne | Portable, Dehumidifier, WiFi Enabled, Remote Control, Built-in Handle, 24-hour timer, Child Lock |
8. Gwarancja i obsługa klienta
For warranty information or technical assistance, please refer to the warranty card included with your product or visit the official Della website. You may also contact Della customer support directly for further assistance with troubleshooting or parts replacement.
Ask a question about this manual
Ask about setup, troubleshooting, compatibility, parts, safety, or missing instructions. Manuals+ will review the question and use this page’s manual context to help answer it.