1. Wprowadzenie
This manual provides detailed instructions for the safe and effective operation of the GVDA GD166B True RMS Digital Clamp Meter. This high-performance smart digital clamp meter is designed to simplify and enhance your electrical measurement tasks. It integrates a wide range of functions, making it an essential tool for professionals and enthusiasts alike.
The GD166B is capable of measuring AC/DC voltage, AC/DC current, frequency, duty cycle, resistance, capacitance, temperature, diode, continuity, NCV (Non-Contact Voltage) detection, live wire detection, and more.
2. Informacje dotyczące bezpieczeństwa
WARNING: To avoid electric shock or personal injury, read and understand all safety information before using this product.
- Zawsze przestrzegaj lokalnych i krajowych przepisów bezpieczeństwa.
- Nie używaj miernika, jeśli wydaje się uszkodzony lub izolacja jest naruszona.
- Nie stosować w ilości większej niż zalecana objętość.tage, jak zaznaczono na mierniku, między zaciskami lub między dowolnym zaciskiem a uziemieniem.
- Zachowaj ostrożność podczas pracy z objętościątagpowyżej 30 V AC RMS, 42 V szczytowo lub 60 V DC. Taka objętośćtagStwarzają ryzyko porażenia prądem.
- Przed zmianą funkcji należy odłączyć przewody pomiarowe od obwodu.
- Ensure the battery cover is closed and secured before operation.
- Do not operate the meter with the battery compartment open.
- Wymień baterie natychmiast po pojawieniu się wskaźnika niskiego poziomu naładowania baterii.
- Nie należy używać miernika w środowiskach, w których występuje zagrożenie wybuchem gazów, oparów lub pyłu.
- Dokonuj pomiarów używając właściwych zacisków, funkcji i zakresów.
3. Koniec produktuview
The GVDA GD166B is a versatile digital clamp meter designed for accurate and reliable electrical measurements. Below are its key features and components.
3.1 Główne cechy
- Pomiar rzeczywistej wartości skutecznej (RMS) umożliwiający dokładne odczyty przebiegów niesinusoidalnych.
- Mierzy napięcie AC/DCtage, prąd przemienny/stały, rezystancja, pojemność, częstotliwość i temperatura.
- Funkcje testu diody i testu ciągłości.
- Objętość bezkontaktowatage (NCV) detection and Live Wire detection for enhanced safety.
- AC Inrush Current measurement.
- Smart Measurement (Auto) mode for simplified operation.
- Data Hold, Backlight, and Flashlight functions.
- Large LCD display with 6000 counts.
- Compact and ergonomic design with a 36mm clamp otwierania.
3.2 Składniki

Rycina 3.2.1: Przód View of the GD166B Clamp Metr. This image shows the main unit of the GVDA GD166B digital clamp meter along with its red and black test leads. The large display, function buttons, and the clamp jaw are clearly visible.

Figure 3.2.2: GVDA GD166B with Brand Logo. Bliżej view of the GD166B clamp meter, highlighting the GVDA brand logo and model number on the device's body.
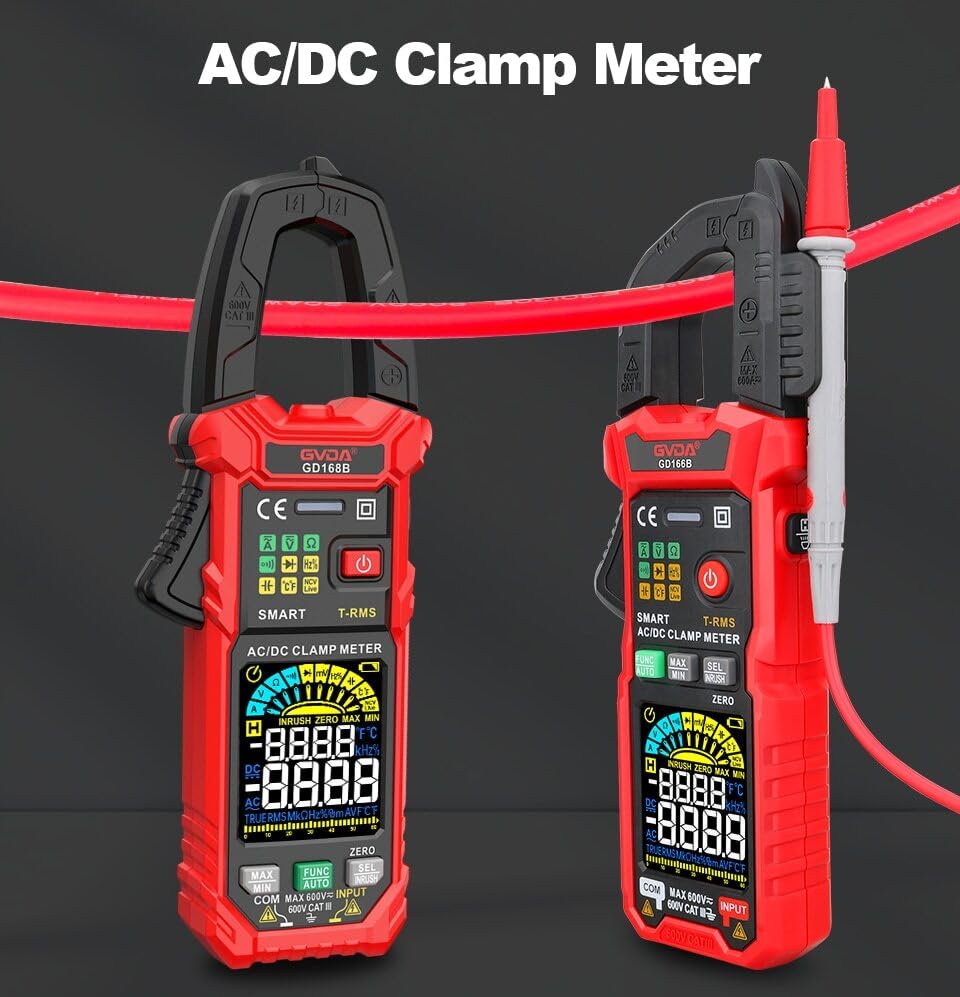
Figure 3.2.3: AC/DC Clamp Meter Comparison. This image displays two GVDA clamp meters, GD168B and GD166B, side-by-side, showcasing their similar design and functionality as AC/DC clamp metrów.

Rysunek 3.2.4: Zawartość opakowania. This image shows the complete package contents, including the GD166B clamp meter, test leads, a thermocouple probe, a carrying case, and the user manual.
4. Konfiguracja
4.1 Instalacja baterii
The GD166B requires 3 x 1.5V AAA batteries (not included) for operation.
- Znajdź komorę baterii z tyłu miernika.
- Za pomocą śrubokręta otwórz pokrywę komory baterii.
- Włóż trzy baterie AAA, zwracając uwagę na prawidłową biegunowość (+ i -).
- Załóż pokrywę komory baterii i zabezpiecz ją śrubą.
4.2 Podłączanie przewodów pomiarowych
Do pomiarów wymagających przewodów pomiarowych (np. objętościtage, resistance, continuity, diode, capacitance, temperature), connect them as follows:
- Włóż czarny przewód pomiarowy do gniazda wejściowego „COM” (wspólnego).
- Insert the red test lead into the "INPUT" (positive) input jack.

Figure 4.2.1: Test Lead Connection. This image illustrates the correct way to connect the test leads to the meter's input jacks for various measurements.
5. Instrukcja obsługi
5.1 Włączanie/wyłączanie zasilania
Naciśnij Przycisk zasilania (⑂) to turn the meter on or off.
5.2 Wybór funkcji
The GD166B features a "Smart Measurement (Auto)" mode, which automatically identifies the measurement type (voltage, resistance, continuity) when test leads are connected. For other specific functions, use the FUNC button to cycle through modes or the rotary dial if present (though this model appears button-driven).
5.3 Typowe pomiary
5.3.1 AC/DC objtage Pomiar
- Connect the red test lead to the "INPUT" jack and the black test lead to the "COM" jack.
- Wybierz odpowiednią objętośćtage range (or use Smart Auto mode).
- Podłącz przewody pomiarowe równolegle do obwodu lub elementu, który chcesz zmierzyć.
- Przeczytaj tomtage wartość na wyświetlaczu.
5.3.2 Pomiar prądu przemiennego/stałego (Clamp)
Do pomiarów prądu należy używać clamp szczęka. Upewnij się, że obwód jest odłączony od zasilania przed zamknięciem.amping.
- Select the AC or DC current function.
- Otwórz klamp jaw and enclose only one conductor of the circuit.
- Zamknij clamp jaw completely.
- Odczytaj aktualną wartość na wyświetlaczu.
5.3.3 Pomiar rezystancji
- Przed pomiarem rezystancji należy upewnić się, że obwód jest odłączony od napięcia.
- Connect the test leads to the "INPUT" and "COM" jacks.
- Select the resistance function.
- Podłącz przewody pomiarowe do mierzonego elementu.
- Odczytaj wartość rezystancji z wyświetlacza.
5.3.4 Test ciągłości
- Upewnij się, że obwód jest odłączony od napięcia.
- Connect the test leads to the "INPUT" and "COM" jacks.
- Select the continuity function.
- Podłącz przewody pomiarowe do obwodu lub elementu. Ciągły sygnał dźwiękowy oznacza ciągłość (niską rezystancję).
5.3.5 tom bez kontaktutage (NCV) Wykrywanie
Funkcja NCV umożliwia wykrywanie objętości prądu przemiennegotage bez bezpośredniego kontaktu.
- Wybierz funkcję NCV.
- Place the top end of the meter near the conductor or outlet.
- Miernik wyda sygnał dźwiękowy i zaświeci się wskaźnik NCV, jeśli objętość prądu przemiennegotage zostało wykryte.

Figure 5.3.5.1: NCV Measurement in Progress. This image demonstrates the GD166B clamp meter being used to perform a Non-Contact Voltage (NCV) measurement on an electrical outlet, indicating its ability to detect live voltage bez kontaktu fizycznego.
5.3.6 AC Inrush Current Measurement
This function measures the initial surge of current when a device is turned on.
- Select the Inrush Current function.
- Otwórz klamp jaw and enclose only one conductor of the circuit.
- Turn on the device to be measured. The meter will capture the peak inrush current.

Figure 5.3.6.1: Inrush Current Measurement. This image shows the GD166B clamp meter actively measuring inrush current on a set of electrical wires, demonstrating its capability to capture transient current peaks.
5.3.7 Inne funkcje
- Przechowywanie danych: Naciśnij TRZYMAĆ Naciśnij przycisk, aby zamrozić aktualny odczyt na wyświetlaczu. Naciśnij ponownie, aby zwolnić.
- MAKS./MIN.: Naciśnij MAKS./MIN. button to record the maximum and minimum readings.
- Podświetlenie/Latarka: Naciśnij Przycisk światła to turn on/off the display backlight or the integrated flashlight.
- DCA Zero: Used to zero out the DC current reading before measurement to ensure accuracy.
6. Konserwacja
6.1 Czyszczenie
Wyczyść obudowę za pomocą reklamyamp Ściereczką i łagodnym detergentem. Nie używaj środków ściernych ani rozpuszczalników. Utrzymuj zaciski wejściowe w czystości i bez wilgoci.
6.2 Wymiana baterii
Gdy wskaźnik niskiego poziomu naładowania baterii (ikona baterii) appears on the display, replace the batteries immediately to ensure accurate readings. Refer to Section 4.1 for battery installation instructions.
6.3 Przechowywanie
Jeśli miernik nie będzie używany przez dłuższy czas, należy wyjąć baterie, aby zapobiec wyciekowi i uszkodzeniu miernika. Przechowuj miernik w chłodnym, suchym miejscu, z dala od bezpośredniego światła słonecznego i ekstremalnych temperatur.
7. Rozwiązywanie Problemów
| Problem | Możliwa przyczyna | Rozwiązanie |
|---|---|---|
| Miernik się nie włącza. | Rozładowane lub nieprawidłowo zainstalowane baterie. | Sprawdź biegunowość baterii; wymień baterie. |
| Wyświetla się "OL". | Przeciążenie lub poza zasięgiem. | Select a higher range (if applicable) or ensure the measured value is within the meter's limits. |
| Niedokładne odczyty. | Low battery; incorrect function/range; poor test lead connection. | Replace batteries; select correct function/range; ensure secure test lead connection. |
| Brak sygnału dźwiękowego. | Circuit not continuous; high resistance; meter not in continuity mode. | Check circuit; ensure resistance is low; select continuity mode. |
8. Specyfikacje
| Parametr | Zakres/Wartość |
|---|---|
| Objętość DCtage | 600mV, 6V, 60V, 600V |
| AC Objętośćtage | 600mV, 6V, 60V, 600V |
| Prąd zmienny | 60A, 600A |
| Prąd stały | 60A, 600A |
| Opór | 600Ω, 6kΩ, 60kΩ, 600kΩ, 6MΩ, 60MΩ |
| Prąd rozruchowy AC | 60A, 600A |
| Pojemność | 6nF, 60nF, 600nF, 6µF, 60µF, 600µF, 6mF, 60mF |
| Częstotliwość | 100Hz, 1000Hz, 10kHz, 100kHz, 1000kHz, 10MHz |
| Cykl pracy | 1-99% |
| Temperatura | -40℃ ~ 1000℃, -40℉ ~ 1832℉ |
| Maks. Tomtage pomiędzy zaciskami a uziemieniem | 600 V |
| Wyświetlacz | 6000 liczy |
| Wskazanie przekroczenia zakresu | "OL" |
| Wskaźnik niskiego poziomu naładowania baterii | Tak |
| Input Polarity Indication | Display "-" |
| Clamp Rozmiar otworu | 36 mm |
| Wymagania dotyczące zasilania | 3 baterie AAA 1.5 V |
| Rozmiar produktu | Wymiary: 199*81*32 mm |
| Waga (opakowanie) | 440g |
9. Gwarancja i wsparcie
This product is manufactured to high-quality standards. For information regarding warranty coverage, technical support, or service, please refer to the documentation provided with your purchase or contact your retailer.
Proszę zachować dowód zakupu na potrzeby roszczeń gwarancyjnych.