1. Wprowadzenie
Thank you for choosing the VENTISOL Electric Garage Heater. This manual provides essential information for the safe installation, operation, and maintenance of your heater. Please read it thoroughly before use and retain it for future reference.

Figure 1: VENTISOL Electric Garage Heater in operation, showing heat emission.
2. Ważne instrukcje bezpieczeństwa
OSTRZEŻENIE: Aby zmniejszyć ryzyko pożaru, porażenia prądem lub obrażeń, przed użyciem grzejnika należy przeczytać i zrozumieć wszystkie instrukcje.
- Instalacja elektryczna: This heater requires a 240V hardwired connection. Installation should only be performed by a qualified electrician in accordance with all local and national electrical codes. A power cord is not included.
- Odłączenie zasilania: Always switch off the circuit breaker to disconnect power to the heater before performing any maintenance, cleaning, or adjustments.
- Zabezpieczenie przed przegrzaniem: The heater is equipped with an automatic overheat protection sensor. If the unit overheats, it will shut off automatically. If this occurs, turn off the heater, allow it to cool, and check for obstructions before restarting.
- Luz: Maintain minimum distances from walls and objects as specified in the installation section to prevent fire hazards. Do not block air intake or exhaust.
- Lokalizacja: Nie używać na mokro lub damp locations. Ensure the heater is mounted securely to a stable structure.
- Materiały łatwopalne: Keep all flammable materials (furniture, paper, clothing, curtains, etc.) at least 3 feet (0.9 meters) from the front, sides, and rear of the heater.
- Nadzór: Do not leave the heater unattended while in operation. Keep children and pets away from the heater.
- Przeznaczenie: Używaj tego grzejnika tylko w sposób opisany w niniejszej instrukcji. Każde inne użycie niezalecane przez producenta może spowodować pożar, porażenie prądem elektrycznym lub obrażenia.
3. Funkcje produktu
The VENTISOL Electric Garage Heater is designed for efficient heating in various indoor environments such as garages, workshops, and greenhouses. Key features include:
- Wydajne ogrzewanie: Offers 3000W, 4000W, or 5000W heating output, providing up to 17,065 BTUs.
- Fan-Forced Circulation: Ensures wide area heat distribution.
- Regulowany termostat: Built-in thermostat for precise temperature control.
- Wiele opcji montażu: Ceiling-mounted design with adjustable vertical and horizontal angles.
- Trwała konstrukcja: Heavy-gauge steel body for long-lasting performance.
- Certyfikat bezpieczeństwa: ETL certified with built-in overheat protection.
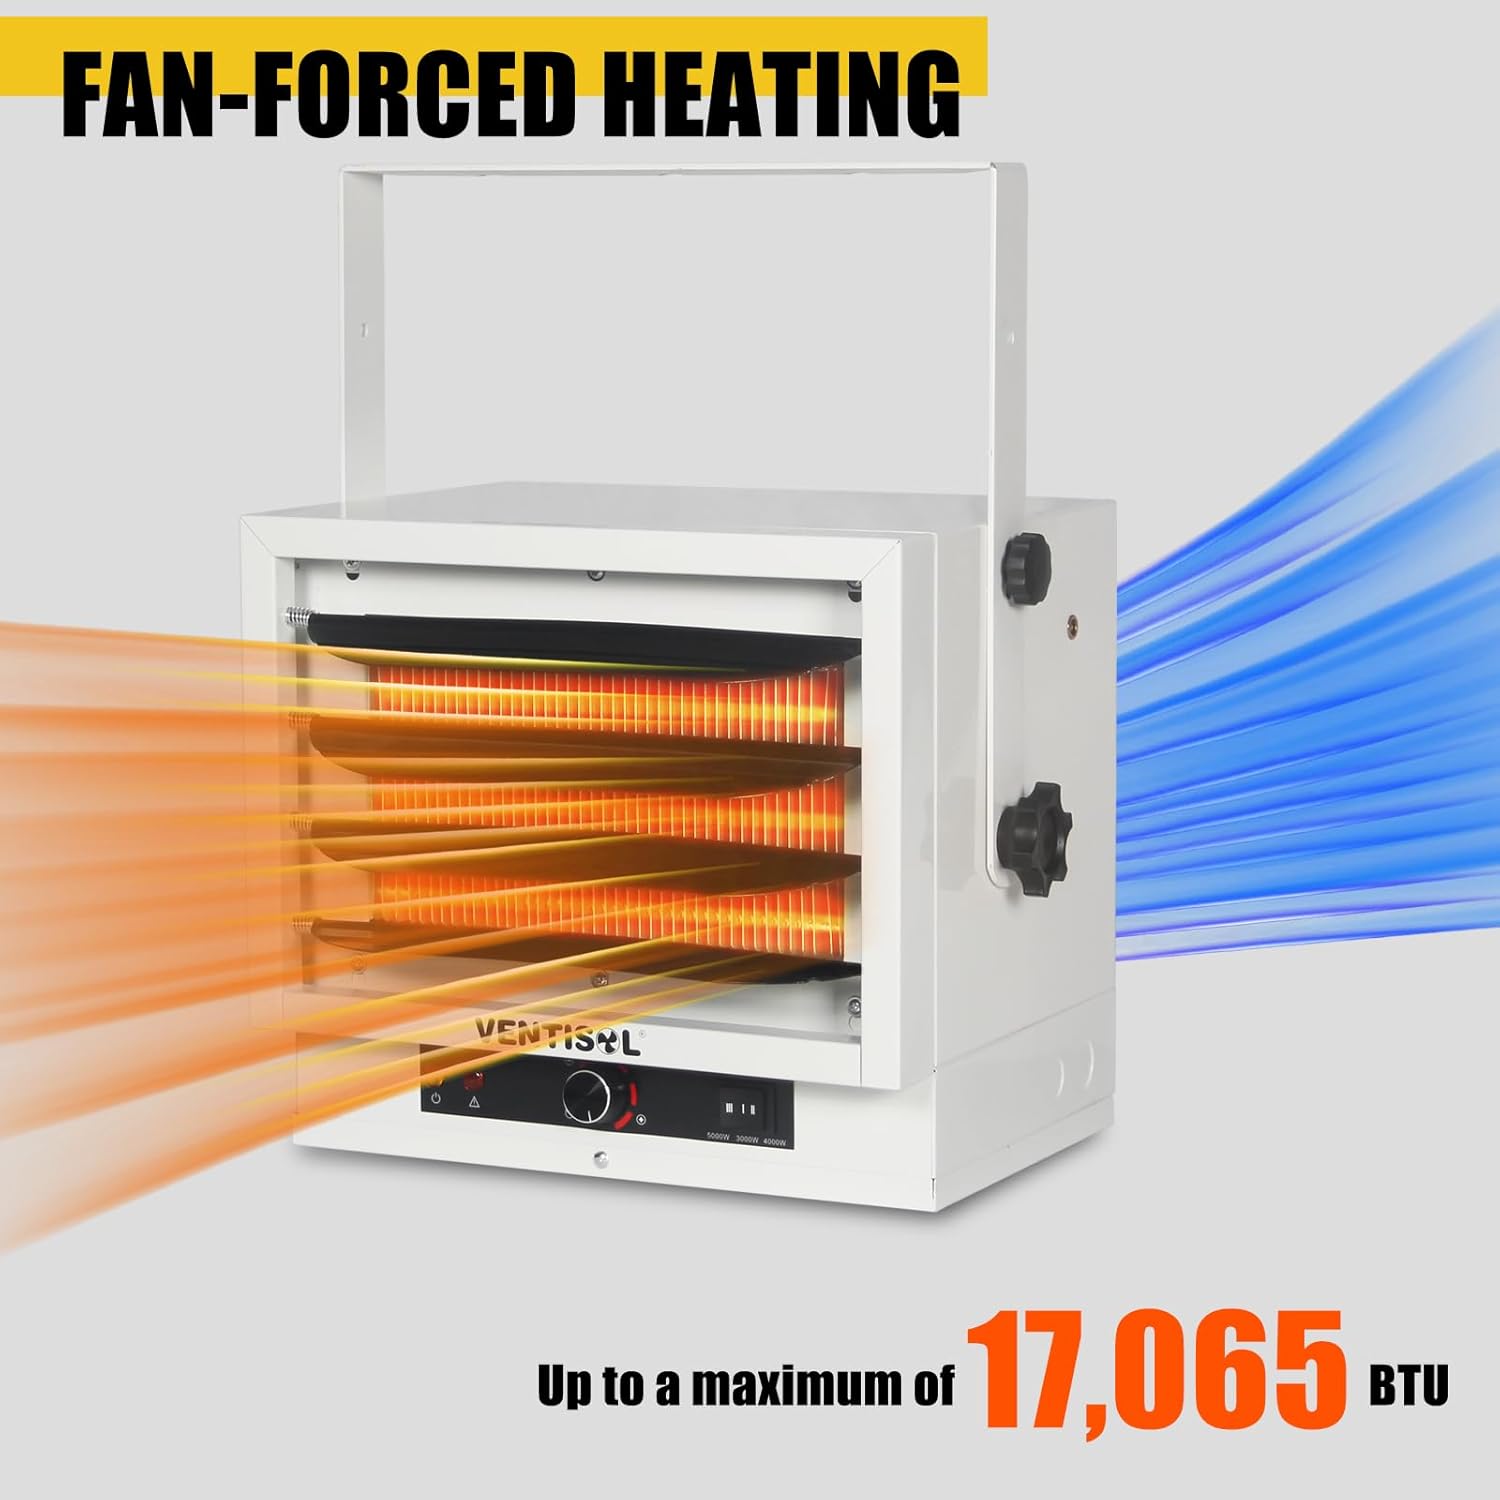
Figure 2: Illustration of the heater's fan-forced heating mechanism, distributing warm air.

Figure 3: The heater mounted in a garage environment, demonstrating its ability to heat up to 500 square feet.
4. Instalacja i konfiguracja
4.1 Rozpakowanie
Carefully remove the heater from its packaging. Inspect the unit for any damage. If damage is found, do not install or operate the heater; contact customer service.
4.2 Miejsce montażu
The heater is designed for ceiling mount installation. Choose a location that allows for proper air circulation and maintains the minimum clearances specified below. Ensure the mounting surface can support the weight of the heater (approximately 26.4 pounds).
- Minimum distance from discharge to any object: 24 inches.
- Minimum distance to wall (side): 7 1/2 inches.
- Minimum distance to wall (front): 14 inches.
- Distance to floor: At least 8 feet.

Figure 4: Detailed diagram illustrating the minimum clearance requirements for safe installation from walls, objects, and the floor.
4.3 Montaż grzejnika
- Secure the mounting bracket to the ceiling using appropriate hardware (not included) suitable for the ceiling material and heater weight.
- Zamontuj grzejnik w uchwycie montażowym.
- Adjust the heater's angle using the small and large knob screws on the sides. The heater can be tilted at various angles (e.g., 45°, 67.5°, 90°) to direct airflow.

Figure 5: The heater's adjustable louvers and various mounting angles (45, 67.5, 90 degrees) for directing heat.

Figure 6: Illustrates the process of securing the mounting bracket to the ceiling.
4.4 Okablowanie elektryczne
IMPORTANT: This heater requires a 240V hardwired connection. A power cord is NOT included. It is strongly recommended to have a professional electrician perform the wiring to ensure safety and compliance with electrical codes.
- Ensure the main power supply to the circuit is turned OFF at the breaker panel before beginning any wiring.
- Connect the appropriate gauge electrical wire (e.g., #8/2 copper wire for 40A breaker) to the heater's terminal block.
- Follow the wiring diagram provided with the heater for correct connections (L1, L2, Ground).
- Dokładnie zabezpiecz wszystkie połączenia.

Rysunek 7: Zbliżenie view of the internal wiring connections, emphasizing the need for professional installation.
5. Instrukcja obsługi
5.1 Panel sterowania ponadview
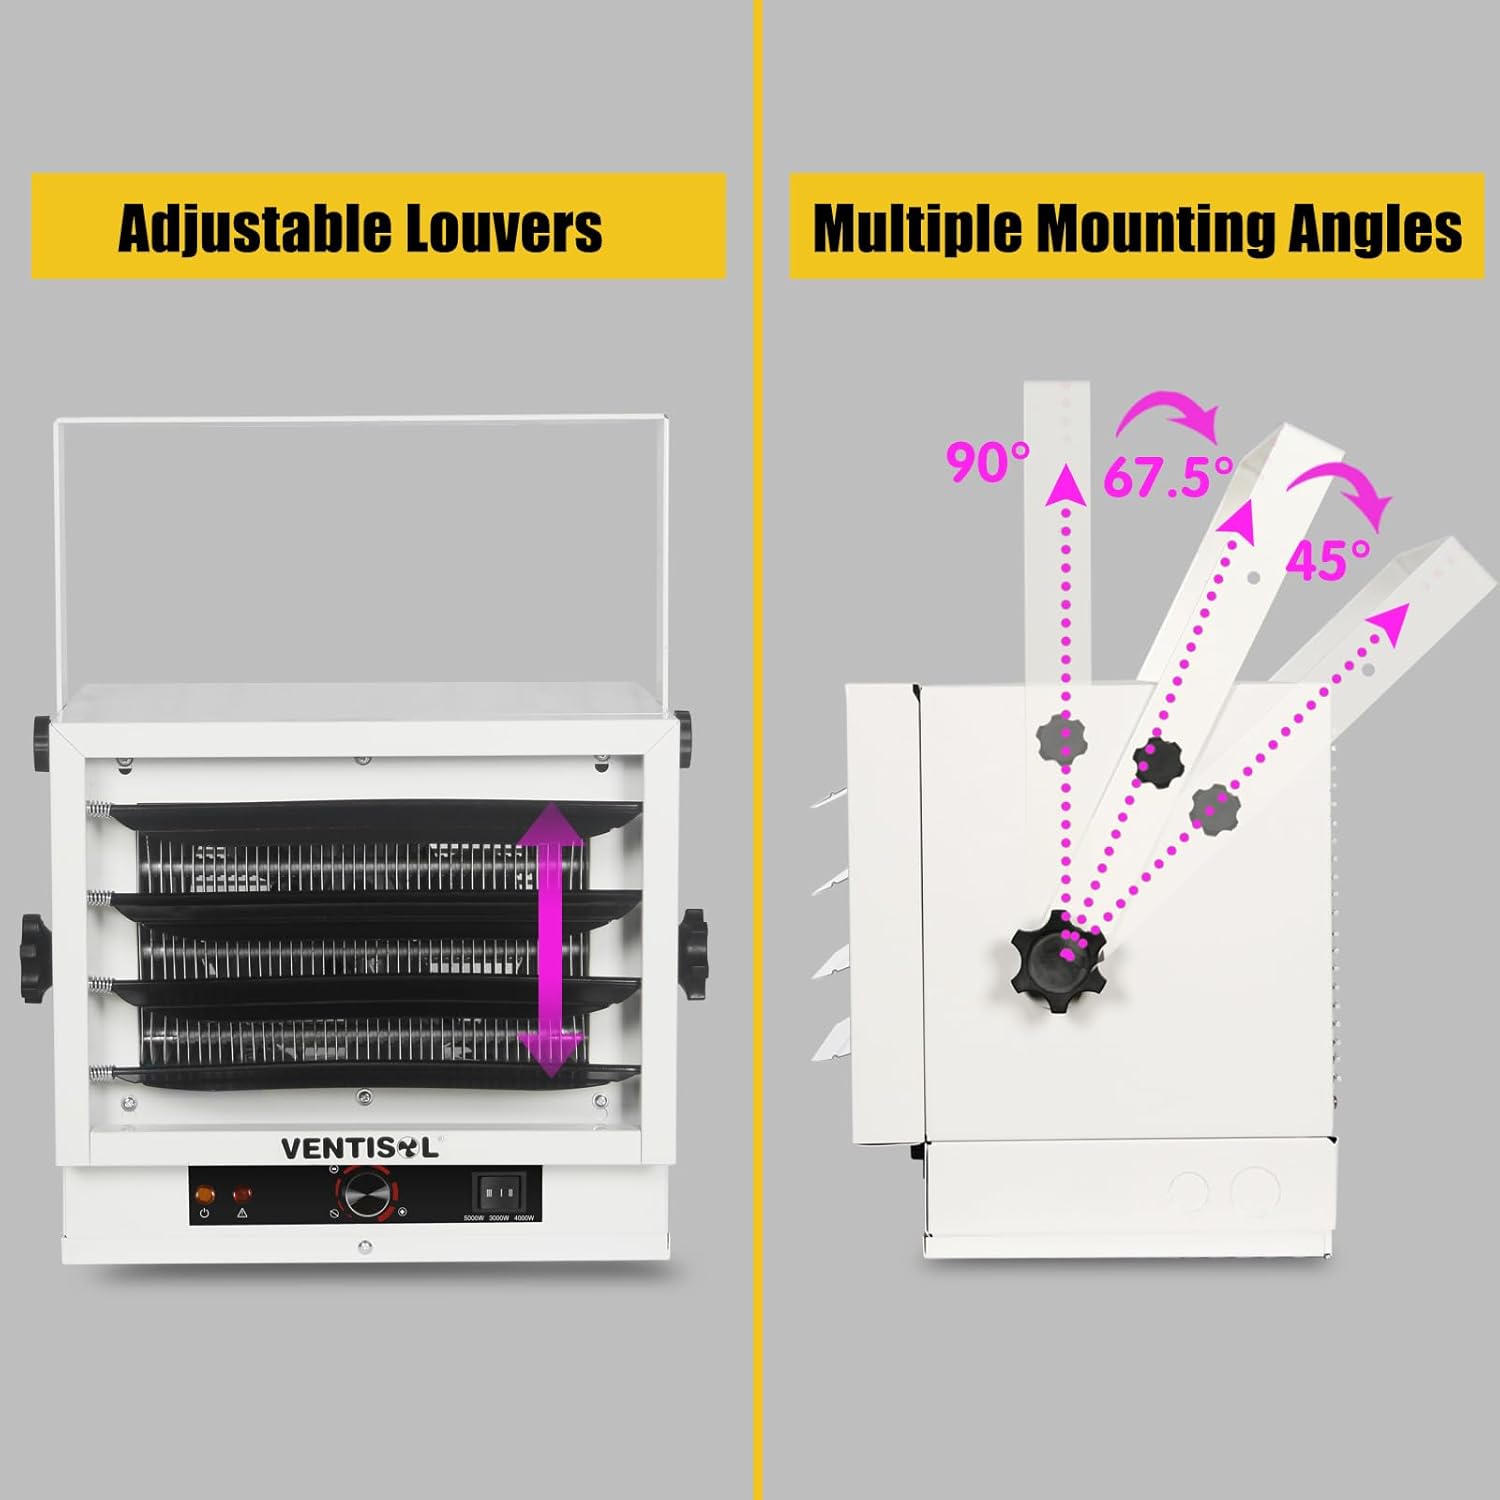
Figure 8: The control panel features a Power Indicator Light, Overheat Caution Light, Thermostat Control knob, and a Power Selection Switch.
- Wskaźnik zasilania: Świeci się, gdy grzejnik jest włączony.
- Overheat Caution Light: Illuminates if the heater detects an overheating condition and automatically shuts off.
- Sterowanie termostatem: A rotary knob to set the desired room temperature.
- Power Selection Switch: Allows selection of heating output: I (3000W), II (4000W), III (5000W).
5.2 Pierwsze uruchomienie
- After successful installation and wiring, turn on the circuit breaker supplying power to the heater. The Power Indicator Light should illuminate.
- Turn the Thermostat Control knob to the desired temperature setting.
- Select the desired heating output using the Power Selection Switch:
- Pozycja I: 3000W heating.
- Pozycja II: 4000W heating.
- Pozycja III: 5000W heating.
- The heater will begin to operate, and the fan will start. The heating elements will activate to reach the set temperature.
5.3 Funkcja termostatu
The built-in thermostat will automatically turn the heating elements on and off to maintain the set temperature. The fan may continue to run even when the heating elements are off to circulate air and prevent heat stratification.
6. Konserwacja
WARNING: Always disconnect power to the heater at the circuit breaker before performing any maintenance or cleaning.
6.1 Czyszczenie
- Zewnętrzny: Przetrzyj zewnętrzne powierzchnie grzejnika miękką,amp ściereczka. Nie należy używać środków czyszczących o właściwościach ściernych ani rozpuszczalników.
- Wlot/wydech powietrza: Periodically check the air intake and exhaust areas for dust and debris. Use a vacuum cleaner with a brush attachment to gently remove any accumulations. Ensure these areas are clear to prevent overheating.
6.2 Przechowywanie
Jeśli grzejnik będzie przechowywany przez dłuższy czas, upewnij się, że jest czysty i suchy. Przechowuj go w chłodnym, suchym miejscu, najlepiej w oryginalnym opakowaniu.
7. Rozwiązywanie Problemów
| Problem | Możliwa przyczyna | Rozwiązanie |
|---|---|---|
| Grzejnik nie włącza się. | No power supply. Circuit breaker tripped. Incorrect wiring. | Check circuit breaker. Ensure proper 240V power supply. Verify wiring connections (consult an electrician if unsure). |
| Ogrzewanie niespodziewanie się wyłącza. | Aktywna ochrona przed przegrzaniem. | Turn off the heater and allow it to cool. Check for obstructions around air intake/exhaust. Ensure proper clearances. Restart the heater. |
| Brak ogrzewania, ale wentylator działa. | Thermostat set too low. Heating elements malfunction. | Increase the thermostat setting. If the issue persists, contact customer support. |
| Wentylator pracuje w sposób ciągły. | This is normal operation. The fan may continue to run to circulate air even when heating elements are off. | No action required. This is part of the design for air circulation. |
| Niewystarczające ogrzewanie. | Incorrect power setting. Thermostat set too low. Room size too large for selected wattage. | Select a higher power setting (4000W or 5000W). Increase thermostat setting. Ensure the heater's capacity matches the room size. |
8. Specyfikacje
| Funkcja | Specyfikacja |
|---|---|
| Marka | VENTISOL |
| Numer modelu | G-5000W |
| Tomtage | 240 wolty |
| Ampwymazać | 20 Amps (at 5000W) |
| Moc cieplna | 3000 W / 4000 W / 5000 W |
| BTU/Godzina | 11,285 / 14,105 / 17,065 |
| Zasięg ogrzewania | 500-625 stóp kwadratowych |
| Wymiary produktu (Gł. x Szer. x Wys.) | 13.78" x 17.9" x 14.57" (350 mm x 455 mm x 370 mm) |
| Waga przedmiotu | 26.4 funta |
| Typ montażu | Montaż sufitowy |
| Cechy specjalne | Energy Efficient, Fast Heating, Overheat Protection |
| Certyfikaty | Wpisany na listę ETL |

Figure 9: Dimensional drawing of the heater, indicating depth, width, and height.
9. Gwarancja i wsparcie
VENTISOL products are manufactured to high-quality standards. For warranty information or technical support, please refer to the warranty card included with your purchase or contact VENTISOL customer service directly. Please have your model number (G-5000W) and purchase date available when contacting support.
You can visit the official VENTISOL store for more information: VENTISOL Store on Amazon