
1. Wprowadzenie
The Crestron HD-CONV-USB-300 is a versatile USB converter designed to seamlessly integrate HDMI and analog audio sources into a USB stream. This device facilitates the capture and conversion of high-definition video and audio signals for various applications, including conferencing, streaming, and recording. This manual provides essential information for the proper installation, operation, and maintenance of your HD-CONV-USB-300 converter.
2. Informacje dotyczące bezpieczeństwa
Please read and understand all safety instructions before operating this device to prevent injury or damage.
- Moc: Use only the power adapter supplied with the unit. Ensure the power source matches the voltagi wymagania.
- Wentylacja: Do not block ventilation openings. Install the device in a location with adequate airflow.
- Wilgoć: Nie wystawiaj urządzenia na działanie deszczu, wilgoci ani nie zanurzaj go w wodzie.
- Ciepło: Trzymaj urządzenie z dala od źródeł ciepła, takich jak grzejniki, kratki wentylacyjne, piece i inne urządzenia wytwarzające ciepło.
- Czyszczenie: Disconnect power before cleaning. Use a dry cloth only. Do not use liquid cleaners or aerosol sprays.
- Serwisowanie: Nie próbuj samodzielnie naprawiać tego produktu. Wszelkie czynności serwisowe należy powierzyć wykwalifikowanemu personelowi serwisowemu.
3. Zawartość opakowania
Sprawdź, czy w przesyłce znajdują się wszystkie elementy:
- 1x Crestron HD-CONV-USB-300 USB Converter
- 1x Zasilacz
- 1x USB Cable (Type A to Type B)
- 1x Quick Start Guide (or similar documentation)
4. Koniec produktuview
The HD-CONV-USB-300 features multiple input and output ports for flexible connectivity.
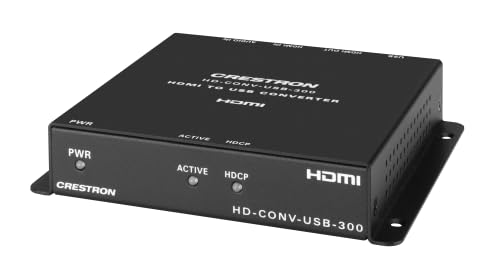
Rycina 1: Przód view of the Crestron HD-CONV-USB-300 USB Converter. This image shows the compact design and the Crestron branding on the device.
4.1. Panel przedni
- Dioda LED stanu: Wskazuje zasilanie i stan operacyjny.
- Przycisk wyboru wejścia: Toggles between HDMI and Analog audio inputs.
4.2. Panel tylny
- Wejście HDMI: Connect your HDMI video and audio source here.
- Analog Audio Input (3.5mm): Podłącz analogowe źródła dźwięku.
- USB Output (Type B): Connect to your computer for data transfer.
- Wejście zasilania (prąd stały 5 V): Podłącz dostarczony zasilacz.
5. Konfiguracja
Follow these steps to set up your Crestron HD-CONV-USB-300 converter:
- Podłącz źródło HDMI: Connect an HDMI cable from your video source (e.g., camera, media player) to the Wejście HDMI port on the HD-CONV-USB-300.
- Connect Analog Audio Source (Optional): If using an analog audio source, connect a 3.5mm audio cable from your audio device to the Wejście audio analogowe port.
- Połącz z komputerem: Connect the supplied USB cable from the USB Output (Type B) port on the converter to an available USB port on your computer.
- Podłącz zasilanie: Plug the supplied power adapter into the Wejście zasilania (5 V DC) port on the converter, then plug the adapter into a power outlet. The Status LED should illuminate.
- Instalacja sterownika: The HD-CONV-USB-300 is typically plug-and-play and does not require specific drivers for most operating systems (Windows, macOS, Linux). It will be recognized as a standard USB Video Class (UVC) and USB Audio Class (UAC) device.
- Konfiguracja oprogramowania: Open your preferred video conferencing, streaming, or recording software (e.g., OBS Studio, Zoom, Microsoft Teams). In the software's settings, select the Crestron HD-CONV-USB-300 as your video and audio input device.
6. Instrukcja obsługi
Once the device is set up, follow these steps for operation:
- Włączanie: Ensure the converter is powered on and connected to your computer. The Status LED should be solid green.
- Wybierz wejście: Naciśnij Przycisk wyboru wejścia on the front panel to switch between HDMI and Analog audio inputs. The Status LED may change color or blink to indicate the active input (refer to specific model documentation for LED behavior).
- Verify Input in Software: In your chosen software, confirm that the video and audio from your selected source are being received. Adjust any necessary settings within the software, such as resolution, frame rate, or audio levels.
- Rozpocznij aplikację: Begin your video conference, streaming session, or recording.
Notatka: The quality of the captured video and audio will depend on the source device and the capabilities of your computer and software.
7. Konserwacja
Proper maintenance ensures the longevity and optimal performance of your HD-CONV-USB-300.
- Czyszczenie: Disconnect the power before cleaning. Use a soft, dry, lint-free cloth to wipe the exterior of the device. Do not use abrasive cleaners, solvents, or chemical sprays.
- Składowanie: If storing the device for an extended period, disconnect all cables and store it in a cool, dry place away from direct sunlight and extreme temperatures.
- Zarządzanie kablami: Ensure all cables are routed neatly and are not under strain or sharply bent to prevent damage.
8. Rozwiązywanie Problemów
If you encounter issues with your HD-CONV-USB-300, refer to the following common problems and solutions:
| Problem | Możliwa przyczyna | Rozwiązanie |
|---|---|---|
| Brak zasilania / Dioda LED stanu wyłączona | Zasilacz nie jest podłączony lub jest uszkodzony. | Ensure the power adapter is securely connected to the converter and a working power outlet. Try a different outlet. |
| No video output in software | Incorrect input selected; HDMI cable issue; Software not configured correctly. |
|
| No audio output in software | Incorrect input selected; Audio cable issue; Software not configured correctly; Source audio settings. |
|
| Komputer nie rozpoznaje urządzenia | USB cable issue; USB port issue; Driver conflict. |
|
9. Specyfikacje
| Numer modelu | 6512272 |
| Marka | Krestron |
| Interfejsy | HDMI, USB, Analog Audio (3.5mm) |
| Wymiary (dł. x szer. x wys.) | Wymiary 10.69 x 25.9 x 29.4 cm |
| Waga | 730 gramów |
| Producent | Krestron |
| Data dostępności | 18 maja 2023 r. |
10. Informacje o gwarancji
Crestron products are typically covered by a limited manufacturer's warranty. The specific terms and duration of the warranty may vary by region and product type. For detailed warranty information, please refer to the warranty card included with your product or visit the official Crestron webstrona.
Notatka: Zachowaj dowód zakupu na potrzeby roszczeń gwarancyjnych.
11. Informacje o pomocy technicznej
For technical support, product updates, or additional resources, please visit the official Crestron webstrona:
You may also find FAQs and community forums on their support pages.


