Wstęp
This manual provides detailed instructions for the installation, operation, and maintenance of your HIKVISION DS-7616NXI-K1 16 Channel 8MP 4K Network Video Recorder (NVR). Please read this manual thoroughly before using the product to ensure proper and safe operation. Keep this manual for future reference.
Zawartość opakowania
Po rozpakowaniu należy sprawdzić, czy wszystkie wymienione poniżej przedmioty znajdują się na miejscu i są w dobrym stanie:
- HIKVISION DS-7616NXI-K1 NVR Main Unit
- Zasilacz
- Mysz USB
- Kabel Ethernet
- Kable SATA (do podłączenia dysku twardego)
- HDMI Cable (USEWEll HDMI Included)
- Szybki przewodnik

Figure 1: Package Contents. The image displays the NVR unit, power adapter, USB mouse, Ethernet cable, SATA cables, and a quick start guide, all neatly arranged as they would appear upon unboxing.
Produkt ponadview
Główne cechy
- Supports up to 16 IP camera inputs.
- Advanced H.265+/H.265/H.264+/H.264 video formats for efficient storage and bandwidth usage.
- Equipped with Motion Detection 2.0 for enhanced security.
- Up to 160 Mbps incoming bandwidth to support multiple high-resolution cameras.
- AcuSense technology for intelligent analysis and reduced false alarms.

Figure 2: Key Features. This image highlights the main capabilities of the NVR, such as H.265+ compression, 4K resolution support, AcuSense technology, and various smart functions.
Interfejs fizyczny
The NVR features a well-organized rear panel with various ports for connectivity. Refer to the diagram below for a detailed layout.

Figure 3: Physical Interface. This diagram illustrates the rear panel of the NVR, labeling ports such as LAN, Audio In/Out, HDMI, VGA, USB, and Power Supply.
| NIE. | Opis | NIE. | Opis |
|---|---|---|---|
| 1 | Interfejs sieci LAN | 6 | Interfejs USB |
| 2 | WEJŚCIE AUDIO | 7 | Zasilacz |
| 3 | WYJŚCIE DZWIĘKU | 8 | Wyłącznik zasilania |
| 4 | Interfejs HDMI | 9 | GND |
| 5 | Interfejs VGA |

Figure 4: NVR Front and Rear View. Ten obraz zapewnia wyraźny view of the NVR's front panel with its minimalist design and the rear panel showcasing all connectivity options.
Organizować coś
Follow these steps to set up your HIKVISION NVR:
- Instalacja dysku twardego (opcjonalnie): If a hard drive is not pre-installed, open the NVR casing, connect the SATA power and data cables to the hard drive, and secure it within the NVR. Close the casing.
- Podłącz wyświetlacz: Connect a monitor to the NVR's HDMI or VGA output port using the provided HDMI cable or a VGA cable.
- Podłącz mysz: Podłącz mysz USB do jednego z portów USB rejestratora NVR.
- Połączenie internetowe: Connect the NVR to your local network using an Ethernet cable. Ensure your network has internet access for remote viewfunkcje.
- Włączanie: Connect the power adapter to the NVR and then to a power outlet. Turn on the NVR using the power switch on the rear panel.
- Konfiguracja wstępna: Follow the on-screen prompts to complete the initial setup, including setting up a password, network settings, and hard drive initialization.
- Podłącz kamery IP: Connect your IP cameras to the same network as the NVR. The NVR will automatically search for and add compatible cameras. For non-PoE cameras, ensure they are powered separately and connected to the network.
Instrukcja obsługi
Once the NVR is set up, you can begin monitoring and managing your surveillance system.
Na żywo View i nagrywanie
- Wejdź na żywo view interface from the connected monitor or via the Hik-Connect app/web interfejs.
- Configure recording schedules and motion detection settings for each camera through the NVR's menu.
AcuSense Features
The NVR's AcuSense technology enhances security by providing intelligent detection capabilities:
- Detekcja ruchu 2.0: Reduces false alarms caused by environmental factors (e.g., rain, leaves) by accurately classifying human and vehicle targets.
- Rozpoznawanie twarzy: Supports face picture comparison and facial detection for specific applications.
- Ochrona obwodowa: Utilizes deep learning algorithms to reduce false alarms in intrusion detection and line crossing scenarios.
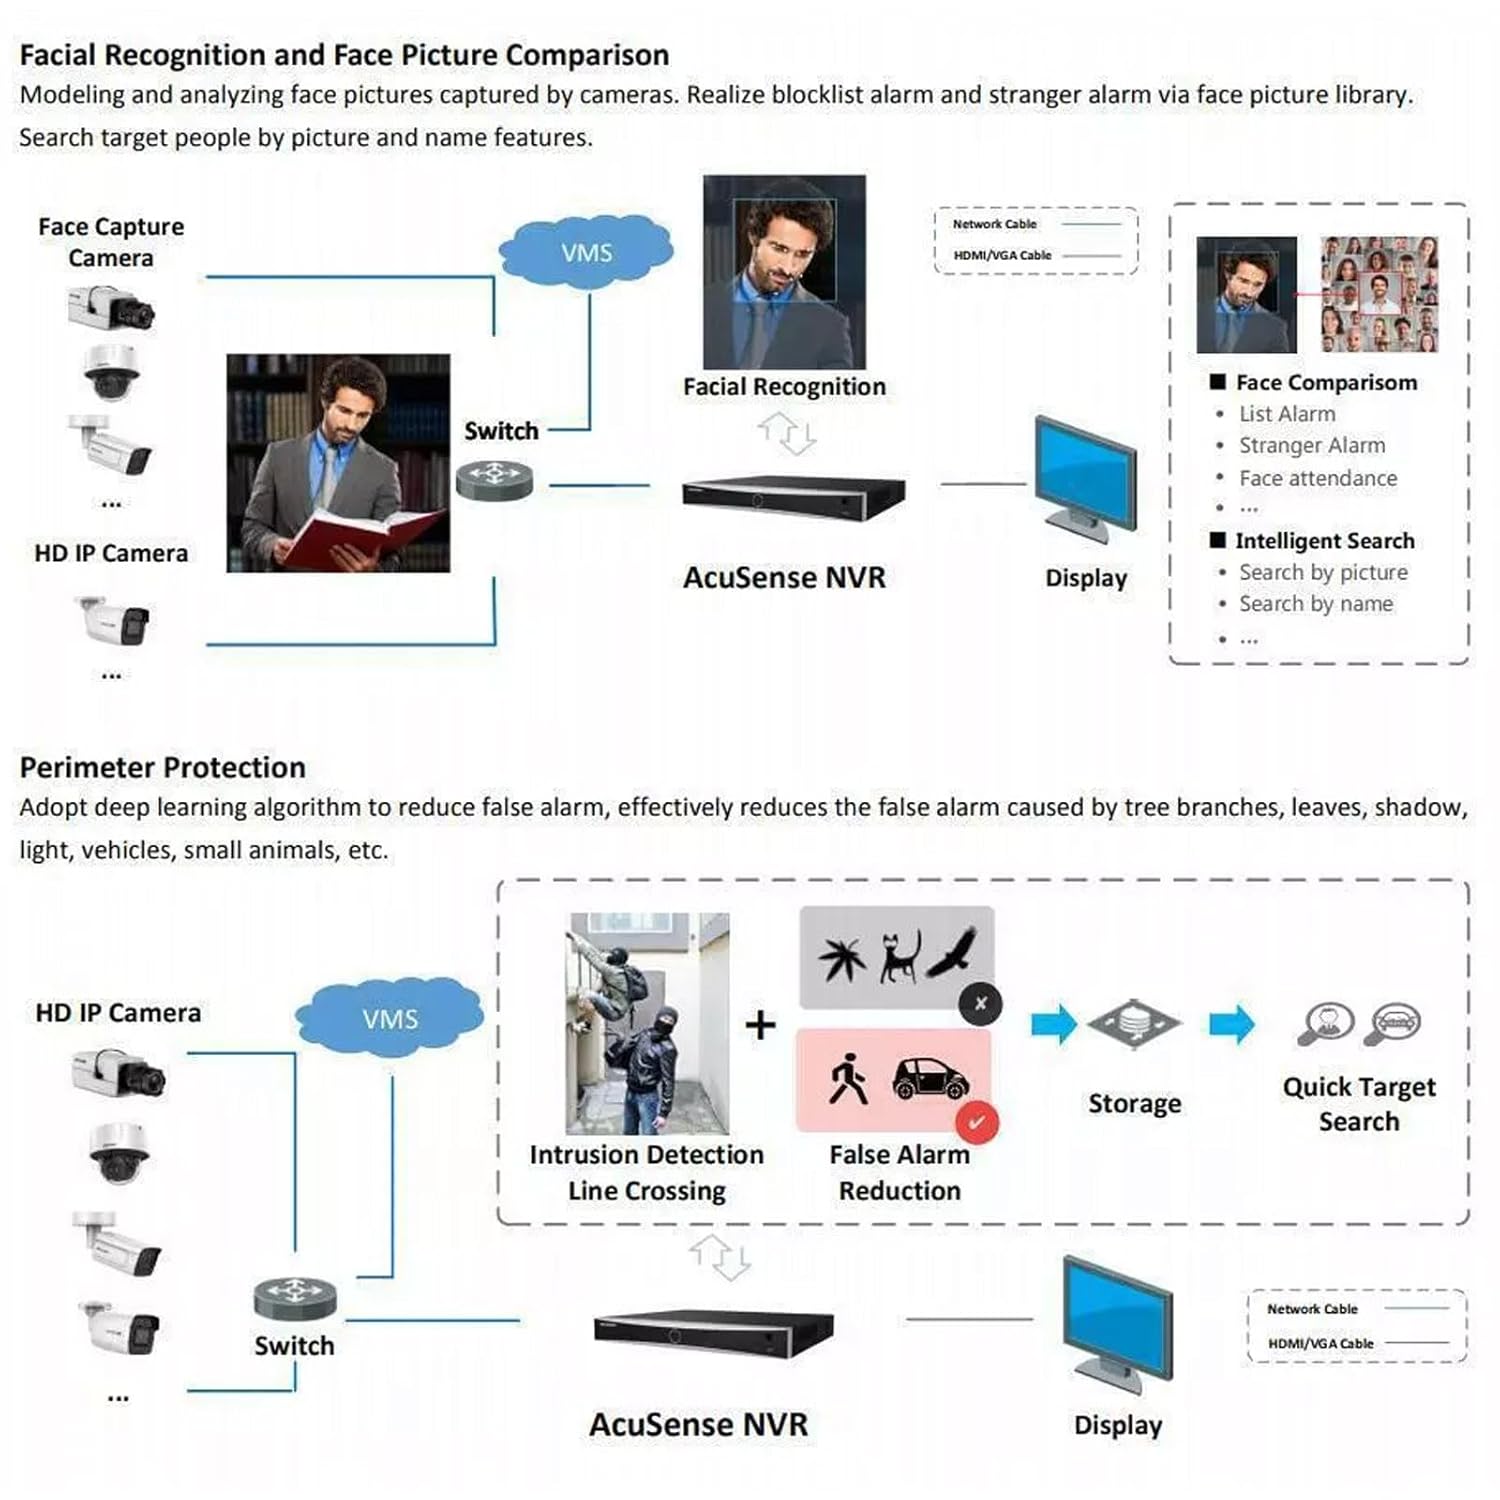
Figure 5: AcuSense Detection Capabilities. This image visually explains how AcuSense technology works for facial recognition and perimeter protection, showing the integration with cameras and the NVR.
Zdalny dostęp
Utilize the Hik-Connect P2P function for easy remote management and live viewing from your mobile device or web przeglądarka.
Konserwacja
Regular maintenance ensures optimal performance and longevity of your NVR system.
- Czyszczenie: Periodically clean the exterior of the NVR with a soft, dry cloth. Ensure ventilation openings are free from dust and obstructions.
- Aktualizacje oprogramowania układowego: Check the official HIKVISION website for the latest firmware updates. Regularly updating the firmware can improve system stability and add new features.
- Zarządzanie dyskiem twardym: Monitor the health of your hard drive(s) through the NVR's system settings. Ensure sufficient storage space is available for recordings.
- Konfiguracja kopii zapasowej: Regularly back up your NVR's configuration settings to a USB drive or network location.
Rozwiązywanie problemów
W tej sekcji omówiono typowe problemy, na które możesz natrafić.
- Brak wyjścia wideo: Check all cable connections (HDMI/VGA, power). Ensure the monitor is on and set to the correct input. Restart the NVR.
- Kamery nie wyświetlają: Verify that IP cameras are powered on and correctly connected to the network. Check network settings on both the NVR and cameras. Ensure cameras are added to the NVR.
- Problemy z połączeniem sieciowym: Confirm the Ethernet cable is securely connected. Check your router/switch status. Verify NVR network settings (IP address, gateway, DNS).
- Hard Drive Detection Issues: If the hard drive is not detected or shows errors, ensure it is properly connected inside the NVR. In some cases, an insufficient power supply to the NVR can cause HDD issues. Consider using a 12V 2A power adapter if the supplied 12V 1.5A adapter proves insufficient for your HDD.
- Fałszywe alarmy: Adjust the sensitivity and detection zones for motion detection. Utilize AcuSense features (Motion Detection 2.0, Perimeter Protection) to filter out non-human/vehicle events.
Specyfikacje
Detailed technical specifications for the HIKVISION DS-7616NXI-K1 NVR.
| Funkcja | Szczegół |
|---|---|
| Wejście wideo IP | 16-kanałowy |
| Przychodzące Przepustowość | 160 Mb/s |
| Przepustowość wychodząca | 80 Mb/s |
| Wyjście HDMI | 1-ch, 4K (3840 × 2160)/30Hz, 2K (2560 × 1440)/60Hz, 1920 × 1080/60Hz, 1600 × 1200/60Hz, 1280 × 1024/60Hz, 1280 × 720/60Hz, 1024 × 768/60Hz |
| Wyjście VGA | 1 kanał, 1920 × 1080/60 Hz, 1280 × 1024/60 Hz, 1280 × 720/60 Hz |
| Format dekodowania | H.265 + / H.265 / H.264 + / H.264 |
| Rozdzielczość nagrywania | 12 MP/8 MP/6 MP/5 MP/4 MP/3 MP/1080p/UXGA/720p/VGA/4CIF/DCIF/2CIF/CIF/QCIF |
| Odtwarzanie synchroniczne | 16-ch |
| Interfejs SATA | Interfejs 1 SATA |
| Pojemność pamięci masowej | Do 10 TB na dysk twardy |
| Interfejs USB | Front panel: 1 × USB 2.0; Rear panel: 1 × USB 2.0 |
| Interfejs sieciowy | 1 RJ-45 10/100/1000 Mbps self-adaptive Ethernet interface |
| Zasilacz | 12 V DC, 1.5 A |
| Pobór mocy | ≤ 10 W (bez dysku twardego) |
| Temperatura pracy | -10 °C do 55 °C (14 °F do 131 °F) |
| Wilgotność robocza | od 10% do 90% |
| Wymiary (szer. × gł. × wys.) | 320 mm × 240 mm × 48 mm (12.6" × 9.4" × 1.9") |
| Waga | ≤ 1 kg (without HDD), 1.5 kg (Item Weight) |
| Kraj pochodzenia | Indie |

Figure 6: NVR Dimensions. This technical drawing provides precise measurements of the NVR unit in millimeters.
Oficjalny film o produkcie
Video 1: HIKVISION 16 Channel 8MP 4K NVR Overview. This video provides a brief visual introduction to the HIKVISION DS-7616NXI-K1 NVR, showcasing its design, package contents, and key features.
Gwarancja i wsparcie
Your HIKVISION DS-7616NXI-K1 NVR comes with a 2-letnia gwarancja, ensuring peace of mind regarding product quality and performance. For technical support, troubleshooting assistance, or warranty claims, please contact HIKVISION customer service or your authorized dealer.
Additionally, extended warranty plans are available for purchase:
- 1 Year Extended warranty by OneAssist
- 2 Year Extended warranty by OneAssist
For further information, visit the official HIKVISION website or consult your product documentation.