
Wstęp
Thank you for choosing the KJK LCK226 Trail Camera. This manual provides detailed instructions for setting up, operating, and maintaining your camera to ensure optimal performance. The LCK226 is designed for capturing high-quality images and videos of wildlife, for hunting, home security, or property surveillance. It features 24MP photo resolution, 1080P HD video recording, a rapid 0.2-second trigger speed, and IP66 waterproof rating for reliable outdoor use.
Produkt ponadview
Zawartość opakowania
Sprawdź, czy w przesyłce znajdują się wszystkie elementy:
- KJK LCK226 Trail Camera
- Instrukcja obsługi
- Threaded Tripod Mount
- Kabel USB
- Installation Strap
- Akcesoria śrubowe (do montażu)
- 8x baterie AA
- 32GB TF Card (Micro SD Card)

Image: Included components of the KJK LCK226 Trail Camera.
Struktura kamery
Familiarize yourself with the camera's external features and ports.

Obraz: Wewnętrzny view of the KJK LCK226 Trail Camera showing ports and controls. Ports include Micro SD Card slot (up to 128GB), AV port, USB port, DC 6V 1.5A port, and a 1/4"-20 Tripod Thread.
Przewodnik po konfiguracji
1. Instalacja baterii
- Open the camera housing latches and open the back cover.
- Insert 8x AA alkaline batteries into the battery compartment, ensuring correct polarity (+/-).
- Close the back cover and secure the latches.
2. Wkładanie karty Micro SD
- Wyłącz kamerę i znajdź gniazdo karty Micro SD.
- Insert the provided 32GB Micro SD card (or another compatible card up to 128GB, Class 10 or higher) into the slot until it clicks into place.
- Aby wyjąć kartę, wciśnij ją ponownie, aż wysunie się.
3. Montaż kamery
The camera can be mounted using the included strap or tripod mount.
- Mocowanie paska: Thread the installation strap through the slots on the back of the camera and secure it around a tree or pole.
- Montaż na statywie: Attach the threaded tripod mount to the 1/4"-20 tripod thread at the bottom of the camera. Use the screw accessories to secure the mount to a desired surface.
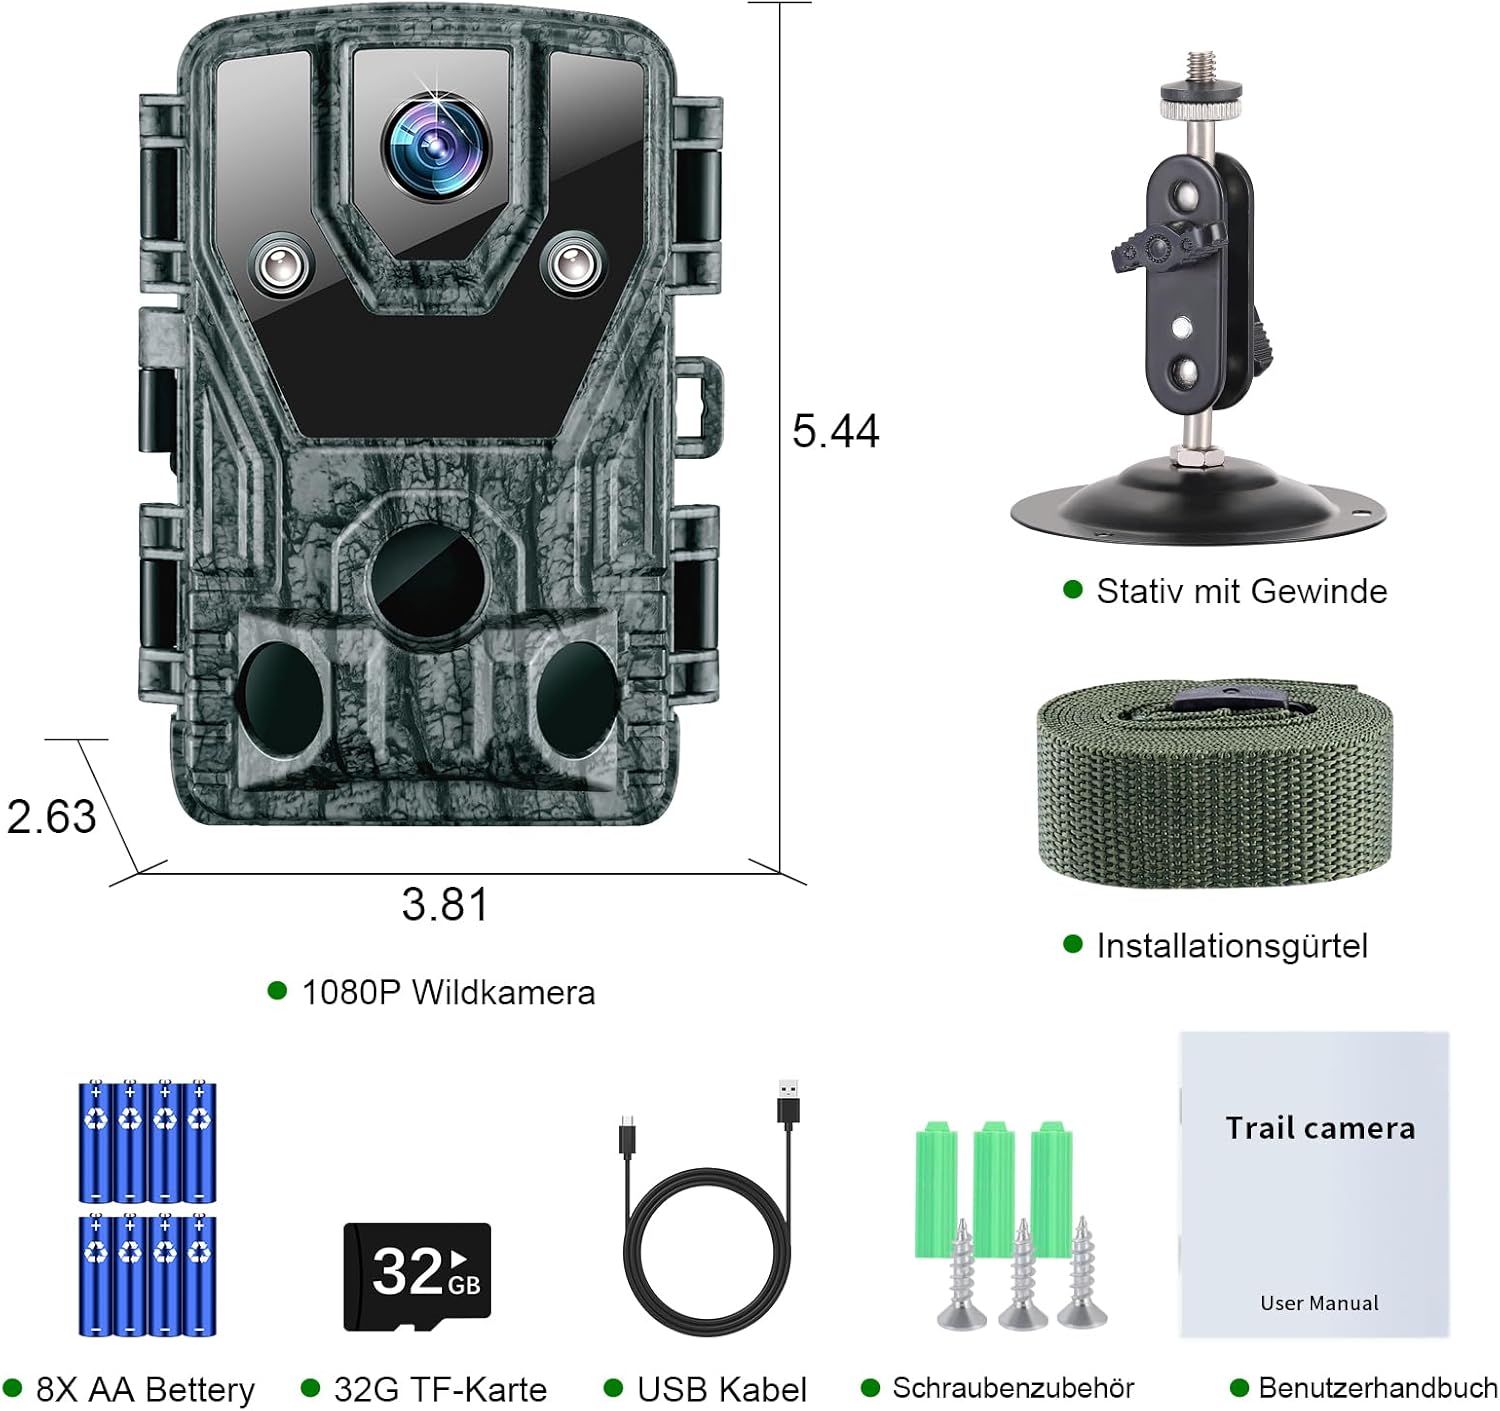
Image: KJK LCK226 Trail Camera showing dimensions and mounting options.
4. Pierwsze włączenie i ustawienia podstawowe
- Slide the power switch to the "SETUP" position. The internal screen will turn on.
- Use the navigation buttons (UP, DOWN, LEFT, RIGHT, OK, MENU) to access the settings menu.
- Set the current date and time. This is crucial for accurate timestampna twoich nagraniach.
- Format the Micro SD card: Navigate to the "Format SD Card" option in the menu and confirm. This prepares the card for use and ensures compatibility.
- Adjust other basic settings as desired (e.g., language, photo/video mode).
- Once settings are configured, slide the power switch to the "ON" position to activate the camera for recording. The screen will turn off, and the camera will enter monitoring mode.
Instrukcja obsługi
Tryby pracy
The KJK LCK226 Trail Camera has three main operating modes:
- OFF: Kamera jest wyłączona.
- USTAWIAĆ: Allows access to the menu for settings configuration and viewprzechwycone media.
- NA: Camera is active and will record photos or videos based on motion detection and configured settings.
Główne funkcje i ustawienia
Photo and Video Resolution
The camera supports high-resolution imaging:
- Rozdzielczość zdjęcia: Up to 24 Megapixels for clear still images. Options typically include 24MP, 16MP, 8MP.
- Rozdzielczość wideo: 1080P HD for detailed video recordings.

Image: Visual representation of 24MP photo and 1080P video resolution capabilities.
Szybkość wyzwalania
The camera boasts an ultra-fast 0.2-second trigger speed, ensuring that fast-moving subjects are captured effectively.

Image: Illustrates the 0.2-second trigger speed for capturing dynamic events.
Wizja nocna
Equipped with non-illuminated infrared LEDs, the camera captures clear black-and-white images and videos in low-light conditions without disturbing wildlife.

Image: Demonstrates the camera's advanced night vision capabilities, showing clear black and white images in darkness.
Szeroki kąt pola widzenia View
The camera features a 120-degree wide-angle lens, allowing for a broader surveillance area.

Image: Depicts the 120-degree wide-angle field of view, capturing a large area.
Nawigacja po menu
In "SETUP" mode, use the following buttons to navigate the menu:
- MENU: Wchodzi/wychodzi z menu głównego.
- GÓRA DÓŁ: Umożliwia nawigację po opcjach menu.
- LEWO PRAWO: Zmienia wartości wybranych opcji.
- OK: Confirms selection or enters sub-menus.
- STRZAŁ: Manually takes a photo or starts recording a video (depending on current mode).
- POWTÓRNA ROZGRYWKA: Wchodzi w tryb odtwarzania view przechwycone media.
Viewprzechwycone media
Do view photos and videos directly on the camera:
- Switch the camera to "SETUP" mode.
- Press the "REPLAY" button.
- Use the UP/DOWN buttons to scroll through files.
- Naciśnij „OK”, aby odtworzyć film lub view zdjęcie.
- Press "REPLAY" again to exit playback mode.
Alternatively, connect the camera to a computer using the USB cable or insert the Micro SD card into a card reader to view files on a larger screen.
Konserwacja
Czyszczenie
- Gently wipe the camera lens and PIR sensors with a soft, lint-free cloth to remove dust or smudges.
- Wyczyść obudowę kamery za pomocąamp szmatką. Unikaj silnych środków chemicznych i materiałów ściernych.
Zarządzanie baterią
- Replace all batteries simultaneously with new ones when the low battery indicator appears. Do not mix old and new batteries or different battery types.
- For extended periods of inactivity, remove the batteries to prevent leakage.
- The camera supports external 6V 1.5A power input, and can be used with a compatible solar panel for continuous power.

Image: The camera supports external power, including solar panels.
Zarządzanie kartą Micro SD
- Regularly format the Micro SD card (at least once a month) to maintain optimal performance and prevent data corruption.
- Ensure the card is properly inserted and removed to avoid damage.
Stopień wodoodporności (IP66)
The camera is rated IP66 waterproof, protecting it from dust and strong jets of water. This makes it suitable for outdoor use in various weather conditions, including rain, snow, and robust environments.

Image: The IP66 waterproof rating ensures durability in various weather conditions.
Rozwiązywanie problemów
Kamera się nie włącza
- Sprawdź biegunowość baterii.
- Ensure batteries are fully charged or replace them with new ones.
- Verify the power switch is in "SETUP" or "ON" position.
Kamera nie nagrywa
- Ensure the Micro SD card is inserted correctly and formatted.
- Check if the SD card is full; if so, transfer filei sformatuj kartę.
- Verify the camera is in "ON" mode.
- Adjust PIR sensitivity settings if motion is not being detected.
- Ensure there are no obstructions in front of the PIR sensors.
Słaba jakość obrazu/wideo
- Wyczyść obiektyw aparatu.
- Check resolution settings in the menu; ensure they are set to 24MP for photos and 1080P for videos.
- Upewnij się, że kamera jest solidnie zamocowana, aby zapobiec jej drganiom.
- For night vision, ensure there are no reflective objects close to the camera that could cause IR glare.
Data/Godzina Śwamp Błędny
- Enter "SETUP" mode and reset the date and time in the menu.
Specyfikacje
| Funkcja | Szczegół |
|---|---|
| Nazwa modelu | LCK226 |
| Rozdzielczość zdjęcia | Do 24 megapikseli |
| Rozdzielczość wideo | Rozdzielczość 1080P HD |
| Szybkość wyzwalania | 0.2 sekund |
| Wizja nocna | Yes (Non-illuminated IR) |
| Pole View | 120 stopnia |
| Stopień wodoodporności | IP66 |
| Składowanie | Micro SD Card (up to 128GB, Class 10 recommended) |
| Zasilacz | 8x AA Alkaline Batteries (included), External DC 6V 1.5A |
| Tworzywo | Akrylonitryl Butadienowo-styrenowy |
| Kolor | Szary |
| Wymiary (w przybliżeniu) | 20.7 x 11.9 x 9 cm (opakowanie) |
| Waga (w przybliżeniu) | 660 gramów (opakowanie) |
Gwarancja i wsparcie
For warranty information or technical support, please refer to the contact details provided with your purchase or visit the official KJK webZachowaj dowód zakupu na wypadek roszczeń gwarancyjnych.