LUME CUBE Panel Pro 2.0
Instrukcja obsługi lampy kamerowej Lume Cube Panel Pro 2.0 RGB
Model: Panel Pro 2.0 | Brand: LUME CUBE
1. Wprowadzenie
The Lume Cube Panel Pro 2.0 is a versatile RGB camera light designed for photography and videography. It offers extensive color options, adjustable brightness, and color temperature, along with convenient Bluetooth app control. This manual provides instructions for setting up, operating, maintaining, and troubleshooting your device to ensure optimal performance.
2. Co znajduje się w pudełku
Carefully unpack your Lume Cube Panel Pro 2.0 and ensure all components are present:
- RGB Panel Pro 2.0 Light
- Dyfuzor zmiękczający
- DSLR Camera Mount
- Kabel USB-C do USB-A
- Etui podróżne

Image: All items included with the Lume Cube Panel Pro 2.0.
3. Koniec produktuview
The Panel Pro 2.0 features a compact design with powerful illumination capabilities. Key components include the LED panel, control buttons, an LCD screen, and a USB-C charging port.

Image: Front and back of the Panel Pro 2.0.

Obraz: Szczegółowy view ekranu LCD.
The device is equipped with an extra-large LCD screen for enhanced control, displaying critical information such as battery life, brightness, color temperature, scene settings, strobe speed, and hue.

Image: LCD Screen Information Diagram.
Physical controls include a Power/Mode button, an adjustment dial, and a USB-C recharge port, conveniently located for easy access.

Image: Side controls and USB-C port.
4. Konfiguracja
4.1. Ładowanie urządzenia
Before first use, fully charge the Panel Pro 2.0 using the provided USB-C to USB-A cable. Connect the USB-C end to the light's port and the USB-A end to a compatible power source (e.g., wall adapter, computer USB port). The battery indicator on the LCD screen will show charging status.
4.2. Attaching the Softening Diffuser
The included softening diffuser can be snapped onto the front of the LED panel to soften the light output, reducing harsh shadows and creating a more even illumination.
4.3. Mounting to a Camera or Stand
The Panel Pro 2.0 includes a DSLR camera mount (cold shoe mount) and features three 1/4"-20 mounting options for versatile attachment to cameras, tripods, or light stands.

Image: Mounting the light to a camera.
5. Instrukcja obsługi
5.1. Włączanie/wyłączanie zasilania
Press and hold the Power/Mode button located on the side of the unit to turn the light on or off.
5.2. Regulacja jasności
Rotate the adjustment dial to increase or decrease the brightness from 1% to 100%. The current brightness level is displayed on the LCD screen.
5.3. Regulacja temperatury barwowej
The Panel Pro 2.0 allows adjustment of color temperature from 2700K (warm) to 7500K (cool). Use the adjustment dial to cycle through color temperature settings. The selected temperature is shown on the LCD screen.
5.4. Selecting RGB Colors
Access millions of color options to match any creative need. Use the controls on the device or the Lume Cube App to select specific RGB values or preset colors.

Obraz: Byłyamples of RGB color options.
5.5. Wireless Control via Bluetooth App
Download the Lume Cube App on your smartphone to wirelessly control the Panel Pro 2.0. The app provides comprehensive control over brightness, color temperature, RGB colors, and special effects.
- Download the 'Lume Cube' app from your device's app store.
- Upewnij się, że Bluetooth jest włączony w Twoim smartfonie.
- Open the Lume Cube App and follow the on-screen instructions to pair with your Panel Pro 2.0.
- Once connected, use the app interface to adjust settings remotely.
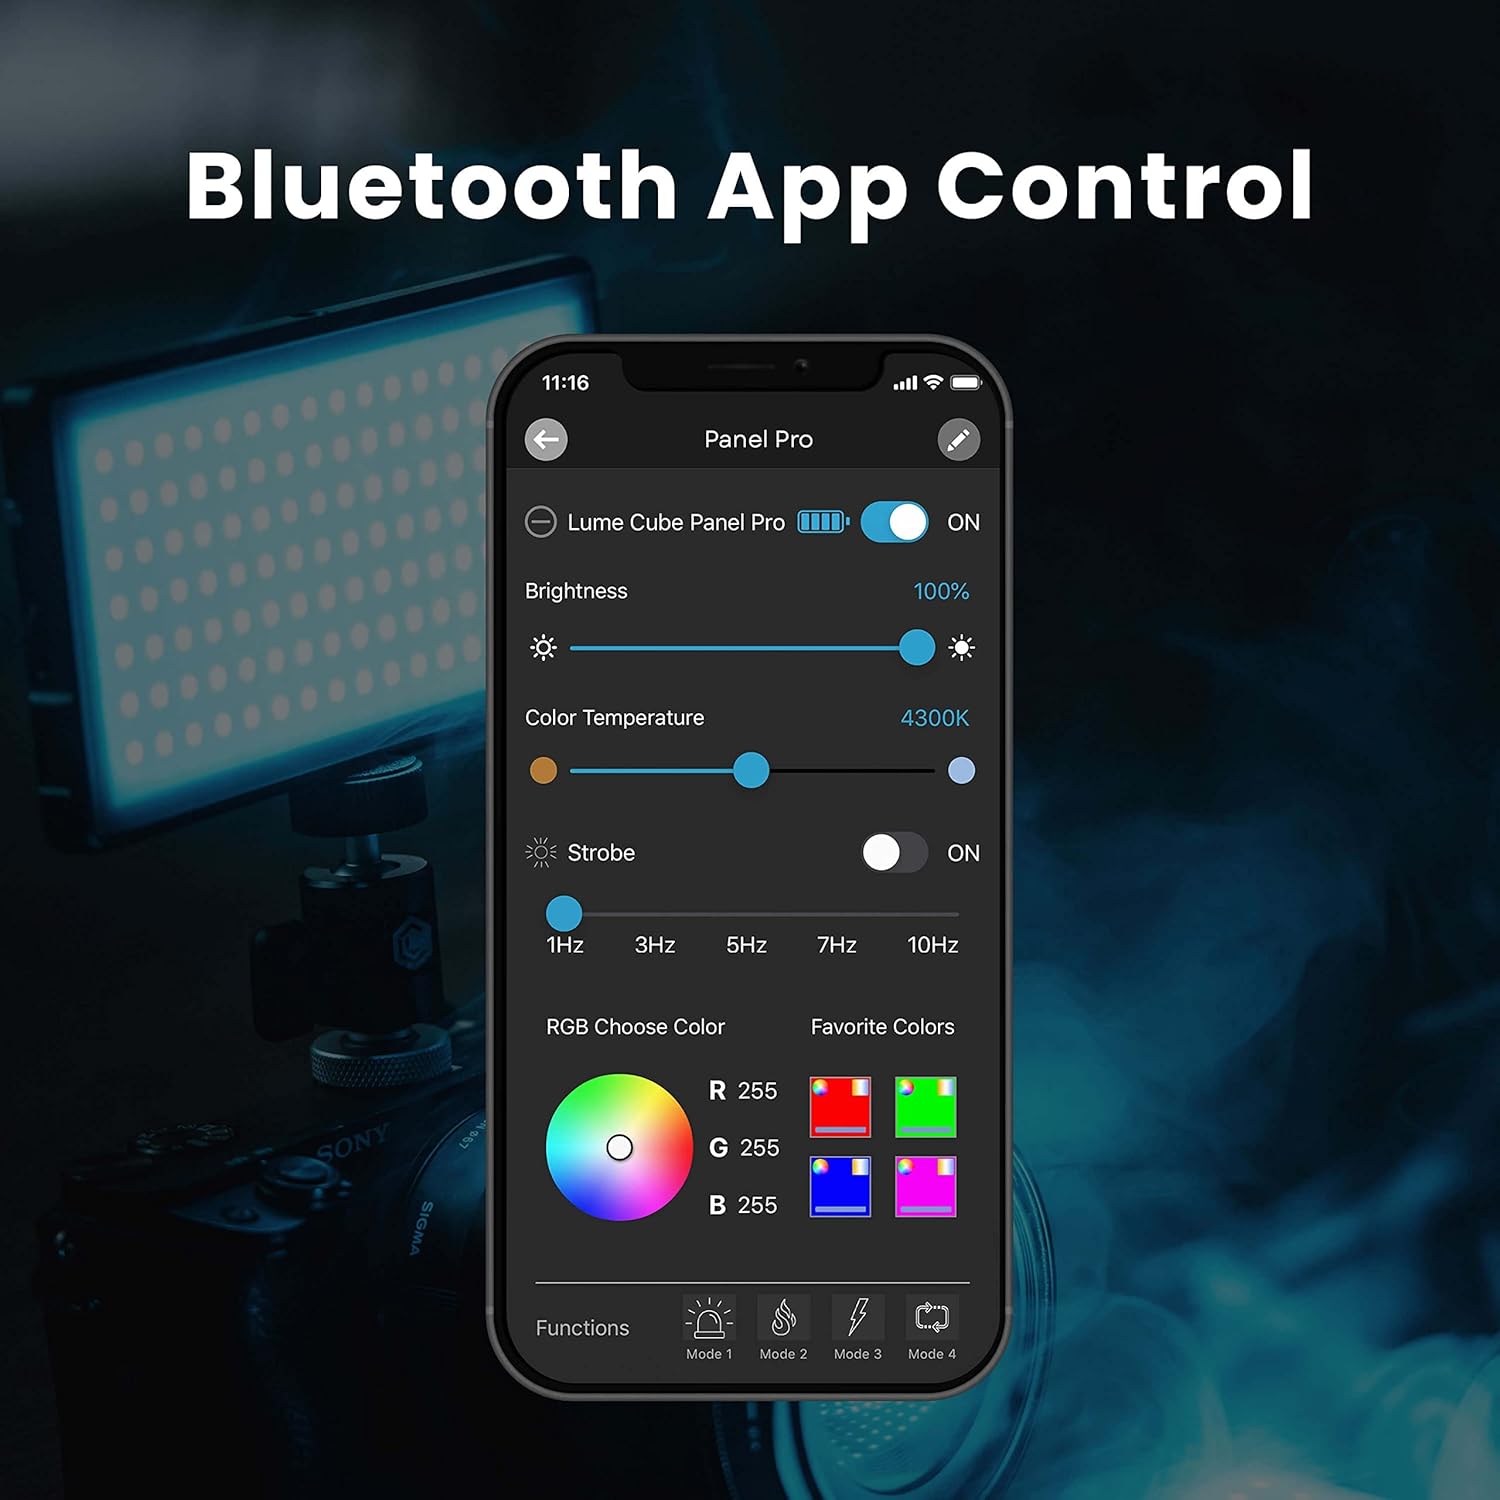
Image: Lume Cube App interface for wireless control.
6. Konserwacja
To ensure the longevity and optimal performance of your Lume Cube Panel Pro 2.0, follow these maintenance guidelines:
- Czyszczenie: Use a soft, dry cloth to clean the exterior of the light. Avoid abrasive cleaners or solvents.
- Składowanie: Store the device in a cool, dry place away from direct sunlight and extreme temperatures. Use the provided travel pouch for protection.
- Pielęgnacja baterii: For extended storage, charge the battery to approximately 50% every few months to maintain battery health. Avoid fully discharging the battery for prolonged periods.
7. Rozwiązywanie Problemów
If you encounter issues with your Panel Pro 2.0, refer to the following common solutions:
- Światło nie włącza się: Ensure the battery is charged. Connect the device to a power source using the USB-C cable and allow it to charge for at least 30 minutes before attempting to power on again.
- Cannot Connect via Bluetooth App:
- Sprawdź, czy w smartfonie jest włączona funkcja Bluetooth.
- Ensure the Panel Pro 2.0 is powered on and within range.
- Close and reopen the Lume Cube App.
- Uruchom ponownie lampę i smartfon.
- Nierównomierna jasność/kolor: Check the battery level. Low battery can affect performance. Ensure no physical obstructions are blocking the light output.
- Problemy z ładowaniem: Try a different USB-C cable or power adapter to rule out faulty accessories. Ensure the charging port is clean and free of debris.
If problems persist, contact Lume Cube customer support for further assistance.
8. Specyfikacje
| Funkcja | Szczegół |
|---|---|
| Wymiary produktu | 8.4 x 6.8 x 1.6 cala |
| Waga przedmiotu | 1.08 funta |
| Typ baterii | 1 bateria litowo-jonowa (w zestawie) |
| Żywotność baterii | Approximately 3.66 Hours (at 100% brightness) |
| Technologia łączności | Bluetooth |
| Zakres temperatury barwowej | 2700K do 7500K |
| Regulacja jasności | od 1% do 100% |
| CRI | > 96 |
| Moc wyjściowa | 1000 lumenów |
| Wyjście luksów | 1500 Lux at 1.5 Feet |
| UPC | 810019501463 |

Image: Premium Output details.
9. Gwarancja i wsparcie
Lume Cube products are designed for durability and performance. For information regarding warranty coverage, product registration, or technical support, please visit the official Lume Cube webOdwiedź witrynę lub skontaktuj się z działem obsługi klienta. Zachowaj dowód zakupu na wypadek reklamacji.
Zasoby internetowe: www.lumecube.com
Ask a question about this manual
Ask about setup, troubleshooting, compatibility, parts, safety, or missing instructions. Manuals+ will review the question and use this page’s manual context to help answer it.