AVARRO 0E-HDMIMX4
Instrukcja obsługi przełącznika HDMI AVARRO 0E-HDMIMX4
Model: 0E-HDMIMX4
1. Wprowadzenie
The AVARRO 0E-HDMIMX4 is a high-performance 4x4 HDMI matrix switcher designed to route any of four HDMI input sources to any of four HDMI output displays. It supports 4K Ultra HD resolutions, HDCP 2.2, and advanced features like Smart EDID Management and a built-in 4K-1080P downscaler. This manual provides detailed instructions for installation, operation, and troubleshooting to ensure optimal performance of your device.
2. Informacje dotyczące bezpieczeństwa
- Przed przystąpieniem do użytkowania urządzenia należy uważnie przeczytać wszystkie instrukcje.
- Do not expose this unit to rain, moisture, or excessive humidity.
- Do not place any objects filled with liquids on the unit.
- Nie blokuj otworów wentylacyjnych.
- Używaj wyłącznie dołączonego zasilacza.
- Nie próbuj samodzielnie naprawiać urządzenia. Wszelkie prace serwisowe zlecaj wykwalifikowanemu personelowi.
- Zapewnij prawidłowe uziemienie wszystkich podłączonych urządzeń.
3. Zawartość opakowania
Verify that all items are present before installation:
- AVARRO 0E-HDMIMX4 HDMI Switcher Unit
- Pilot zdalnego sterowania IR
- Zasilacz prądu stałego 12 V
- Instrukcja obsługi (ten dokument)
- Mounting Brackets (if applicable, not explicitly mentioned but common for such devices)
4. Koniec produktuview
4.1 Panel przedni

Obraz: Przód view of the AVARRO 0E-HDMIMX4 HDMI Switcher, showing the IR receiver and output selector buttons.
- Odbiornik IR: Receives signals from the IR remote control.
- Output Selectors (1-4): Buttons to select the input source for each corresponding HDMI output. Each output has its own set of source selection buttons (1, 2, 3, 4).
- Wskaźniki LED: Indicate the currently selected input for each output.
4.2 Panel tylny
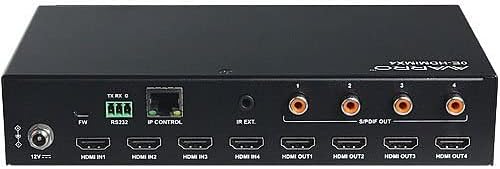
Obraz: Tył view of the AVARRO 0E-HDMIMX4 HDMI Switcher, displaying all input/output ports and control interfaces.
- Wejście DC 12V: Port wejściowy zasilania.
- FW (Micro USB): Micro-USB port for firmware upgrades.
- RS232: Serial port for control via RS232 commands.
- IP CONTROL (RJ45): Ethernet port for network control and Web Dostęp do interfejsu użytkownika.
- ZEWN. IR: Port for connecting an external IR receiver.
- HDMI IN (1-4): HDMI input ports for connecting source devices (e.g., Blu-ray player, game console).
- HDMI OUT (1-4): HDMI output ports for connecting display devices (e.g., TV, projector).
- S/PDIF OUT (1-4): Digital audio output ports for each HDMI output, supporting PCM 2.0/5.1, Dolby Digital, and DTS up to 5.1 Channel.
5. Konfiguracja i połączenie
- Wyłącz wszystkie urządzenia: Before making any connections, ensure all source devices, displays, and the switcher are powered off.
- Podłącz źródła HDMI: Connect your HDMI source devices (e.g., media players, gaming consoles) to the HDMI IN 1-4 ports on the switcher using high-quality HDMI cables.
- Podłącz wyświetlacze HDMI: Connect your HDMI display devices (e.g., TVs, projectors) to the HDMI OUT 1-4 ports on the switcher using high-quality HDMI cables.
- Connect Audio Outputs (Optional): If desired, connect external audio systems to the S/PDIF OUT ports for digital audio extraction.
- Połącz sieć (opcjonalnie): For IP control and Web UI access, connect an Ethernet cable from your network router/switch to the IP CONTROL (RJ45) port.
- Podłącz zasilanie: Connect the provided DC 12V power adapter to the DC 12V IN port on the switcher, then plug the adapter into a power outlet.
- Włącz urządzenia: Power on the switcher, then your display devices, and finally your source devices.
Notatka: For optimal performance with 4K content, use certified High-Speed HDMI cables.
6. Instrukcja obsługi
6.1 Sterowanie na panelu przednim
To switch an input source for a specific output:
- Locate the "SELECTOR" buttons for the desired OUTPUT (1-4).
- Press the corresponding "SOURCE" button (1, 2, 3, or 4) below the "SELECTOR" button to route the desired input to that output. The LED indicator will illuminate to show the active input.
6.2 pilot na podczerwień
The included IR remote control allows for convenient switching from a distance. Point the remote towards the IR receiver on the front panel of the switcher.
- Przyciski wejściowe (1-4): Wybiera źródło wejściowe.
- Output Buttons (A-D or 1-4): Selects the output to control.
- Przełączanie matrycowe: Typically, you would press an Output button, then an Input button to route that input to the selected output. Refer to the remote's specific layout for exact button functions.
6.3 Web Kontrola interfejsu użytkownika
Ten Web UI provides a graphical interface for advanced control and configuration.
- Ensure the switcher is connected to your network via the IP CONTROL port.
- Obtain the IP address of the switcher (refer to network settings or device documentation for default IP or discovery method).
- Otwórz web przeglądarkę na komputerze podłączonym do tej samej sieci.
- Enter the switcher's IP address into the browser's address bar.
- Log in using the default credentials (if prompted, refer to device documentation for default username/password).
- Użyj Web UI to manage input/output routing, EDID settings, and other advanced features.
6.4 Sterowanie RS232
The RS232 port allows for integration with control systems using serial commands. Refer to the detailed RS232 command set documentation (usually available from the manufacturer's website) for specific protocols and commands.
7. Smart EDID Management
The 0E-HDMIMX4 features Smart EDID Management to ensure compatibility between source devices and displays. EDID (Extended Display Identification Data) communicates display capabilities to the source. The switcher can automatically manage EDID or allow manual configuration via the Web UI to optimize video and audio formats for connected devices.
8. Aktualizacja oprogramowania sprzętowego
Firmware updates can improve performance, add new features, or resolve issues. The 0E-HDMIMX4 supports firmware upgrading via both the Micro-USB port and the Web UI.
- Mikro USB: Connect a computer to the FW (Micro USB) port and use the manufacturer's provided upgrade tool.
- Web Interfejs użytkownika: Uzyskaj dostęp do Web UI and navigate to the firmware upgrade section.
Always download the latest firmware and instructions from the official AVARRO website before attempting an upgrade.
9. Specyfikacje
| Funkcja | Szczegół |
|---|---|
| Model | 0E-HDMIMX4 |
| Wejścia | 4x wejście HDMI |
| Wyjścia | 4 x HDMI OUT, 4 x S/PDIF OUT (Digital) |
| Porty sterujące | 1 x RS232, 1 x IP CONTROL (RJ45), 1 x FW (Micro USB) |
| Zgodność z HDMI | 4K Ultra HD, HDCP 2.2 compliant |
| Obsługa rozdzielczości wideo | VESA: 800x600 to 1920x1200; SMPTE: 720x576P to 4096x2160 |
| Obsługa HDR | HDR 10, HLG, DOLBY VISION up to 4K60 444 |
| Skalowanie w dół | Built-in 4K-1080P downscaler |
| Maksymalna szybkość transmisji danych | 18 Gb/s |
| Maksymalny zegar pikseli | 600MHz |
| Formaty audio (HDMI) | PCM 2.0/5.1/7.1, Dolby TrueHD, Dolby Atmos, DTS HD Master Audio, DTS:X |
| Audio Formats (S/PDIF) | PCM 2.0/5.1, Dolby Digital, DTS up to 5.1 Channel |
| Ochrona ESD | ±8 kV (wyładowanie w szczelinie powietrznej) / ±4 kV (wyładowanie kontaktowe) |
| Ochrona przeciwprzepięciowa | Tomtage: ±1 Kv |
| Zasilacz | Prąd stały 12 V 2 A |
| Pobór mocy (max) | 10.8 W |
| Wymiary urządzenia (dł. x szer. x wys.) | 8.46 "x 4.73" x 1.65 "(21.49 cm x 12.01 cm x 4.19 cm) |
| Waga produktu | 1.19 funta (0.54 kg) |
10. Rozwiązywanie Problemów
Jeśli napotkasz problemy, zapoznaj się z poniższymi typowymi problemami i rozwiązaniami:
- Brak wyjścia wideo/audio:
- Sprawdź, czy wszystkie kable HDMI są solidnie podłączone.
- Verify the power adapter is correctly connected and the unit is powered on.
- Check that the correct input source is selected for the desired output.
- Przetestuj przy użyciu różnych kabli HDMI.
- Bypass the switcher to confirm source and display functionality.
- Check EDID settings, especially with mixed resolution displays.
- Sygnał przerywany/migotanie:
- Use high-quality, certified HDMI cables, especially for longer runs or 4K content.
- Ensure cables are not excessively bent or damaged.
- Check for potential electromagnetic interference from other devices.
- Pilot nie działa:
- Ensure there are no obstructions between the remote and the switcher's IR receiver.
- Wymień baterie w pilocie.
- Verify the remote is pointed directly at the IR receiver.
- Web UI/IP Control Issues:
- Confirm the Ethernet cable is properly connected.
- Verify the switcher's IP address and ensure your computer is on the same network subnet.
- Check firewall settings on your computer or network.
11. Konserwacja
- Czyszczenie: Do czyszczenia zewnętrznej części urządzenia należy używać miękkiej, suchej ściereczki. Nie należy używać płynnych środków czyszczących ani aerozoli.
- Wentylacja: Aby zapobiec przegrzaniu, należy upewnić się, że otwory wentylacyjne są drożne i niezasłonięte.
- Składowanie: If storing the unit for an extended period, disconnect power and store in a cool, dry place.
12. Gwarancja i wsparcie
AVARRO products are designed for reliability and performance. For specific warranty information, please refer to the warranty card included with your product or visit the official AVARRO webAby uzyskać pomoc techniczną, zarejestrować produkt lub pobrać najnowsze sterowniki i oprogramowanie sprzętowe, odwiedź stronę www.avarrus.com or contact AVARRO customer service.
Ask a question about this manual
Ask about setup, troubleshooting, compatibility, parts, safety, or missing instructions. Manuals+ will review the question and use this page’s manual context to help answer it.