
Foxeer Reaper Extreme 2.5W
Instrukcja obsługi Foxeer Reaper Extreme 2.5W VTX
Model: Reaper Extreme 2.5W
1. Koniec produktuview
The Foxeer Reaper Extreme 2.5W is a high-power 5.8GHz Video Transmitter (VTX) designed for FPV (First Person View) long-range drones. It features adjustable power output levels, including Pitmode, 25mW, 200mW, 500mW, 1.5W, and 2.5W, providing flexibility for various flight scenarios and regulatory requirements. Its compact size and wide input voltage range make it suitable for a broad range of FPV builds.

Rysunek 1: Góra view of the Foxeer Reaper Extreme 2.5W VTX, featuring a teal-colored heatsink with the Foxeer logo and mounting screw locations.
2. Specyfikacje
| Funkcja | Specyfikacja |
|---|---|
| Nazwa produktu | Reaper Extreme 2.5W |
| Wejście Voltage | 7~36V (2-8S LiPo compatible) |
| Objętość wyjściatage | 5V (for camera/FC) |
| Kanały | 40 kanałów |
| Moc wyjściowa | Pitmode / 25mW / 200mW / 500mW / 1.5W / 2.5W |
| Konsumpcja | 1.2A at 9V (at max power) |
| Waga | 13g |
| Wymiary | 36mm x 27.5mm x 8mm |
| Wzór otworu montażowego | 20x20mm (standard FPV stack size) |
| Złącze anteny | MMCX |
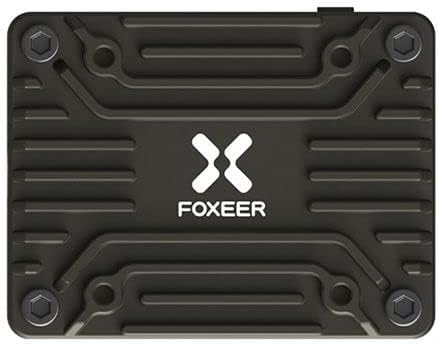
Figure 2: Pinout and feature diagram of the Foxeer Reaper Extreme VTX, indicating connections for Video, GND, 5V Out, Tramp, and 7-36V In, along with control buttons (KEY, CH, BAND, PWR) and MMCX antenna connector.
3. Konfiguracja i instalacja
Proper installation is crucial for optimal performance and longevity of your VTX. Always ensure power is disconnected before making any connections.
3.1 Schemat okablowania
Connect the VTX to your flight controller (FC) and camera according to the following pinout:
- WIDEO: Connect to the video input of your FPV camera.
- masa: Connect to a common ground point on your FC or PDB.
- WYJŚCIE 5V: Provides regulated 5V power for your FPV camera.
- TRAMP: Connect to a UART TX pad on your FC for SmartAudio/Tramp kontrola protokołu.
- 7~36V IN: Connect directly to your main battery voltage (2-8S LiPo). Ensure correct polarity.

Rysunek 3: Szczegółowy view of the Foxeer Reaper Extreme VTX connection pads, illustrating the layout for Video, GND, 5V Out, Tramp, and power input.
3.2 Montaż
The Reaper Extreme VTX features a 20x20mm mounting pattern, allowing it to be stacked with most modern flight controllers and ESCs. Use appropriate standoffs and screws to secure the VTX, ensuring no components are short-circuited by the frame or other electronics.
3.3 Podłączenie anteny
Connect a 5.8GHz FPV antenna to the MMCX connector. Ensure the antenna is securely attached before powering on the VTX. Running the VTX without an antenna can cause permanent damage.
4. Instrukcja obsługi
The Foxeer Reaper Extreme VTX can be configured via physical buttons or through SmartAudio/Tramp protocol via your flight controller's OSD (On-Screen Display).
4.1 Sterowanie przyciskiem
The VTX has four buttons: KEY, CH, BAND, and PWR. These buttons allow manual adjustment of channels, bands, and power levels.
- CH (kanał): Short press to cycle through channels (CH1-CH8).
- ZESPÓŁ MUZYCZNY: Short press to cycle through bands (A, B, E, F, R).
- PWR (moc): Long press to cycle through power levels (Pitmode, 25mW, 200mW, 500mW, 1.5W, 2.5W).
- KLAWISZ: This button may be used for locking/unlocking settings or other advanced functions depending on firmware. Refer to the latest Foxeer documentation for specific usage.
Notatka: Always ensure you are operating within legal power limits for your region. Use Pitmode or low power for testing to avoid interference.
4.2 SmartAudio/Tramp Protokół
For convenient configuration, connect the VTX's TRAMP pad to a UART TX pad on your flight controller. Enable the VTX (SmartAudio or Tramp) feature in your flight controller's Betaflight/ArduPilot configurator. This allows you to change VTX settings directly from your FPV goggles' OSD menu.
5. Konserwacja i pielęgnacja
- Zarządzanie ciepłem: The Reaper Extreme VTX can generate significant heat, especially at higher power outputs. Ensure adequate airflow around the VTX during operation. Avoid enclosing it in tight spaces without ventilation.
- Ochrona anteny: Always connect an antenna before powering on the VTX. Disconnecting the antenna while powered can permanently damage the VTX.
- Czystość: Keep the VTX free from dirt, dust, and moisture. If it gets wet, ensure it is completely dry before reapplying power.
- Kontrola fizyczna: Periodically inspect the VTX for any signs of physical damage, loose connections, or burnt components.
6. Rozwiązywanie Problemów
6.1 Brak sygnału wideo
- Sprawdź połączenia: Verify all wiring (Video, GND, Power) is correct and secure.
- Antena: Ensure the antenna is properly connected to the VTX and the receiver.
- Moc: Confirm the VTX is receiving adequate power (7-36V). Check for correct polarity.
- Channel/Band Mismatch: Ensure your FPV goggles/receiver are set to the exact same channel and band as the VTX.
- Pitmode: Check if the VTX is in Pitmode (very low power output). Increase power if necessary.
6.2 Poor Video Quality / Static
- Jakość/umiejscowienie anteny: Use a good quality antenna. Ensure it is not obstructed by carbon fiber or other components.
- Moc wyjściowa: Increase the VTX power output if you are experiencing range issues or heavy interference.
- Ingerencja: Keep the VTX away from other noisy electronics (ESCs, motors, high-current wires). Add capacitors to your power system if experiencing power line noise.
- Frequency Overlap: Ensure no other FPV systems nearby are using the same frequency.
6.3 VTX Overheating
- Przepływ powietrza: Ensure sufficient airflow around the VTX. Avoid mounting it in enclosed spaces.
- Moc wyjściowa: Operating at 2.5W for extended periods, especially on the ground, will generate significant heat. Reduce power if not needed.
- Antena: Verify the antenna is securely connected. Running without an antenna causes rapid overheating and damage.
7. Gwarancja i wsparcie
For specific warranty information, technical support, or service inquiries, please refer to the official Foxeer webOdwiedź witrynę lub skontaktuj się ze sprzedawcą. Zachowaj dowód zakupu na wypadek reklamacji.
This manual provides general guidelines. Specifications and features are subject to change without prior notice.
Ask a question about this manual
Ask about setup, troubleshooting, compatibility, parts, safety, or missing instructions. Manuals+ will review the question and use this page’s manual context to help answer it.