
CRUXGG 55854d46-84c5-48f2-8749-9927a6f8f352
Instrukcja obsługi szybkowaru i frytkownicy powietrznej MUSA 6.5 qt. Air Pro Cook & Fry
Model: 55854d46-84c5-48f2-8749-9927a6f8f352 | Brand: CRUXGG
Wstęp
Welcome to the MUSA 6.5 Qt. Air Pro Cook & Fry Pressure Cooker and Air Fryer. This innovative appliance combines the functionality of a pressure cooker and an air fryer into a single, compact unit, designed to simplify your cooking process. With its versatile cooking modes, including Pressure Cook, Slow Cook, Air Fry, Roast, Bake, Broil, Steam, Sauté, Rice/Grains, Proof, and Dehydrate, you can prepare a wide variety of meals efficiently. This manual provides essential information for safe operation, setup, maintenance, and troubleshooting to ensure you get the most out of your appliance.
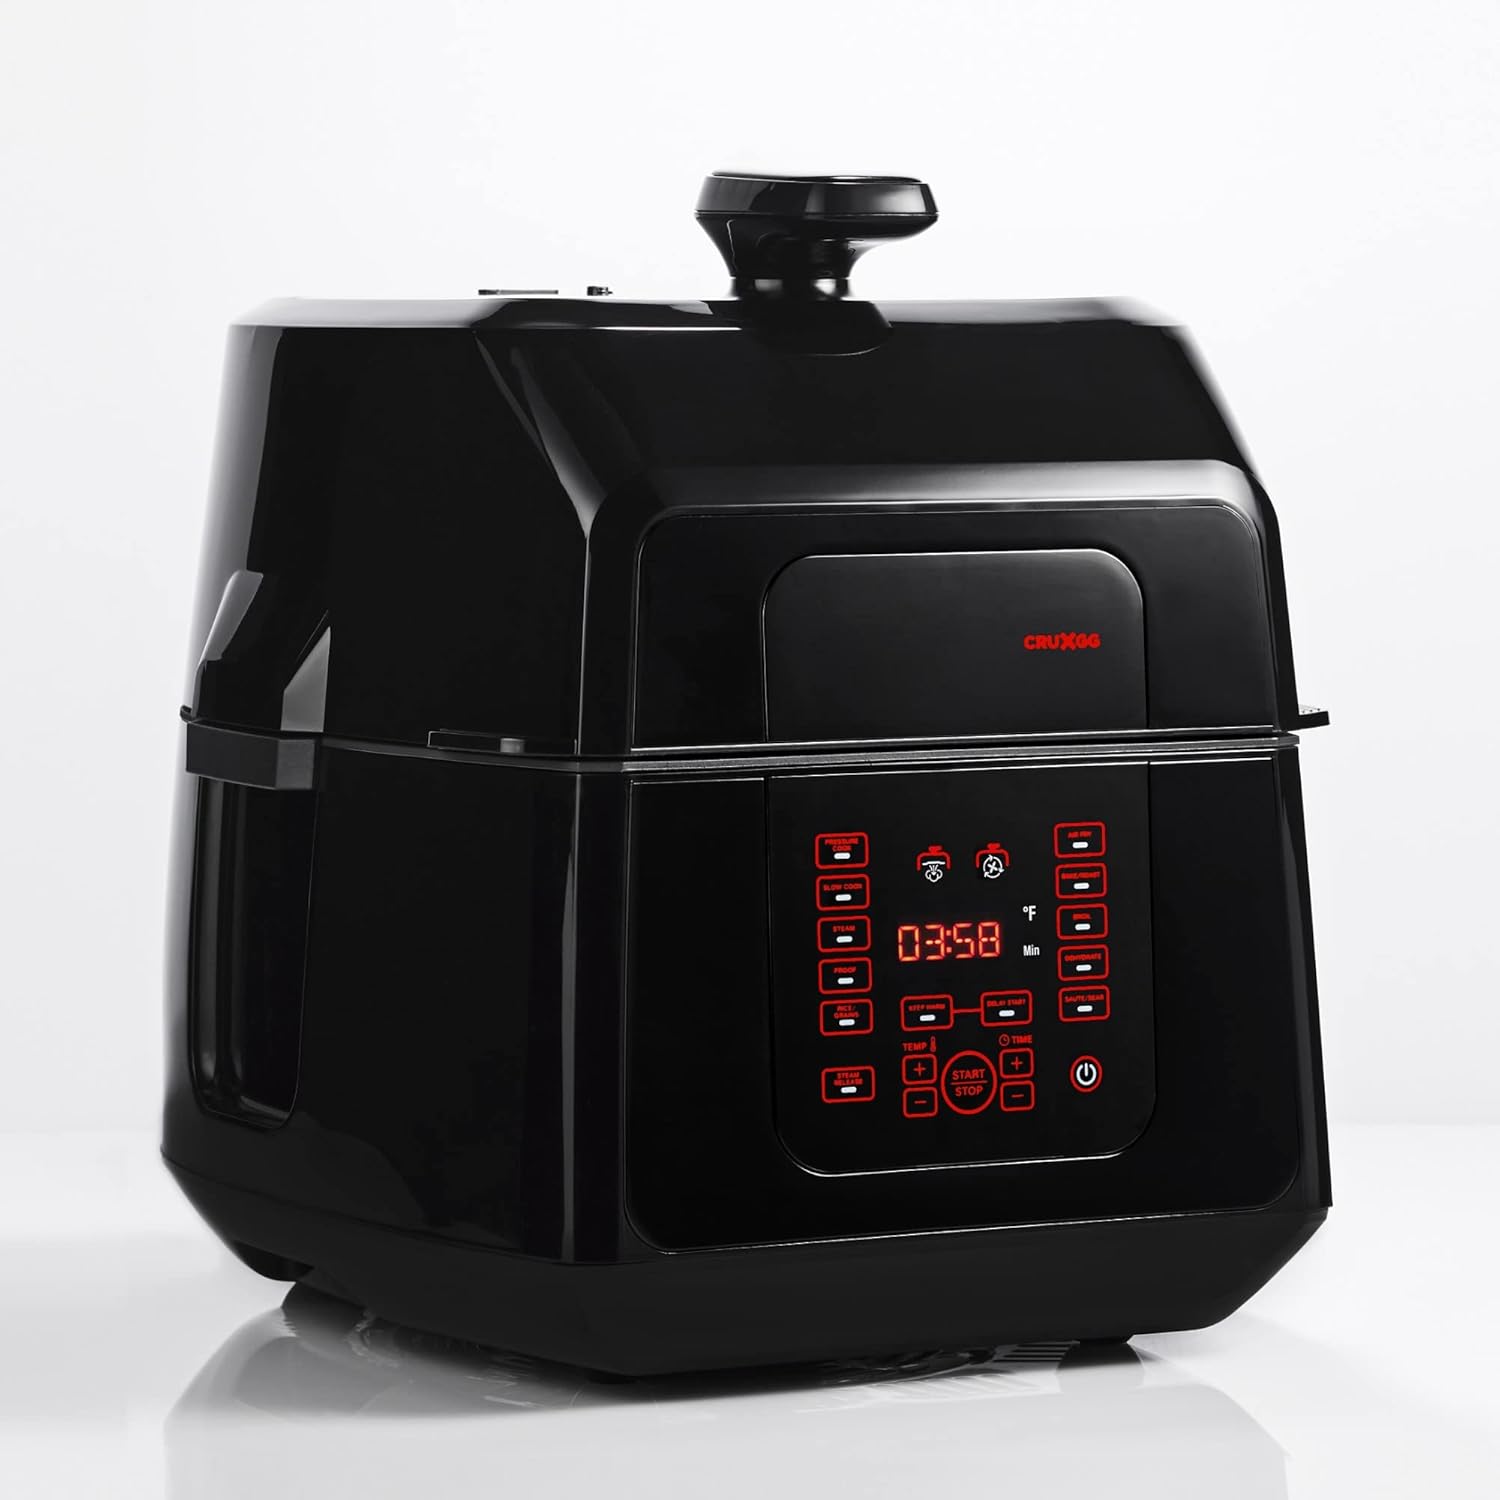
Rycina 1: Przód view of the MUSA 6.5 Qt. Air Pro Cook & Fry Pressure Cooker and Air Fryer.
Ważne zabezpieczenia
Podczas korzystania z urządzeń elektrycznych należy zawsze przestrzegać podstawowych zasad bezpieczeństwa, aby zminimalizować ryzyko pożaru, porażenia prądem elektrycznym i/lub obrażeń ciała, w tym:
- Przed użyciem urządzenia należy przeczytać całą instrukcję.
- Nie dotykaj gorących powierzchni. Używaj uchwytów lub gałek.
- Aby uniknąć porażenia prądem elektrycznym, nie zanurzaj przewodu, wtyczek ani jednostki głównej w wodzie ani innym płynie.
- Należy zachować ścisły nadzór, jeżeli z urządzenia korzystają dzieci lub w ich pobliżu.
- Odłącz od gniazdka, gdy nie jest używany i przed czyszczeniem. Pozostaw do ostygnięcia przed założeniem lub zdjęciem części.
- Nie używaj żadnego urządzenia, jeśli przewód lub wtyczka są uszkodzone, ani po awarii urządzenia lub po jego uszkodzeniu w jakikolwiek sposób.
- Stosowanie akcesoriów niezalecanych przez producenta urządzenia może spowodować obrażenia.
- Nie stosować na zewnątrz.
- Nie pozwól, aby przewód zwisał z krawędzi stołu lub blatu i dotykał gorących powierzchni.
- Nie umieszczać na gorącym palniku gazowym lub elektrycznym ani w jego pobliżu, a także w nagrzanym piekarniku.
- Należy zachować szczególną ostrożność podczas przenoszenia urządzenia zawierającego gorący olej lub inne gorące płyny.
- Zawsze najpierw podłącz wtyczkę do urządzenia, a następnie podłącz przewód do gniazdka ściennego. Aby odłączyć, ustaw dowolny element sterujący w pozycji „wyłączone”, a następnie wyjmij wtyczkę z gniazdka ściennego.
- Nie używaj urządzenia niezgodnie z jego przeznaczeniem.
- To urządzenie gotuje pod ciśnieniem. Niewłaściwe użytkowanie może spowodować oparzenia. Upewnij się, że urządzenie jest prawidłowo zamknięte przed uruchomieniem.
- Never force open the appliance. Ensure pressure is completely released before opening.
- Nie napełniaj urządzenia powyżej 2/3 jego pojemności. Podczas gotowania potraw, które zwiększają swoją objętość podczas gotowania, takich jak ryż czy suszone warzywa, nie napełniaj urządzenia powyżej 1/2 jego pojemności.
- Przed użyciem należy zawsze sprawdzić, czy zawór bezpieczeństwa i zawór pływakowy nie są zatkane.
Produkt ponadview
Komponenty i akcesoria
The MUSA Air Pro Cook & Fry comes with several key components and accessories to facilitate various cooking methods.
- Jednostka główna: Główne urządzenie, w którym znajduje się element grzejny i panel sterowania.
- Single-Lid Design: An innovative lid that easily switches between pressure cooking and air frying functions.
- 6.5-Qt. Nonstick Pressure Cooking Pot: The main cooking vessel with handles, featuring a PFOA/PFOS-free ultra-nonstick GG Red surface.
- 4-Qt. Crisping Basket: Used for air frying, roasting, and dehydrating.
- Reversible Steam Rack: For steaming and elevating food during pressure cooking.
- Pressure Plate Insert: Essential for pressure cooking operations.
- Air Fry Grate: Placed inside the crisping basket for optimal air circulation during air frying.
- Plate Handle: For safely inserting and removing hot accessories.
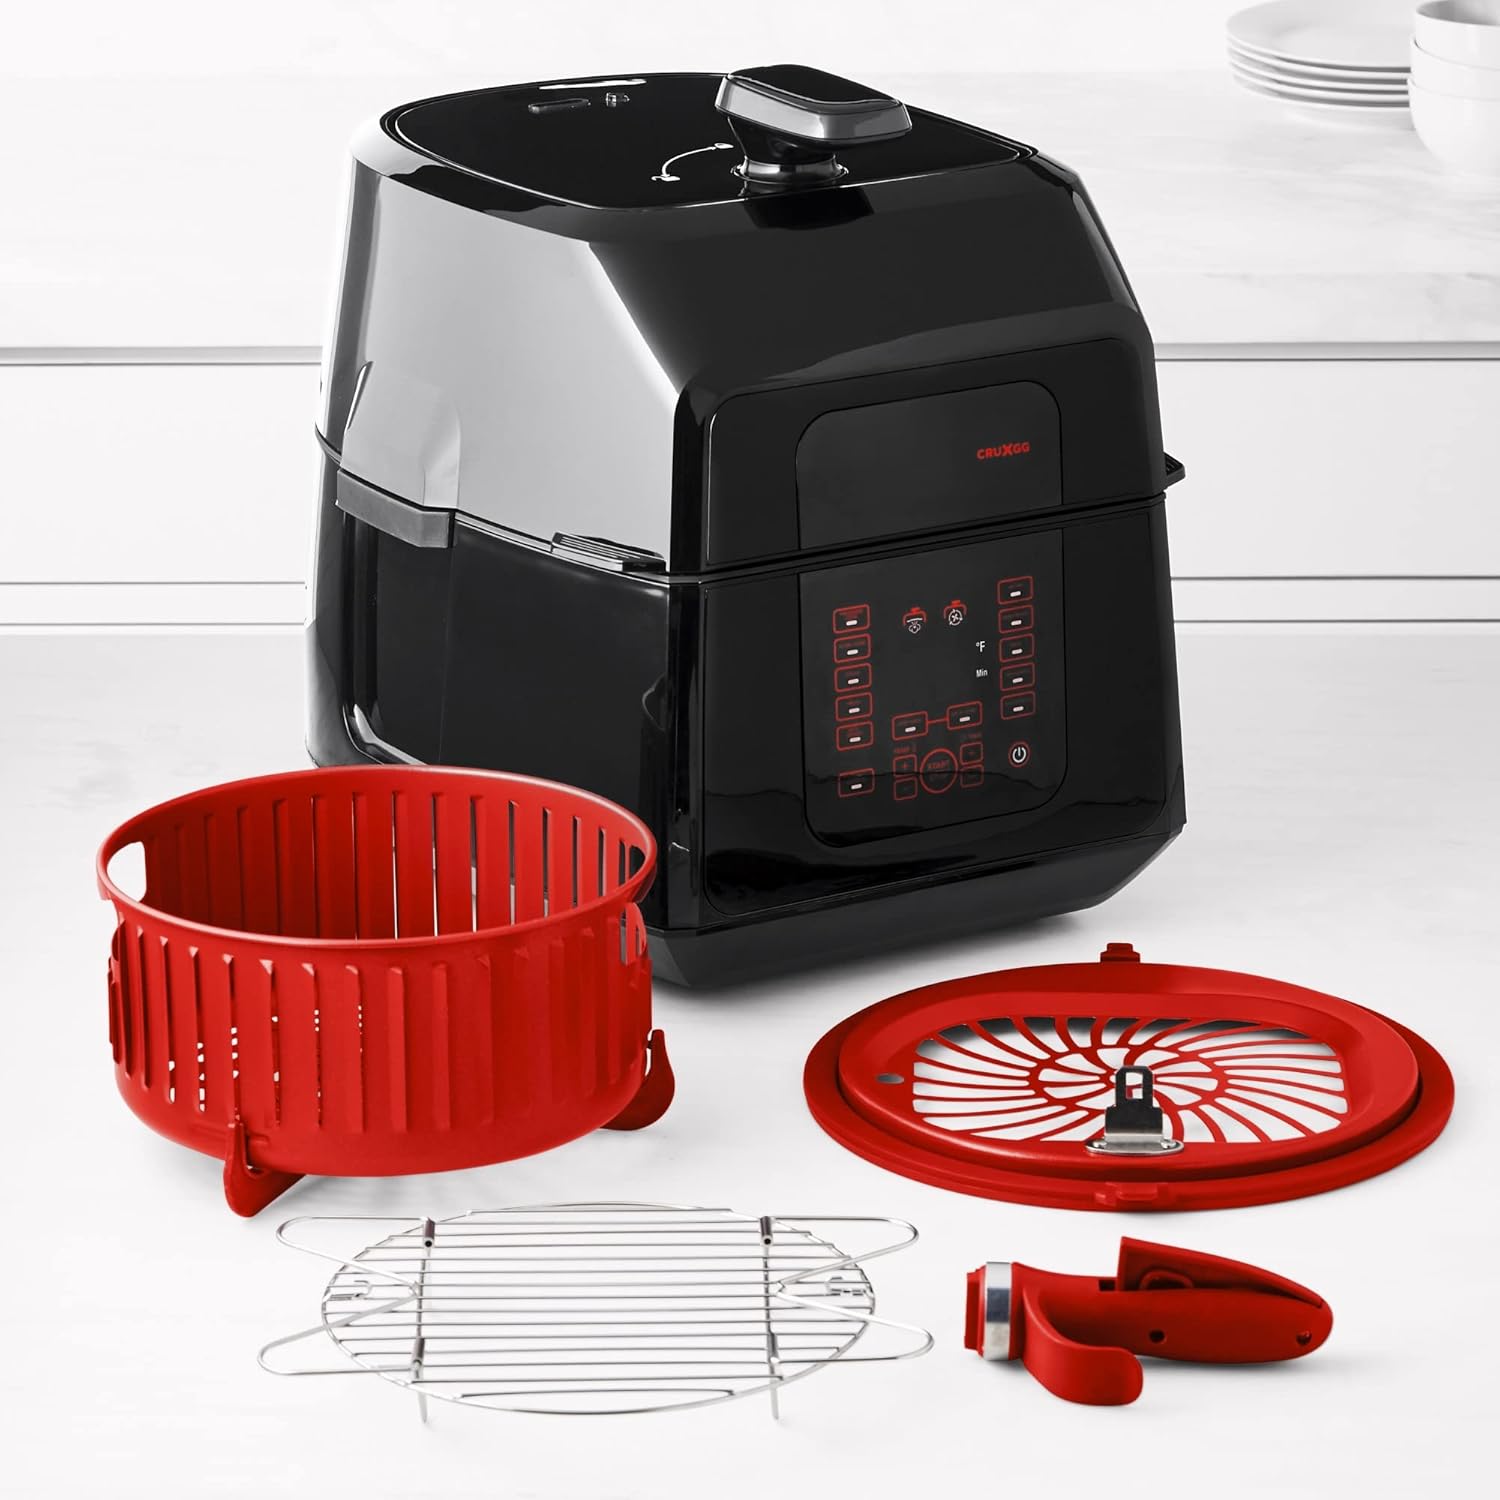
Figure 2: MUSA Air Pro Cook & Fry with its included accessories: pressure cooking pot, crisping basket, reversible steam rack, pressure plate insert, air fry grate, and plate handle.
Panel sterowania
The Signature GG Glow control panel features Precision Touch controls and a digital display for easy operation.
- Wyświetlacz cyfrowy: Shows cooking time, temperature, and status indicators.
- Przyciski funkcyjne: Dedicated buttons for Pressure Cook, Slow Cook, Air Fry, Roast, Bake, Broil, Steam, Sauté, Rice/Grains, Proof, and Dehydrate.
- Przyciski TEMP +/-: Dostosuj temperaturę gotowania.
- Przyciski CZAS +/-: Dostosuj czas gotowania.
- Przycisk START/STOP: Uruchamia lub anuluje program gotowania.
- Przycisk UTRZYMANIA CIEPŁA: Utrzymuje temperaturę potrawy po ugotowaniu.
- DELAY START Button: Ustawia opóźniony start gotowania.
- STEAM RELEASE Button: Manually releases pressure after pressure cooking.
- Przycisk zasilania: Włącza lub wyłącza urządzenie.

Rysunek 3: Szczegółowy view of the Signature GG Glow control panel with Precision Touch controls.
Konfiguracja i pierwsze użycie
- Rozpakowywanie: Carefully remove all components and accessories from the packaging. Retain packaging materials for future storage or transport if needed.
- Czyszczenie wstępne: Before first use, wash the pressure cooking pot, crisping basket, steam rack, pressure plate insert, air fry grate, and plate handle in warm, soapy water. Rinse thoroughly and dry completely. Wipe the main unit with a damp płótno. Nie zanurzaj jednostki głównej w wodzie.
- Umieszczenie: Place the appliance on a stable, level, heat-resistant surface, away from walls or other appliances to allow for proper air circulation. Ensure there is adequate space above and around the unit.
- Podłączenie zasilania: Podłącz przewód zasilający do uziemionego gniazdka elektrycznego. Wyświetlacz cyfrowy zaświeci się.
- Orientacja pokrywy: Familiarize yourself with the single-lid design. The lid can be positioned for pressure cooking (sealed) or air frying (vented, or removed for certain functions).
Instrukcja obsługi
Gotowanie pod ciśnieniem
- Place the pressure cooking pot into the main unit.
- Add ingredients and the required liquid to the pot. Ensure the liquid level is at least 1 cup for proper pressure build-up. Do not exceed the MAX fill line (2/3 full, or 1/2 full for expanding foods).
- Place the pressure plate insert over the food if required by the recipe.
- Close the lid, ensuring it is properly sealed for pressure cooking. The lid should click into place.
- Press the "Pressure Cook" button. The default time and temperature will appear.
- Use the "TEMP +/-" and "TIME +/-" buttons to adjust settings as needed.
- Press "START/STOP" to begin cooking. The unit will preheat and build pressure. Once pressure is reached, the float valve will rise, and the cooking timer will begin.
- Once cooking is complete, the unit will beep and may automatically switch to "KEEP WARM" mode.
- Uwolnienie ciśnienia:
- Naturalne uwalnianie: Allow pressure to release naturally. This is suitable for foods that benefit from continued cooking or for foamy foods. The float valve will drop when pressure is fully released.
- Szybkie wydanie: Press the "STEAM RELEASE" button to quickly release pressure. Keep hands and face away from the steam vent. Only use for recipes that specify quick release. The float valve will drop when pressure is fully released.
- Once pressure is fully released and the float valve has dropped, carefully open the lid.
Smażenie na powietrzu
- Place the crisping basket into the main unit. If using, place the air fry grate inside the crisping basket.
- Add food to the crisping basket. Do not overfill; ensure air can circulate around the food.
- Close the lid, ensuring it is properly positioned for air frying (it may not seal completely like pressure cooking, allowing for air circulation).
- Press the "Air Fry" button. The default time and temperature will appear.
- Use the "TEMP +/-" and "TIME +/-" buttons to adjust settings as needed.
- Press "START/STOP" to begin cooking. The unit will preheat, and the fan will start.
- During cooking, you may pause the cycle to shake or flip food for even crisping. Close the lid to resume.
- Once cooking is complete, the unit will beep. Carefully open the lid and remove food using heat-resistant utensils.
Inne tryby gotowania
The MUSA Air Pro Cook & Fry offers additional cooking modes. Refer to the specific function buttons on the control panel and adjust time/temperature as required by your recipe.
- Wolny kucharz: Ideal for tenderizing meats and simmering stews over extended periods.
- Roast/Bake/Broil: Use with the crisping basket for oven-like results.
- Para: Requires liquid in the pot and the steam rack for healthy steaming.
- Smażenie/Obsmażanie: Use the pressure cooking pot directly for browning ingredients before other cooking methods.
- Rice/Grains: Optimized settings for various grains.
- Dowód: Provides a warm environment for dough rising.
- Odwodnić: Low-temperature cooking for drying fruits, vegetables, or jerky.

Figure 4: The MUSA Air Pro Cook & Fry in operation, demonstrating its versatility in meal preparation.
Konserwacja i czyszczenie
Regular cleaning and maintenance will extend the life of your MUSA Air Pro Cook & Fry and ensure optimal performance. Always unplug the appliance and allow it to cool completely before cleaning.
- Doniczka wewnętrzna i akcesoria: The 6.5-qt. nonstick pressure cooking pot, 4-qt. crisping basket, reversible steam rack, pressure plate insert, air fry grate, and plate handle are dishwasher-safe. For best results, hand wash with warm, soapy water and a non-abrasive sponge. Rinse thoroughly and dry completely.
- Pokrywa: Wytrzyj pokrywę reklamąamp cloth. Pay attention to the sealing ring and float valve area, ensuring they are free of food debris. The sealing ring can be removed for thorough cleaning and should be reinserted correctly before next use.
- Jednostka główna: Wipe the exterior of the main unit and the control panel with a soft, damp Ściereczką. Nie używaj szorstkich środków czyszczących ani gąbek. Nigdy nie zanurzaj jednostki głównej w wodzie ani innym płynie.
- Składowanie: Przed schowaniem upewnij się, że wszystkie części są czyste i suche. Przechowuj urządzenie w chłodnym i suchym miejscu.
Rozwiązywanie problemów
If you encounter issues with your MUSA Air Pro Cook & Fry, consult the table below for common problems and their solutions.
| Problem | Możliwa przyczyna | Rozwiązanie |
|---|---|---|
| Urządzenie nie włącza się. | Brak podłączenia; problem z gniazdkiem elektrycznym; usterka urządzenia. | Ensure cord is securely plugged into a working outlet. Check household circuit breaker. If problem persists, contact customer support. |
| Pressure not building during pressure cook. | Lid not properly sealed; sealing ring not in place or damaged; insufficient liquid; steam release valve open. | Ensure lid is fully closed and locked. Check sealing ring for proper placement and damage. Add at least 1 cup of liquid. Ensure steam release valve is in the sealed position. |
| Food not crisping during air fry. | Overcrowding the basket; insufficient cooking time/temperature; food not flipped. | Do not overcrowd the basket; cook in batches if necessary. Increase cooking time or temperature. Flip or shake food halfway through cooking. |
| Wyświetlono kod błędu. | Konkretny problem wewnętrzny. | Note the error code and refer to the full troubleshooting guide on the manufacturer's webodwiedź witrynę lub skontaktuj się z działem obsługi klienta. |
Specyfikacje
| Numer modelu | 55854d46-84c5-48f2-8749-9927a6f8f352 |
| Marka | CRUXGG |
| Pojemność | 6.5 kwarty |
| Cotage | 1500 watów |
| Wymiary (gł. x szer. x wys.) | 16.5" gł. x 13.25" szer. x 15.5" wys. |
| Tworzywo | Plastic (exterior), Nonstick (inner pot) |
| Kolor | Czarny |
| Metoda kontroli | Dotykać |
| Części można myć w zmywarce | Inner pot, crisping basket, steam rack, pressure plate insert, air fry grate, plate handle |
| UPC | 829486149801 |
Gwarancja i wsparcie
The MUSA 6.5 Qt. Air Pro Cook & Fry Pressure Cooker And Air Fryer is backed by a manufacturer's warranty. Please refer to the warranty card included with your purchase for specific terms and conditions, including warranty period and coverage details.
For technical support, troubleshooting assistance beyond this manual, or warranty claims, please contact CRUXGG Customer Service.
- Obsługa klienta: Refer to the contact information provided on the CRUXGG official webwitryny lub opakowania produktu.
- Zasoby internetowe: Visit the official CRUXGG webwitryna z odpowiedziami na często zadawane pytania, pomysłami na przepisy i dodatkowymi informacjami o produktach.
Ask a question about this manual
Ask about setup, troubleshooting, compatibility, parts, safety, or missing instructions. Manuals+ will review the question and use this page’s manual context to help answer it.