Wstęp
This manual provides detailed instructions for the installation, operation, and maintenance of your EaseLife 30x80in Pocket Door Frame Kit. This kit is designed for 2x4 stud walls and includes a two-way soft close mechanism for smooth and quiet door operation. Please read all instructions carefully before beginning installation.
Produkt ponadview
The EaseLife Pocket Door Frame Kit allows a door to slide into a wall cavity, saving space and providing a clean aesthetic. The integrated soft close mechanism ensures the door closes gently and silently in both directions.

Image: An installed pocket door frame kit with a door partially open, demonstrating the invisible design and smooth operation.

Image: A side-by-side comparison showing a pocket door in both open and closed positions, illustrating its space-saving and invisible design when recessed into the wall.
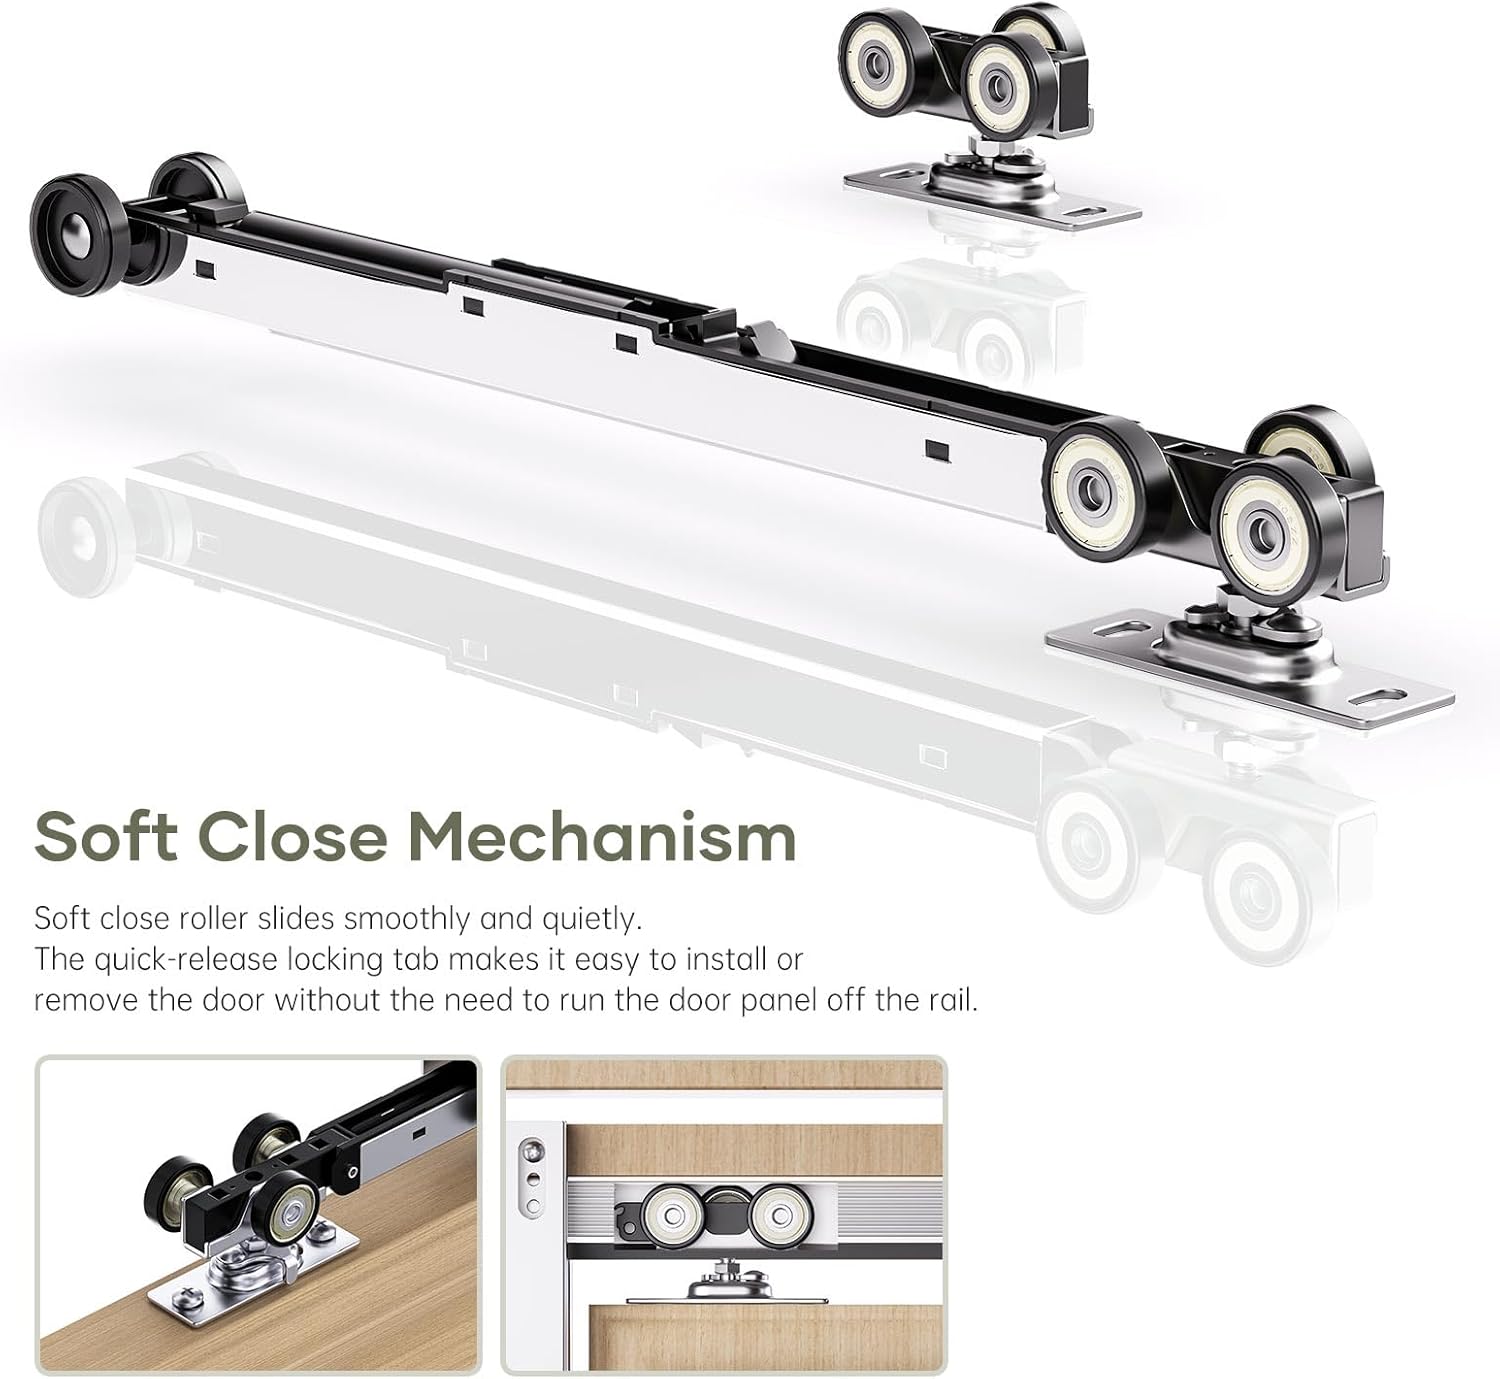
Obraz: Zbliżenie view of the soft close mechanism and rollers, emphasizing the smooth and quiet operation of the pocket door.
Zawartość opakowania
The EaseLife 30x80in Pocket Door Frame Kit includes the following components. Please verify all parts are present before beginning installation. Note: Door panel is NOT included.
- 1 x 60" Aluminum Track with Wood Slot
- 4 x Square Uprights for 80" Door
- 1 x Double-Sided Soft Close Mechanism
- 1 x Set of Rollers
- 2 x Door Stops
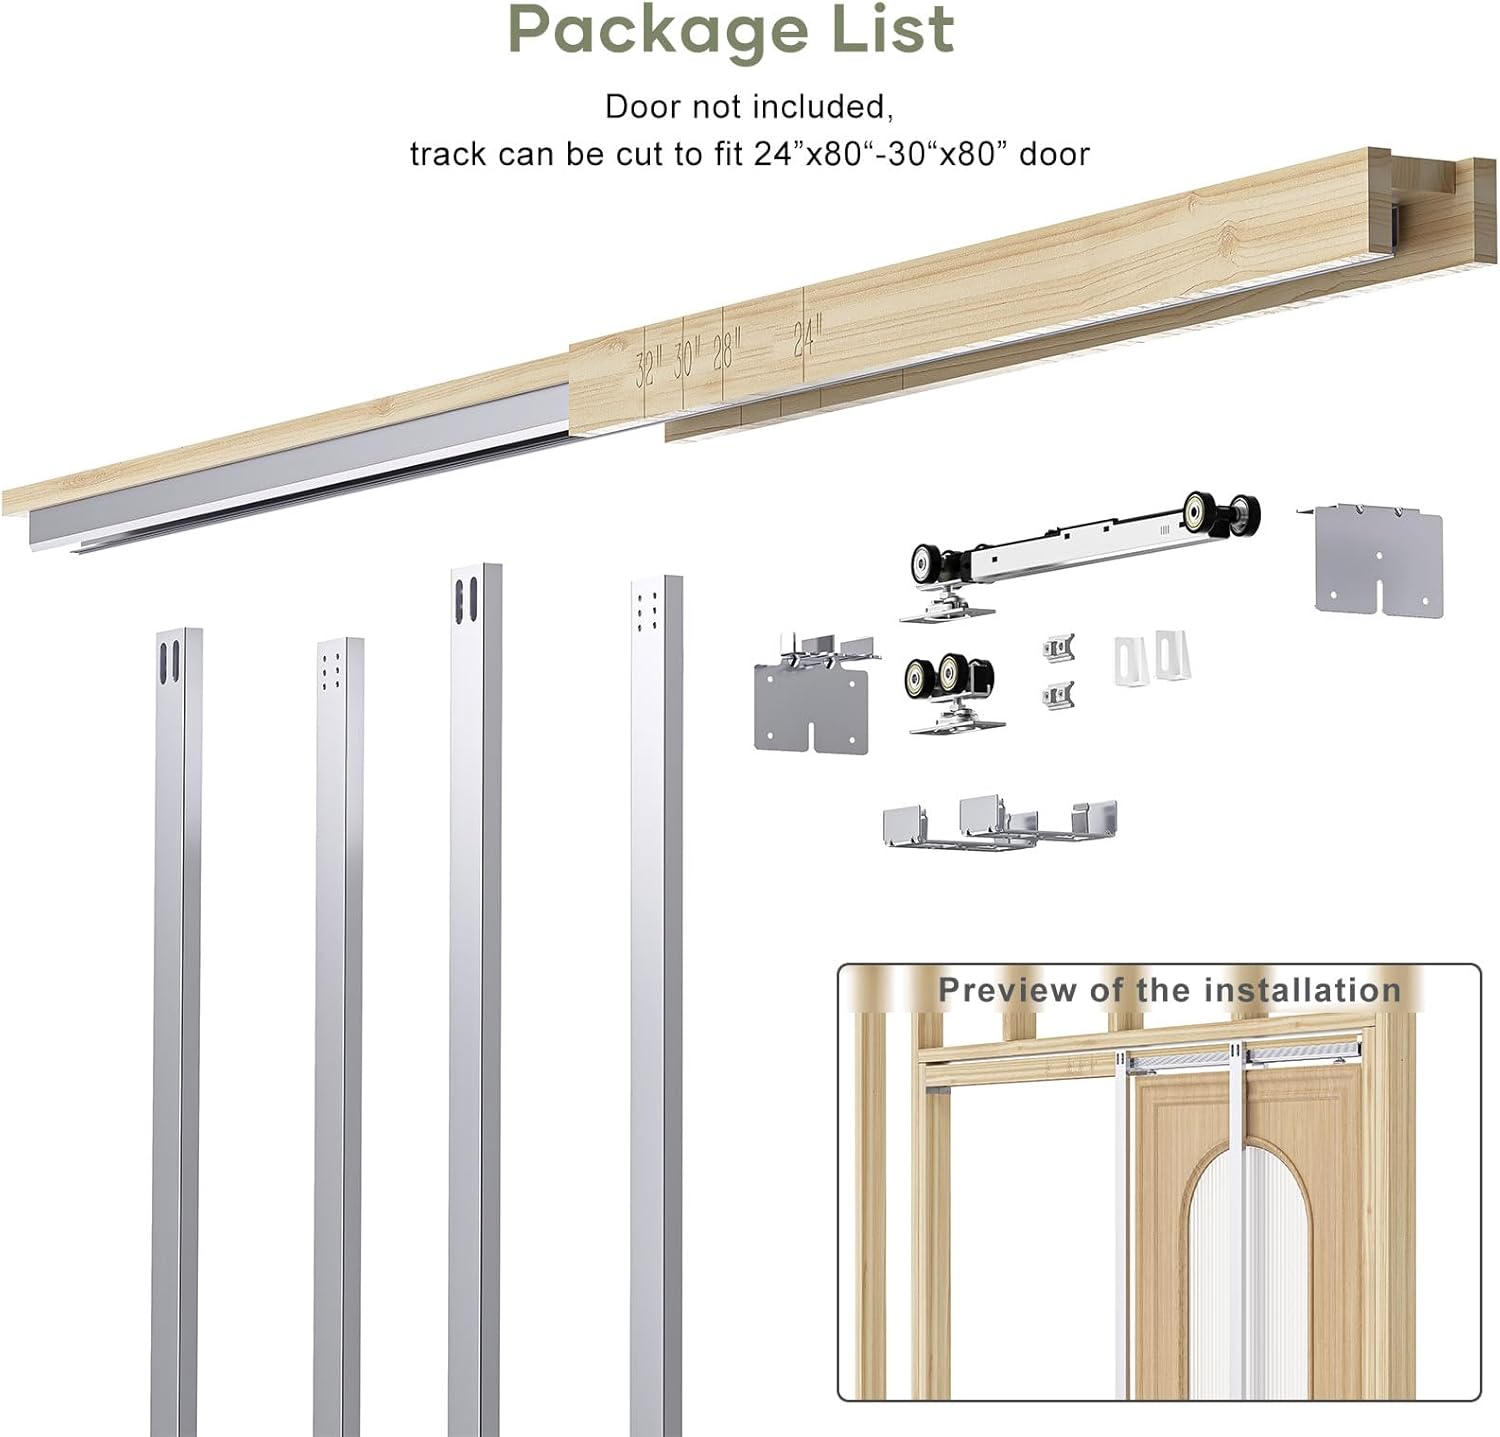
Obraz: Wybuch view of all components included in the pocket door frame kit, including the aluminum track, uprights, soft close mechanism, rollers, and door stops.
Specyfikacje
| Funkcja | Szczegół |
|---|---|
| Numer modelu | 0503 |
| Zgodność szerokości drzwi | 24" - 30" |
| Door Height Compatibility | 80" |
| Zgodność grubości drzwi | 1" - 1-3/4" (25mm - 45mm) |
| Door Weight Capacity | 88 funta (40 kg) |
| Zgodność ze słupkami ściennymi | 2x4 Studs |
| Długość toru | 60" (can be cut) |
| Tworzywo | Aluminium |
| Mechanizm miękkiego zamykania | Two-way, double-sided |
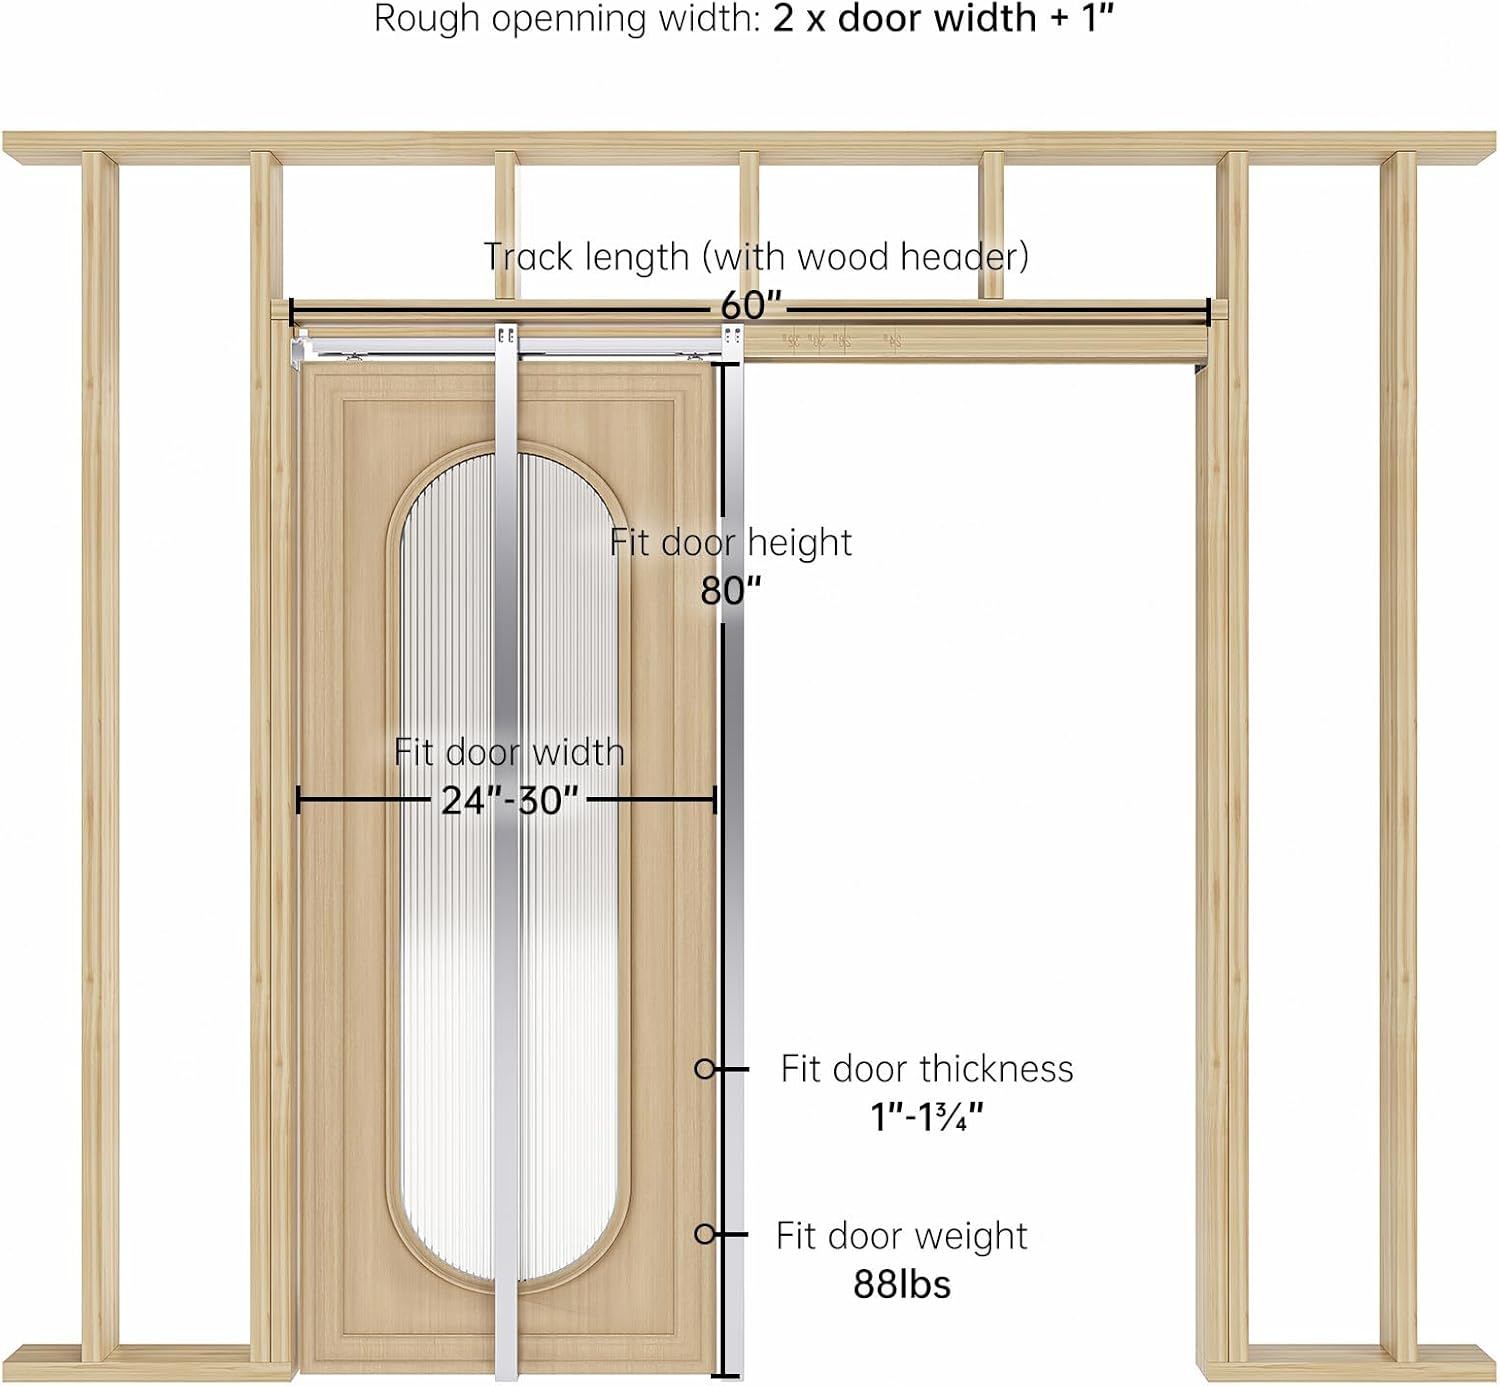
Image: A diagram illustrating the required rough opening width (2 x door width + 1") and height (door height + 4-1/2"), along with compatible door width, height, thickness, and weight capacity.
Instrukcje instalacji
Follow these steps carefully for proper installation of your pocket door frame kit. It is recommended to watch the official installation video for visual guidance.
Video: Official EaseLife Pocket Door Frame Kit Installation Guide. This video provides a step-by-step visual walkthrough of the entire installation process, from preparing the rough opening to mounting the door and finishing the trim.
Step 1: Construct Rough Opening
Prepare the wall framing for the pocket door. The minimum height for the rough opening should be the door height plus 4-1/2 inches (114mm). The width should be 2 times the door width plus 1 inch (25mm).
Step 2: Measure for Frame Header End Brackets
Mark the position for the frame header end brackets. Set a nail at the door height plus 3/4" from the finished floor, or door height plus 1-1/2" from the sub-floor. Ensure a 1/8" gap as shown in the video.
Step 3: Snap a Chalk Line
Snap a chalk line on the floor to guide the placement of the split steel studs, ensuring proper alignment for the pocket door.
Step 4: Attach Frame Header to Rough Studs
Secure the frame header to the rough studs. Use a level to ensure the header is perfectly horizontal. If using a door size other than the standard, refer to the cutting instructions section.
Step 5: Attach Split Steel Studs
Attach the split steel studs to the frame header and secure them to the floor along the chalk line. Ensure they are plumb and evenly spaced.
Step 6: Insert Hanger Assembly and Soft Open/Close Mechanism
Insert the hanger assembly and the soft open/close mechanism into the track. Ensure the dampener is engaged for proper soft close function. Alternate wheel positions for even weight distribution.
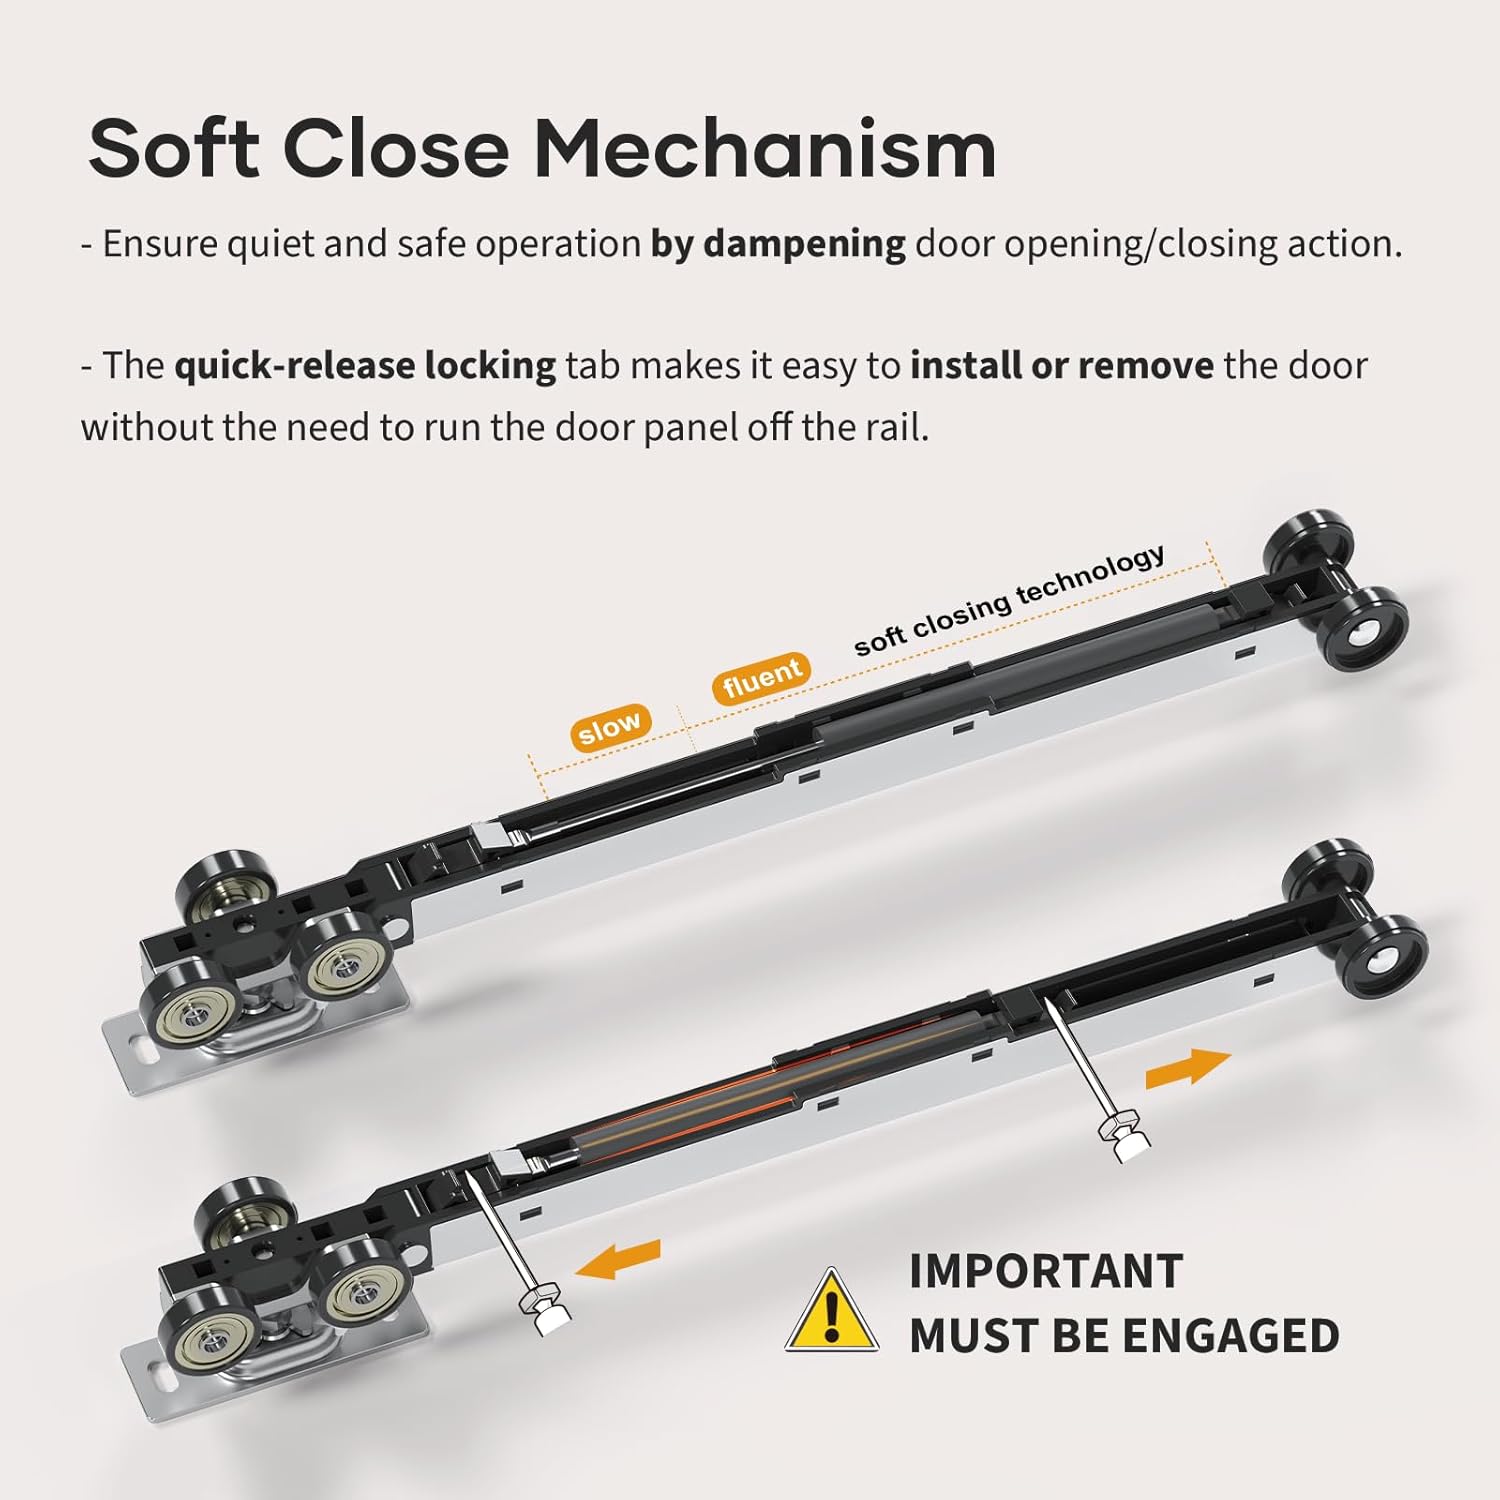
Obraz: szczegółowy view of the soft close mechanism, highlighting the engagement point for proper functionality. It is crucial to ensure the dampener is engaged.
Step 7: Apply Desired Wall Material
Once the frame is securely installed, apply your desired wall material (e.g., drywall) over the frame. Use self-tapping 1" screws for drywall (not included).
Step 8: Seal All Edges
Seal all edges of the wall material around the pocket door opening to prepare for finishing.
Step 9: Mount Door Plates and Mount Door
Attach the door plates to the top edge of your door panel, ensuring they are centered and securely fastened. Then, carefully lift and mount the door onto the hanger assembly in the track. Repeat for the other side if applicable.
Step 10: Install Finished Jambs, Split Headers, and Casing
Install the finished jambs, split headers, and casing around the pocket door opening. Use self-tapping 1-5/8" screws for finish trim (not included). Ensure a 3/16" (5mm) gap between the door and the jambs for smooth operation.
Step 11: Fasten Door Guides
Fasten the door guides to the floor at the bottom of the door opening. These guides prevent the door from swinging out of the pocket. Ensure a 3/16" (5mm) gap between the door and the guides.
Cutting Instructions for Pocket Door Frame Header
The track and wood slot kit can be cut to fit door panels from 24" to 30" wide. No cutting is needed for a 36" standard door. For other standard door sizes (24", 28", 30", 32"), cutting lines are marked on the wood header.
- Zdejmij regulowany wspornik końcowy.
- At the marked line for your door size, cut the wood header ONLY.
- Turn the header assembly over and cut the metal track 1 3/8" shorter than the wood header cut.
- Replace the adjustable end bracket on the newly cut end of the header.
- Cut the header trim board ONLY at the proper mark. Remove the cut-off end and discard.
- Cut the header trim board ONLY on the other side at the proper mark.
For special door sizes, calculate the rough opening width as: 2 x door width + 1". Then follow the cutting steps above, adjusting measurements accordingly.
Instrukcja obsługi
Your EaseLife Pocket Door Frame Kit features a two-way soft close mechanism. To operate, simply slide the door. As the door approaches the fully open or fully closed position, the soft close mechanism will engage, gently slowing the door and pulling it into its final position. This ensures quiet operation and prevents slamming.
Konserwacja
- Czyszczenie: Wipe the track and door surfaces with a soft, damp płótno. Unikaj ściernych środków czyszczących.
- Smarowanie: Periodically check the rollers for smooth operation. If needed, apply a silicone-based lubricant to the roller bearings. Do not use oil-based lubricants as they can attract dust.
- Kontrola: Regularly inspect all fasteners and components to ensure they are secure. Tighten any loose screws.
Rozwiązywanie problemów
- Drzwi nie przesuwają się płynnie:
- Check the track for any obstructions. Ensure rollers are clean and lubricated. Verify that the door guides are properly aligned and not causing friction.
- Soft close mechanism not engaging:
- Upewnij się, że dampener is correctly engaged as shown in the installation video (Step 6). Check for any debris obstructing the mechanism.
- Door is rubbing against the frame:
- Verify that the rough opening dimensions were correctly constructed and that the finished jambs and casing maintain the recommended 3/16" (5mm) gap. Adjust door plates or hangers if necessary.
Gwarancja i wsparcie
EaseLife specializes in sliding door products and hardware. If any parts are missing or broken, please contact EaseLife customer service. They are available 24 hours a day to assist with your problems and provide professional installation guidance.
Aby uzyskać dalszą pomoc, odwiedź stronę EaseLife Store on Amazon.