
1. Wprowadzenie
Thank you for choosing the Browning Dark Ops Full HD Extreme Trail Camera. This camera is designed for capturing high-quality images and videos of wildlife with its advanced motion-activated system and invisible infrared illumination. This manual provides detailed instructions for setting up, operating, and maintaining your camera to ensure optimal performance.
2. Zawartość opakowania
Sprawdź, czy w przesyłce znajdują się wszystkie elementy:
- Browning Dark Ops Full HD Extreme Trail Camera (Main camera unit)
- Pasek montażowy
- Instrukcja obsługi (ten dokument)
Note: Batteries and SD card are sold separately.
3. Koniec kameryview
Familiarize yourself with the key components of your Browning Dark Ops Full HD Extreme Trail Camera.
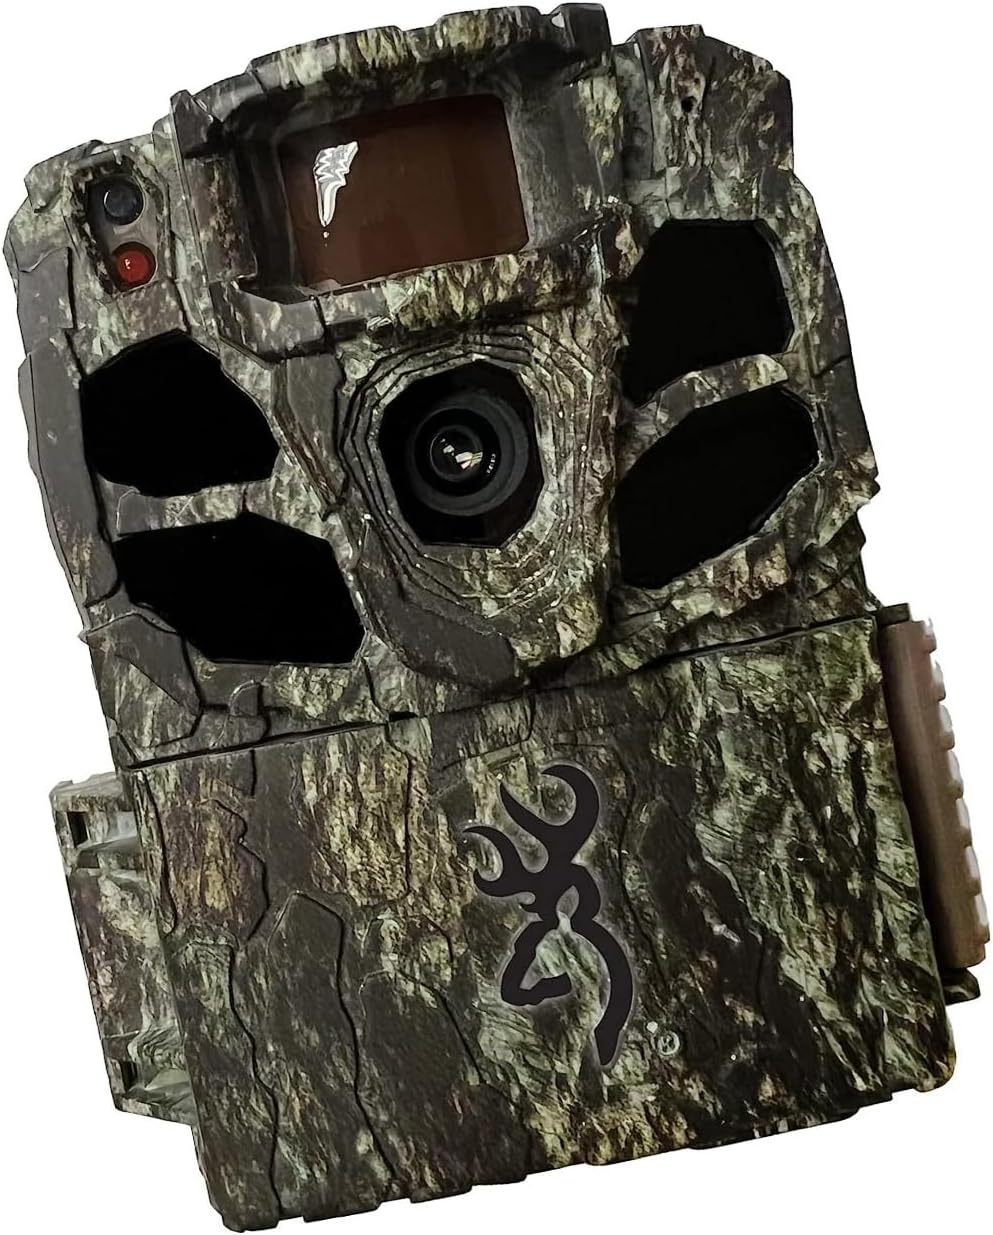
Rysunek 3.1: Przód view of the Browning Dark Ops Full HD Extreme Trail Camera, showcasing its camouflage design and primary lens.

Rysunek 3.2: Wewnętrzny view of the camera with the front cover open, displaying the LCD screen, navigation buttons (E, arrows), ON/OFF switch, MODE button, SD card slot, and Eject button.
Kluczowe elementy obejmują:
- Główny obiektyw: Przechwytuje obrazy i filmy.
- Diody podczerwieni: Zapewnia niewidoczne oświetlenie umożliwiające widzenie w nocy.
- Czujnik ruchu (PIR): Wykrywa ruch i uruchamia nagrywanie.
- Ekran LCD: Displays menu options and settings.
- Przyciski sterujące: Do poruszania się po menu i zmiany ustawień.
- Przełącznik włącz / wyłącz: Włącza lub wyłącza kamerę.
- Przycisk TRYB: Switches between setup, photo, and video modes.
- Gniazdo karty SD: For inserting your memory card.
- Komora baterii: Mieści wymagane baterie.
4. Konfiguracja
4.1 Instalacja baterii
- Otwórz obudowę kamery poprzez odpięcie bocznych zatrzasków.
- Zlokalizuj komorę baterii.
- Włóż 8 baterie AA, zwracając uwagę na prawidłową biegunowość (+/-), zgodnie ze wskazaniami wewnątrz komory.
- Dokładnie zamknij komorę baterii.
4.2 Instalacja karty SD
- Wyłącz kamerę i znajdź gniazdo karty SD.
- Włóż kompatybilną kartę SD (do 512 GB, nie jest dołączona do zestawu) do gniazda, aż zatrzaśnie się na swoim miejscu.
- It is recommended to format the SD card using the camera's menu system before first use and periodically thereafter. To format, navigate to the 'Format SD Card' option in the camera's setup menu and confirm.
4.3 Montaż kamery
- Select a sturdy tree or post at the desired location.
- Przeciągnij dołączony pasek montażowy przez otwory z tyłu kamery.
- Securely fasten the camera to the tree or post, ensuring it is stable and pointed in the desired direction.
- Adjust the camera's angle to cover the intended area. Ensure no obstructions are directly in front of the lens or motion sensor.
5. Instrukcja obsługi
5.1 Włączanie/wyłączanie
- To power on: Slide the ON/OFF switch to the 'ON' position. The LCD screen will illuminate.
- To power off: Slide the ON/OFF switch to the 'OFF' position.
5.2 Nawigacja po menu
Use the control buttons (up, down, left, right arrows, and 'E' for Enter) to navigate through the camera's menu options. The 'MODE' button switches between different operational modes.
5.3 Wybór trybu
Press the 'MODE' button to cycle through the following operational modes:
- Tryb konfiguracji: Access camera settings and configurations.
- Tryb zdjęć: Camera captures still images when triggered.
- Tryb wideo: Camera records video clips when triggered.
- Timelapse Plus Mode: Captures images at set intervals and also triggers on motion.
5.4 Dostosowywanie ustawień
In Setup Mode, you can customize various camera settings:
- Rozdzielczość obrazu: Select from various resolutions up to 24 Megapixels for still photos.
- Rozdzielczość wideo: Choose 1080p Full HD for video recording.
- Prędkość wyzwalania: Adjust the trigger speed from 0.135 to 0.7 seconds to capture fast-moving subjects.
- Zasięg błysku: Set the infrared flash range up to 90 feet for night captures.
- Zasięg wykrywania: Configure the motion detection range up to 80 feet.
- Oświetlenie IR: Utilize the Radiant 4 LED system for optimal night-time visibility.
- Timelapse Plus: Configure intervals for timelapse photography.
- Smart IR Video: Optimizes infrared recording for efficient storage.
5.5 Zarządzanie kartami SD
The camera features an SD Card Management system to optimize storage. This system helps overwrite older files when the card is full, ensuring continuous operation. Refer to the camera's menu for specific settings related to SD card management.
6. Główne cechy
- Invisible Flash: The Dark Ops Full HD Extreme camera features an invisible flash with the innovative Radiant 4 LED system, capturing high-quality night-time images and videos without disturbing wildlife.
- Szerokie pole View: Z polem 55 stopni view, this camera allows for a broader coverage area, ensuring you capture more of the action.
- HDR Night Photos: The addition of HDR night photos enhances the camera's ability to capture clear and detailed images in low-light conditions.
- Adjustable Trigger Speeds: Users can customize their experience by adjusting the trigger speed to match their specific preferences, ensuring precise and timely capture of wildlife activity.
- Przechowywanie i organizacja: The camera includes a unique SD Card Management system and Smart IR Video setting to enhance storage efficiency and optimize infrared recording.
7. Specyfikacje
| Specyfikacja | Szczegół |
|---|---|
| Efektywna rozdzielczość obrazu nieruchomego | 24 MP |
| Rozdzielczość przechwytywania wideo | 1080p Full HD |
| Max Shutter Speed (Trigger Speed) | 0.135 to 0.7 seconds (adjustable) |
| Zasięg błysku | 90 feet (Infrared IR illumination) |
| Zasięg wykrywania | 80 stóp (regulowane) |
| Diody podświetlające | Radiant 4 LED System |
| Źródło zasilania | Zasilany bateryjnie (8 baterie AA, brak w zestawie) |
| Technologia łączności | Wireless (Wi-Fi for certain features/connectivity, though direct remote viewing is not specified) |
| Zastosowanie wewnątrz/na zewnątrz | Plenerowy |
| Poziom wodoodporności | IP65 (Pyłoszczelność i ochrona przed strumieniami wody) |
| Wymiary (dł. x szer. x wys.) | 3.13 x 9.13 x 4.75 cala |
| Waga przedmiotu | 1.06 funta |
| Numer modelu | BTC-6FHDX |
8. Rozwiązywanie Problemów
Jeśli masz problemy z aparatem, zapoznaj się z poniższymi, często występującymi problemami i ich rozwiązaniami:
- Kamera nie włącza się:
- Sprawdź, czy baterie zostały włożone prawidłowo, z zachowaniem właściwej polaryzacji.
- Sprawdź, czy baterie są całkowicie naładowane lub wymień je na nowe.
- Sprawdź, czy przełącznik WŁ./WYŁ. jest w pozycji „WŁ.”.
- Brak zdjęć/filmów:
- Sprawdź, czy karta SD jest prawidłowo włożona i sformatowana.
- Sprawdź, czy na karcie SD jest wystarczająca ilość wolnego miejsca.
- Ensure the camera is in an active recording mode (Photo, Video, or Timelapse Plus).
- Verify that the motion sensor is not obstructed and the detection range is set appropriately.
- Test the camera's motion detection by walking in front of it.
- Słaba jakość obrazu/wideo:
- Oczyść obiektyw aparatu miękką, suchą szmatką.
- Adjust image/video resolution settings to a higher quality.
- Ensure the camera is stable and not subject to movement from wind or animals.
- For night images, ensure subjects are within the effective flash range.
- Krótki czas pracy baterii:
- Use high-quality alkaline or lithium batteries.
- Zmniejsz częstotliwość przechwytywania lub długość wideo w ustawieniach.
- In cold weather, battery performance can decrease; consider using lithium batteries for better cold-weather performance.
9. Konserwacja
- Czyszczenie: Regularly clean the camera lens and the PIR sensor window with a soft, lint-free cloth. Avoid abrasive materials or harsh chemicals.
- Pielęgnacja baterii: Jeśli aparat nie będzie używany przez dłuższy czas, wyjmij baterie, aby zapobiec wyciekowi.
- Składowanie: Przechowuj kamerę w chłodnym, suchym miejscu, z dala od bezpośredniego światła słonecznego i ekstremalnych temperatur.
- Karta SD: Periodically format your SD card to maintain optimal performance and prevent data corruption.
10. Gwarancja i wsparcie
Browning Trail Cameras are covered by a limited warranty. For detailed warranty information, product registration, or technical support, please visit the official Browning Trail Cameras webOdwiedź witrynę lub skontaktuj się z działem obsługi klienta. Zachowaj paragon jako dowód zakupu na wypadek reklamacji.
For further assistance, please refer to the contact information provided on the official Browning webstrona: www.browningtrailcameras.com