
Wstęp
This manual provides detailed instructions for the installation, operation, and maintenance of your Aqualin Garden Irrigation Timer Controller. This device is designed to automate your garden watering, ensuring efficient and precise irrigation for your plants.

Figure 1: Aqualin Garden Irrigation Timer Controller, showing the main dial and connections.
Produkt ponadview i komponenty
The Aqualin Irrigation Timer Controller is a robust device designed for outdoor use. It features a user-friendly dial for setting irrigation schedules and standard connections for easy integration into your existing watering system.
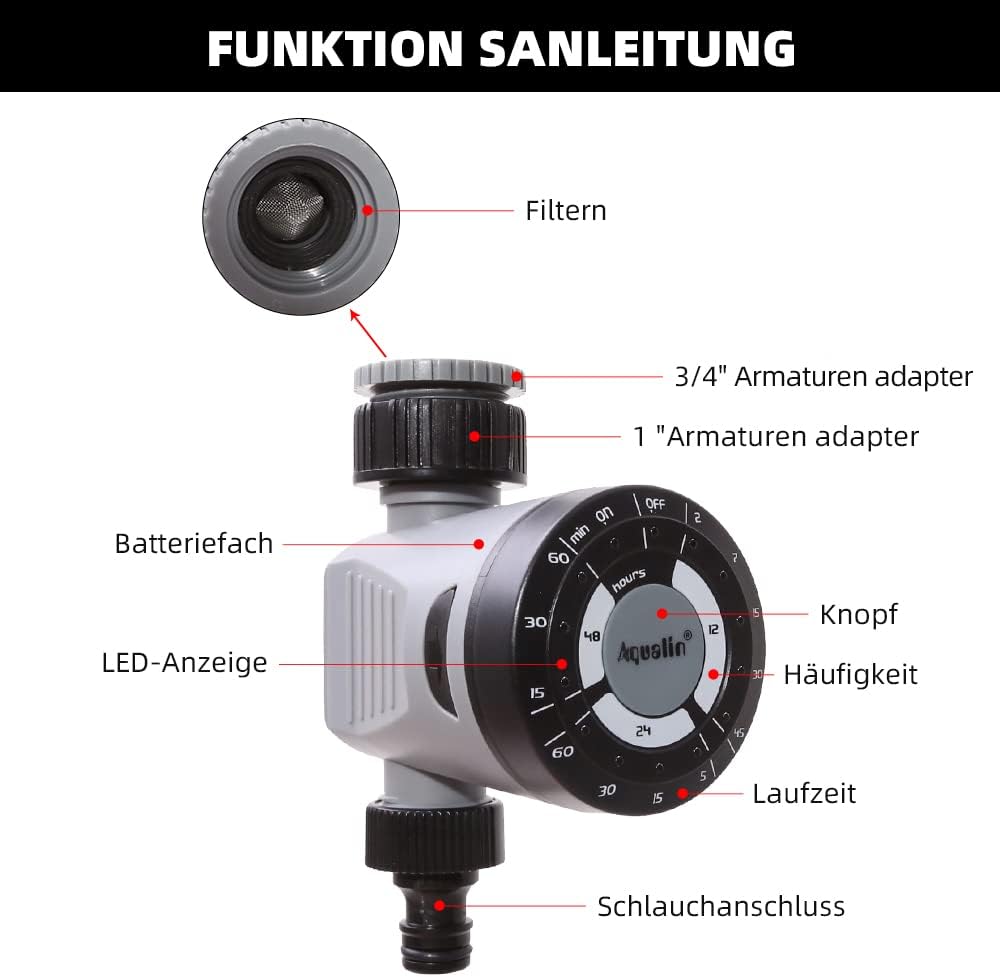
Figure 2: Diagram illustrating the main components of the Aqualin Irrigation Timer, including the filter, 3/4" and 1" faucet adapters, battery compartment, LED indicator, control knob, frequency settings, duration settings, and hose connection.
Kluczowe elementy obejmują:
- Pokrętło kontrolne: Used to set watering frequency and duration.
- Połączenie wlotowe: For connecting to a standard garden faucet (includes adapters for 3/4" and 1" sizes).
- Połączenie wylotowe: For connecting to a garden hose or irrigation system.
- Komora baterii: Houses the power source for the timer.
- Wskaźnik LED: Zapewnia informację zwrotną o statusie.

Figure 3: The Aqualin Irrigation Timer shown with its included 3/4" and 1" faucet adapters, ready for installation.
Konfiguracja i instalacja
Instalacja baterii
The timer requires 2 AAA batteries for operation. Follow these steps to install the batteries:
- Press the two buttons located on the sides of the timer to open the battery compartment.
- Ostrożnie zdejmij pokrywę komory baterii.
- Insert 2 x LR03/AAA 1.5V Alkaline batteries, ensuring correct polarity (+/-).
- Załóż pokrywę komory baterii i sprawdź, czy jest dobrze zamocowana.
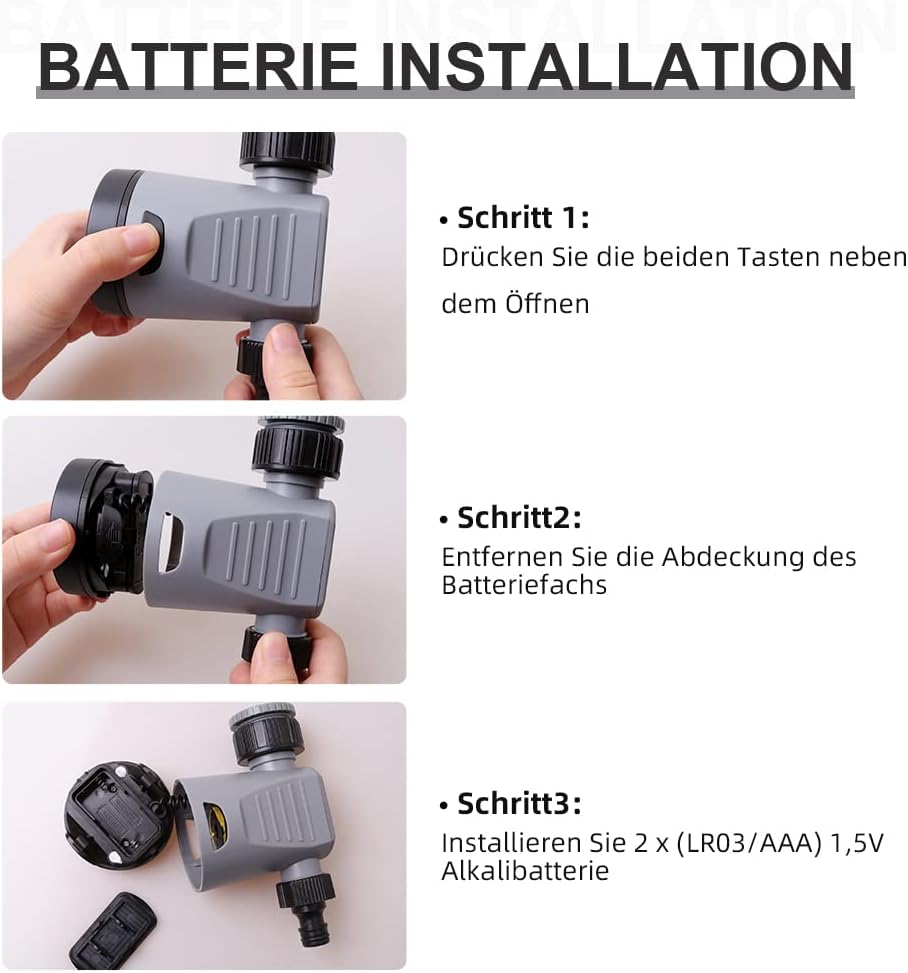
Figure 4: Step-by-step guide for installing batteries into the Aqualin Irrigation Timer. This shows pressing side buttons, removing the cover, and inserting AAA batteries.
Podłączanie timera
- Ensure the timer is in the "OFF" position before connecting.
- Screw the timer's inlet connection onto your outdoor faucet. Use the appropriate adapter (3/4" or 1") if necessary to ensure a snug, leak-free fit.
- Connect your garden hose or irrigation system to the timer's outlet connection.
- Slowly turn on your faucet to full pressure. The timer is designed to operate under standard water pressure (1-8 bar).
Instrukcja obsługi
The Aqualin Irrigation Timer offers flexible programming options for automated watering and a manual override function.
Setting Automatic Irrigation Cycles
The timer allows you to set three different irrigation cycles based on frequency and duration:
- Częstotliwość: Select from options such as every 12 hours, every 24 hours, or every 48 hours.
- Czas trwania: Choose watering durations from 2 minutes up to 60 minutes, depending on the selected frequency. For exampna:
- Every 12 hours: 2, 7, 15, 30, 45 minutes
- Every 24 hours: 5, 15, 30, 60 minutes
- Every 48 hours: 15, 30, 60 minutes
To set a cycle, rotate the main dial to align the desired frequency and duration settings. The timer will automatically begin the programmed schedule.
Ręczne nawadnianie
To water immediately or outside of the programmed schedule, you can use the manual function:
- Rotate the dial to the "ON" position to start watering manually.
- Rotate the dial to the "OFF" position to stop manual watering.
Using the manual "ON/OFF" function will temporarily override any active automatic program.
Delay Function (Controlled Irrigation)
In situations such as heavy rainfall or when you need to temporarily pause the irrigation program, you can use the delay function. This function allows you to delay the next scheduled watering cycle.
- The delay function range is from 1 to 23 hours, increasing in 1-hour increments.
- Consult the dial markings for specific delay settings.

Figure 5: The Aqualin Irrigation Timer effectively watering a garden, demonstrating its practical application.
Konserwacja
To ensure the longevity and optimal performance of your Aqualin Irrigation Timer, follow these maintenance guidelines:
- Czyszczenie: Okresowo czyść zewnętrzną część timera za pomocąamp ściereczką. Nie używaj środków czyszczących o właściwościach ściernych ani nie zanurzaj urządzenia w wodzie.
- Konserwacja filtra: The inlet connection contains a filter to prevent debris from entering the timer. Regularly inspect and clean this filter to ensure unrestricted water flow.
- Wymiana baterii: Replace batteries when the LED indicator shows low power or if the timer stops functioning as expected. Always use fresh alkaline batteries.
- Zimowanie: Before the first frost, disconnect the timer from the faucet and hose. Drain any remaining water from the unit and store it indoors in a dry, protected area to prevent freezing damage.
Rozwiązywanie problemów
| Problem | Możliwa przyczyna | Rozwiązanie |
|---|---|---|
| Timer nie podlewa / Brak przepływu wody. |
|
|
| Timer się nie wyłącza. |
|
|
| Wyciek wody z przyłączy. |
|
|
Specyfikacje
| Funkcja | Szczegół |
|---|---|
| Marka | Aqualin |
| Numer modelu | 21113 |
| Typ materiału | Kunststoff (Plastik) |
| Źródło zasilania | 2 baterii AAA (wymagane) |
| Waga przedmiotu | 0.21 kilograma |
| Wymiary opakowania | Wymiary 11.8 x 11.6 x 6.9 cm |
| Liczba ustawień | 4 (referring to frequency/duration combinations) |
| Kolor | Czarny czy biały |

Figure 6: Visual representation of key product specifications for the Aqualin Irrigation Timer, including brand, weight, pressure, power, frequency, and runtime.
Gwarancja i wsparcie
Aqualin is committed to customer satisfaction. If you encounter any issues or have questions regarding your irrigation timer, our after-sales team is available to assist you.
- Our support team aims to respond to your requests within 12 hours.
- Szczegóły gwarancji i dane kontaktowe znajdziesz w dokumentacji zakupu.
For further assistance, please visit the official Aqualin webstronę internetową lub skontaktuj się ze sprzedawcą bezpośrednio za pośrednictwem platformy zakupowej.