wassermann 4SDM3/5-0.37
WASSERMANN 4" Deep Well Pump Instruction Manual
Model: 4SDM3/5-0.37
Wstęp
This manual provides essential information for the safe and efficient operation, installation, and maintenance of your WASSERMANN 4" Deep Well Submersible Pump. Please read this manual thoroughly before installation and operation to ensure proper use and to prevent damage to the pump or injury to personnel.
The WASSERMANN 4" Deep Well Pump is designed for extracting groundwater from deep wells, suitable for various applications including home water supply, farmland irrigation, livestock watering, and industrial use in non-corrosive clear water environments.

Figure 1: WASSERMANN 4" Deep Well Submersible Pump and accessories.
Informacje dotyczące bezpieczeństwa
Aby zmniejszyć ryzyko obrażeń lub uszkodzeń, należy zawsze przestrzegać następujących środków ostrożności:
- Upewnij się, że zasilanie jest zgodne z wydajnością pompytage (115V/60Hz).
- Do not operate the pump dry. The pump body must be fully submerged in water when running.
- Do not run the pump horizontally. It must be installed vertically.
- This pump is designed for clean water. Pumping sand or abrasive particles will clog and damage the pump. Consider installing an additional filter for new wells with excessive granular sediment.
- Przed przystąpieniem do prac konserwacyjnych lub instalacyjnych należy odłączyć zasilanie.
- All electrical connections must be waterproof and properly insulated.
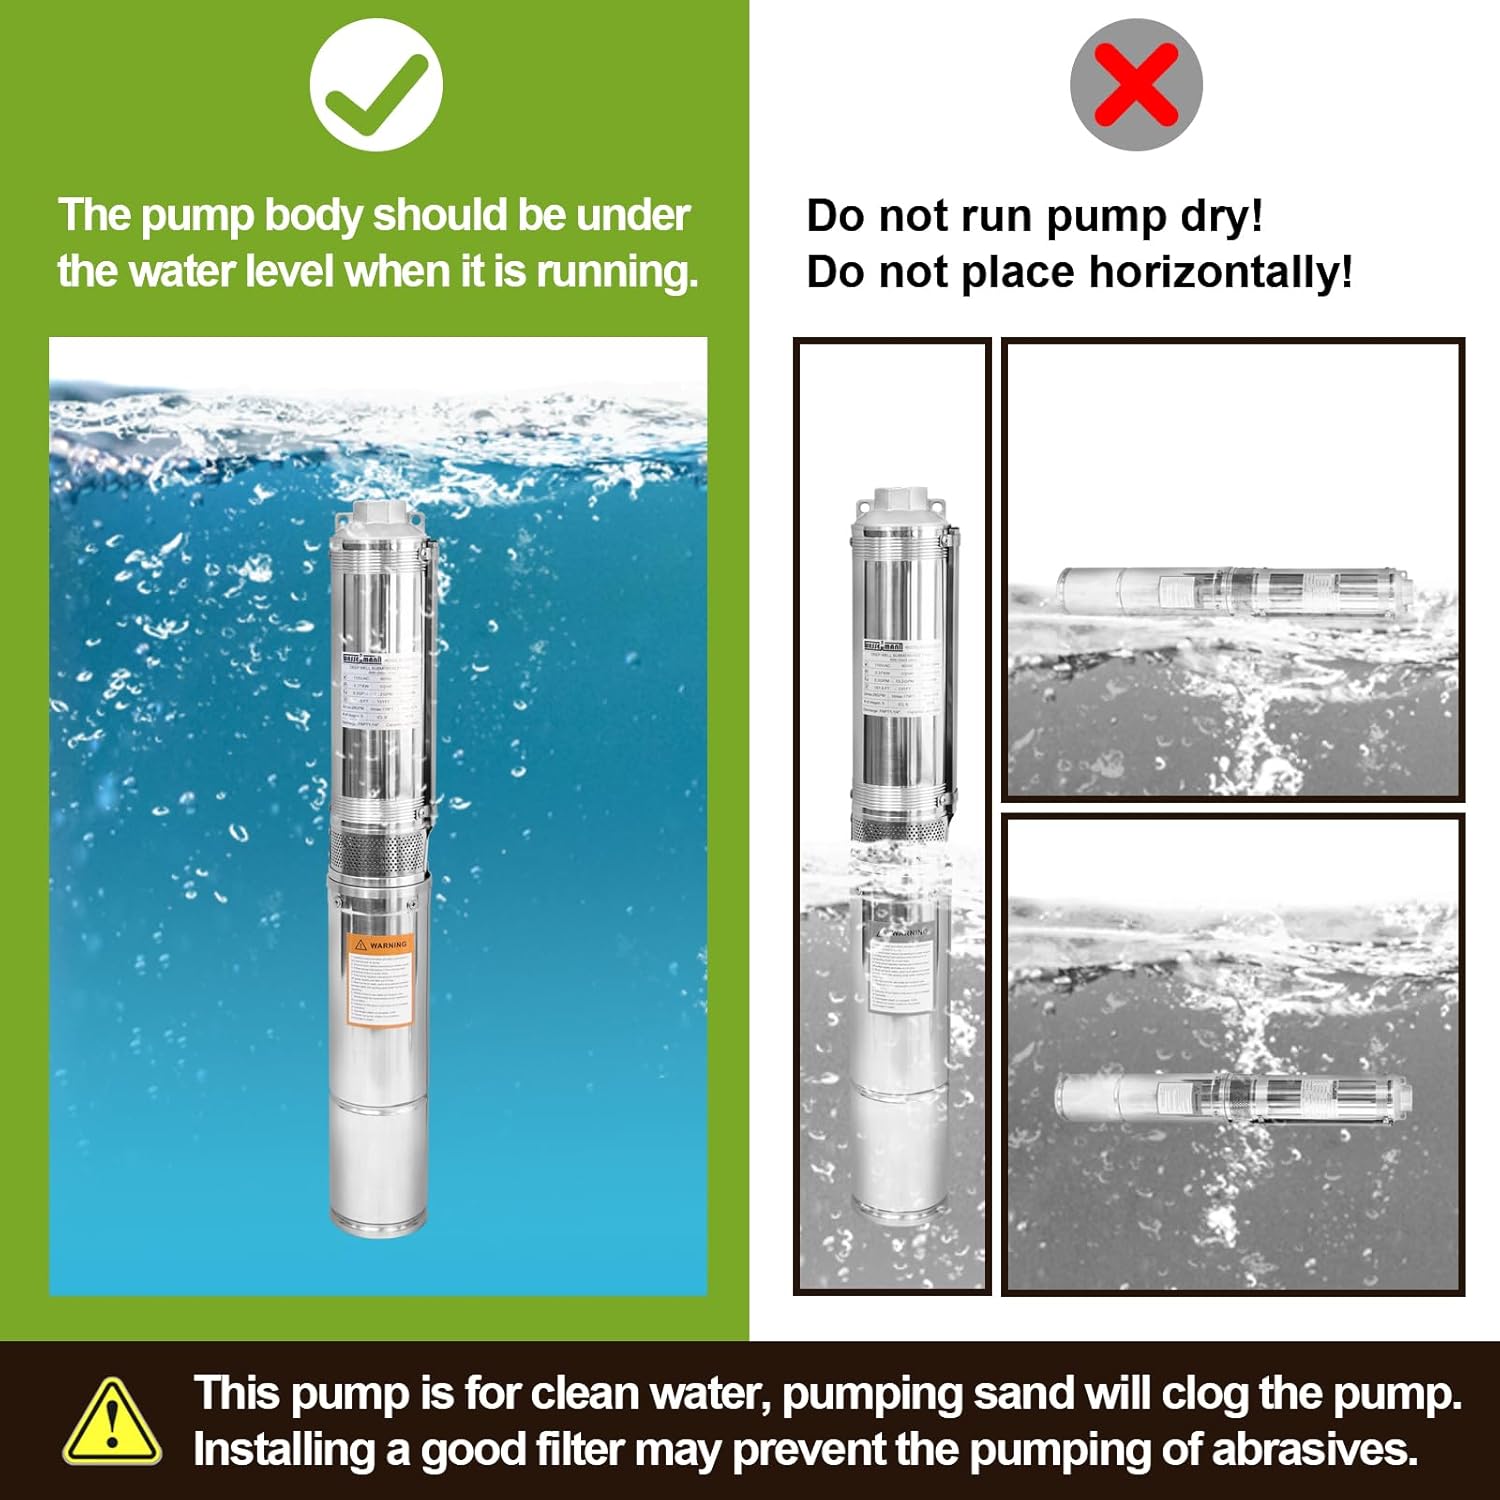
Figure 2: Important operating conditions for the pump. Ensure the pump is fully submerged and installed vertically.
Składniki i funkcje produktu
The WASSERMANN Deep Well Pump is constructed with durable materials and features designed for reliable performance:
- Korpus ze stali nierdzewnej: Provides corrosion resistance and extended service life.
- SS304 Pump Head: High-quality stainless steel for durability.
- 100% Copper Motor: Oil-immersed motor with strong power and thermal protection to prevent overheating.
- multistage Floating Impeller: Efficiently moves water.
- Stainless Steel Inlet Filter Screen: Filters impurities from the water.
- Built-in Control Box: 2-wire pump design eliminates the need for an external control box, simplifying installation.
- 1-1/4" FNPT Outlet: Standard threaded outlet for easy connection to plumbing.

Figure 3: Internal and external components of the pump.

Rysunek 4: Szczegółowy views of pump connections and features.
Konfiguracja i instalacja
Prawidłowy montaż ma kluczowe znaczenie dla wydajności i trwałości pompy. Postępuj ściśle według poniższych kroków:
1. Kontrole przed instalacją
- Upewnij się, że studnia casing is at least 4 inches in diameter.
- Verify the well depth and dynamic water level to ensure the pump can be submerged correctly.
- Gather all necessary tools and materials, including appropriate piping, clamps, and additional wiring if needed.
2. Połączenia elektryczne
The pump comes with a 10-foot cable. If an extension is required, ensure proper waterproof connections.
- Identify the Live Wire (L), Neutral Wire (N), and Ground Wire (PE) from both the pump cable and your extension cord (if used).
- Carefully cross-wind the copper wires of corresponding colors (e.g., Live to Live, Neutral to Neutral, Ground to Ground).
- Apply electrical tape to each individual connection to insulate them.
- Cover the electrical tape wrapping with waterproof tape for enhanced protection against moisture.
- Wrap the entire wire group with waterproof tape to create a robust, sealed connection.
- Apply a final layer of electrical tape over the waterproof tape for additional protection and neatness.

Figure 5: Step-by-step guide for making waterproof electrical connections.
3. Pump Placement and Piping
- Apply waterproof tape (Teflon tape) to the threads of the pump's outlet before connecting the outlet pipe.
- Connect the outlet pipe to the pump's 1-1/4" FNPT outlet. Ensure a secure, leak-free connection, using a hose clamp if necessary for flexible piping.
- Attach a strong wire or nylon rope to the designated rope holes on the pump head. This rope will be used to lower and retrieve the pump from the well.
- Lower the pump into the well, ensuring the water outlet is at least 16.4 feet (5 meters) below the dynamic water level.
- The diving depth of the pump should not exceed 230 feet (70 meters).
- Maintain a minimum distance of 9.8 feet (3 meters) between the bottom of the pump and the bottom of the well to prevent drawing in sediment.
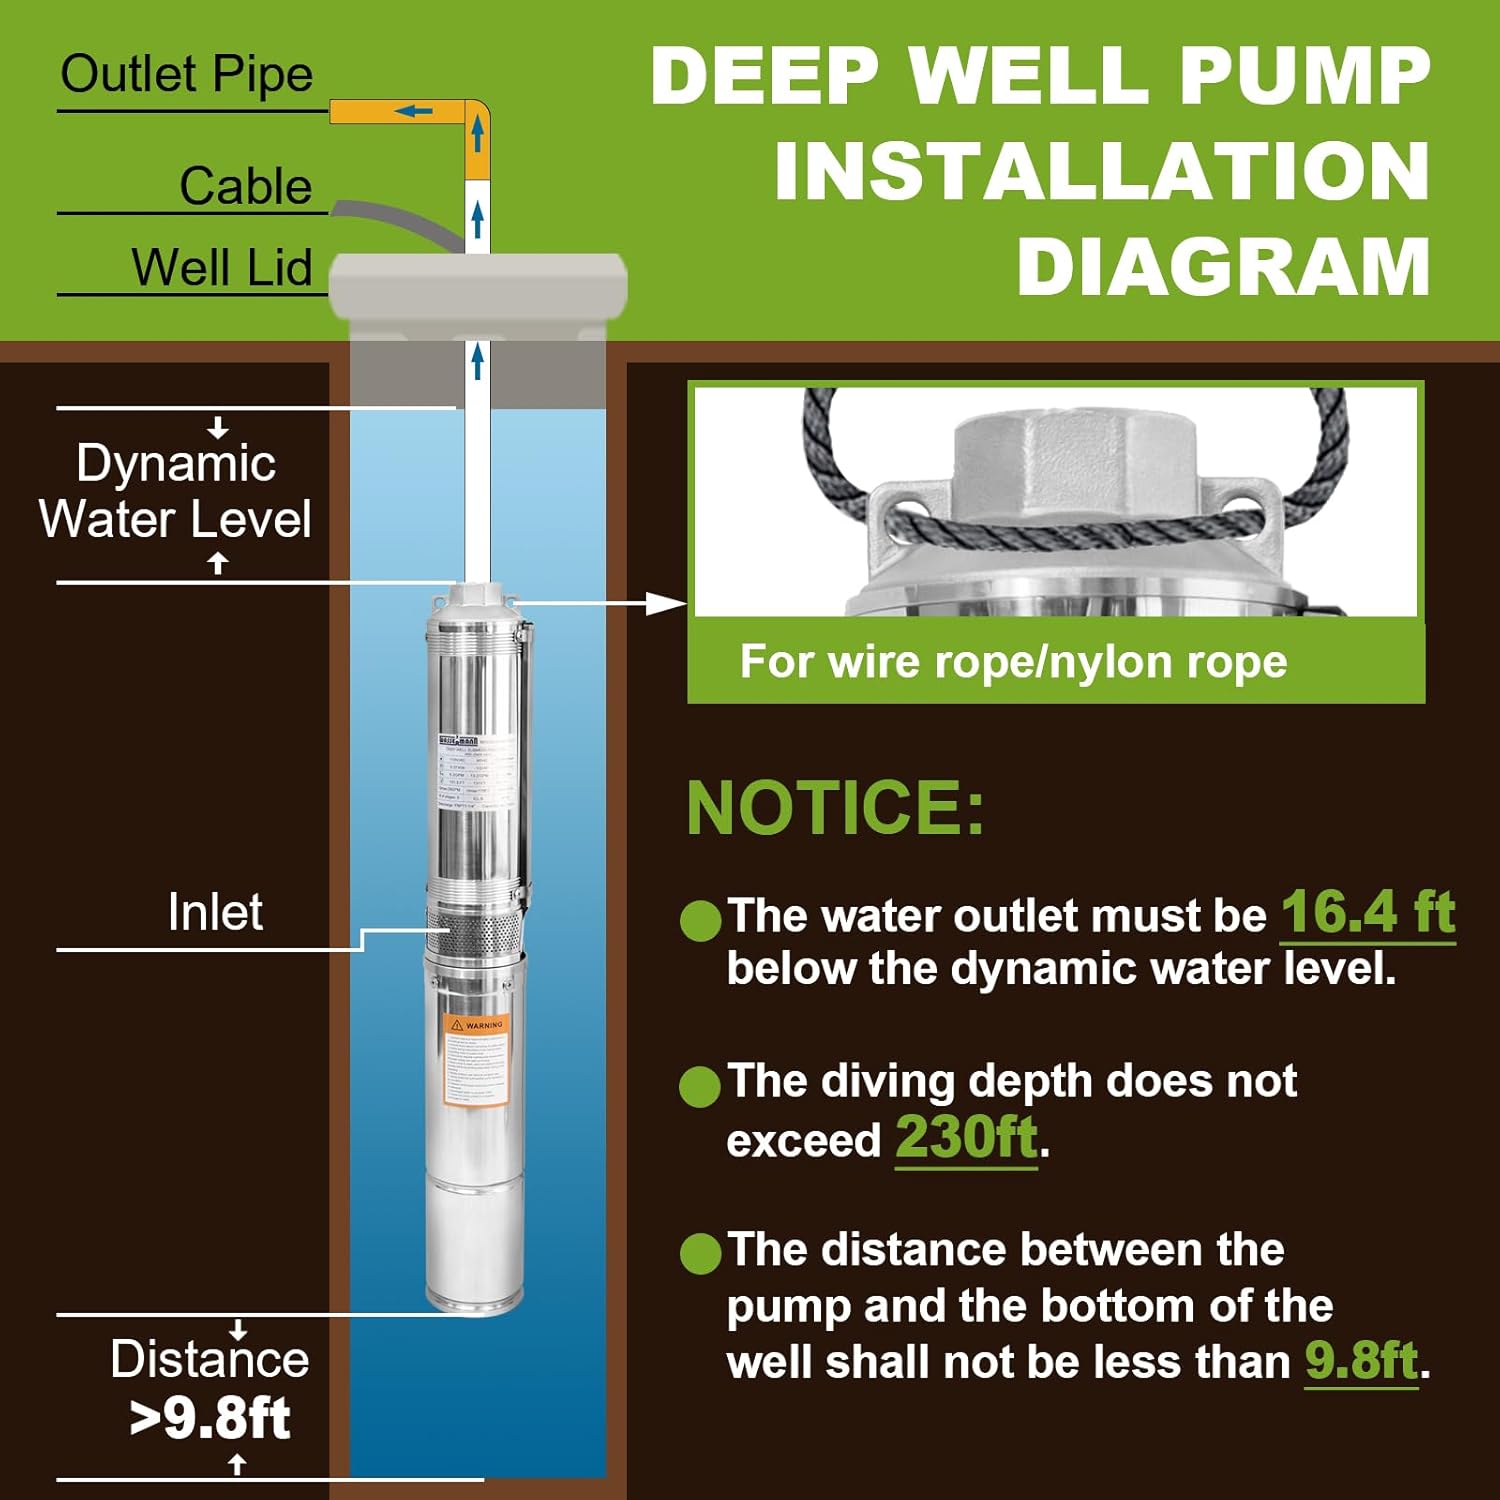
Figure 6: Deep Well Pump Installation Diagram with critical depth and distance requirements.

Apply waterproof tape

Connect outlet hose

Secure with rope

Final hose connection
Instrukcja obsługi
Once installed, operating the WASSERMANN Deep Well Pump is straightforward:
- Ensure all connections are secure and the pump is properly submerged according to the installation guidelines.
- Connect the pump to a suitable 115V/60Hz power supply. The built-in control box will manage the pump's operation.
- Monitor the water flow and pressure. The pump is designed to deliver a maximum flow of 28 GPM and a maximum head of 179 feet.
- If the pump runs but no water is delivered, or if the flow is weak, immediately disconnect power and check for issues such as insufficient water level, clogged inlet, or airlock.
Ważny: Never run the pump dry. Dry running can cause severe damage to the motor and seals, voiding the warranty.
Konserwacja
Regularna konserwacja zapewnia długowieczność i optymalną wydajność pompy:
- Ekran filtra wlotowego: Periodically inspect the stainless steel inlet filter screen for blockages from sediment or debris. Clean as necessary. For new wells with high sediment, consider adding an external pre-filter.
- Połączenia elektryczne: Annually inspect all electrical connections for signs of wear, corrosion, or water ingress. Re-tape or repair as needed to maintain waterproof integrity.
- Zanurzenie pompy: Regularly verify that the pump remains adequately submerged during operation, especially during dry seasons when water levels may drop.
- Składowanie: If the pump is to be stored for an extended period, especially in freezing conditions, remove it from the well, drain all water, clean it thoroughly, and store it in a dry, frost-free location.
Rozwiązywanie problemów
Aby zapoznać się z typowymi problemami i ich rozwiązaniami, zapoznaj się z poniższą tabelą:
| Problem | Możliwa przyczyna | Rozwiązanie |
|---|---|---|
| Pompa nie uruchamia się. | No power; tripped circuit breaker; faulty wiring; motor overheating. | Check power supply and circuit breaker. Inspect wiring connections. Allow motor to cool if overheated. |
| Pompa pracuje, ale nie ma wody lub jej przepływ jest niewielki. | Insufficient water level; clogged inlet filter; airlock in system; damaged impeller. | Check well water level. Clean inlet filter. Prime the pump/system to remove air. Inspect impeller for damage (professional service recommended). |
| Pompa często się włącza i wyłącza. | Low water level; pressure tank issue (if applicable); check valve malfunction. | Verify adequate water level. Check pressure tank air charge/diaphragm. Inspect or replace check valve. |
| Pompa jest głośna. | Dry running; foreign object in pump; worn bearings. | Ensure pump is fully submerged. Disconnect power and inspect for debris. Contact support for worn bearings. |
If the problem persists after attempting these solutions, please contact WASSERMANN customer support.
Specyfikacje
| Parametr | Wartość |
|---|---|
| Model | 4SDM3/5-0.37 |
| Znamionowa objętośćtage | 115 V / 60 Hz |
| Moc znamionowa | 1/2 KM (370 W) |
| Maksymalna szybkość przepływu | 28 GPM (galonów na minutę) |
| Maksymalna wysokość głowy | 179 stóp (stóp) |
| Średnica wylotu | 1-1/4" FNPT |
| Średnica pompy | 3.74" (for 4 inch well casings and bigger) |
| Długość kabla | 10 FT |
| Tworzywo | Stainless Steel (Body, Pump Head, Filter Screen) |
| Typ silnika | 100% Copper, Oil-immersed, Thermally Protected |
| Skrzynka sterownicza | Built-in (2-wire pump) |
| Waga przedmiotu | 24.1 funta (10.98 kg) |
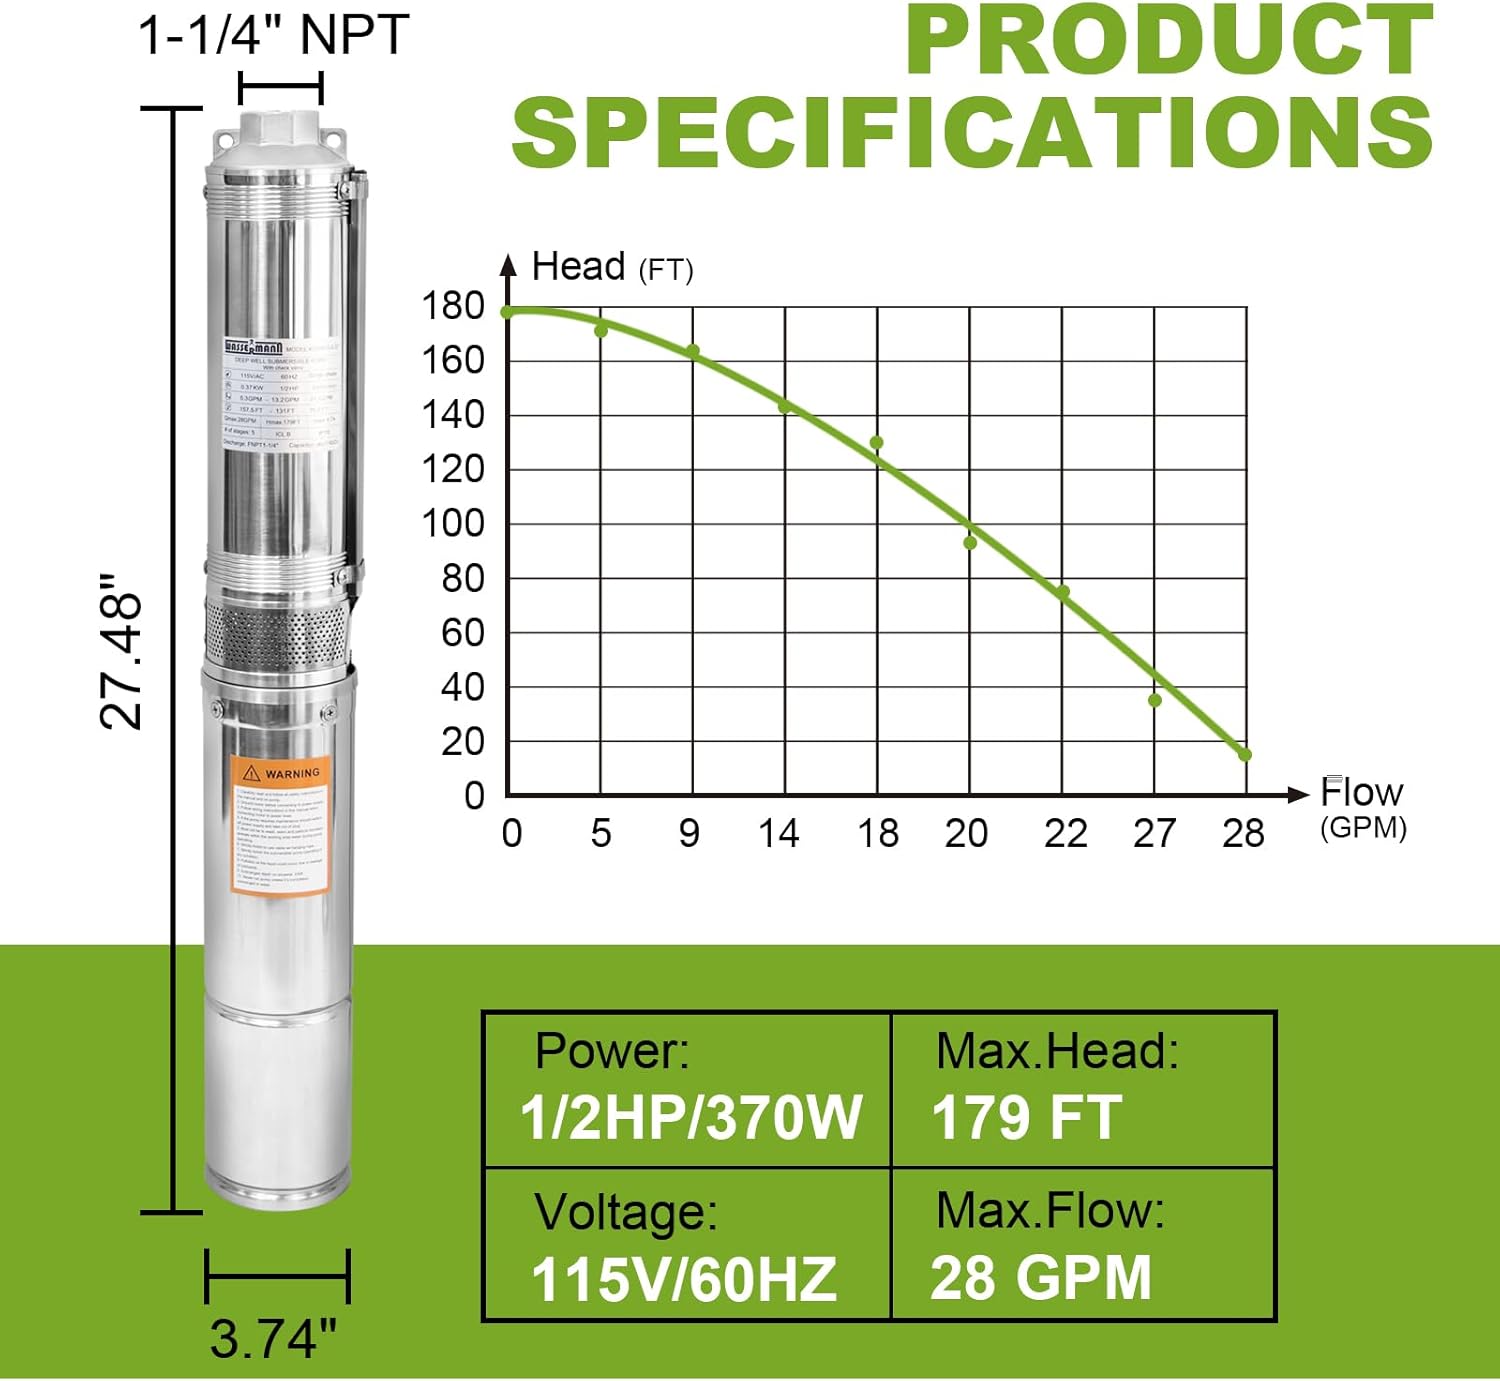
Figure 7: Detailed product specifications and performance curve.

Figure 8: Guide for calculating required pump head based on installation scenario.
Gwarancja i wsparcie
WASSERMANN products are designed for reliability and performance. For warranty information and customer support, please refer to the following:
- 30-dniowa polityka zwrotów: You are covered by Amazon's hassle-free return and replacement policy for 30 days from purchase.
- Po 30 dniach: For support beyond the initial 30-day period, please contact the seller directly. WASSERMANN is committed to working with customers to find satisfactory solutions.
- Kontakt: For specific inquiries or technical assistance, please visit the official WASSERMANN store on Amazon or contact their customer service as per your purchase documentation.
For more information and to explore other WASSERMANN products, visit the WASSERMANN Store.