
1. Wprowadzenie
Thank you for choosing the MARK ADLER Expert 6.2 Ergonomic Office Chair. This manual provides essential information for the safe assembly, operation, maintenance, and troubleshooting of your new office chair. Please read this manual thoroughly before assembly and retain it for future reference.

Image: The MARK ADLER Expert 6.2 ergonomic office chair.
2. Informacje dotyczące bezpieczeństwa
- Przed montażem upewnij się, że wszystkie części są kompletne i nieuszkodzone. Nie używaj, jeśli którejkolwiek części brakuje lub jest uszkodzona.
- Należy ściśle przestrzegać instrukcji montażu. Nieprawidłowy montaż może prowadzić do niestabilności i obrażeń.
- Nie stawaj na krześle.
- Nie należy używać krzesła jako stopnia.
- Trzymaj dzieci i zwierzęta z dala od siebie podczas montażu. Małe części mogą stanowić zagrożenie zadławienia.
- Nie przekraczać maksymalnego udźwigu 150 kg (330 funtów).
- Regularly check all bolts and screws to ensure they are tightened. Retighten if necessary.
- Aby zapobiec degradacji materiału, należy unikać wystawiania krzesła na bezpośrednie działanie promieni słonecznych i ekstremalnych temperatur.
3. Zawartość opakowania
Sprawdź, czy w pakiecie znajdują się wszystkie elementy:
- Montaż oparcia
- Zespół poduszki siedzenia
- Siłownik gazowy
- Gwiezdna baza
- Kółka (koła)
- Podłokietniki (lewy i prawy)
- Zagłówek
- Mounting Hardware (Screws, Washers, Allen Key)
Obraz: Wybuchowy view of chair components for assembly.
4. Instrukcja montażu
Follow these steps to assemble your MARK ADLER Expert 6.2 office chair:
- Zamontuj kółka do podstawy: Włóż kółka w otwory na końcu każdej nogi podstawy w kształcie gwiazdy. Dociśnij mocno, aż zatrzasną się na swoim miejscu.
- Włóż podnośnik gazowy: Umieść cylinder gazowy w środkowym otworze podstawy w kształcie gwiazdy.
- Zamontuj podłokietniki na siedzisku: Przymocuj podłokietniki do spodu poduszki siedziska za pomocą dołączonych śrub. Upewnij się, że są prawidłowo zorientowane (lewo i prawo).
- Zamontuj oparcie na siedzisku: Align the backrest with the seat mechanism and secure it with screws.
- Zamontuj zagłówek: Wsuń zagłówek w przeznaczone do tego otwory w górnej części oparcia.
- Podłączanie zespołu siedziska do podnośnika gazowego: Carefully place the assembled seat and backrest onto the gas lift cylinder. Press down firmly to secure.
- Kontrola końcowa: Przed użyciem należy sprawdzić, czy wszystkie śruby są dokręcone i czy krzesło jest stabilne.
5. Instrukcja obsługi
Your MARK ADLER Expert 6.2 chair offers several adjustment features for optimal comfort and ergonomics:
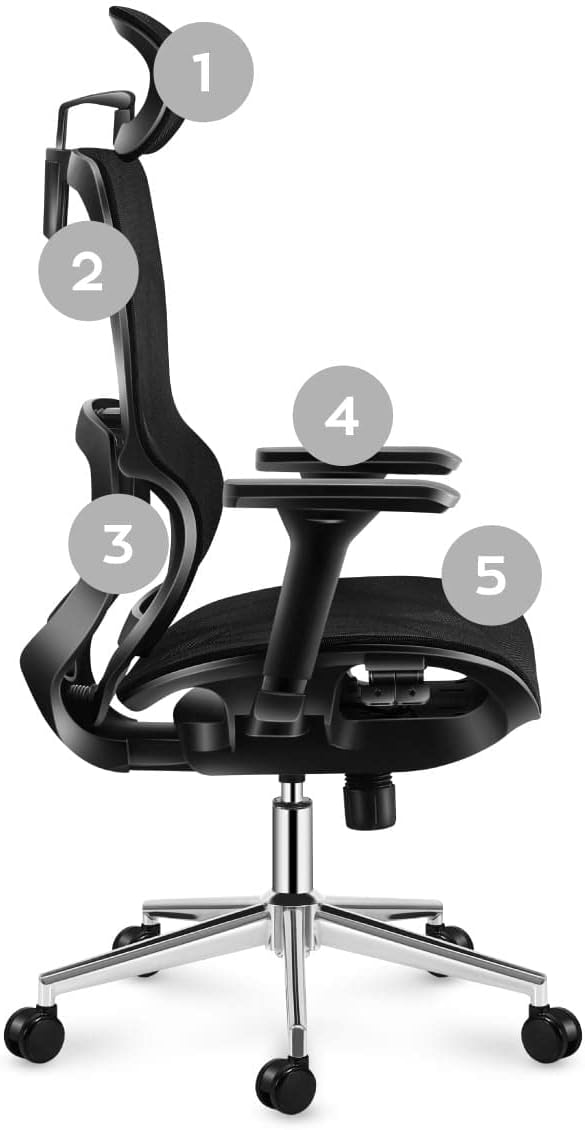
- Regulacja wysokości krzesła: Locate the lever on the right side, under the seat. Pull the lever up to raise the chair (when no weight is on it) or lower it (when seated). Release the lever to lock the height.
- Backrest Recline and Lock (SeatRest Mulitlock-Funktion): The mechanism allows the backrest to tilt to any desired position. Pull the recline lever (typically on the left side, under the seat) to unlock the recline. Lean back to your desired angle, then push the lever down to lock the backrest in place.
- Regulowany zagłówek: The headrest can be adjusted vertically to provide proper support for your neck and head. Simply slide it up or down to your preferred height.
- Podparcie lędźwiowe: The flexible, ergonomic lumbar support is designed to provide adequate support to your spine. This feature automatically adjusts with your posture to maintain spinal alignment.
- Regulacja podłokietnika: The armrests are adjustable. Look for a button or lever on the side of the armrest to adjust their height.

Image: Detail of the chair's recline and headrest adjustment.
6. Konserwacja i pielęgnacja
To ensure the longevity and optimal performance of your MARK ADLER Expert 6.2 office chair, follow these maintenance guidelines:
- Czyszczenie: For the mesh and fabric parts, use a soft cloth dampened with mild soap and water. Avoid harsh chemicals or abrasive cleaners. For the metal parts, wipe with a dry or slightly damp płótno.
- Regularna kontrola: Periodically check all screws, bolts, and connections to ensure they are tight. Retighten any loose fasteners to maintain stability and safety.
- Pielęgnacja kół: Clean the casters regularly to remove hair, dust, and debris that can impede smooth movement.
- Unikaj przeciążania: Do not exceed the chair's maximum weight capacity.
- Warunki środowiskowe: Keep the chair away from direct sunlight, excessive heat, or humidity, which can damage the materials.
7. Rozwiązywanie Problemów
Jeśli napotkasz jakiekolwiek problemy z krzesłem, zapoznaj się z poniższymi typowymi problemami i ich rozwiązaniami:
| Problem | Możliwa przyczyna | Rozwiązanie |
|---|---|---|
| Krzesło nie ma regulacji wysokości | Awaria cylindra podnośnika gazowego lub problem z dźwignią. | Ensure the lever is fully engaged. If the problem persists, the gas lift may need replacement. |
| Krzesło jest chwiejne lub niestabilne | Luźne śruby lub nieprawidłowy montaż. | Check and tighten all assembly screws, especially those connecting the seat, backrest, and armrests. |
| Kółka nie toczą się płynnie | Zanieczyszczenia w kółkach lub uszkodzone kółka. | Remove any hair or debris from the caster wheels. If damaged, replace the casters. |
| Piszczące dźwięki | Luźne połączenia lub tarcie między częściami. | Tighten all screws. Apply a small amount of silicone lubricant to moving parts if necessary, avoiding contact with mesh or fabric. |
8. Specyfikacje
| Funkcja | Szczegół |
|---|---|
| Marka | MARK ADLER |
| Nazwa modelu | Ekspert 6.2 |
| Wymiary produktu (dł. x szer. x wys.) | 49 x 70 x 131 cm (ok. 19.3 x 27.6 x 51.6 cala) |
| Waga przedmiotu | 17 kilograma (ok. 37.5 funty) |
| Kolor | Czarny |
| Tworzywo | Air Mesh HD Material |
| Maksymalna nośność | 150 kg (ok. 330 funta) |
| Cechy specjalne | Adjustable Headrest, Lumbar Support, Reclining Backrest with Lock, Breathable Mesh |

Image: MARK ADLER Expert 6.2 chair with key dimensions.
9. Gwarancja i wsparcie
For warranty information or technical support, please refer to the documentation provided with your purchase or visit the official MARK ADLER webwitryny. Możesz również skontaktować się bezpośrednio ze sprzedawcą, aby uzyskać pomoc.