Technaxx TX-190
Technaxx Mini WiFi IP Camera TX-190 User Manual
Wstęp
The Technaxx Mini WiFi IP Camera TX-190 is a compact, wireless indoor security camera designed for home surveillance. It features FullHD video resolution, PIR motion detection, night vision, and two-way audio communication. With its integrated rechargeable battery, it offers flexible placement and long operational times. This manual provides essential information for setting up, operating, and maintaining your TX-190 camera.
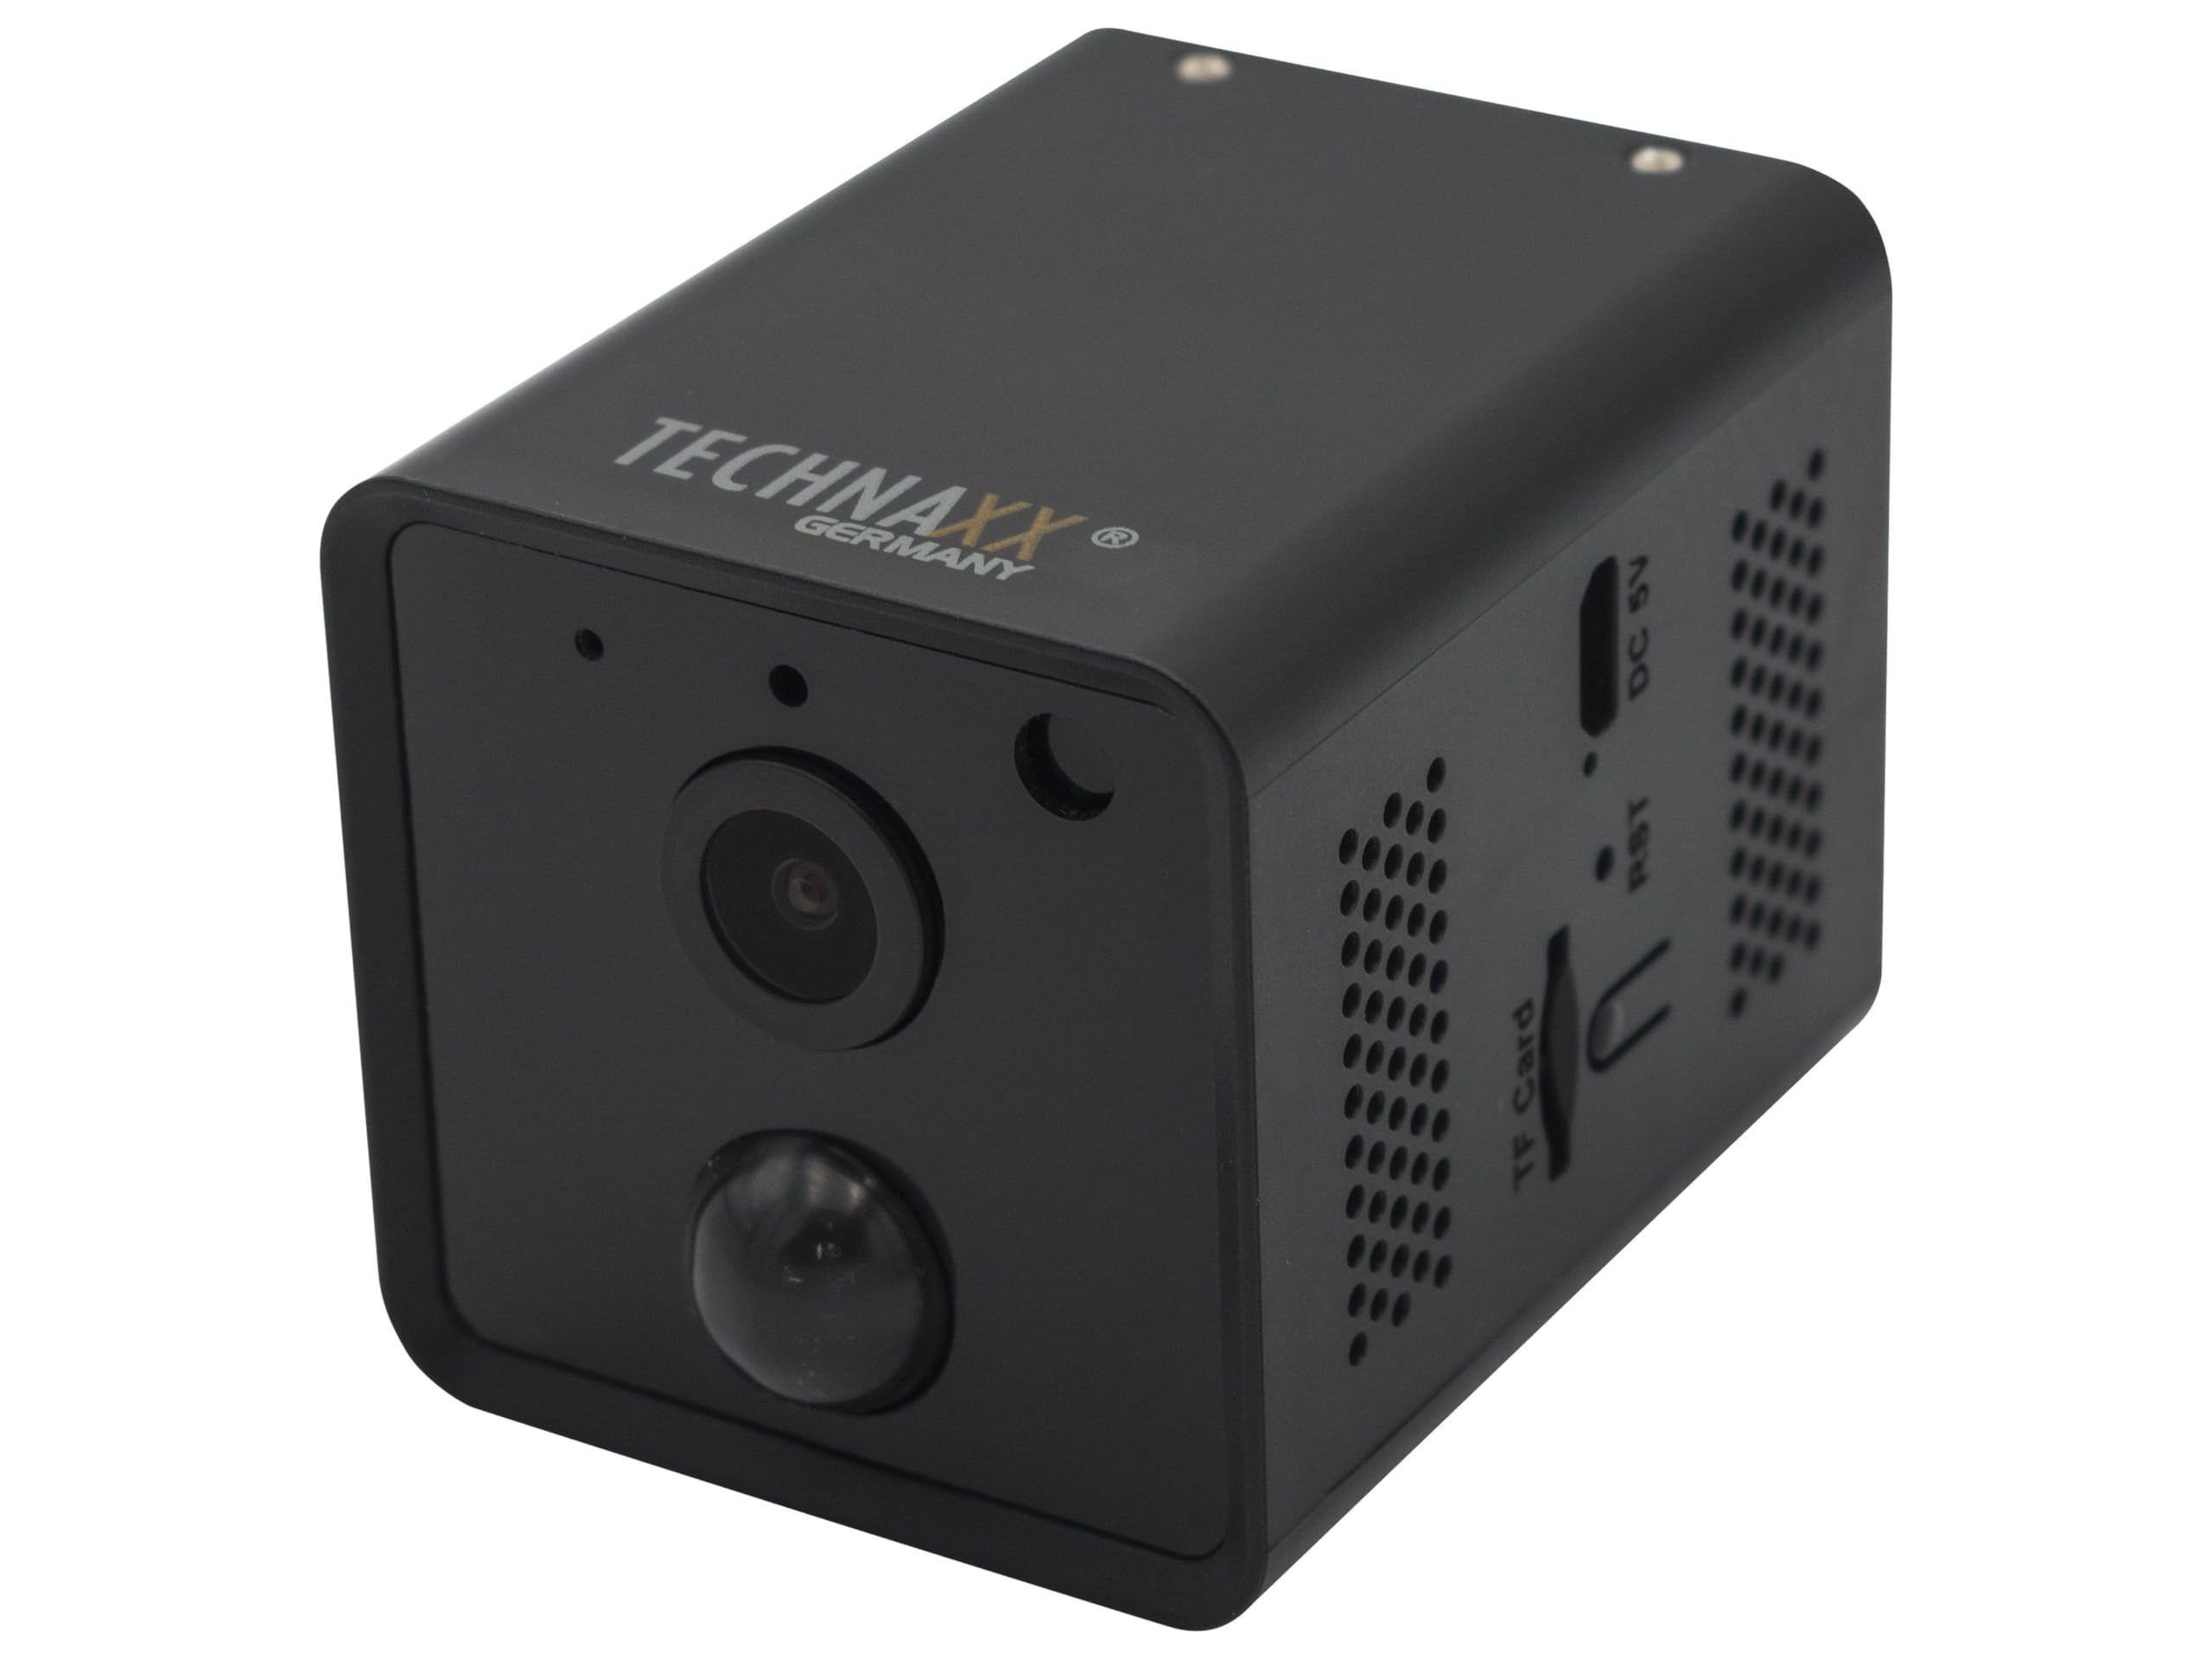
Image: Technaxx Mini WiFi IP Camera TX-190, showcasinze względu na kompaktową konstrukcję.
Zawartość opakowania
Proszę sprawdzić, czy w paczce znajdują się następujące elementy:
- Mini WiFi IP Camera TX-190
- 1x USB Power Cable (1m)
- 3x Screws and Dowels
- Statyw
- User Manual (short version)

Image: All items included in the Technaxx TX-190 package.
Specyfikacje
| Funkcja | Wartość |
|---|---|
| Czujnik obrazu | CMOS 3 MP 1/3" |
| Obiektyw | F = 3.6 mm, Fixed Focus |
| Minimalne oświetlenie | Color mode: 1 lux; Night mode: 0.01 lux with 2 IR LEDs |
| Rozdzielczość wideo | Rozdzielczość HD (2304x1296) |
| Szybkość klatek | 15 klatek na sekundę |
| Format wideo | .TS |
| Wi-Fi | 2.4 GHz 802.11b / g / n |
| WiFi Security / Distance | WPA2 / max. 15 m |
| Max Radiated Output Power | 100 mW |
| Obsługa kart MicroSD | Up to 128 GB (FAT32/exFAT), Class 10 |
| PIR Motion Detection Distance / Angle | ~8 m (open space) / 120° |
| PIR Trigger Time | 0.2 sekunda |
| Power Consumption (Normal / Standby) | ≤ 2 W / ≤ 0.1 W |
| Ładowarka zewnętrzna | DC 5 V/1 A (brak w zestawie) |
| Bateria | Integrated 3.7 V, 3200 mAh Lithium Polymer |
| Czas działania | Up to 15 days (or up to 7 hours continuous recording) |
| Czas czuwania | Do 30 dni |
| Czas ładowania | Up to 5-7 hours (with DC 5 V/1 A adapter) |
| Weight / Dimensions (L x W x H) | 120 g / 6.6 x 4.8 x 4.8 cm |
| Zgodność aplikacji | Security Premium App: iOS 13.0+, Android 10.0+ |
| Numer modelu | 4989 |
| ASIN | B0BP883GYS |
Przewodnik po konfiguracji
1. Ładowanie aparatu
Before initial use, fully charge the camera's integrated 3200 mAh battery. Connect the provided USB power cable to the DC 5V port on the camera and to a 5V/1A USB power adapter (not included). The charging process can take up to 5-7 hours.
2. Wkładanie karty MicroSD
For local video storage, insert a MicroSD (HC/XC) card (up to 128GB, FAT32/exFAT, Class 10) into the TF Card slot. Ensure the camera is powered off before inserting or removing the card.

Obraz: Góra view of the camera, highlighting the TF Card slot, Reset button, and DC 5V port.
3. Instalacja aplikacji i utworzenie konta
Pobierz "Security Premium" app from your smartphone's app store (compatible with iOS 13.0+ and Android 10.0+). Follow the in-app instructions to create an account and register your device.
4. Łączenie z Wi-Fi
Power on the camera. Open the "Security Premium" app and follow the prompts to add a new device. The app will guide you through connecting the camera to your 2.4 GHz Wi-Fi network. Ensure your camera is within 15 meters of your Wi-Fi router for optimal connection.
5. Montaż kamery
The camera can be placed on a flat surface using the included tripod or mounted to a wall using the provided screws and dowels. Choose a location that provides the desired viewing angle (100° horizontal, 62° vertical) and is within range of your Wi-Fi network. The camera is designed for indoor use.

Image: Camera mounted on a wall, demonstrating installation flexibility.

Obraz: Inny view of the camera mounted, showing its discreet integration into a room.
Instrukcja obsługi
Na żywo View
Open the "Security Premium" app and select your TX-190 camera from the device list to access the live video feed. You can monitor your space in real-time.
Nagrywanie i odtwarzanie
The camera automatically records when motion is detected (PIR). Recordings are saved to the inserted MicroSD card. Use the app's playback function to review nagrano footage. The video resolution is 2304 x 1296 at 15 fps.
Wykrywanie ruchu (PIR)
The integrated PIR sensor detects motion up to approximately 8 meters with a 120° angle. When motion is detected, the camera will automatically begin recording and can send notifications to your smartphone via the app. Adjust sensitivity settings within the app if needed.
Wizja nocna
The camera features 2 infrared LEDs for night vision, which activate automatically in low-light conditions. This provides clear visibility up to approximately 5 meters in the dark.
Dwukierunkowy dźwięk
Utilize the built-in microphone and speaker for two-way communication through the app. This allows you to listen in on your environment and speak through the camera.
Konserwacja
Czyszczenie
Wipe the camera's exterior with a soft, dry cloth. Do not use liquid cleaners or aerosols, as they may damage the device. Keep the lens clean for optimal image quality.
Pielęgnacja baterii
To prolong battery life, avoid exposing the camera to extreme temperatures. Recharge the battery when the low battery indicator appears in the app. If storing the camera for an extended period, charge it to about 50% and recharge every few months.
Aktualizacje oprogramowania
Periodically check the "Security Premium" app for available firmware updates for your camera. Keeping the firmware updated ensures optimal performance and security.
Rozwiązywanie problemów
Kamera nie łączy się z siecią Wi-Fi
- Upewnij się, że Twoja sieć Wi-Fi obsługuje częstotliwość 2.4 GHz. Kamera nie obsługuje Wi-Fi 5 GHz.
- Sprawdź, czy hasło Wi-Fi jest poprawnie wprowadzone w aplikacji.
- Place the camera closer to your Wi-Fi router (within 15 meters).
- Uruchom ponownie router i kamerę.
- If connection issues persist, try resetting the camera using the RST button (requires a pin) and attempt the setup process again.
Password Change Loop During Setup
Some users have reported an issue where the app enters a loop when attempting to change the camera's password during initial setup. If you encounter this, try the following:
- Upewnij się, że aplikacja jest zaktualizowana do najnowszej wersji.
- Try a simpler password initially, then change it after successful setup if possible.
- Perform a factory reset on the camera using the RST button and retry the setup.
- If the issue persists, contact Technaxx customer support for further assistance.
No Recording or Playback Issues
- Check if a MicroSD card is properly inserted and formatted (FAT32/exFAT).
- Ensure the MicroSD card is not full. Back up important footagi sformatuj kartę, jeśli to konieczne.
- Verify that motion detection recording is enabled in the app settings.
Słaba jakość obrazu
- Oczyść obiektyw aparatu miękką szmatką.
- Ensure there is adequate lighting in the environment, especially during the day.
- Sprawdź siłę sygnału Wi-Fi. Słaby sygnał może mieć wpływ na jakość przesyłania strumieniowego.
Gwarancja i wsparcie
Technaxx products are designed for reliability and performance. This product comes with a standard manufacturer's warranty. Please refer to the warranty card included in your package or visit the official Technaxx webSzczegółowe warunki gwarancji można znaleźć na naszej stronie.
For technical support, troubleshooting assistance, or inquiries regarding your Technaxx Mini WiFi IP Camera TX-190, please contact Technaxx customer service. Contact details can typically be found on the official Technaxx webmiejscu lub w opakowaniu produktu.
Ask a question about this manual
Ask about setup, troubleshooting, compatibility, parts, safety, or missing instructions. Manuals+ will review the question and use this page’s manual context to help answer it.