Camco 48904-A
Camco Eaz-Lift TR3 Weight Distribution Hitch Kit User Manual
Modele: 48904-A
1. Wprowadzenie
This manual provides comprehensive instructions for the installation, operation, and maintenance of your Camco Eaz-Lift TR3 Weight Distribution Hitch Kit. The Eaz-Lift TR3 is designed to distribute the weight of your trailer across the axles of the tow vehicle, enhancing stability and control. It features an adjustable sway control mechanism to minimize trailer sway during towing. Proper installation and use are crucial for safe and effective performance.

Figure 1: Assembled Camco Eaz-Lift TR3 Weight Distribution Hitch Kit.
2. Informacje dotyczące bezpieczeństwa
Always prioritize safety when installing, operating, or maintaining your weight distribution hitch. Failure to follow these guidelines could result in serious injury or property damage.
- Read this entire manual before installation and use.
- Ensure your tow vehicle and trailer are rated for the combined weight and tongue weight capacity of this hitch. The 800lb TR3 kit has a maximum tongue weight rating of 1,000 lb. and a maximum gross trailer weight of 10,000 lb.
- Podczas montażu należy zawsze nosić odpowiedni sprzęt ochrony osobistej (PPE), w tym okulary ochronne i rękawice.
- Never exceed the weight ratings of any component of your towing system.
- Ensure all bolts, nuts, and pins are securely fastened before towing. Regularly inspect for wear and tear.
- Adjust sway control carefully. In dangerous or icy road conditions, the sway control can be turned off.
- Consult a qualified professional if you are unsure about any part of the installation or operation.
3. Lista komponentów
The Camco Eaz-Lift TR3 800lb Weight Distribution Hitch Kit includes the following main components:
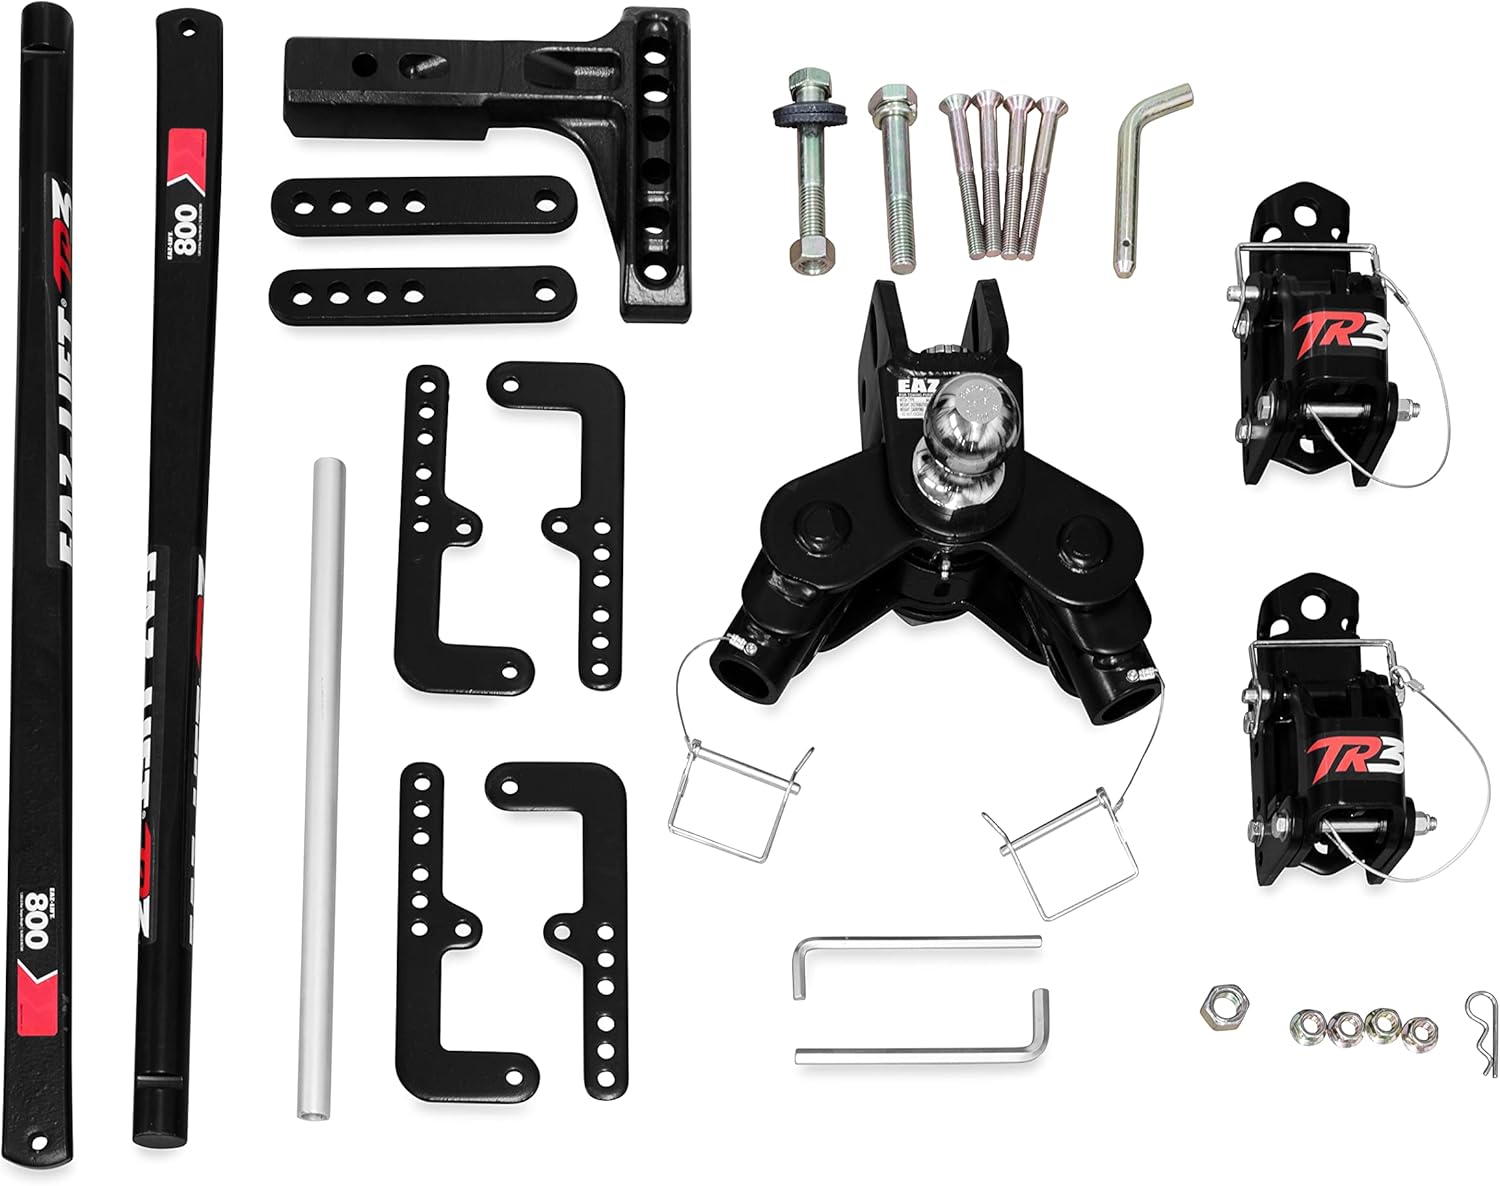
Rysunek 2: Wszystkie elementy w zestawie.
- Weight Distribution Hitch Head with Pre-Installed 2-5/16-inch Hitch Ball
- Sway Control Brackets (2)
- Spring Bars (2)
- Adjustable Shank
- Zestaw elementów montażowych (śruby, nakrętki, podkładki, kołki)
- Lift Handle/Bar
4. Konfiguracja i instalacja
Proper installation is critical for the performance and safety of your Eaz-Lift TR3 hitch. This hitch is designed for easy installation on top-mount or bottom-mount coupler style trailers.
4.1. Kroki przed instalacją
- Park the tow vehicle and trailer on a level surface.
- Ensure the trailer is level and at towing height.
- Measure the initial height of the front and rear of the tow vehicle's fender wells from the ground. Record these measurements.
4.2. Hitch Head and Shank Assembly
- Insert the adjustable shank into your tow vehicle's receiver hitch. Secure with a hitch pin.
- Attach the weight distribution hitch head to the adjustable shank. Adjust the height to ensure the trailer is level when connected.
- Secure the hitch head to the shank using the provided bolts and nuts. Torque to specifications (refer to the included printed manual for exact torque values).

Figure 3: Hitch head with pre-installed ball.
4.3. Spring Bar Installation
- Insert the spring bars into the receptacles on the hitch head. Ensure they are fully seated and secured with the retaining pins.

Figure 4: Spring bars connected to the hitch head.
4.4. Sway Control Bracket Installation
- Attach the sway control brackets to the trailer frame. Position them according to the instructions in your printed manual to ensure proper spring bar angle and tension.
- The sway control collar uses brake pad material for effective sway control. Adjust the clamp to control the amount of sway control exerted on the trailer.
- Use the lift handle to raise the spring bars and connect them to the sway control brackets. Secure with the provided pins.

Rysunek 5: Szczegółowy view of the adjustable sway control bracket.

Figure 6: Fully installed hitch on a trailer.
4.5. Final Adjustments and Measurements
- After connecting the spring bars, re-measure the height of the front and rear of the tow vehicle's fender wells. The goal is to return the vehicle to as close to its original unhitched height as possible, or slightly lower at the rear.
- Adjust the hitch head angle and spring bar tension as needed to achieve proper weight distribution.
- Ensure all pins are secured with clips and all bolts are tightened to their specified torque.
5. Instrukcja obsługi
The Eaz-Lift TR3 is designed for straightforward operation once installed. Its primary function is to distribute trailer tongue weight evenly across the tow vehicle's axles and provide adjustable sway control.
5.1. Connecting the Trailer
- Back the tow vehicle to the trailer and connect the trailer coupler to the hitch ball. Secure the coupler latch.
- Lower the trailer jack until the hitch ball is fully seated in the coupler.
- Insert the spring bars into the hitch head and secure them with the retaining pins.
- Use the lift handle to raise the spring bars and connect them to the sway control brackets on the trailer frame. Secure with the provided pins.
- Raise the trailer jack slightly to relieve tension, then remove it from the ground.
5.2. Adjusting Sway Control
The Eaz-Lift TR3 features adjustable sway control. The amount of sway control is determined by the tightness of the clamp on the sway control brackets. You can adjust this by tightening or loosening the bolts on the clamp.
- Increased Sway Control: Dokręć clamp bolts. This applies more friction, reducing trailer sway.
- Decreased Sway Control: Rozluźnij clamp bolts. This reduces friction, allowing more trailer movement.
- No Sway Control: In certain conditions, such as icy roads or sharp turns in tight spaces, you may wish to turn off the sway control completely. This can be done by fully loosening the clamp bolts or by removing the spring bars from the sway control brackets.
Always test the sway control setting in a safe environment before beginning your journey. The goal is to achieve a stable towing experience without excessive rigidity.
5.3. Disconnecting the Trailer
- Zaparkuj na równej powierzchni.
- Lower the trailer jack to take tension off the spring bars.
- Remove the pins securing the spring bars to the sway control brackets.
- Carefully remove the spring bars from the hitch head.
- Raise the trailer jack to lift the coupler off the hitch ball.
- Disconnect safety chains and electrical connections.
6. Konserwacja
Regular maintenance ensures the longevity and safe operation of your Eaz-Lift TR3 hitch.
- Kontrola: Before each trip, inspect all components for signs of wear, damage, cracks, or corrosion. Pay close attention to the hitch head, shank, spring bars, and sway control brackets.
- Smarowanie: Apply a thin coat of grease to the hitch ball and the pivot points of the spring bars where they connect to the hitch head. Do NOT lubricate the brake pad material on the sway control clamps, as this will reduce their effectiveness.
- Elementy złączne: Periodically check all bolts and nuts for tightness. Re-torque to factory specifications if necessary.
- Czyszczenie: Clean the hitch components as needed, especially after exposure to dirt, salt, or harsh weather conditions. A mild soap and water solution is usually sufficient. Dry thoroughly to prevent rust.
- Składowanie: When not in use, store the hitch in a dry, protected area to prevent corrosion.
7. Rozwiązywanie Problemów
This section addresses common issues you might encounter with your Eaz-Lift TR3 hitch.
| Problem | Możliwa przyczyna | Rozwiązanie |
|---|---|---|
| Excessive Trailer Sway | Insufficient sway control tension; improper weight distribution; overloaded trailer. | Increase tension on sway control clamps; re-adjust weight distribution; ensure trailer is not overloaded and load is balanced. |
| Difficulty Engaging/Disengaging Spring Bars | Too much tension; not using the lift handle correctly; hitch ball not fully seated. | Lower trailer jack to relieve tension before connecting/disconnecting; ensure hitch ball is fully seated; use the provided lift handle. |
| Hitch Noise (Creaking/Groaning) | Lack of lubrication at pivot points; normal operation. | Lubricate hitch ball and spring bar pivot points (do not lubricate sway control pads); some noise is normal with friction-based systems. |
| Tow Vehicle Sagging at Rear | Insufficient weight distribution; incorrect hitch head angle. | Adjust hitch head angle to apply more tension to spring bars; ensure spring bars are correctly rated for tongue weight. |
If you encounter issues not listed here or if solutions do not resolve the problem, contact Camco customer support or a qualified RV technician.
8. Specyfikacje
| Atrybut | Wartość |
|---|---|
| Marka | Kamco |
| Numer modelu | 48904-A |
| Maksymalna waga języka | 1,000 funtów |
| Maximum Gross Trailer Weight | 10,000 funtów |
| Pre-Installed Hitch Ball Size | 2-5/16 cala |
| Waga przedmiotu | 107 funtów |
| Wymiary produktu | 12 x 36 x 13 cala (przybliżone wymiary opakowania) |
| Tworzywo | Blend (Metal components, brake pad material) |
| Rodzaj wykończenia | Malowane proszkowo |
| UPC | 014717489041 |
9. Gwarancja i wsparcie
Camco products are manufactured with quality in mind. For specific warranty information, please refer to the warranty card included with your product or visit the official Camco website. For technical support, replacement parts, or further assistance, please contact Camco customer service.
Camco Customer Support: Refer to your product packaging or the official Camco webna tej stronie znajdziesz najbardziej aktualne dane kontaktowe.
Zasoby internetowe: Additional setup videos and FAQs may be available on the Camco website or authorized dealer channels.
Ask a question about this manual
Ask about setup, troubleshooting, compatibility, parts, safety, or missing instructions. Manuals+ will review the question and use this page’s manual context to help answer it.