
ThreeH H-AC60White
ThreeH Rotary Digital Timer with Clock (Model: H-AC60White) - User Manual
Szczegółowe instrukcje dotyczące konfiguracji, obsługi i konserwacji.
1. Wprowadzenie
Thank you for choosing the ThreeH Rotary Digital Timer. This versatile device is designed to assist with time management, offering preset timers, a customizable DIY timer, an alarm clock, and various reminder modes. Please read this manual carefully to ensure proper use and to maximize the benefits of your new timer.
2. Koniec produktuview
The ThreeH Rotary Digital Timer features a unique four-sided rotating design, allowing quick switching between modes. It includes an LED display, control buttons, and a battery compartment.
2.1 Składniki
- Wyświetlacz LED: Shows time, timer, and alarm settings.
- Rotation Sides: Labeled "CLOCK", "DIY", "5 min", and "25 min" for mode selection.
- Przyciski sterujące (góra): 'M' (Minute/Mode), 'S' (Second/Set), 'S/S' (Start/Stop/Power).
- Alarm Mode Switch (Back): Selects reminder type.
- Battery Compartment (Back): Holds AAA batteries.
2.2 Przewodnik wizualny

This image displays the timer from a front-angle view, highlighting its compact, square design and the central digital display. The labels "DIY", "CLOCK", "5 min", and "25 min" are visible on its four sides, indicating the different operational modes.
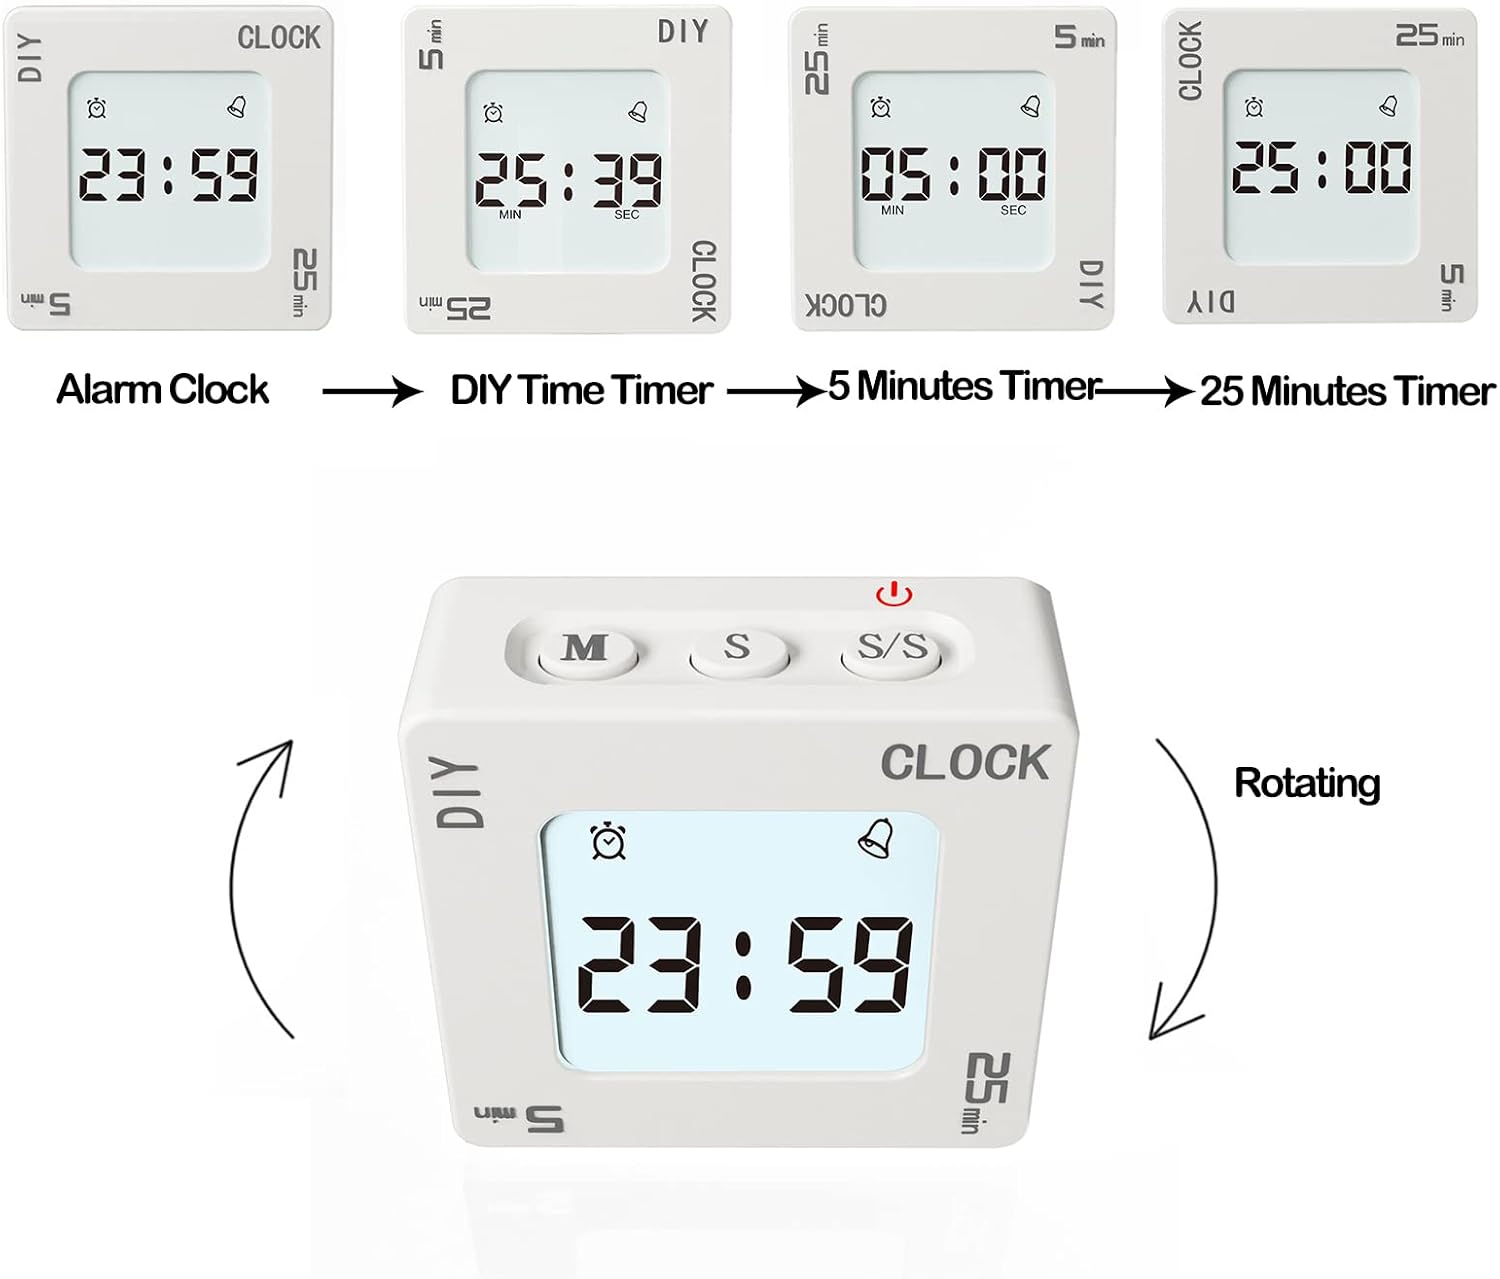
This diagram illustrates the four main modes of the timer: Alarm Clock, DIY Time Timer, 5 Minutes Timer, and 25 Minutes Timer. Arrows indicate the rotational movement required to switch between these modes, with the active mode displayed on the screen.
3. Konfiguracja
3.1 Instalacja baterii
- Znajdź komorę baterii z tyłu timera.
- Otwórz pokrywę komory baterii.
- Włóż dwie baterie AAA (nie ma ich w zestawie), zwracając uwagę na prawidłową biegunowość (+/-).
- Dokładnie zamknij pokrywę komory baterii.
The timer requires two AAA batteries for operation. Ensure they are inserted correctly to power on the device.
3.2 Włączanie/wyłączanie zasilania
- Włączanie: Press and hold the 'S/S' button. The display will light up.
- Aby wyłączyć: Press and hold the 'S/S' button. All settings will be saved.
4. Instrukcja obsługi
4.1 Wybór trybu
The timer has four main modes, selected by rotating the device so the desired mode label faces upwards:
- CLOCK Mode: Displays the current time and allows alarm setting.
- 5 min Mode: Activates a preset 5-minute countdown timer.
- 25 min Mode: Activates a preset 25-minute countdown timer.
- Tryb DIY: Allows setting a custom countdown or count-up timer.

This image shows various display configurations for the timer, including a 24-hour clock, a 12-hour clock with AM/PM indicator, an alarm setting, and a countdown timer. This illustrates the versatility of the display across different functions.
4.2 Setting Time and Alarm (CLOCK Mode)
- Rotate the timer to the "CLOCK" side.
- Naciśnij i przytrzymaj przycisk „M”, aby przejść do trybu ustawiania czasu. Cyfry godzin zaczną migać.
- Use the 'M' button to adjust hours and the 'S' button to adjust minutes.
- Press 'S/S' to confirm and exit time setting.
- To set the alarm, briefly press 'S' while in CLOCK mode. The alarm icon will appear.
- Press and hold 'M' to enter alarm setting mode. Adjust hours and minutes using 'M' and 'S'.
- Press 'S/S' to confirm and activate the alarm.
4.3 Using Preset Timers (5 min / 25 min Modes)
- Rotate the timer to either the "5 min" or "25 min" side. The display will show the preset time.
- Zacząć: Gently shake the timer or press the 'S/S' button. The countdown will begin.
- Pauzować: Gently shake the timer again or press the 'S/S' button.
- When the timer reaches zero, the selected alarm mode will activate.

This image demonstrates the interactive "shaking" function of the timer. It shows a hand gently shaking the device, indicating how to start or pause a timer without needing to press buttons, providing a quick and intuitive control method.
4.4 Using DIY Timer (DIY Mode)
- Rotate the timer to the "DIY" side.
- Press 'M' to set minutes and 'S' to set seconds for your custom timer.
- Zacząć: Gently shake the timer or press the 'S/S' button.
- Pauzować: Gently shake the timer again or press the 'S/S' button.
- The timer has a memory function; it will save your last DIY setting. To reset, press 'M' and 'S' simultaneously.
4.5 Funkcja drzemki
When an alarm sounds (either from the alarm clock or a timer), gently shake the timer to activate the snooze function. The snooze duration can be set from 5 to 60 minutes.

This image depicts the snooze alarm feature, showing a child in bed with the timer nearby. It highlights that the alarm function includes a snooze option, which can be set for 5 to 60 minutes, providing flexibility for waking up.
4.6 Tryby przypomnień
The timer offers four reminder modes, selectable via a switch on the back of the device. These modes allow you to customize how you are alerted when a timer or alarm finishes, suitable for various environments without disturbing others.
- Alarm + Vibration + Backlight Flashing: Full alert mode.
- Alarm + Backlight Flashing: Audible and visual alert.
- Vibration + Backlight Flashing: Silent and visual alert.
- Backlight Flashing Only: Discreet visual alert.

Na tym obrazie przedstawiono szczegółowo view of the back of the timer, specifically highlighting the four-position switch used to select different alarm modes. Each position corresponds to a unique combination of vibration, sound, and light alerts, allowing users to choose the most suitable notification method.
5. Konserwacja
- Clean the timer with a soft, dry cloth. Do not use abrasive cleaners or immerse in water.
- Unikaj upuszczania urządzenia i narażania go na działanie ekstremalnych temperatur.
- If the timer will not be used for an extended period, remove the batteries to prevent leakage.
6. Rozwiązywanie Problemów
| Problem | Możliwa przyczyna | Rozwiązanie |
|---|---|---|
| Timer się nie włącza. | Baterie są rozładowane lub nieprawidłowo włożone. | Wymień baterie na nowe baterie AAA, zwracając uwagę na prawidłową biegunowość. |
| Wyświetlacz jest przyciemniony lub migocze. | Niski poziom naładowania baterii. | Wymień baterie. |
| Timer does not start/pause with shaking. | Insufficient shaking motion or internal sensor issue. | Ensure a clear, gentle shake. Try using the 'S/S' button to start/pause. |
| Alarm nie włącza się. | Alarm mode set to silent (vibration or light only). | Check the alarm mode switch on the back and select an audible option. |
7. Specyfikacje
- Marka: TrzyH
- Model: H-AC60White
- Kolor: Biały
- Wymiary produktu: 6 x 3 x 7 cm (approximately 60P x 30l x 70H mm)
- Tworzywo: Plastikowy
- Waga przedmiotu: 82 gramów
- Źródło zasilania: Baterie 2 x AAA (brak w zestawie)
- Preset Timers: 5 minut, 25 minut
- Czas drzemki: 5-60 minut (regulowane)
- Tryby przypomnień: Alarm+Vibration+Backlight, Alarm+Backlight, Vibration+Backlight, Backlight Only
8. Gwarancja i wsparcie
For warranty information or technical support, please refer to the documentation included with your purchase or contact ThreeH customer service through their official websklep lub sklep, w którym zakupiono produkt. Zachowaj paragon na wypadek reklamacji.
Aby uzyskać więcej informacji, odwiedź stronę ThreeH Store on Amazon.
Powiązane dokumenty - H-AC60White
 |
Instrukcja obsługi radia z budzikiem FM ThreeH Kompleksowa instrukcja obsługi budzika radiowego ThreeH FM, szczegółowo opisująca funkcje, konfigurację, ustawienia, funkcje alarmu, obsługę radia, wyłącznik czasowy, regulację jasności, ładowanie, przywracanie ustawień fabrycznych i środki ostrożności. |
 |
Instrukcja obsługi cyfrowego termometru do mięsa Instrukcje i przydatne wskazówki dotyczące korzystania z cyfrowego termometru do mięsa, w tym dotyczące temperatur gotowania różnych mięs. |
 |
Instrukcja obsługi zegara biurkowego cyfrowego ThreeH H-AC11 Instrukcja obsługi cyfrowego zegara biurkowego ThreeH H-AC11, obejmująca tryby wyświetlania, ustawienia czasu/daty/alarmu, jasność, zasilanie i funkcje resetowania. |
 |
Instrukcja obsługi cyfrowego budzika projekcyjnego ThreeH HAC54 Instrukcja obsługi cyfrowego budzika projekcyjnego ThreeH HAC54 zawiera szczegółowe informacje na temat funkcji, konfiguracji, ustawień czasu i alarmu, obsługi radia FM, wyłącznika czasowego, korzystania z projektora, regulacji jasności, ładowania, przywracania ustawień fabrycznych i środków ostrożności. |
 |
Instrukcja obsługi cyfrowego budzika projekcyjnego ThreeH EN8827 – Przewodnik po konfiguracji i obsłudze Kompleksowa instrukcja obsługi cyfrowego budzika projekcyjnego ThreeH EN8827. Dowiedz się, jak ustawić godzinę, alarmy, radio, projekcję oraz korzystać z funkcji takich jak automatyczne przyciemnianie i tryb nocny. |
 |
Instrukcja obsługi budzika cyfrowego z projekcją EN8827A-RGB Kompleksowa instrukcja obsługi budzika cyfrowego z projektorem EN8827A-RGB, zawierająca szczegółowe informacje na temat konfiguracji, funkcji, ustawień alarmu, projekcji, kontroli jasności i konserwacji. |
Ask a question about this manual
Ask about setup, troubleshooting, compatibility, parts, safety, or missing instructions. Manuals+ will review the question and use this page’s manual context to help answer it.