
1. Ważne informacje dotyczące bezpieczeństwa
Zawsze należy przeczytać i zrozumieć wszystkie ostrzeżenia dotyczące bezpieczeństwa, instrukcje, ilustracje i specyfikacje dołączone do tego elektronarzędzia. Nieprzestrzeganie wszystkich poniższych instrukcji może spowodować porażenie prądem, pożar i/lub poważne obrażenia.
- Bezpieczeństwo w miejscu pracy: Utrzymuj miejsce pracy w czystości i dobrym oświetleniu. Zagracone lub ciemne pomieszczenia sprzyjają wypadkom. Nie używaj elektronarzędzi w atmosferach wybuchowych, takich jak obecność łatwopalnych cieczy, gazów lub pyłów. Elektronarzędzia wytwarzają iskry, które mogą zapalić pył lub opary.
- Bezpieczeństwo elektryczne: Wtyczki elektronarzędzi muszą pasować do gniazdka. Nigdy nie modyfikuj wtyczki w żaden sposób. Nie używaj przewodu zbyt intensywnie. Nigdy nie używaj przewodu do przenoszenia, ciągnięcia ani odłączania elektronarzędzia. Trzymaj przewód z dala od źródeł ciepła, oleju, ostrych krawędzi i ruchomych części.
- Bezpieczeństwo osobiste: Stay alert, watch what you are doing, and use common sense when operating a power tool. Do not use a power tool while you are tired or under the influence of drugs, alcohol, or medication. Always wear eye protection. Use safety glasses, goggles, or a face shield.
- Używanie i konserwacja narzędzia: Nie używaj elektronarzędzia na siłę. Używaj elektronarzędzia odpowiedniego do danego zastosowania. Prawidłowe elektronarzędzie wykona pracę lepiej i bezpieczniej, z szybkością, do której zostało zaprojektowane. Przed dokonaniem jakichkolwiek regulacji, wymianą akcesoriów lub przechowywaniem elektronarzędzia odłącz wtyczkę od źródła zasilania i/lub wyjmij akumulator (jeśli jest odłączalny).
- Użytkowanie i konserwacja akumulatora: Ładuj tylko za pomocą ładowarki określonej przez producenta. Ładowarka odpowiednia dla jednego typu akumulatora może stwarzać ryzyko pożaru, jeśli będzie używana z innym akumulatorem. Elektronarzędzi należy używać wyłącznie ze specjalnie przeznaczonymi akumulatorami.
2. Zawartość opakowania
Ostrożnie rozpakuj wszystkie przedmioty i upewnij się, że otrzymałeś następujące rzeczy:
- BATAVIA Cordless Drill (BT-CTD001)
- 20V MAX 2.0Ah Lithium-Ion Battery
- Ładowarka 2.4A
- Instrukcja obsługi

Image: The BATAVIA Cordless Drill, including the main unit, a 20V MAX 2.0Ah Lithium-Ion battery, and a 2.4A battery charger.
3. Koniec produktuview
Familiarize yourself with the components of your BATAVIA Cordless Drill:
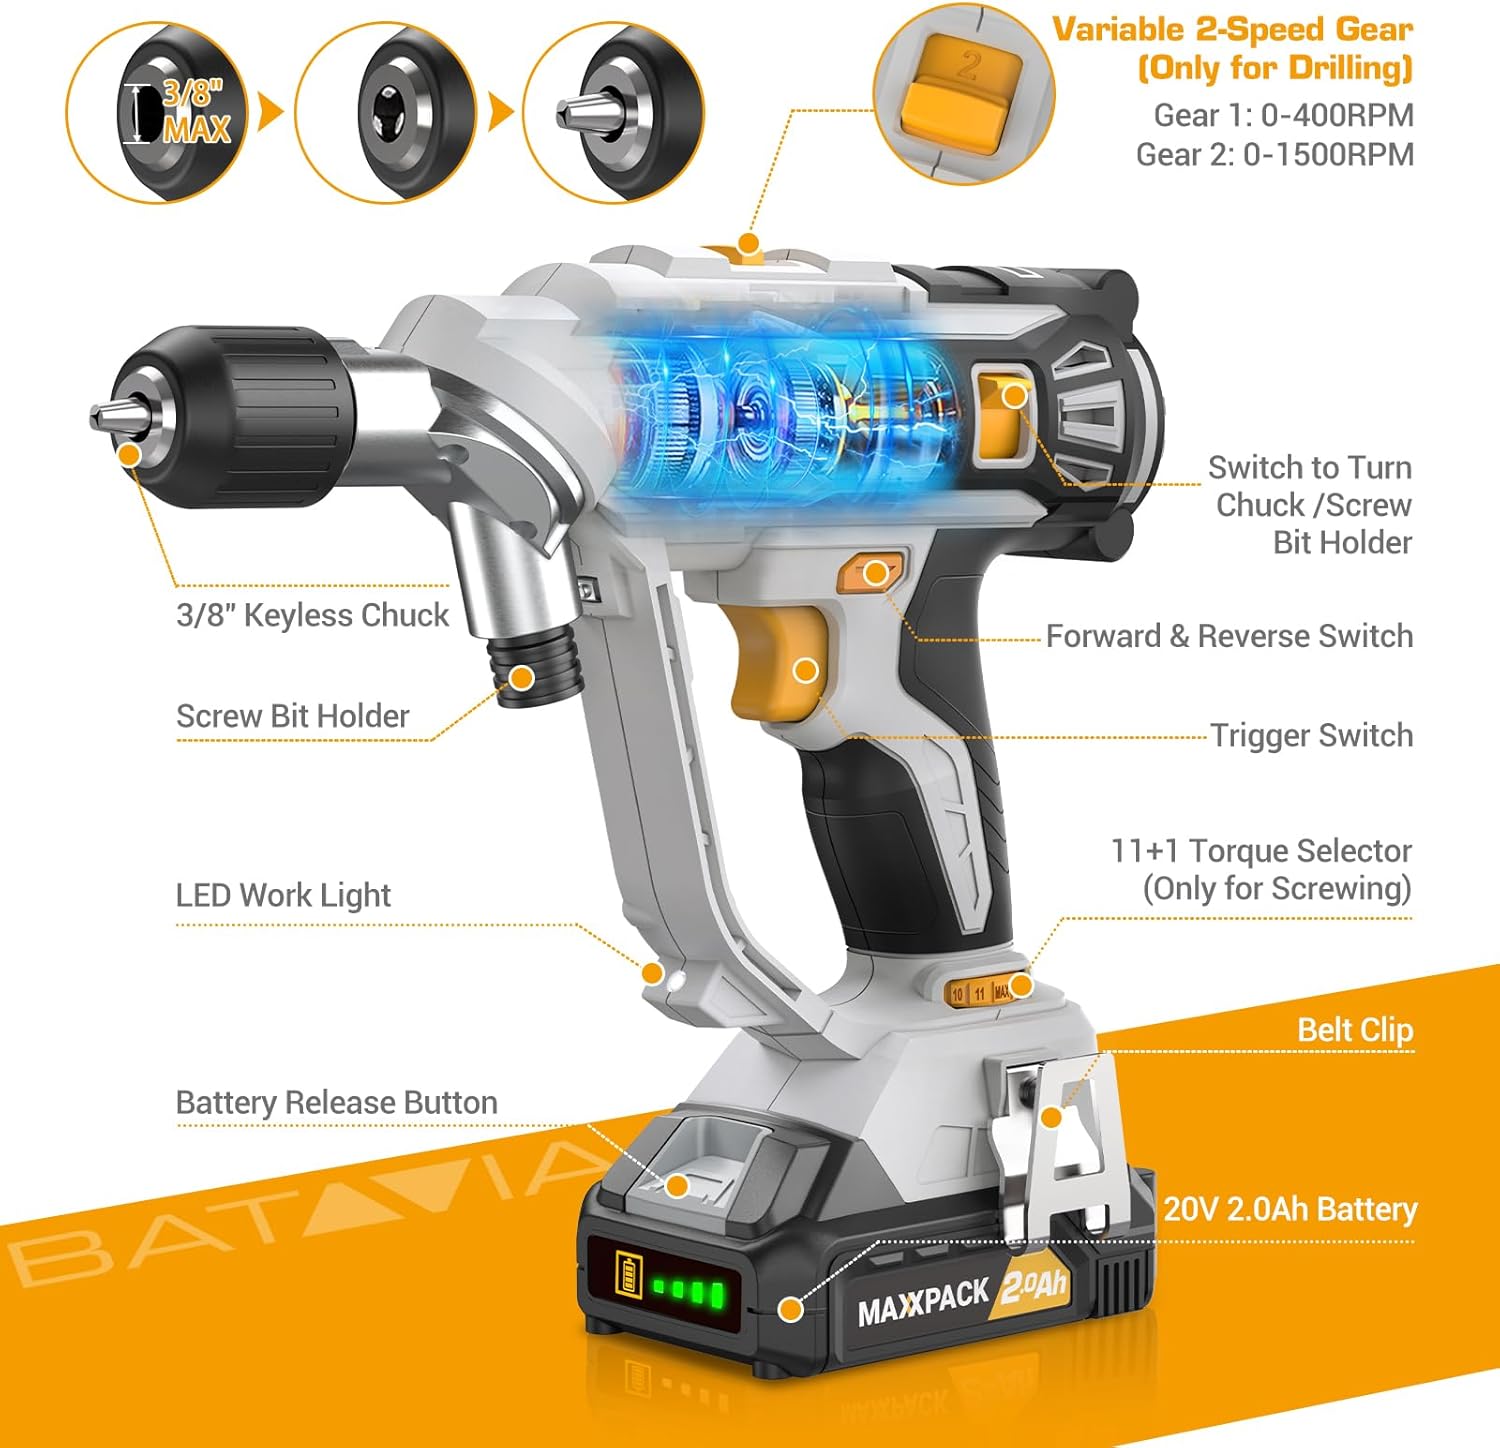
Image: A detailed diagram highlighting key components of the BATAVIA Cordless Drill, including the 3/8" Keyless Chuck, Screw Bit Holder, LED Work Light, Battery Release Button, 20V 2.0Ah Battery, Belt Clip, 11+1 Torque Selector, Trigger Switch, Forward & Reverse Switch, and Variable 2-Speed Gear switch.
- Dual Rotating Chucks: Features both a 3/8" keyless chuck for drilling and a 1/4" hex chuck for driving, allowing quick transitions between tasks.
- 11+1 ustawień momentu obrotowego: Provides precise control for various applications and materials.
- 2 zmiennych prędkości: Offers two speed ranges (0-400 RPM and 0-1500 RPM) for optimal performance in different drilling and driving scenarios.
- Automatic LED Work Light: Oświetla miejsce pracy, zapewniając lepszą widoczność w warunkach słabego oświetlenia.
- Sprzączka: Conveniently attaches the drill to your belt for easy access.
4. Konfiguracja
4.1 Ładowanie akumulatora
- Ensure the battery is securely inserted into the 2.4A battery charger.
- Plug the charger into a standard 120V AC electrical outlet.
- The indicator lights on the charger will show the charging status. A full charge typically takes less time due to the 2.4A charger.
- Once fully charged, disconnect the charger from the outlet and remove the battery.
4.2 Instalowanie/wyjmowanie akumulatora
- To install: Align the battery with the base of the drill handle and slide it in until it clicks securely into place.
- To remove: Press the battery release button located on the front of the battery pack and slide the battery out.
4.3 Using the Dual Rotating Chucks
This drill features a unique dual rotating chuck system for quick changes between drilling and driving tasks.

Image: The BATAVIA Cordless Drill demonstrating its dual rotating chuck feature, allowing users to switch between a drill bit and a screwdriver bit by rotating the chuck assembly.
- For Drilling (3/8" Keyless Chuck): Rotate the front section of the drill head to expose the 3/8" keyless chuck. Insert the drill bit and tighten the chuck by hand until the bit is secure.
- For Driving (1/4" Hex Chuck): Rotate the front section of the drill head to expose the 1/4" hex chuck. Insert the screwdriver bit directly into the hex opening until it locks into place.
5. Instrukcja obsługi
5.1 Setting Torque (11+1 Settings)
The torque selector ring allows you to adjust the amount of rotational force the drill applies. This is crucial for preventing overtightening screws or damaging materials.

Image: The BATAVIA Cordless Drill highlighting its 11+1 torque settings, with recommendations for low settings for small screws/soft materials and high settings for large screws/hard materials.
- Rotate the torque selector ring to choose a setting from 1 to 11. Lower numbers are for smaller screws or softer materials, while higher numbers are for larger screws or harder materials.
- The 'Drill' symbol (often indicated as 'MAX' or a drill icon) bypasses the clutch for maximum torque, suitable for drilling applications.
5.2 Selecting Speed (2 Variable Speeds)
The drill features a 2-speed gearbox to match the speed to the application.

Image: The BATAVIA Cordless Drill showing its adjustable variable 2-speed gear selector. Gear 1 (0-400 RPM) is recommended for large diameter drilling, and Gear 2 (0-1500 RPM) for small diameter drilling.
- Gear 1 (0-400 RPM): Use for high-torque applications, such as driving large screws or drilling large holes in tough materials.
- Gear 2 (0-1500 RPM): Use for high-speed applications, such as drilling small holes or driving small screws quickly.
- The trigger switch provides variable speed control within the selected gear range. Pressing the trigger further increases the speed.
5.3 Przełącznik przód/tył
The forward/reverse switch is located above the trigger. It controls the direction of rotation.
- Przesuń przełącznik w lewo, aby włączyć obroty do przodu (do wiercenia i wkręcania śrub).
- Push the switch to the right for reverse rotation (for removing screws or backing out drill bits).
- Gdy przełącznik znajduje się w pozycji środkowej, spust jest zablokowany, co zapobiega przypadkowemu uruchomieniu.
5.4 Automatic LED Work Light
Wbudowana dioda LED włącza się automatycznie po naciśnięciu spustu, zapewniając widoczność w słabo oświetlonych miejscach pracy.
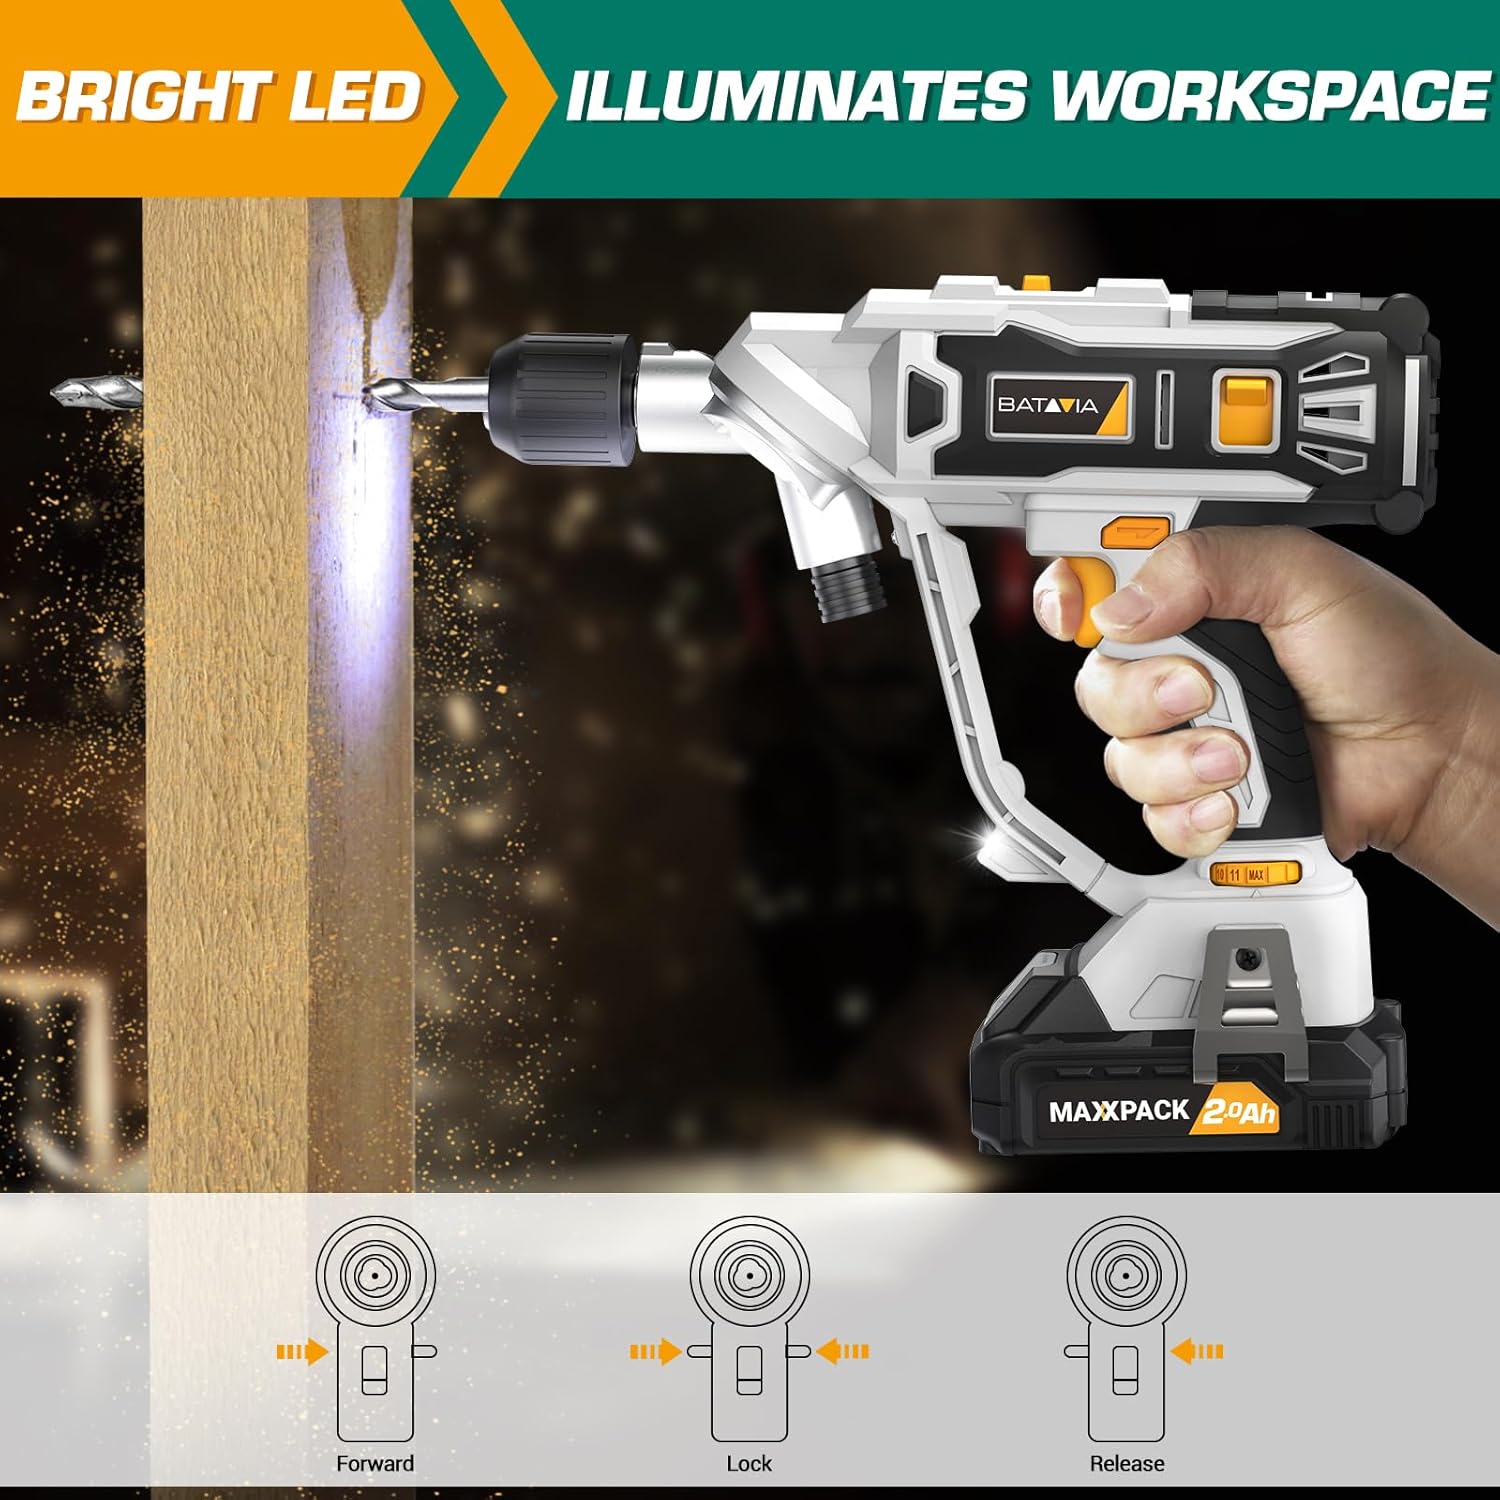
Image: The BATAVIA Cordless Drill in use, with its bright LED light illuminating the work surface, demonstrating its utility in dark or confined spaces.
6. Konserwacja
Regularna konserwacja zapewnia długowieczność i optymalną wydajność wiertarki.
- Czyszczenie: Po każdym użyciu należy przetrzeć wiertło czystą,amp Ściereczką. Nie używaj silnych środków chemicznych ani ściernych środków czyszczących. Utrzymuj otwory wentylacyjne w czystości, bez kurzu i zanieczyszczeń.
- Składowanie: Store the drill, battery, and charger in a cool, dry place, away from direct sunlight and extreme temperatures. Ensure the battery is removed from the drill before storage.
- Pielęgnacja baterii: Nie przechowuj baterii w stanie rozładowanym. Ładuj je okresowo, jeśli nie są używane przez dłuższy czas.
7. Rozwiązywanie Problemów
If you encounter issues with your BATAVIA Cordless Drill, refer to the following common problems and solutions:
| Problem | Możliwa przyczyna | Rozwiązanie |
|---|---|---|
| Wiercenie nie rozpoczyna się. | Battery not charged or not properly inserted. Forward/Reverse switch in locked (center) position. | Ensure battery is fully charged and securely inserted. Move Forward/Reverse switch to forward or reverse position. |
| Akumulator się nie ładuje. | Ładowarka nie jest podłączona. Uszkodzony akumulator lub ładowarka. | Check power outlet and charger connection. If problem persists, contact customer support. |
| Drill lacks power or stops during use. | Niski poziom naładowania baterii. Zadziałało zabezpieczenie przed przeciążeniem. | Recharge battery. Reduce pressure on the drill or use a lower speed setting for tough materials. |
| Uchwyt nie trzyma pewnie wiertła. | Bit not inserted deep enough. Chuck not tightened properly. | Ensure bit shank is fully inserted into the chuck. Tighten the keyless chuck firmly by hand. |
8. Specyfikacje
| Funkcja | Specyfikacja |
|---|---|
| Numer modelu | BT-CTD001 |
| Marka | Batawia |
| Źródło zasilania | Zasilany bateryjnie |
| Typ baterii | 20V MAX 2.0Ah Lithium-Ion |
| Rumak Ampwymazać | 2.4 Amps |
| Maksymalna prędkość obrotowa | 1500 obr./min. |
| Liczba prędkości | 2 (0-400 RPM & 0-1500 RPM) |
| Ustawienia momentu obrotowego | 11+1 |
| Maksymalny rozmiar uchwytu | 3/8 Inches (Keyless Chuck) |
| Tworzywo | PA6-GF30 |
| Wymiary produktu (dł. x szer. x wys.) | 8.07" x 3.34" x 14.5" |
| Waga przedmiotu | 5.28 funta |
| Cechy specjalne | Adjustable Torque, Built-In LED Working Light, Compact, Cordless, Variable Speed |
| Certyfikaty | Certyfikowany przez ETL |
9. Gwarancja i wsparcie
BATAVIA products are designed and manufactured to the highest quality standards. This product is ETL certified, ensuring product quality and safety.
For any questions, technical assistance, or warranty claims, please contact BATAVIA customer service:
- Telefon: (+1) 866-272-5789
- Operating Hours (EDT): 10am - 7pm
- Operating Hours (PDT): 7am - 4pm
Please have your model number (BT-CTD001) and purchase information ready when contacting support.