1. Wprowadzenie
Dziękujemy za zakupasing the Ysametp 5G WiFi Bluetooth Projector. This device is designed to provide a high-quality home theater experience with its native 1080p Full HD resolution, 4K support, and integrated Android system. Please read this manual thoroughly before using the projector to ensure proper operation and to maximize its lifespan.
2. Informacje dotyczące bezpieczeństwa
Aby zapobiec uszkodzeniu projektora i zapewnić bezpieczeństwo użytkownika, należy przestrzegać następujących środków ostrożności:
- Zasilanie: Używaj wyłącznie określonego zasilacza. Upewnij się, że gniazdko elektryczne ma odpowiednią głośność.tagodpowiada wymaganiom projektora.
- Wentylacja: Nie blokuj otworów wentylacyjnych. Zapewnij odpowiedni przepływ powietrza wokół projektora, aby zapobiec przegrzaniu.
- Umieszczenie: Ustaw projektor na stabilnej, równej powierzchni. Unikaj umieszczania go w bezpośrednim świetle słonecznym, w pobliżu źródeł ciepła oraz w środowiskach o dużej wilgotności i zapyleniu.
- Czyszczenie: Przed czyszczeniem odłącz zasilanie. Użyj miękkiej, suchej ściereczki. Nie używaj środków czyszczących w płynie ani aerozolu.
- Ochrona oczu: Nie patrz bezpośrednio w obiektyw projektora, gdyamp jest włączony, ponieważ jasne światło może uszkodzić wzrok.
- Remont: Nie próbuj samodzielnie naprawiać projektora. Wszelkie naprawy zlecaj wykwalifikowanemu personelowi.
3. Zawartość opakowania
Sprawdź, czy w opakowaniu znajdują się wszystkie elementy:
- Ysametp 5G WiFi Bluetooth Projector (Model DE-M8-E-An)
- Zdalne sterowanie
- Power Cable (AC 220V with Schuko plug)
- Kabel HDMI
- Instrukcja obsługi
4. Koniec produktuview
Zapoznaj się z podzespołami i interfejsami projektora.
4.1 Przód View

Obraz: Przód view of the Ysametp Projector, highlighting the projection lens and side ventilation grilles.
4.2 Rear and Side Interfaces
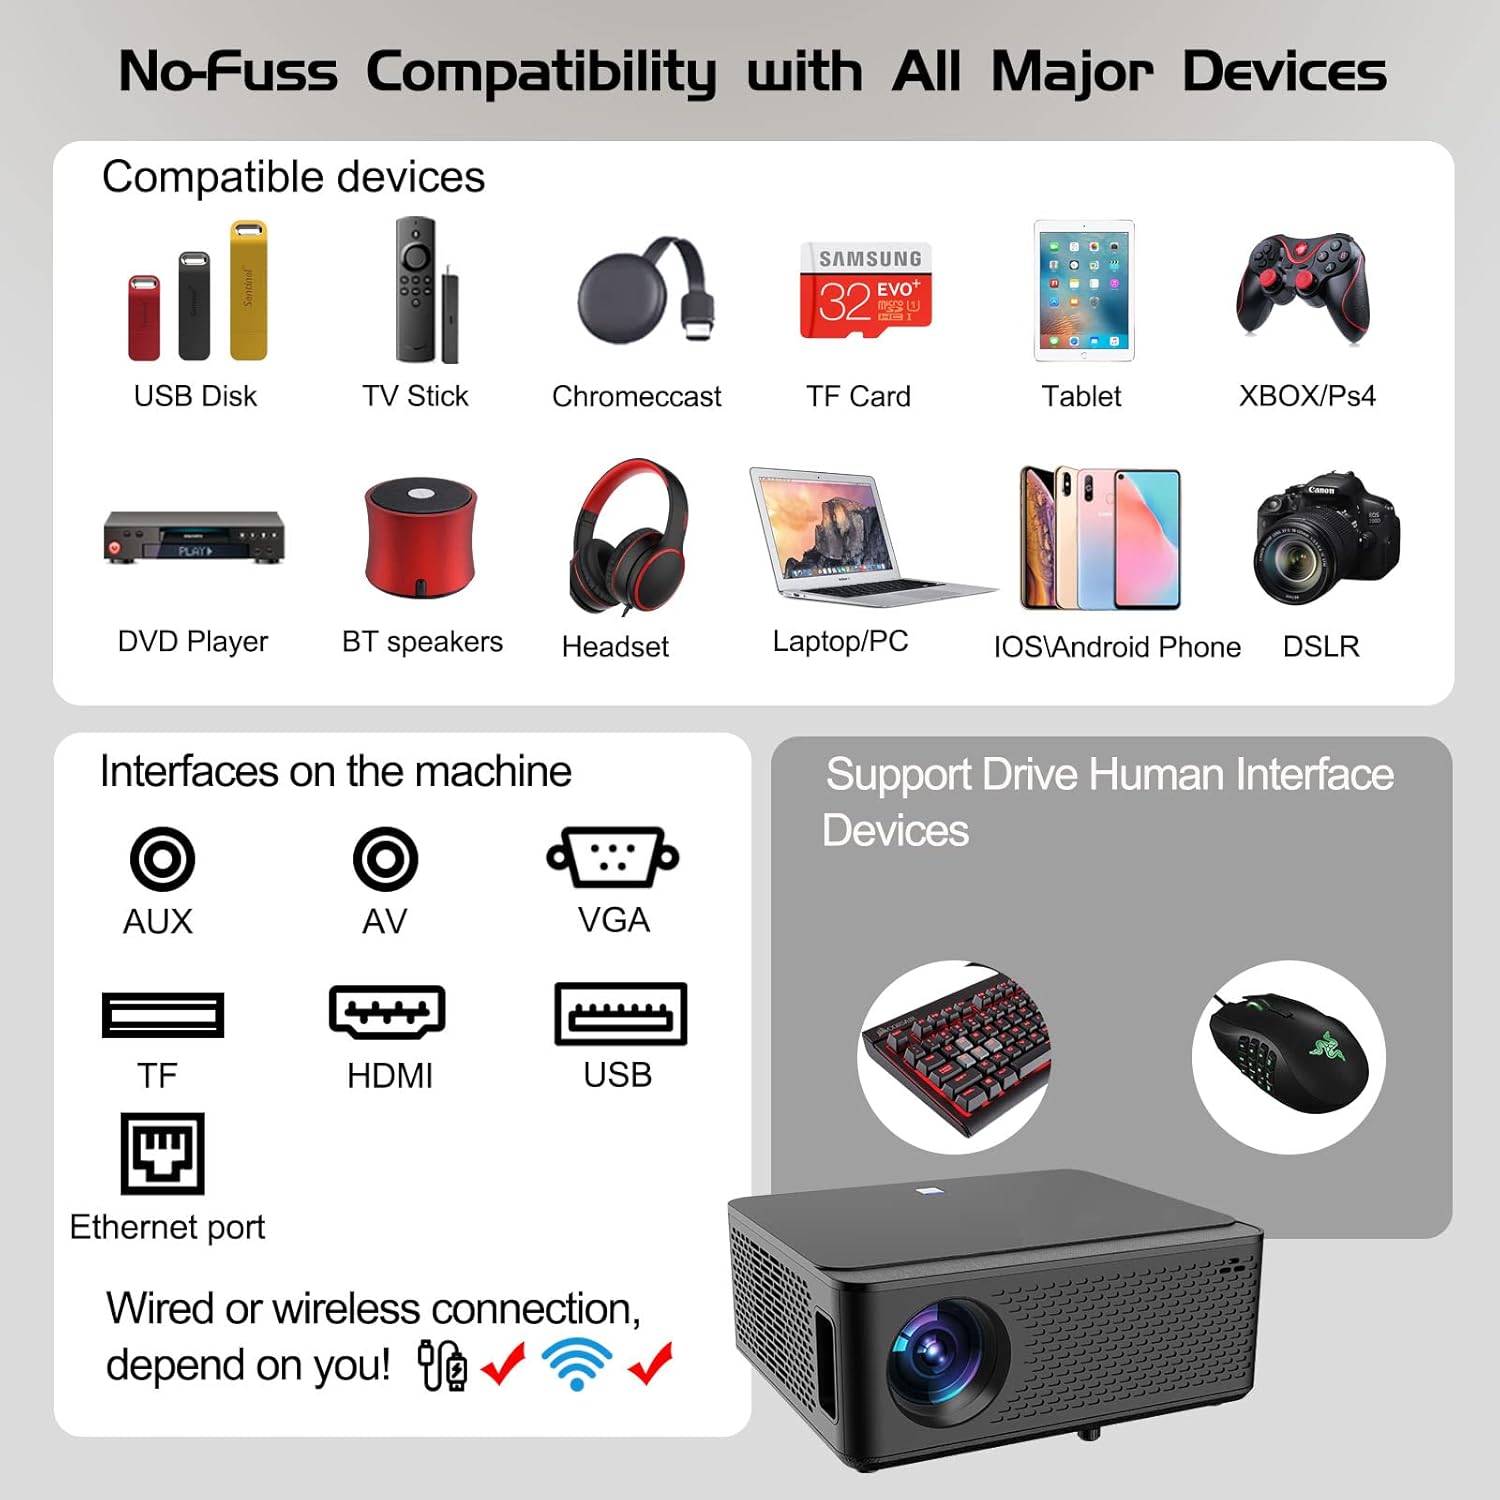
Image: Diagram illustrating the various input and output ports available on the Ysametp Projector, including USB, HDMI, AV, VGA, TF card slot, and Ethernet port.
The projector features a comprehensive set of ports for versatile connectivity:
- Port Ethernet: Do przewodowego połączenia internetowego.
- Port VGA: Do łączenia ze starszymi komputerami.
- Port USB-A: For connecting USB flash drives or external devices.
- Port HDMI: For high-definition audio and video input from various sources.
- Wejście AV: For connecting analog audio/video devices.
- Wyjście audio 3.5 mm: Do podłączenia zewnętrznych głośników lub słuchawek.
- Gniazdo karty TF: For reading media from Micro SD cards.
- Pobór mocy: Do podłączenia kabla zasilającego prądem zmiennym.
4.3 Najważniejsze elementy sterujące
The top of the projector includes a power button for basic on/off functionality. Further controls are available via the remote control and the on-screen display.
4.4 Regulacja ostrości
A mechanical focus adjustment screw is located on the side of the lens for manual image clarity control.
5. Konfiguracja
5.1 Umieszczenie
Position the projector on a stable surface. The projection distance will determine the screen size. For optimal viewUpewnij się, że projektor jest ustawiony prostopadle do powierzchni projekcyjnej.
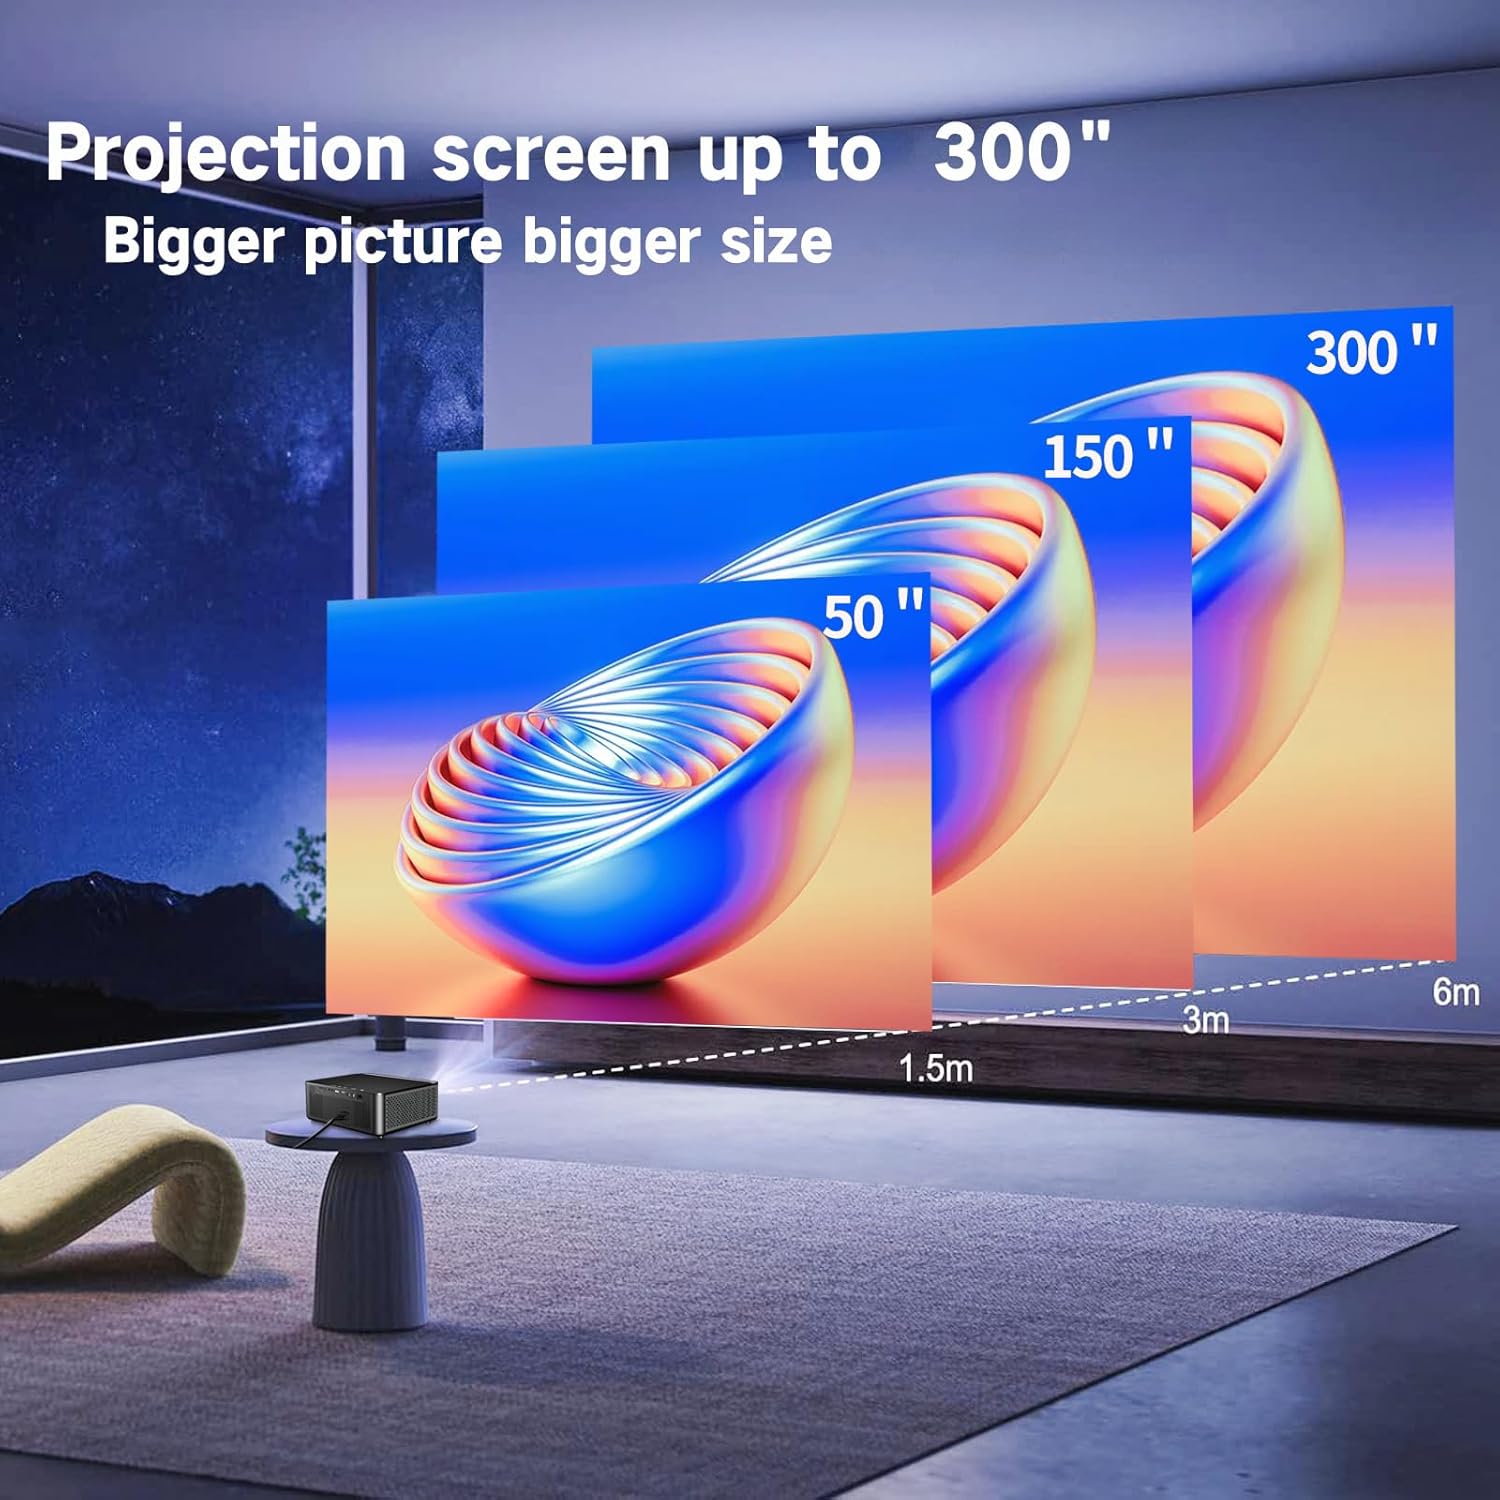
Image: Illustration demonstrating recommended projection distances for achieving screen sizes of 50, 150, and 300 inches.
5.2 Połączenie zasilania
- Podłącz kabel zasilający do wejścia zasilania projektora.
- Podłącz drugi koniec kabla zasilającego do odpowiedniego gniazdka elektrycznego.
5.3 Pierwsze włączenie zasilania
- Naciśnij przycisk zasilania na projektorze lub pilocie, aby włączyć urządzenie.
- Allow a few moments for the projector to boot up.
5.4 Korekcja ostrości i zniekształceń trapezowych
After powering on, adjust the image for clarity and proper geometry:
- Centrum: Rotate the mechanical focus adjustment screw near the lens until the image appears sharp and clear.
- Korekcja Keystone'a: If the projected image is trapezoidal (wider at the top or bottom), use the 4D keystone correction feature via the on-screen menu to adjust the image corners until it forms a perfect rectangle.

Image: Diagram showing how 4P/4D keystone correction can be used to adjust the corners of a projected image to achieve a rectangular shape.
6. Instrukcja obsługi
6.1 Podłączanie urządzeń zewnętrznych
The projector supports various connection methods:
- HDMI: Connect gaming consoles (PS4, Xbox), laptops, or other HDMI-enabled devices using an HDMI cable.
- USB: Insert a USB flash drive into the USB-A port to play media files bezpośrednio.
- Karta TF: Insert a Micro SD (TF) card into the TF card slot to access media.
- VGA/AV: Use these ports for older devices requiring analog connections.
- Bluetooth: Pair Bluetooth speakers or headphones for enhanced audio.

Image: The projector shown with various compatible devices, including laptops, smartphones, gaming consoles, USB drives, and external speakers, demonstrating its versatile connectivity.
6.2 Using the Integrated Android System
The projector comes with an integrated Android system, allowing access to a wide range of applications.

Image: The projector displaying its Android interface, featuring icons for popular streaming services and apps such as Netflix, YouTube, Prime Video, Hulu, Spotify, and TikTok.
- Połączenie internetowe: Connect the projector to your home Wi-Fi network via the settings menu or use an Ethernet cable for a wired connection.
- Dostęp do aplikacji: Navigate the Android interface using the remote control. You can download and install applications from the Google Play Store.
- Transmisja strumieniowa: Enjoy content from pre-installed or downloaded streaming services.
6.3 5G WiFi Screen Mirroring
Mirror your smartphone, tablet, or PC screen wirelessly to the projector.

Image: A family enjoying content mirrored from a smartphone onto the large projected screen, illustrating the 5G WiFi Screen Mirroring feature for iOS, Android, and Windows devices.
- Upewnij się, że zarówno projektor, jak i urządzenie są podłączone do tej samej sieci WiFi 5G.
- Select the "Screen Mirroring" option on the projector's menu.
- On your smartphone/tablet/PC, activate its screen mirroring function (e.g., "Smart View" for Android, "AirPlay" for iOS, "Cast" for Windows).
- Aby nawiązać połączenie, wybierz projektor z listy dostępnych urządzeń.
7. Konserwacja
7.1 Czyszczenie obiektywu
Delikatnie przetrzyj obiektyw projektora miękką, niepozostawiającą włókien ściereczką przeznaczoną specjalnie do powierzchni optycznych. Nie używaj środków ściernych ani nadmiernej siły.
7.2 Czyszczenie obudowy projektora
Use a soft, dry cloth to clean the exterior of the projector. Avoid using harsh chemicals or solvents.
7.3 Optical Engine Protection
The projector features a full-sealed optical engine designed to prevent dust from entering the internal components, reducing the need for frequent internal cleaning and extending the device's lifespan.

Obraz: Wnętrze view diagram of the projector's full-sealed optical engine, highlighting its design to prevent dust from entering and affecting performance.
7.4 Łamp Życie
The projector utilizes advanced SmarEco technology to minimize energy consumption and extend the lamp's lifespan up to 60,000 hours, providing long-term reliability.

Obraz: Szczegółowy diagram pokazującyasing the projector's lamp technology, indicating a lifespan of over 30,000 hours.
8. Rozwiązywanie Problemów
Jeśli masz problemy z projektorem, zapoznaj się z poniższymi typowymi problemami i ich rozwiązaniami:
| Problem | Możliwa przyczyna | Rozwiązanie |
|---|---|---|
| Brak obrazu na ekranie. | Power cable loose; incorrect input source; device not connected. | Check power connections. Select correct input source (HDMI, AV, etc.). Ensure external device is powered on and connected properly. |
| Obraz jest rozmazany. | Focus not adjusted; projector too far/close. | Adjust the focus ring on the lens. Ensure projector is within optimal projection distance. |
| Obraz ma kształt trapezu. | Projektor nie jest ustawiony prostopadle do ekranu. | Use the 4D keystone correction feature in the settings menu to adjust the image shape. |
| Brak dźwięku. | Zbyt niski poziom głośności; zewnętrzne urządzenie audio nie jest podłączone; wybrano nieprawidłowe wyjście audio. | Increase volume. Check external speaker/headphone connection. Ensure correct audio output is selected in settings. |
| Nie można połączyć się z siecią Wi-Fi. | Nieprawidłowe hasło; poza zasięgiem; problem z siecią. | Zweryfikuj hasło Wi-Fi. Przesuń projektor bliżej routera. Uruchom ponownie router i projektor. |
9. Specyfikacje
Key technical specifications for the Ysametp 5G WiFi Bluetooth Projector (Model DE-M8-E-An):
- Marka: Ysametp
- Numer modelu: DE-M8-E-An
- Kolor: Czarny
- Typ produktu: Projektor przenośny
- Technologia łączności: HDMI, USB, Wi-Fi (5G), Bluetooth
- Cechy szczególne: Integrated WiFi, Android System, 4D Keystone Correction
- Zgodne urządzenia: Game Consoles, Speakers, Laptops, Smartphones, Tablets
- Rozdzielczość wyświetlacza: Natywna rozdzielczość 1920 x 1080 (Full HD)
- Maksymalna rozdzielczość wyświetlania: 4096 x 2160 (obsługa 4K)
- Typ wyświetlacza: DLP
- Wymiary produktu: 26Dł. x 23Sz. x 11Wys. centymetrów
- Współczynnik kształtu: Przenośny
- Typ montażu: Mocowanie na stole
- Lamp Długość życia: Do 60,000 godzin

Image: A visual comparison highlighting the projector's 20,000 Lumens brightness, Native 1080P resolution, and 4K support, contrasting it with a lower specification projector.
10. Gwarancja i wsparcie
The Ysametp Projector comes with a 3-year service warranty. For technical support or warranty claims, please contact Ysametp customer service through your purchase platform or the official Ysametp webstrona.