
KIDOMO F03
Instrukcja obsługi drona KIDOMO F03
Model: F03
1. Koniec produktuview
The KIDOMO F03 Drone is a foldable RC quadcopter equipped with a 4K GPS camera, designed for ease of use and stable flight. It features a brushless motor for extended lifespan, dual cameras for versatile shooting, and advanced GPS and Optical Flow positioning for precise control and automatic return functions. This manual provides essential information for safe operation, maintenance, and troubleshooting.

Figure 1: KIDOMO F03 Drone, remote controller, and two modular batteries.
2. Wytyczne bezpieczeństwa
Always prioritize safety when operating the drone. Failure to follow these guidelines may result in injury, damage to the drone, or property damage.
- Kontrola przed lotem: Ensure all components are securely attached, batteries are fully charged, and propellers are free from damage before each flight.
- Warunki środowiskowe: Avoid flying in strong winds, rain, snow, or fog. Maintain a clear line of sight to the drone at all times.
- Obszar lotu: Fly in open areas away from people, animals, buildings, and power lines. Do not fly near airports or restricted airspace.
- Bezpieczeństwo baterii: Use only original KIDOMO batteries and chargers. Do not overcharge or puncture batteries. Store batteries in a cool, dry place.
- Bezpieczeństwo śmigła: Trzymaj ręce, twarz i luźne ubrania z dala od obracających się śmigieł.
- Odpowiedzialna operacja: Do not operate the drone under the influence of alcohol or drugs. Respect privacy and local regulations.
3. Zawartość opakowania
Sprawdź, czy w przesyłce znajdują się wszystkie elementy:
- KIDOMO F03 Drone
- Pilot zdalnego sterowania
- 2 x baterie litowo-polimerowe (7.4 V 2200 mAh)
- Kabel ładujący USB
- Zapasowe śmigła (ilość może się różnić)
- Śrubokręt
- Instrukcja obsługi
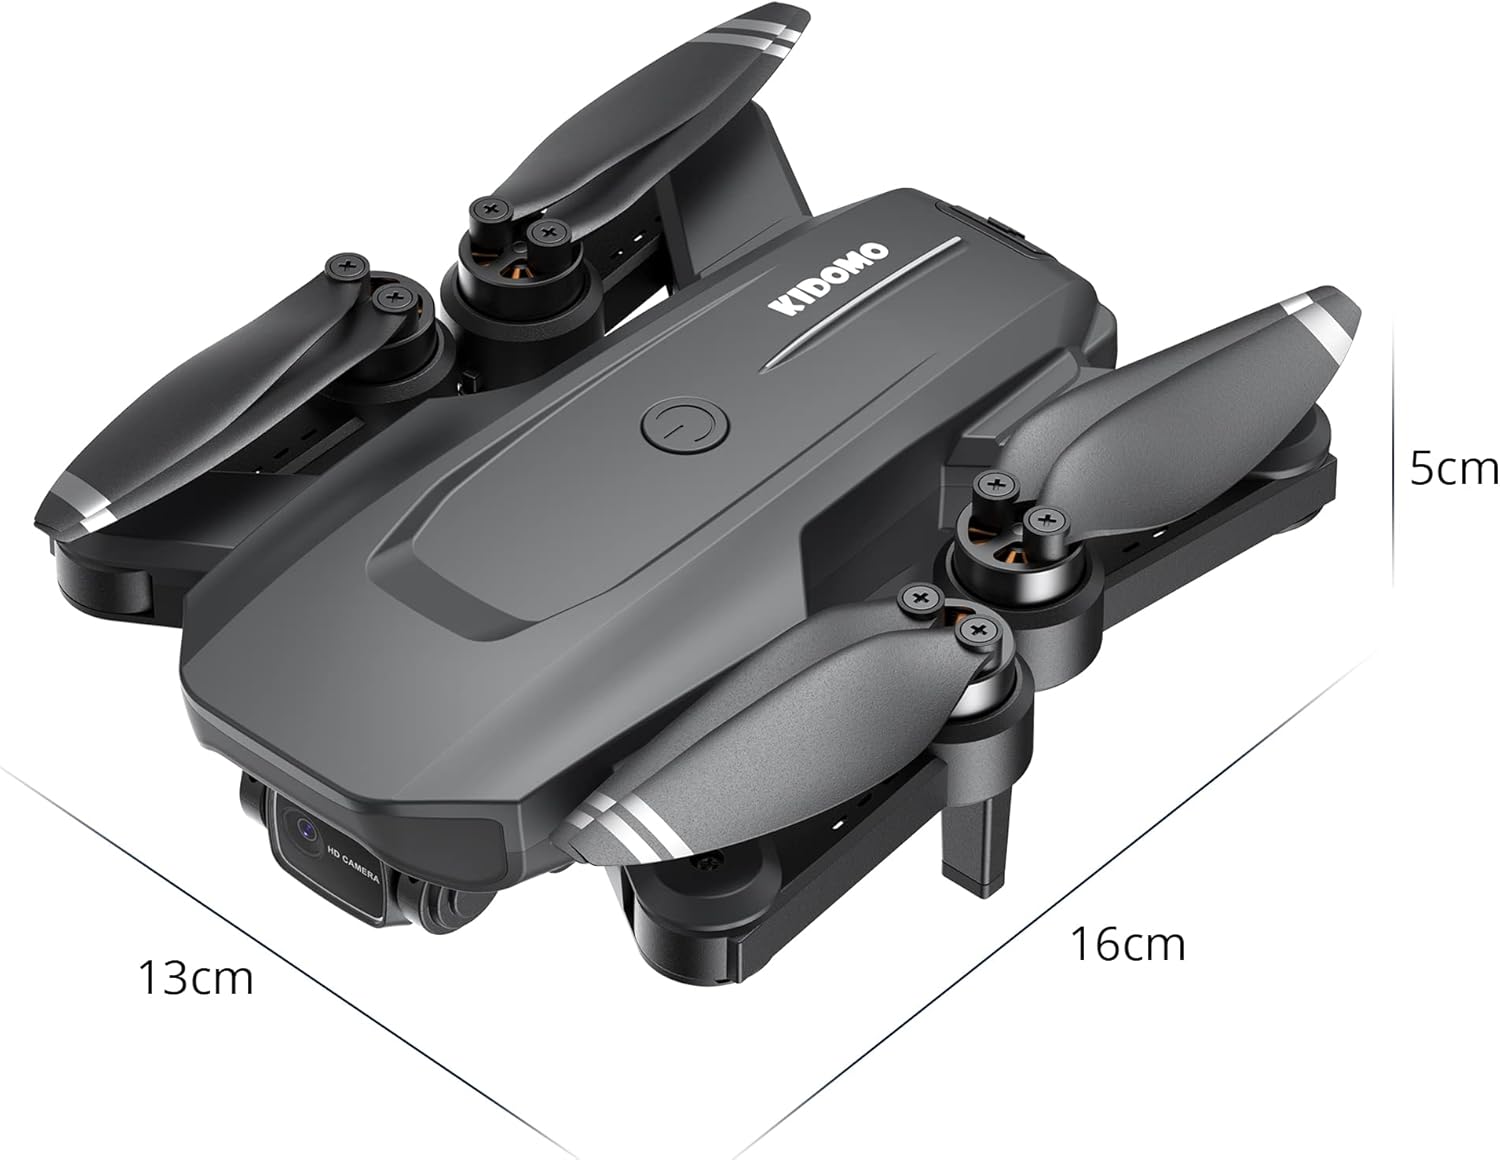
Figure 2: Folded dimensions of the KIDOMO F03 Drone (approx. 13cm x 16cm x 5cm).
4. Przewodnik konfiguracji
4.1. Ładowanie akumulatorów
Before first use, fully charge both drone batteries and the remote controller battery (if applicable).
- Podłącz kabel ładujący USB do akumulatora drona.
- Podłącz drugi koniec kabla USB do zasilacza USB 5 V/2 A (nie ma go w zestawie).
- The indicator light on the battery will be green during charging and will turn off when fully charged.
- Czas ładowania jednego akumulatora wynosi około 3–4 godzin.

Figure 3: The 7.4V 2200mAh Li-ion modular batteries provide up to 56 minutes of total flight time.
4.2. Montaż akumulatorów drona
- Upewnij się, że dron jest wyłączony.
- Insert a fully charged battery into the battery compartment on the drone until it clicks into place.
4.3. Rozkładanie drona
- Gently unfold the front arms first, then the rear arms until they are fully extended.
- Ensure all arms are locked into position before flight.
4.4. Konfiguracja pilota zdalnego sterowania
- Install 3 x AA batteries (not included) into the remote controller.
- Pull out the phone holder and securely mount your smartphone.
4.5. Instalacja i połączenie aplikacji
- Scan the QR code in the manual (or search "KIDOMO F03 App" on your app store) to download the official control application.
- Turn on the drone and then the remote controller.
- On your smartphone, connect to the drone's Wi-Fi network (e.g., "KIDOMO-F03-XXXX").
- Open the app. The app should automatically connect to the drone, displaying the live camera feed.
5. Instrukcja obsługi
5.1. Parowanie i kalibracja
- Umieść drona na płaskiej, poziomej powierzchni.
- Włącz drona, a następnie kontroler.
- Push the left joystick up then down to pair the remote with the drone. The drone lights will stop flashing and become solid.
- Perform gyroscope calibration by pushing both joysticks to the bottom-right corner simultaneously until the drone lights flash rapidly and then become solid.
- Perform compass calibration (for GPS mode):
- Press the GPS calibration button on the remote (refer to remote diagram in app).
- Hold the drone horizontally and rotate it 360 degrees until the lights change.
- Hold the drone vertically with the camera facing down and rotate it 360 degrees until the lights become solid. Calibration is complete.
5.2. Start i lądowanie
- Start jednym klawiszem: Press the one-key take-off/landing button on the remote or in the app. The drone will automatically ascend to a safe height.
- Ręczny start: Push both joysticks to the bottom-left/right corners (depending on model) to arm the motors. Then slowly push the left joystick up to ascend.
- Lądowanie jednym klawiszem: Press the one-key take-off/landing button again. The drone will automatically descend and land.
- Awaryjny postój: In an emergency, press and hold the one-key landing button for 3 seconds to immediately stop the motors. Use only in emergencies.
5.3. Tryby i funkcje lotu
The KIDOMO F03 drone offers various intelligent flight modes:
- GPS Positioning Mode: Provides precise outdoor positioning, stable hovering, and accurate return-to-home functions. Essential for intelligent flight modes.
- Optical Flow Positioning Mode: Ideal for indoor flight or areas without GPS signal. Uses a downward-facing camera to maintain position.
- Automatic Return (RTH):
- Inteligentne RTH: Press the Return-to-Home button on the remote or in the app. The drone will return to its recorded take-off point.
- Niski poziom baterii RTH: Dron automatycznie powróci, gdy poziom naładowania akumulatora będzie krytycznie niski.
- Utrata sygnału RTH: If the connection between the drone and remote is lost, the drone will automatically return to the take-off point.
- Tryb „Podążaj za mną”: In GPS mode, enable "Follow Me" in the app. The drone will automatically follow the remote controller (and thus the user's smartphone) at a set distance.
- Surround Mode (Point of Interest): In GPS mode, select a point of interest in the app. The drone will circle around that point at a specified radius and altitude.
- Lot po punkcie kontrolnym (lot trajektorią): Draw a path on the map in the app. The drone will automatically fly along the designated route.

Figure 4: The drone utilizes Optical Flow Positioning for stable indoor flight and GPS Positioning for precise outdoor flight.

Figure 5: GPS precise localization ensures the drone can automatically return home under various conditions.

Figure 6: The drone's intelligent flight modes, such as Follow Me and Waypoint Flight, allow for dynamic aerial photography.
5.4. Obsługa kamery
The F03 drone features a dual-camera system:
- Przednia kamera 4K: Captures high-resolution photos and videos. The camera angle can be adjusted remotely from 0-90 degrees via the app or remote controller.
- 480P Bottom Camera: Used for Optical Flow Positioning and can also capture images/videos from a different perspective.

Figure 7: The drone features a 4K front camera with 90-degree adjustable angle and a 480P bottom camera.
- Robienie zdjęć: Press the photo button on the remote or in the app.
- Nagrywanie filmów wideo: Press the video button on the remote or in the app to start/stop recording.
- Przechowywanie multimediów: Photos and videos are saved directly to your smartphone via the app.
6. Konserwacja
- Czyszczenie: Use a soft, dry cloth to clean the drone body and camera lenses. Do not use liquid cleaners.
- Kontrola śmigła: Regularly check propellers for cracks, bends, or damage. Replace damaged propellers immediately using the provided screwdriver.
- Pielęgnacja silnika: The brushless motors are designed for durability. Keep them free from dust and debris.
- Przechowywanie baterii: If storing the drone for an extended period, charge batteries to approximately 50-60% and store them in a cool, dry place. Remove batteries from the drone and remote controller.
- Aktualizacje oprogramowania układowego: Check the official KIDOMO website or app for any available firmware updates to ensure optimal performance.
7. Rozwiązywanie Problemów
| Problem | Możliwa przyczyna | Rozwiązanie |
|---|---|---|
| Dron się nie włącza. | Akumulator nie jest naładowany lub nie został prawidłowo włożony. | Sprawdź, czy akumulator jest całkowicie naładowany i prawidłowo włożony. |
| Pilot zdalnego sterowania nie łączy się. | Remote batteries low; not paired correctly. | Replace remote batteries; re-pair drone and remote (Section 5.1). |
| Dron dryfuje w czasie lotu. | Gyroscope not calibrated; strong wind. | Perform gyroscope calibration (Section 5.1); avoid flying in strong winds. |
| Brak transmisji wideo na żywo w aplikacji. | Brak połączenia z siecią Wi-Fi drona; aplikacja nieotwarta. | Ensure phone is connected to drone's Wi-Fi; restart app. |
| Sygnał GPS słaby/niedostępny. | Flying indoors or in an area with obstructions. | Move to an open outdoor area; ensure clear sky view. |
| Drone does not respond to commands. | Out of range; signal interference; low battery. | Fly within range (max 1000m); avoid areas with strong interference; check drone battery level. |
8. Specyfikacje
| Model | F03 |
| Marka | KIDOMO |
| Wymiary (złożony) | Około. 13 x 16 x 5 cm |
| Waga | 950 gramów |
| Czas lotu | Do 56 minut (z 2 bateriami) |
| Typ baterii | 7.4 V 2200 mAh litowo-polimerowy |
| Czas ładowania | Approx. 3-4 hours per battery |
| Zakres sterowania | Do 1000 metrów |
| Rozdzielczość wideo | 4K (Front Camera), 480P (Bottom Camera) |
| Łączność | 5G FPV Wi-Fi, APP Control |
| Typ silnika | Silnik bezszczotkowy |
| System pozycjonowania | GPS, optyczne pozycjonowanie przepływu |
9. Gwarancja i wsparcie
KIDOMO products come with a standard manufacturer's warranty. Please refer to the warranty card included in your package for specific terms and conditions. For technical support, troubleshooting assistance, or warranty claims, please contact KIDOMO customer service:
- E-mail: support@kidomo.com
- Webstrona: www.kidomo.com
- Please have your model number (F03) and purchase date ready when contacting support.
Ask a question about this manual
Ask about setup, troubleshooting, compatibility, parts, safety, or missing instructions. Manuals+ will review the question and use this page’s manual context to help answer it.