
1. Wprowadzenie
This manual provides instructions for the safe and effective operation of your ThreeH 1/4 Inch Digital Torque Adapter. This device converts a standard ratchet wrench into a digital torque wrench, offering precise torque measurement with audible and visual alerts.
2. Informacje dotyczące bezpieczeństwa
- Podczas korzystania z narzędzi należy zawsze nosić odpowiedni sprzęt ochrony osobistej, np. okulary ochronne.
- Ensure the adapter is securely attached to the ratchet wrench and the fastener before applying torque.
- Do not exceed the maximum torque capacity of the adapter (30 Nm / 22.1 ft-lb).
- Utrzymuj urządzenie w czystości i suchości. Unikaj narażania na działanie ekstremalnych temperatur i środowisk korozyjnych.
- Do not attempt to disassemble or modify the adapter. Refer servicing to qualified personnel.
3. Koniec produktuview
The ThreeH Digital Torque Adapter features a clear digital display, intuitive controls, and a compact design for use in various applications.

Rysunek 3.1: Digital Torque Adapter Components and Controls. This image highlights the LED flashing indicator, buzzer, and control buttons (P/T, Power, M, +, -) for unit selection and value adjustment.
Kluczowe komponenty:
- Wyświetlacz cyfrowy: Shows real-time torque values and settings.
- P/T Button: Toggles between Peak Hold (P) and Track (T) modes.
- Przycisk zasilania: Włącza/wyłącza urządzenie.
- Przycisk M: Used for mode selection and data memory functions.
- Przyciski „+” i „-”: Adjust preset torque values.
- LED Flashing Indicator: Provides visual alert during torque application.
- Brzęczyk: Provides audible alert during torque application.
- 1/4 Inch Drive: Input and output square drives for connecting to a ratchet wrench and sockets.
4. Konfiguracja
4.1 Instalacja baterii
The torque adapter requires two (2) AAA 1.5V batteries (not included).
- Locate the battery compartment cover on the back of the adapter.
- Remove the screw(s) securing the battery cover and carefully lift it off.
- Włóż dwie baterie AAA, zwracając uwagę na prawidłową biegunowość (+/-), zgodnie ze wskazaniami wewnątrz komory.
- Załóż pokrywę baterii i zabezpiecz ją śrubą(ami).
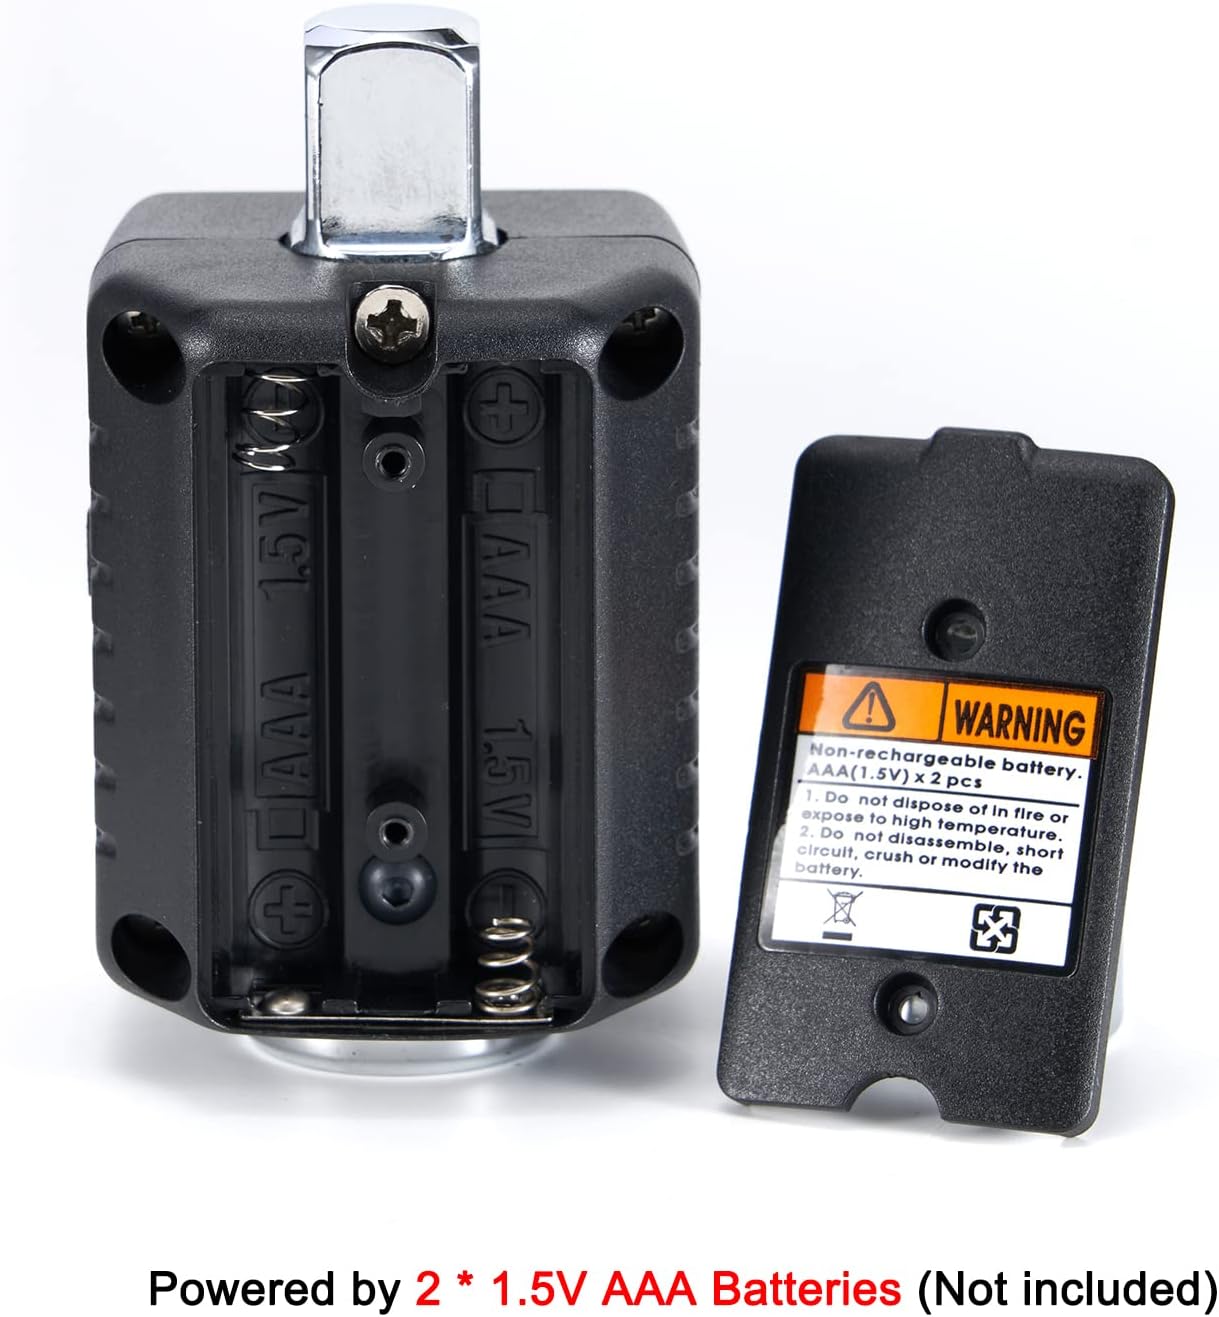
Rysunek 4.1: Battery Compartment. The image shows the open battery compartment, ready for two AAA batteries to be inserted with correct polarity.
5. Instrukcja obsługi
5.1 Włączanie/wyłączanie zasilania
- Aby włączyć: Naciśnij Moc przycisk.
- Aby wyłączyć: Naciśnij i przytrzymaj Moc button for approximately 3 seconds. The device will also auto shut off after 70 seconds of inactivity.
5.2 Wybór jednostki
The adapter supports torque units in Newton-meters (Nm), foot-pounds (lb-ft), and kilogram-meters (kg-m).
- To change units: Simultaneously press the P / T I M buttons. The unit displayed on the screen will cycle through Nm, lb-ft, and kg-m. Release the buttons when the desired unit is shown.
5.3 Setting Target Torque Value
- Naciśnij M button to enter the preset torque setting mode.
- Użyj '+' I '-' buttons to adjust the target torque value. Pressing and holding these buttons will increase or decrease the value more rapidly.
- Once the desired value is set, press the M Naciśnij przycisk ponownie, aby potwierdzić i wyjść z trybu ustawień.
5.4 Torque Application and Alerts
Attach the digital torque adapter to your 1/4 inch drive ratchet wrench, then attach the appropriate socket to the adapter's output drive. Apply torque to the fastener.

Rysunek 5.1: Adapter in Use. The image shows the digital torque adapter connected to a ratchet wrench, being used to tighten a fastener on an engine.
- As you apply torque, the digital display will show the real-time torque value.
- When the applied torque reaches 80% of the preset target value, the buzzer will begin to sound, and the LED will flash. The frequency of the beeps and flashes will increase as the torque approaches the target.
- When the preset target torque value is reached, the buzzer will emit a continuous tone, and the LED will flash rapidly. At this point, stop applying force immediately to avoid over-tightening.
5.5 Peak Hold (P) and Track (T) Modes
- Tryb śledzenia (T): Displays the real-time torque value as it is being applied. This is the default mode.
- Peak Hold Mode (P): Displays the maximum torque value achieved during the tightening process. To switch to Peak Hold mode, press the P / T button once. The display will show 'P' to indicate Peak Hold mode. To clear the peak value, press the P / T naciśnij przycisk ponownie.
6. Konserwacja
6.1 Czyszczenie
- Wipe the adapter with a soft, dry cloth after each use.
- Do not use abrasive cleaners or solvents, as these can damage the display or housing.
6.2 Przechowywanie
- Gdy adapter nie jest używany, należy go przechowywać w opakowaniu ochronnym, aby zapobiec jego uszkodzeniu.
- Aby zapobiec wyciekowi baterii, wyjmij je, jeśli urządzenie nie będzie używane przez dłuższy czas.
- Przechowywać w chłodnym, suchym miejscu, z dala od bezpośredniego światła słonecznego i ekstremalnych temperatur.

Rysunek 6.1: Protective Carrying Case. The image displays the compact protective case designed for storing the digital torque adapter, with dimensions indicated.
7. Rozwiązywanie Problemów
- Urządzenie się nie włącza: Sprawdź instalację baterii i upewnij się, że są nowe. W razie potrzeby wymień.
- Niedokładne odczyty: Ensure the adapter is properly seated on the ratchet wrench and the socket is firmly attached. Avoid sudden jerking motions when applying torque. If persistent, the device may require professional calibration.
- Wyświetlacz jest przyciemniony lub migocze: Baterie mogą być rozładowane. Wymień baterie.
- Buzzer or LED not working: Sprawdź poziom naładowania baterii. Jeśli problem będzie się powtarzał, skontaktuj się z obsługą klienta.
8. Specyfikacje
| Funkcja | Specyfikacja |
|---|---|
| Numer modelu | H-TG55A |
| Zakres momentu obrotowego | 0.3 - 30 Nm (0.22 - 22.1 ft-lb) |
| Rozmiar dysku | 1/4 cala |
| Dokładność | ±2% |
| Jednostki | Nm, lb-ft, kg-m |
| Pamięć danych | 40 zestawów |
| Automatyczne wyłączanie | 70 seconds (no usage) |
| Źródło zasilania | 2 baterie AAA 1.5 V |
| Tworzywo | Stal stopowa |
| Długość elementu | 4.7 cali |
| Waga przedmiotu | 120 gram |

Rysunek 8.1: Drive Size and Torque Range. This image visually confirms the 1/4 inch drive size and the specified torque range of 0.3-30Nm (0.22-22.1ft-lb).
9. Informacje o gwarancji
This product comes with a standard manufacturer's warranty. Please retain your proof of purchase for any warranty claims. For specific warranty terms and conditions, refer to the documentation included with your purchase or contact ThreeH customer support.
10. Wsparcie
For technical assistance, troubleshooting, or warranty inquiries, please contact ThreeH customer support through the retailer's platform or the official ThreeH website. Please have your product model number (H-TG55A) and purchase details ready when contacting support.