
Wstęp
This manual provides detailed instructions for the installation, operation, and maintenance of your UNITOPSCI Android 13 Car Stereo Radio. Designed specifically for Honda Odyssey models from 2005 to 2010, this 10.1-inch touch screen unit integrates advanced features such as Bluetooth, GPS navigation, Mirror Link, and backup camera support to enhance your driving experience. Please read this manual thoroughly before use to ensure proper functionality and safety.

Figure 1: UNITOPSCI Android 13 Car Stereo Radio with accessories.
Informacje dotyczące bezpieczeństwa
- Zalecana profesjonalna instalacja: Due to the complexity of vehicle electrical systems, professional installation is highly recommended to prevent damage to the unit or your vehicle.
- Zasilanie: Upewnij się, że urządzenie jest podłączone do źródła zasilania 12 V DC z ujemnym biegunem uziemienia. Nieprawidłowa głośnośćtagmoże spowodować uszkodzenie.
- Okablowanie: Do not modify or cut the wiring harness. Refer to the wiring diagram for correct connections.
- Temperatura pracy: The unit is designed to operate within a temperature range of -40℃ to 80℃.
- Bezpieczeństwo jazdy: Nie należy obsługiwać urządzenia ani view Filmy, które mogą rozpraszać Cię podczas jazdy. Zawsze priorytetem jest bezpieczeństwo na drodze.
- Wentylacja: Aby zapobiec przegrzaniu, należy zapewnić odpowiednią wentylację wokół urządzenia.
Zawartość opakowania
Sprawdź, czy w przesyłce znajdują się wszystkie elementy wymienione poniżej:
- 1 x Android Car Stereo (pre-installed with trim)
- 1 x kamera cofania
- 1 x kabel zasilający
- 1 x antena GPS
- 1 x kabel wejściowy kamery
- 1 x kabel wejściowy i wyjściowy RCA
- Kable 2 x USB
- 1 x Instrukcja obsługi
- 1 x zestaw narzędzi instalacyjnych
- 1 x Mikrofon zewnętrzny
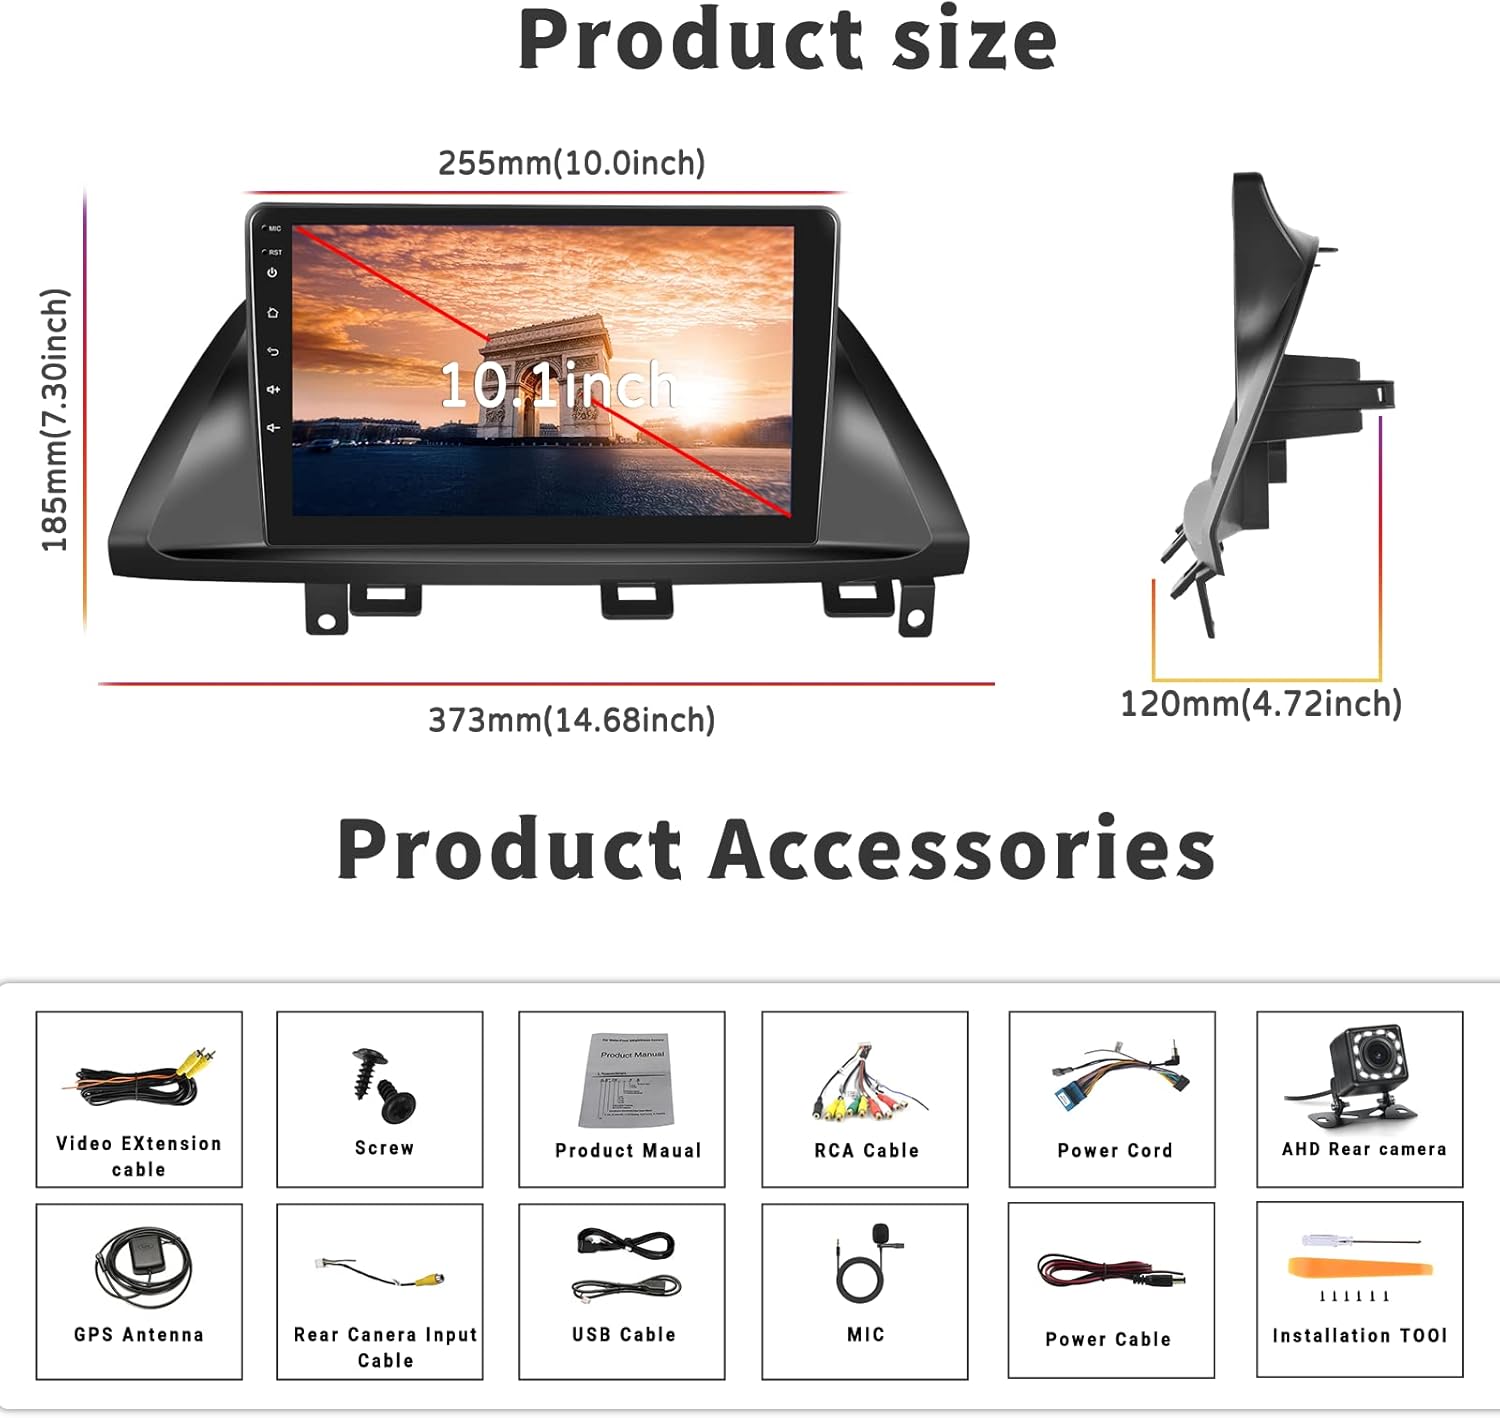
Rysunek 2: Wymiary produktu i dołączone akcesoria.
Konfiguracja i instalacja
Zgodność
This car stereo is designed for Honda Odyssey models from 2005 to 2010. It is compatible with vehicles that have an original car radio with a DVD player. It is niekompatybilny with original car radios that have a factory screen or GPS. In such cases, an additional wire harness may be required. Please verify your car's center console size and wire harness details before installation.

Figure 3: Car compatibility and wiring harness details.
Wiring Diagram for Backup Camera
Proper connection of the backup camera is crucial for its automatic activation. Follow these steps:
- Podłączenie kabla zasilającego: Connect the red wire of the backup camera's power cable to the positive reversing light, and the black wire to the negative reversing light.
- Połączenie kablem RCA: Insert the yellow RCA cable from the camera into the 'CAM-IN' (yellow) port on the back of the radio unit.
- Przewód spustowy odwrotny: Ensure the 'reverse (+)' wire connection (typically a pink wire on the power wire harness labeled 'back') is securely connected to the positive wire of the reversing light. This enables the unit to automatically display the rear view image when the vehicle is in reverse.
Uwaga 1: The short red wires next to the RCA port do not require connection in this wiring setup.
Uwaga 2: When the device is in parking mode (displaying the rear view), other functions will temporarily pause.

Rysunek 4: Tył view schemat okablowania kamery.
Ogólne kroki instalacji
While specific steps may vary by vehicle, the general installation process involves:
- Odłącz akumulator: Przed rozpoczęciem jazdy należy odłączyć ujemny zacisk akumulatora pojazdu, aby zapobiec zwarciu elektrycznemu.
- Usuń starą jednostkę: Carefully remove the existing car stereo and trim.
- Podłącz okablowanie: Connect the new stereo's power harness, speaker wires, antenna, and other necessary cables according to the provided wiring diagram.
- Montaż anteny GPS: Zamontuj antenę GPS w miejscu z wolnym dostępem view nieba, zazwyczaj na desce rozdzielczej lub pod przednią szybą.
- Zainstaluj kamerę cofania: Route the backup camera cable from the rear of the vehicle to the head unit, connecting it as described in the wiring section.
- Połączenia testowe: Before fully securing the unit, reconnect the battery and perform a quick test of all functions (power, audio, radio, GPS, camera, etc.).
- Bezpieczna jednostka: Once tested, carefully slide the new stereo into the dash opening and secure it with screws. Reinstall the trim.
- Kontrola końcowa: Perform a comprehensive test of all features to ensure proper operation.
Instrukcja obsługi
Bluetooth & FM/RDS Radio Function
The unit features built-in Bluetooth 4.2 and an FM/RDS radio. The integrated microphone supports hands-free calling, Bluetooth music streaming, and automatic phone book download. The FM radio includes 18 preset stations for news, music, and weather broadcasts. You can also adjust sound settings with the EQ balance function and connect to a subwoofer.

Figure 5: Bluetooth and FM Radio interface.
Nawigacja GPS i Wi-Fi
The head unit comes with preloaded offline maps and supports both online and offline navigation. With a WiFi connection, you can access online maps and download additional maps as needed. To download maps, connect to WiFi, open the 'Here We Go' app, click the 'folder' icon, select 'download maps', and choose the appropriate region. WiFi connectivity also allows you to surf the internet and download various applications.

Figure 6: GPS Navigation and WiFi features.
Mirror Link for Android and iOS Phones
The unit supports mirror link functionality for both Android and iOS mobile phones. For iOS devices, it supports one-way projection via WiFi. For Android phones, it supports two-way connection via WiFi or the original USB phone cable, allowing you to control your phone's apps directly from the 10.1-inch screen. This feature is convenient for displaying videos or navigation maps from your phone. Note: Not compatible with Samsung phones for two-way control.

Rysunek 7: Funkcjonalność Mirror Link.
Wejście kamery cofania
A backup camera is included with the unit. When the vehicle is shifted into reverse gear, the screen will automatically switch to display the reversing image, providing a clear view of the area behind your car. The camera features waterproof design, night vision, and a 170° wide-angle view dla większego bezpieczeństwa.

Figure 8: Backup Camera Input display.
Video Output & Split Screen
The unit supports video output, allowing you to share entertainment with a backseat monitor. Additionally, the split-screen function enables you to display two applications side-by-side simultaneously, such as navigation and music playback, for improved multitasking.

Figure 9: Video Output and Split Screen functionality.
Sterowanie z kierownicy (SWC)
The unit supports steering wheel control functions, allowing you to manage various features directly from your vehicle's steering wheel buttons. Please note that a steering wheel controller may need to be ordered separately if your vehicle does not have compatible controls or if the existing system works with a CANbus (this unit does not support CANbus). Refer to the unit's settings to map your steering wheel buttons.
Konserwacja
- Czyszczenie ekranu: Delikatnie przetrzyj ekran dotykowy miękką, niepozostawiającą włókien ściereczką. W przypadku uporczywych plam delikatnie przetrzyj.ampPrzetrzyj ściereczkę wodą lub płynem do czyszczenia ekranów przeznaczonym do urządzeń elektronicznych. Unikaj silnych środków chemicznych i materiałów ściernych.
- Ogólne sprzątanie: Utrzymuj urządzenie i jego otoczenie w czystości, bez kurzu i zanieczyszczeń. Do czyszczenia otworów wentylacyjnych i portów używaj miękkiej szczotki lub sprężonego powietrza.
- Aktualizacje oprogramowania: Periodically check for software updates from the manufacturer's official channels to ensure optimal performance and access to new features.
- Unikaj ekstremalnych temperatur: While the unit is designed for a wide temperature range, prolonged exposure to extreme heat or cold can affect its lifespan.
Rozwiązywanie problemów
W tej sekcji omówiono typowe problemy, które mogą wystąpić. Jeśli problem będzie się powtarzał, skontaktuj się z obsługą klienta.
| Problem | Możliwa przyczyna | Rozwiązanie |
|---|---|---|
| Urządzenie nie włącza się. | Nieprawidłowe okablowanie; Przepalony bezpiecznik; Luźne połączenie. | Check power cable connections (red and yellow wires); Inspect vehicle's fuse box; Ensure all harnesses are securely plugged in. |
| Brak dźwięku z głośników. | Nieprawidłowo podłączone przewody głośnikowe; Zbyt niski poziom głośności; Aktywna funkcja wyciszenia. | Verify speaker wire connections; Increase volume; Check if unit is muted. |
| Sygnał GPS jest słaby lub niedostępny. | Antena GPS jest nieprawidłowo zainstalowana lub zasłonięta. | Ensure GPS antenna is mounted in a clear, unobstructed location; Check antenna connection to the unit. |
| Kamera cofania nie jest wyświetlana. | Incorrect camera wiring; 'Reverse' trigger wire not connected. | Review the 'Wiring Diagram for Backup Camera' section; Ensure the camera's power and RCA cables are correctly connected, and the 'reverse' trigger wire is properly linked to the vehicle's reversing light positive. If the camera has an LED light, check if it illuminates when reverse is engaged. |
| Mirror Link not connecting. | Incorrect connection method; Incompatible phone model; App issues. | For iOS, use WiFi only. For Android, try both WiFi and USB (original phone cable). Ensure your phone is not a Samsung model (known compatibility issue). Restart both phone and head unit. |
| Unit lags or freezes. | Too many apps running; Low memory. | Close unnecessary applications; Restart the unit. |
Specyfikacje
| Funkcja | Specyfikacja |
|---|---|
| System | Android 13.0 |
| Zestaw układów scalonych | 8227L-DEMO |
| Rozmiar ekranu | 10.1 cali |
| Rozdzielczość ekranu | 1024x600 |
| Pamięć (RAM+ROM) | 1 GB pamięci RAM + 32 GB pamięci ROM |
| Link lustrzany | Android/iOS (Android two-way, iOS one-way) |
| Video Output/WiFi | Utrzymany |
| Pasmo radiowe | FM |
| Układ radiowy | NXP6851 |
| Moc Ampukład scalony | AC7315 |
| Moc wyjściowa | 4*45W |
| Temperatura pracy | -40℃ do 80℃ |
| Sterowanie z kierownicy | Supported (controller may be separate) |
| Wersja Bluetooth | 4.2 |
| Mapy | Wbudowane mapy offline |
| Interfejs USB | Podwójny USB |
| Obsługa formatu audio | APE/FLAC/WAV/MP3/WMA itp. |
| Obsługa formatu wideo | MKV/RMVB/AVI/MP4/MDV itp. |
| Obsługa formatu obrazu | PNG/JPEG/JPG/GIF/WBMP/BNP itd. |
| Wymiary produktu | 0.39 x 0.39 x 0.39 cala |
| Waga przedmiotu | 3.27 funta |
Gwarancja i wsparcie
UNITOPSCI is committed to providing high-quality products and satisfactory services. We offer the following support:
- Replacement Availability: Wymiany są możliwe w ciągu 24 miesięcy od daty zakupu.
- Szybka odpowiedź: Na zapytania można spodziewać się odpowiedzi w ciągu 16 godzin.
- Dożywotnie wsparcie posprzedażowe: We provide lifetime after-sales consultation and technical support.
- Zasady zwrotu: Skorzystaj z 60-dniowego okresu zwrotu bez obaw.
For any questions, technical assistance, or warranty claims, please contact us directly via email:
E-mail: UNITOPSCI@126.com

Figure 10: UNITOPSCI Customer Support Information.