Produkt ponadview
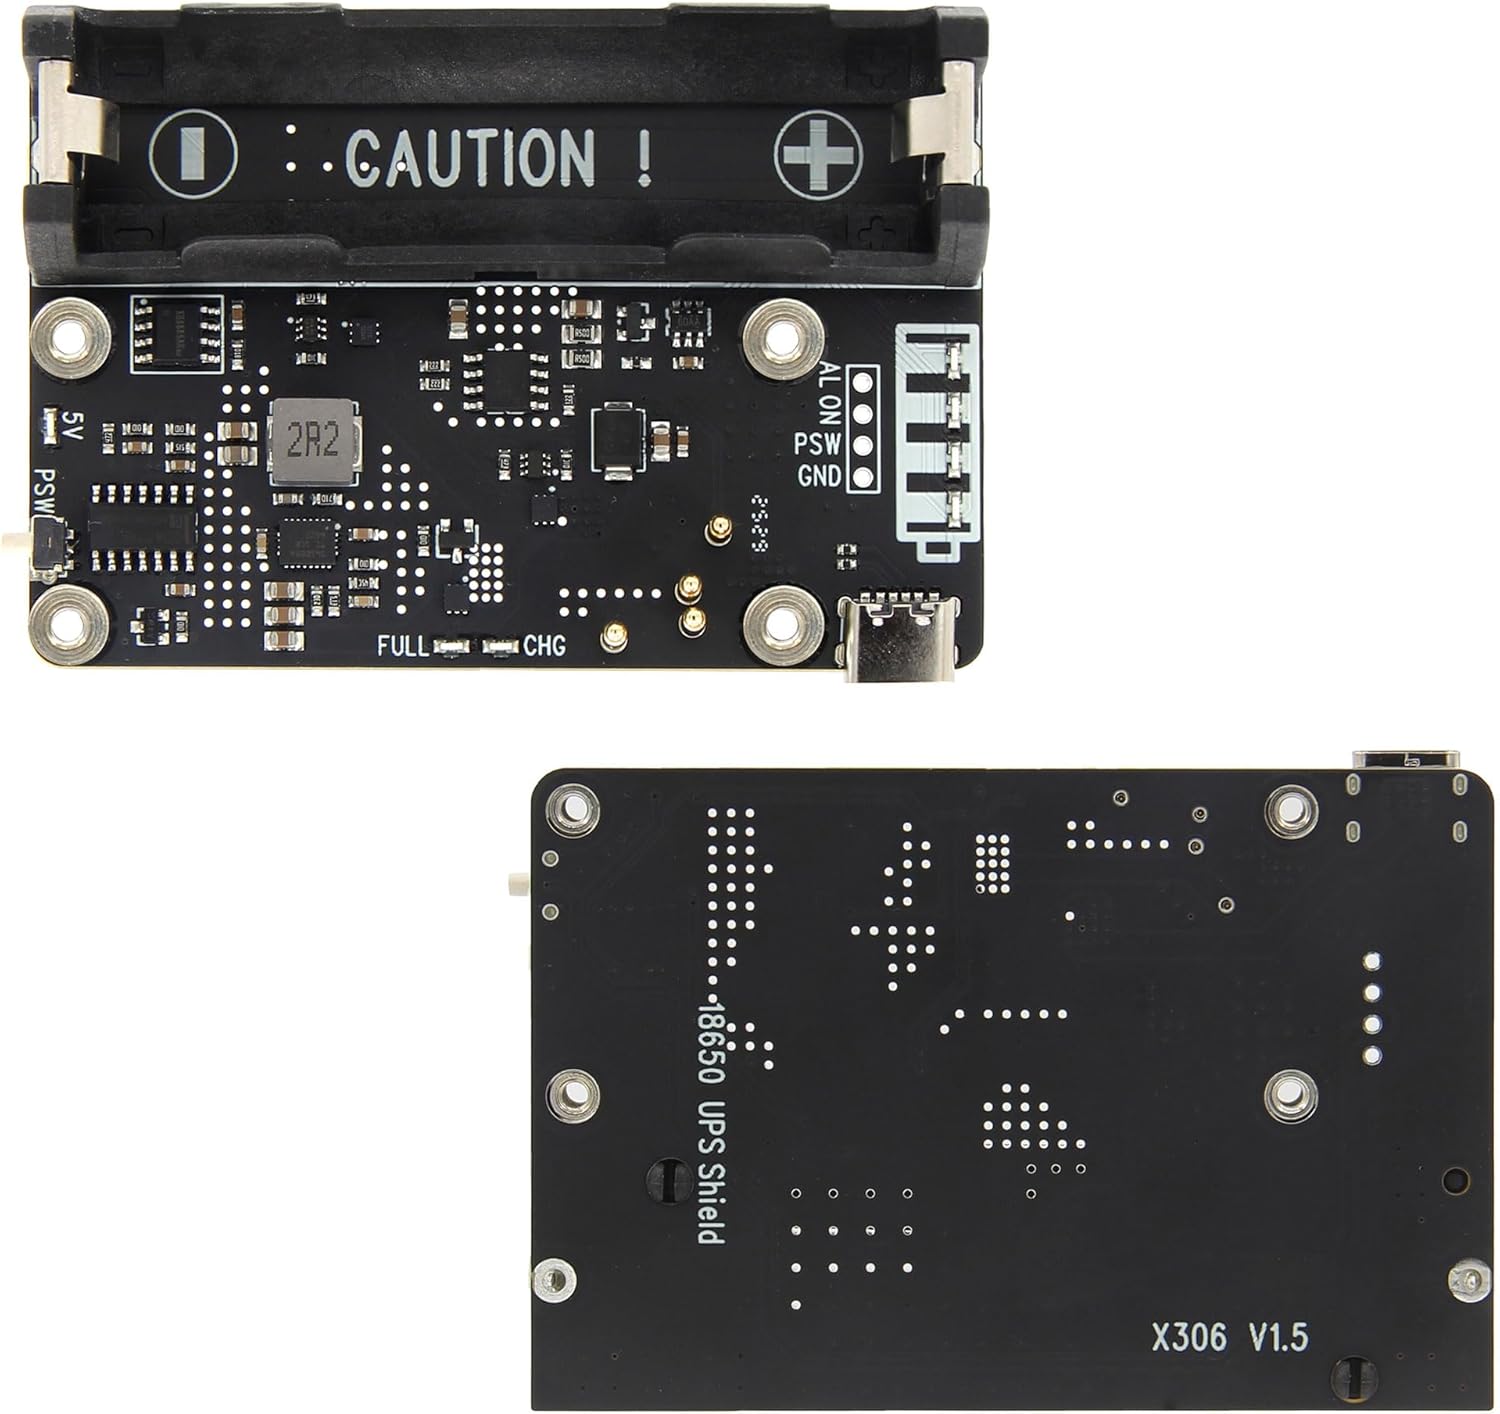
The Geekworm X306 V1.5 is an Uninterruptible Power Supply (UPS) expansion board designed specifically for the Raspberry Pi Zero 2 W. It provides a reliable power backup solution with a single-cell battery holder, ensuring continuous operation of your Raspberry Pi Zero 2 W. This version features an enhanced battery holder for easier installation and removal of 18650 batteries.


Zgodność
The X306 V1.5 UPS Expansion Board is compatible exclusively with the Raspberry Pi Zero 2 W. It does NIE support Raspberry Pi Zero or Raspberry Pi Zero W models. For optimal integration, the matching case X306-C1 is compatible with both X306 V1.3 and V1.5 versions.
Lista rzeczy do spakowania
- 1 x X306 V1.5 Expansion board
- 4 śruby M2.5 x 5 mm

Konfiguracja i instalacja
Follow these steps to properly install your Geekworm X306 V1.5 UPS Expansion Board with your Raspberry Pi Zero 2 W.
- Attach Raspberry Pi Zero 2 W: Carefully align the Raspberry Pi Zero 2 W with the pogo pins and mounting holes on the X306 V1.5 board. Ensure all pogo pins are correctly aligned and make proper contact.
- Secure the Boards: Use the provided 4 x M2.5 x 5mm screws to fix the Raspberry Pi Zero 2 W onto the X306 V1.5 board.
- Install 18650 Battery: Wstaw 3.7V 18650 battery (NOT included) into the battery holder. Ważny: Always double-check the polarity of the battery's connector to ensure '+' aligns with '+' and '-' aligns with '-'. Using a battery with a built-in protection circuit is not recommended as the UPS Shield has its own protection function.
- Optional: Install into X306-C1 Case: If using the X306-C1 case, first remove the 18650 battery from the X306 board. Then, push the assembled X306 kit into the X306-C1 case, aligning it with the bottom mounting holes. Fix it by 4pcs KM2.5x5mm screws (these screws come with the X306-C1 accessories). Finally, put the top cover and fix it by 4pcs KM2.5x5mm screws.


Instrukcja wideo instalacji
Video 1: This video provides a step-by-step installation guide for the X306 UPS board and its compatible X306-C1 case with a Raspberry Pi Zero 2W.
Włączanie urządzenia
The X306 V1.5 is powered via its USB Type-C 5V Power In port. Ensure the power input is 5Vdc +/-5% and provides at least 3A. For best performance and safety, use a Geekworm UL listed 20W 5V 4A USB Type-C power adapter.

Rozwiązanie chłodzące
It is recommended to use the X306 V1.5 with a C296 aluminum heatsink for the Raspberry Pi Zero 2 W to ensure optimal thermal management and performance.

Instrukcja obsługi
The X306 V1.5 board features a power switch and battery voltage level indicators for easy monitoring and control. The UPS functionality ensures uninterrupted power supply to your Raspberry Pi Zero 2 W.
- Przycisk zasilania: Use the integrated power switch to turn the Raspberry Pi Zero 2 W on or off.
- Wskaźniki baterii: Monitor the battery status using the charging LED and battery voltage level indicators on the board.
- Zasilacz awaryjny (UPS): The board provides continuous power to the Raspberry Pi Zero 2 W, seamlessly switching to battery power during outagt.j.
Conceptual Video: UPS HAT Features
Video 2: This video provides a conceptual introduction to the design and features of a compact UPS solution for Raspberry Pi Zero, demonstrating power management, battery status detection, and customizable button functions. While specific to 'PiSugar', the principles apply to the X306 V1.5's UPS functionality.
Specyfikacje
| Funkcja | Szczegół |
|---|---|
| Wymiary produktu | 3.03 x 2.56 x 0.39 cala |
| Waga przedmiotu | 1.38 uncji |
| ASIN | B0B74NT38D |
| Numer modelu przedmiotu | TB-2022-56 |
| Producent | Robak geekowy |
| Marka | Robak geekowy |
| Skład ogniw baterii | Litowo-jonowy |
| Tomtage | 5.0 V |
| Kolor | Czarny |
| Tworzywo | Plastikowy |
Rozwiązywanie problemów
- Battery Holder Tightness: The X306 V1.5 features an enhanced battery holder. However, ensure you use 18650 cells without button tops or built-in protection circuits, as these can be a very tight fit and potentially damage the holder. Refer to the battery dimension requirements in Figure 6.
- Porty USB nie działają: If USB ports are not working, double-check all connections and ensure the Raspberry Pi Zero 2 W is properly seated on the X306 board's pogo pins. Verify that the power supply meets the recommended specifications (5Vdc +/-5%, ≥3A).
- Power Interruption During Charging: The X306 V1.5 is designed to provide uninterrupted power. If power is interrupted when the charging source is removed, ensure the 18650 battery is correctly installed and charged, and that the board's power management ICs are functioning as expected.
Gwarancja i wsparcie
For warranty information, technical support, or further inquiries, please visit the official Geekworm store or contact their customer service directly.
Geekworm Store: https://www.amazon.com/stores/Geekworm/page/F81710CF-C58D-4189-A48E-AD35BBAECDB7


